|
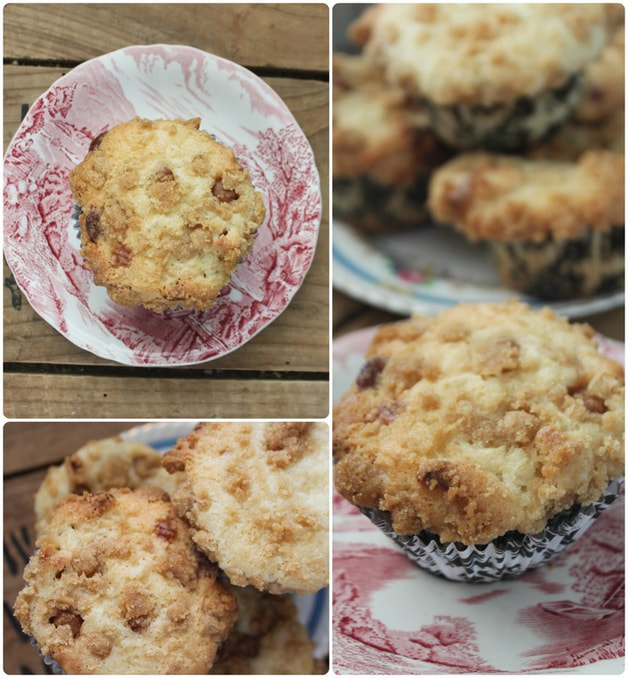
Hello! Happy first day of autumn! :) Truthfully, it's not been terribly "autumn-y' around here! We've had hotter days than we had all summer, and we've had them more continuously than we had all summer! But, the earth temperature aside, our apple and pear trees are still making fruit (although not as happily as usual), and making muffins from some of that fruit needed to happen! I saw this recipe for Caramel-Apple Streusel Muffins from Tracey's Culinary Adventures! They looked so good, and I had apples to spare, so I gave them a shot! Of course, because I had a ton of apples, I made this recipe x 3 and stored most of them away in the freezer to use in school lunches, breakfasts, or after school snacks. They are delicious & full of fall flavour! Enjoy!!! 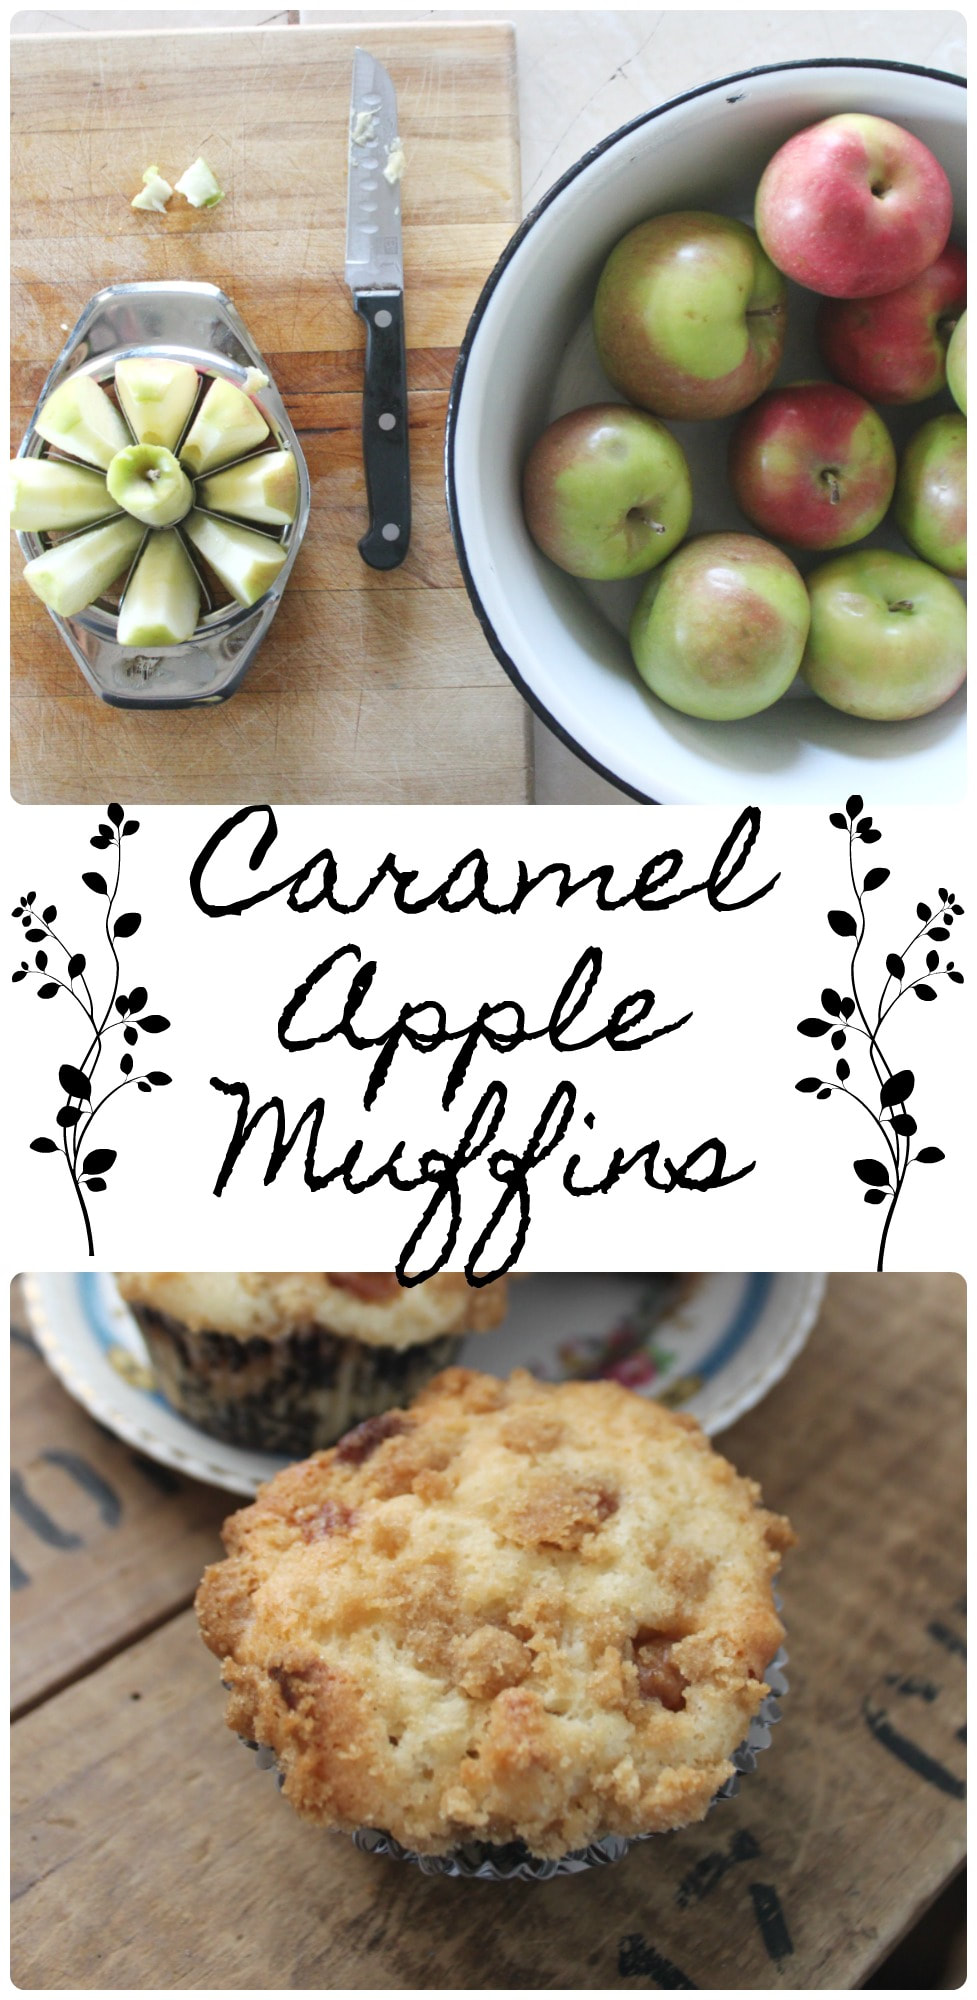 Caramel Apple Muffins Ingredients: Muffins
Streusel Topping
Method:
 Let's shift gears a little here....and look at my kids from the last 4 years of the first day of school! I mean, they go from babies to beautiful, grown-up kids! *tear*  Let's shift gears again....to a little company that is starting up that I'd love to briefly share about! It's called Little Red Canoe Book Co., and they are a Canadian book subscription business! I was asked to review a book box with Abby and Keziah, but that only involved getting the boxes, and doing an online survey for the woman who got in touch with me from the company - me talking about it here is all me!!! The girls (and I) loved the boxes! They were beautiful, filled with wonderful things, awesome books, and so much fun (which then makes reading even more fun!). So, check them out! 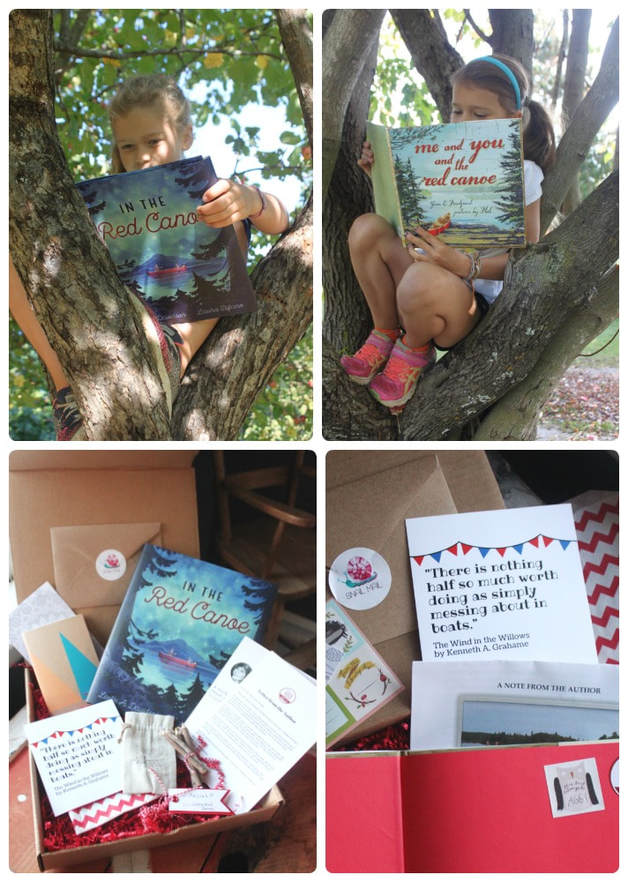 That's all for now!
happy Friday! xo
5 Comments
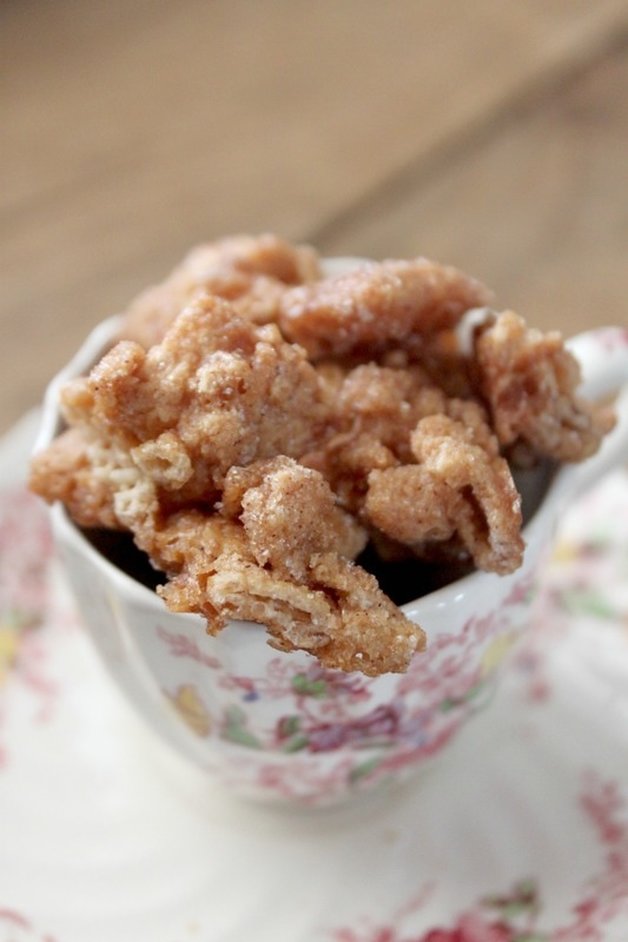
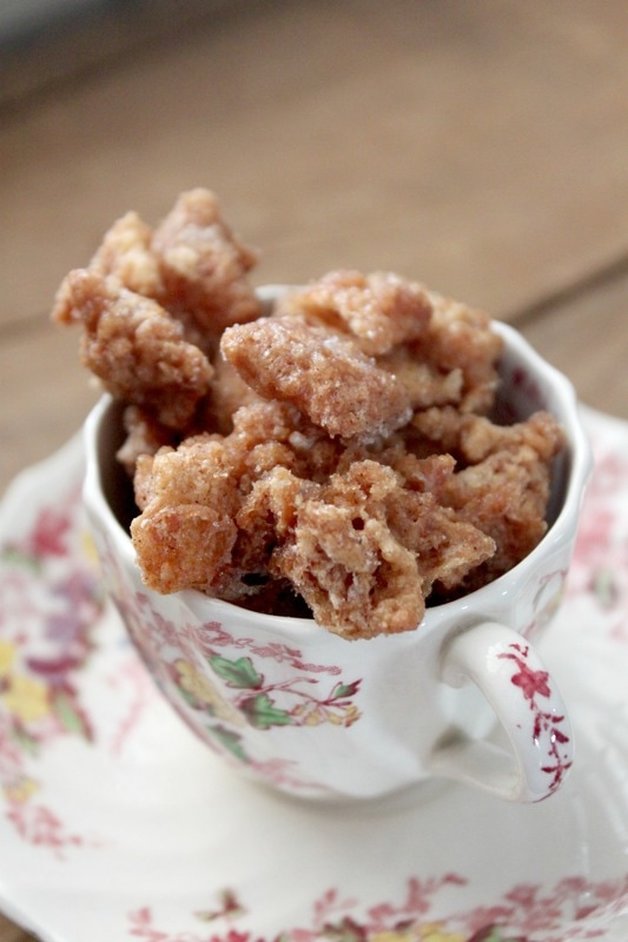
I'm sorry I've been away for soooooooo long!!! I've been home, but I've been busy and have hardly had any time at all to sit at the computer, write a blog, edit some pictures, stay still for more than 15 minutes! But I am still here! I wanted to super-quick show up today to share this oh-so-simple and fabulous treat! I first saw it on Confessions of a Cookbook Queen, and thought it looked really (reeeeaaaaally!) good! But, I hadn't gotten around to making it yet, mostly due to having a really tight grocery budget the last few months. I wasn't buying whatever I wanted to make whatever I wanted, and Chex cereal just wasn't making it on the grocery list week after week! So, when I was in a grocery store I don't normally go to, and saw they had slightly beat-up boxes of Cinnamon Chex at clear-out prices (because the boxes were a little squashed), I did a little happy dance, and grabbed two boxes! I may have also out loud said, "Oh Boy!!!". I got some side-wise glances, but, whatever! I knew the recipe I'd pinned didn't call for Cinnamon Chex, but I didn't see how it would effect this treat negatively? If anything, I imagined them being even better because of the extra cinnamon-iness. That's a word. So, here it is, a sweet treat worthy of every Canada Day, 4th of July, and summer BBQ you will attend! 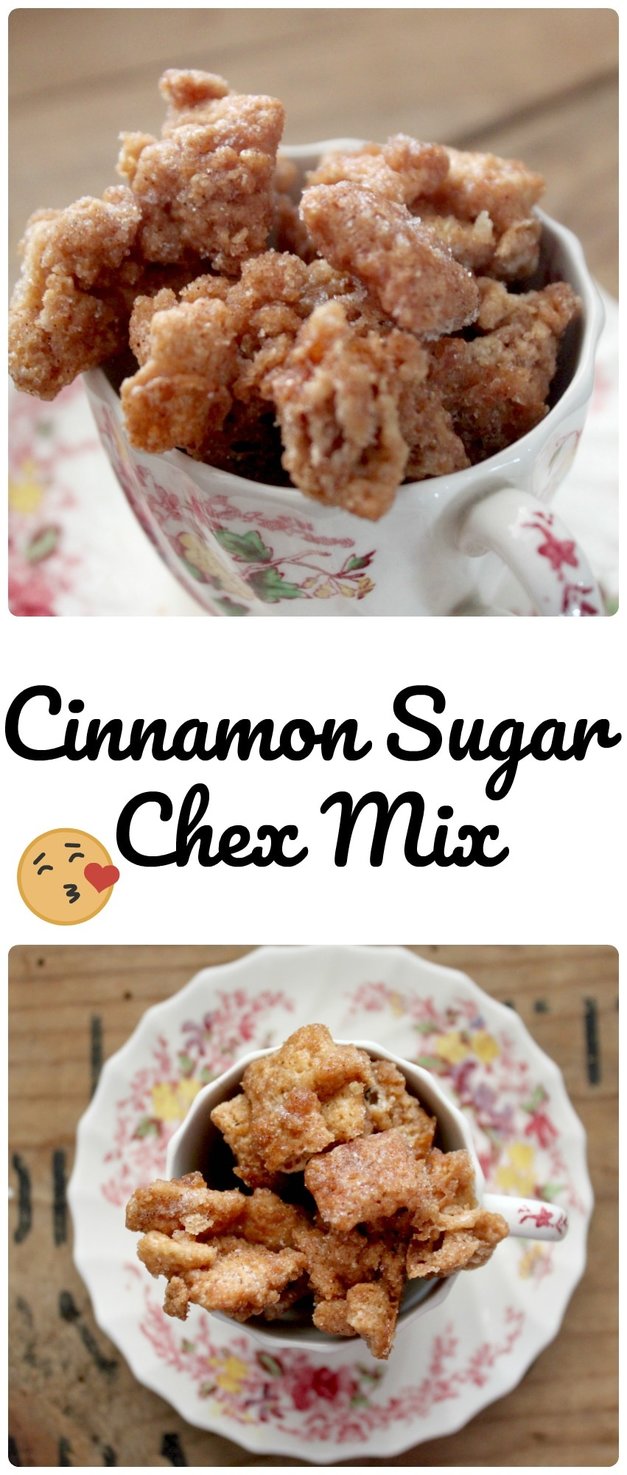 Cinnamon Sugar Chex Mix (Gluten-Free!) From Confessions of a Cookbook Queen Ingredients:
Method:
  In order for me to mentally be ok with sitting down for a while at the computer, I had to promise myself to keep this post short! No gabbing, no going on about what I've been busy with, no nonsense, just a recipe! So, I'm signing off now!
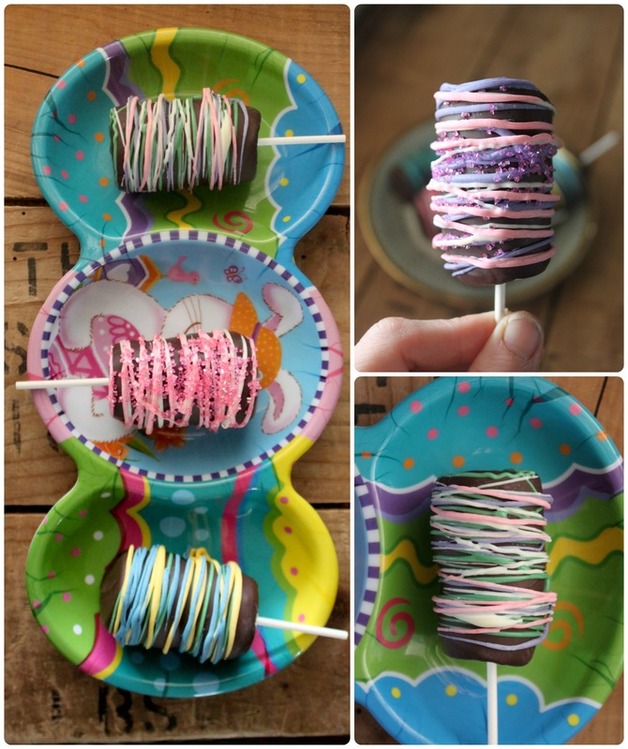
I really hope to check back in here soon with a few more posts over the summer, and be sure to let me know what your plans are for the summer! xoxoxo Hello! We head out today to spend the weekend with family, but I wanted to make a quick appearance here to share some delicious and simple treats you can make for Easter (or anytime, really!) I've got 2 treats to share, both wheat free, both could be gluten-free too (if you used gluten-free Rice Krispies). I recently saw some little rice krispie nests from Crafty Morning, and thought they looked so gosh darned cute! I knew they'd be easy to make, but I was going to make some personal preference adjustments. For starters, the beautiful nests that Michelle at Crafty Morning made had an edible grass in them...? I've never even heard of such a thing, so I decided I would make a quick and small batch of green buttercream, and pipe some grass into my nests. Also, she uses Robin Eggs candies (chocolates?), again, I don't know what they are. But I do know what Cadbury mini eggs are, and I know we all loooooove them in this house, so that swap was a no-brainer! The second sweetie I saw was Springtime Marshmallow Wands from Two Sisters. I love mallows, and chocolate, and my brain said, "Hey! You have sticks!", so then it just seemed like a natural step to go ahead and make these! So, here you go! Enjoy! 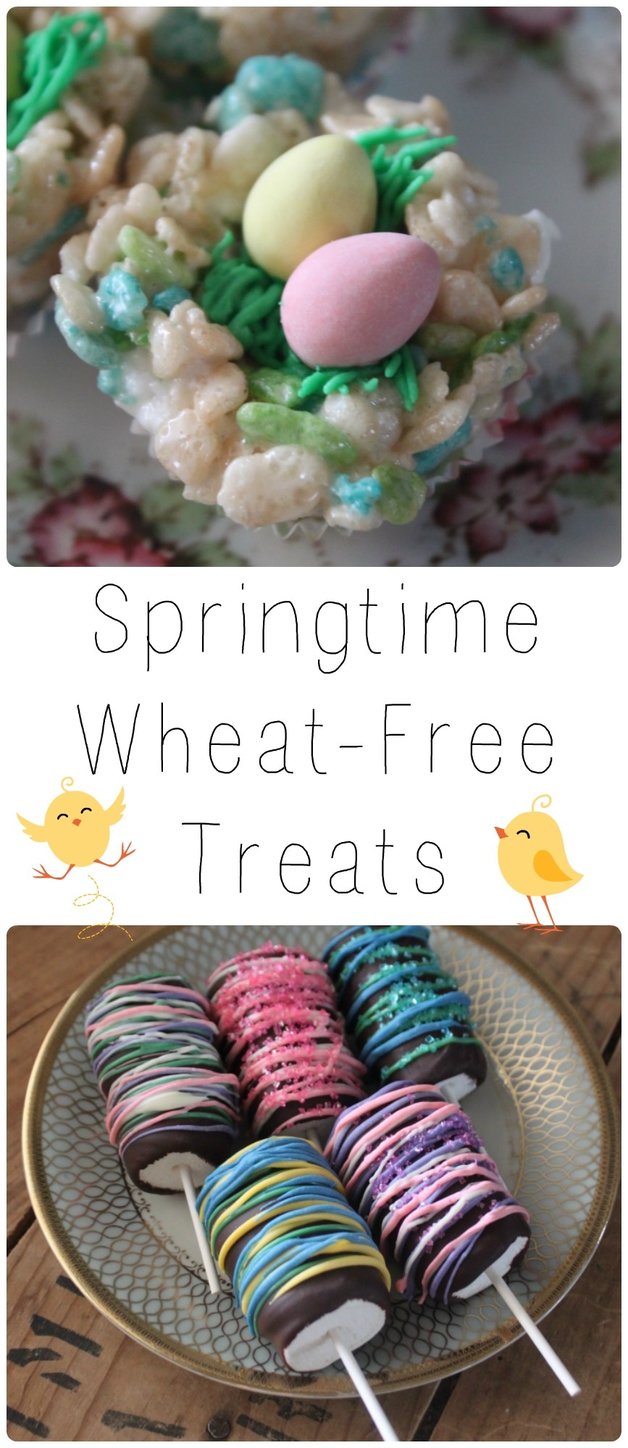 Rice Krispie Nests Makes about 36 mini nests Ingredients:
Method:
 Marshmallow Wands Ingredients/Supplies
Method:
 Ok, that's all for now!
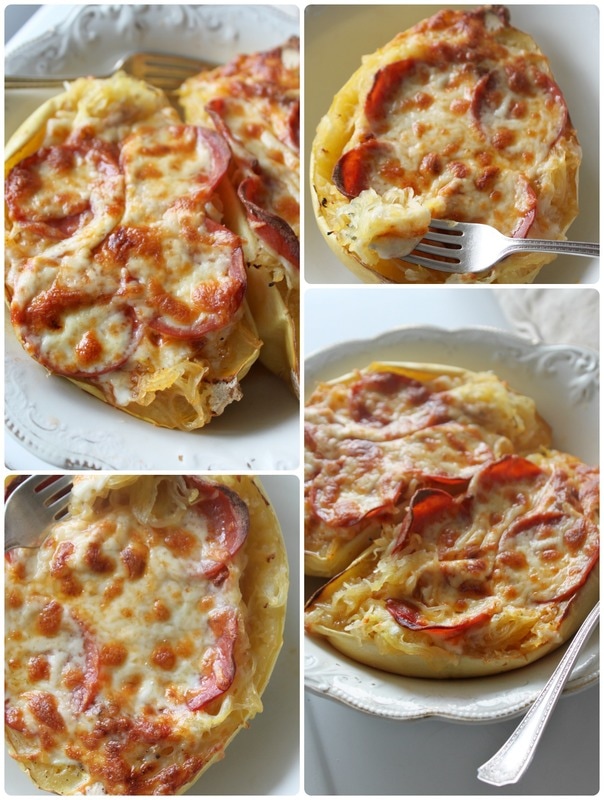
Check out a post from last year of a delicious round-up of Easter Treats, all no bake, and most gluten-free! Well, I hate to gripe about the weather....again....but it started snowing again last night! It's official! Spring is NOT coming to Ontario this year! Sorry! With some luck we'll hopefully get summer, but I'm not holding out hope at this point! While doing the barn chores this morning, and getting the hay out for the horses from our last bale I thought, "well, crap! I guess I'm going to need to get more hay?!?!" With the nice weather we had a few weeks ago I really thought we'd make it with the hay we had....but then the winter was like, "Psych! I'm cooooooming baaaaaack!". (insert weeping from this gal). Don't get me wrong, I like winter. But it's officially been spring now for 2 weeks, tomorrow is April, in 2 weeks it's Easter - so I want spring!!! I am saying that like a 3 year old having a temper tantrum! Alright....move on Amy-Lyn....no amount of whining will change the weather..... Here at the Van Londersele house we like pizza. We like store bought, homemade, take-out (well, we rarely order take-out, but sometimes people come to visit for dinner, and they stop in town and grab a pizza or two). We'll eat sauce, cheese and pepperoni on baked potatoes, zucchini, and stuffed into chicken breasts. Because, let's be honest, tomato sauce, cheese and pepperoni together are soooo yummy, I recently have been trying to get my kids (aka-trick my kids) into eating more veggies. They are actually all pretty good about eating the veggies they like, which isn't a bad variety of veggies, but I want to be able to make less and less variations of dinner to suit us all. I'm not a make-8-different-kinds-of-dinner-to-suit-everyone kind of Mom by any means, but I do tend to make the family something to eat (it's always gluten-free), but because I eat mostly paleo, I'm the one with the adjusted meal. Yes, I am the picky child in our family scenario. Ok, I'm not picky at all, just specific. So, for instance, if we're having a pasta night, the kids will have gluten free pasta, and Adam and I will have spaghetti squash noodles, or some other veggie noodle (because I own a Inspiralizer and can make noodles out of anything!). Caleb, my eldest child who has autism is getting really, really good at trying new foods, but there are still a few he is very wary about. Spaghetti squash is one of those foods. But recently I'd made a casserole using spaghetti squash, and he ate it (he picked the broccoli out though). The casserole had a "cheese sauce", bacon and chicken though, so it was easy to get him to eat it. I'm not sure he even noticed it was spaghetti squash with how much he enjoyed the meats and "cheese". So, taking advantage of his enormous pre-teen appetite, and his love of meat and cheese, and the fact that he'd successfully eaten spaghetti squash without gagging, I thought this could be a good time to try something new and delicious. Pizza stuffed spaghetti squash! Yes indeed! I will openly admit that he was reeeeeeealy skeptical, and wasn't into eating his "pizza" out of the squash shell (or the "squashes stinky coat" as he called it!), so I dumped it into a bowl, added another generous pinch of mozzarella, and a sprinkle of parmesan....and he ate it! I may have also bribed him with a treat if he finished it. I mean, sometimes, no amount of meat, cheese, or treat bribery will work to convince him to eat something new, so the fact that it did speaks to the tasty value of these pizzas! He did say when he was done, "Caleb will not like spaghetti squash" (it sounds like a question, but he was making a statement), and I said, "but you ate it all?", and he said nothing. In my Mom brain though I heard him say "drat". : ) So, I'm not going to say "everyone will love this recipe!", but if your family already likes spaghetti squash then it's a no-brainer that you'll want to try this, but if your kids are on the fence, this may be the ticket to getting them on the spaghetti squash train!  Pepperoni Pizza Stuffed Spaghetti Squash Ingredients:
Method:
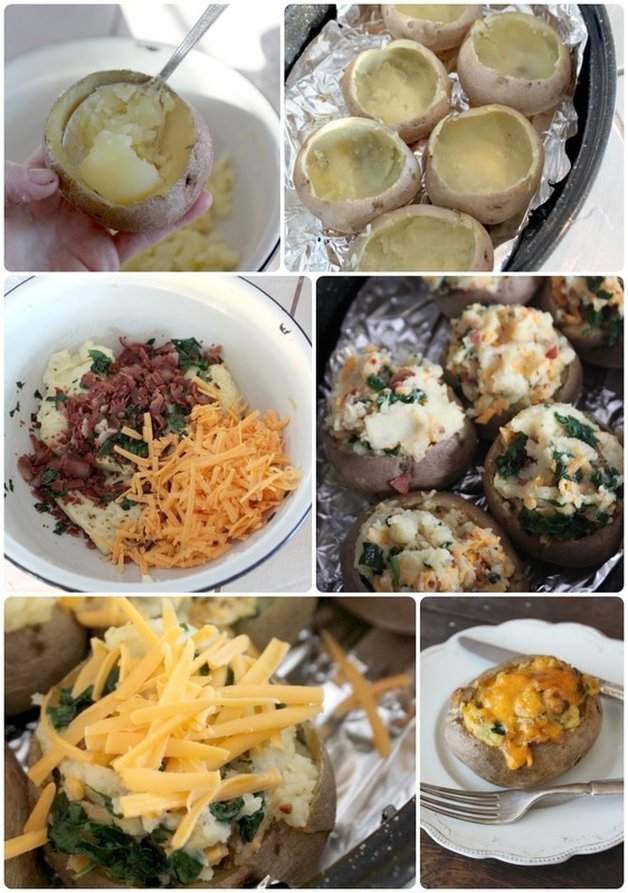
 For a bunch more spaghetti squash ideas, check out this post from Buzzfeed! I blabbed too much at the beginning of this post, so all I will say now is have a great weekend! Bye! Well, I thought spring was here...but it's not (apparently!) Ok, well, the sun has been out most days lately, but the temperature is still in the below zero mark! I'm talking -10 with a nasty wind! You step out thinking, "oh, what a sun-shiny terrific day!", and then the snappy wind sweeps up and bites you in the face! Waaaaa! Yes, that was crying. Like a baby. I've started just rubbing coconut oil (organic, virgin) on my face because it was getting so dry and scratchy from the wind! Waaaa! More crying. Well, this morning we woke up to snow! Whomp whomp (waaaa waaaa). Ok, crying over, back to the coconut oil, I actually like it on my face! It smells loverly, and has made my skin reeeeeal soft! Alright. Food time. In April of last year I wrote something called "The Great Potato Debate" and talked about potatoes, and how they are the evil enemy to weight loss and a long and happy life!!! (a slightly overdramatic voice needs to be used when reading that. Possibly even putting a hand to the forehead like a damsel in distress?). Well, there are many pros and cons regarding potatoes, but sometimes, they are choice # 1 in my house. Why? Because they are really freakin' affordable, that's why! They are filling, they really do have many nutritious benefits, and they are a humble, blank slate to so many meal ideas! And THEN they are inexpensive on top of all that? Well, hot-dog, sign me up! All you need to do is load ‘em up with toppings (see the above link for a delicious recipe that I included at the end of the post!) after they come out of the oven, add a side of veggies, and your meal is complete! When we do baked potatoes as a meal, I’ll switch up what we top them with. If the budget is particularly tight, we’ll just add butter, salt, and a sprinkle of cheese. Other times we’ve made curry, chilli, pulled pork, to top them with (separately, of course!) and then there's the ever “classic” baked potato toppings of sour cream, bacon bits, green onion and cheese. Now, to take a humble baked potato to a new level, someone (who loved mashed potatoes!) at some point thought, “I wish the inside of my baked potato was filled with mashed potatoes! (this account is almost certainly 100% historically accurate!). Enter the twice baked potato! Granted, these take a little more work, but you can do the first baking, as well as mash and fill the potatoes ahead of time and then put the lovely stuffed gems into the oven when you need them! You can even fully prepare these up until the final baking, and store them in the freezer! After we had our third child, a woman from church brought us the most amazing meal, all made ahead and frozen! One of the super tasty items was twice baked potatoes, and they were so delicious! This past weekend I devoured some mini twice baked potatoes that a friend had made for a St. Paddy's day party. She made them all earlier in the week, then froze them until party time! The twice baked potatoes today are a bacon & spinach version, and they are deeeee-lightful! The process of baking, scooping, mixing, re-filling and baking again isn't that bad when you consider how yummy these are! 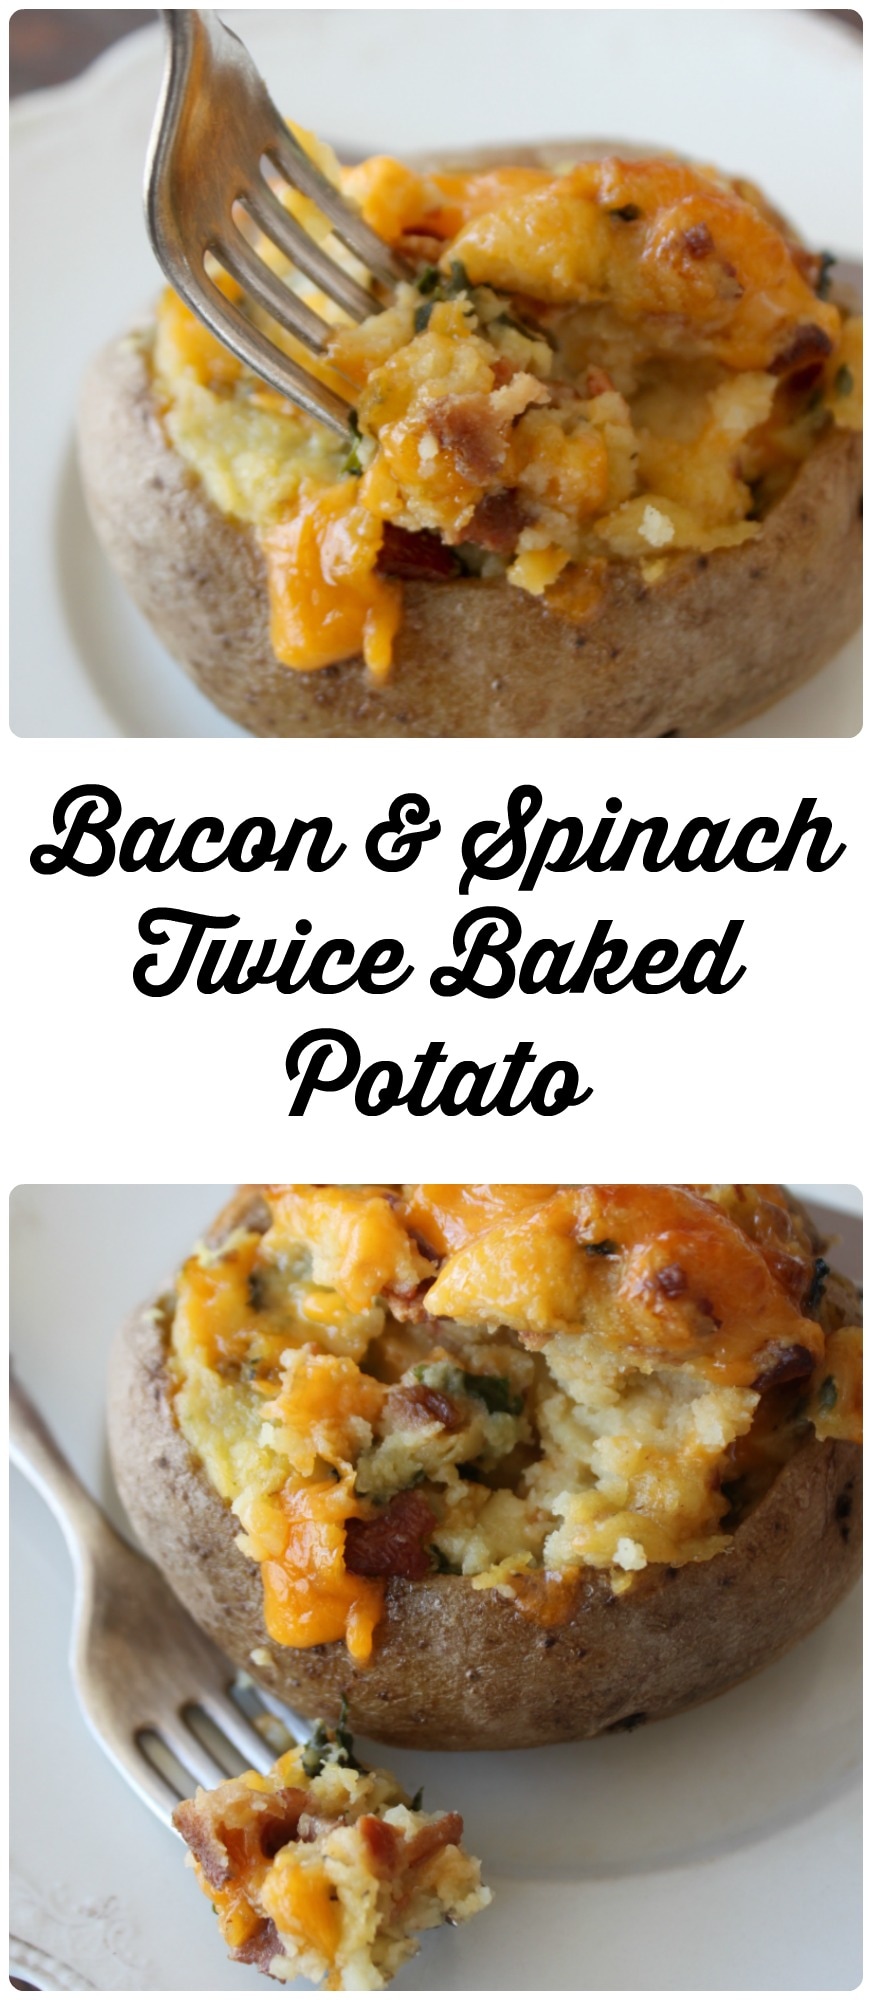 Bacon & Spinach Twice Baked Potatoes *With paleo and non-paleo options. This recipe can easily be doubled Ingredients:
Method:
 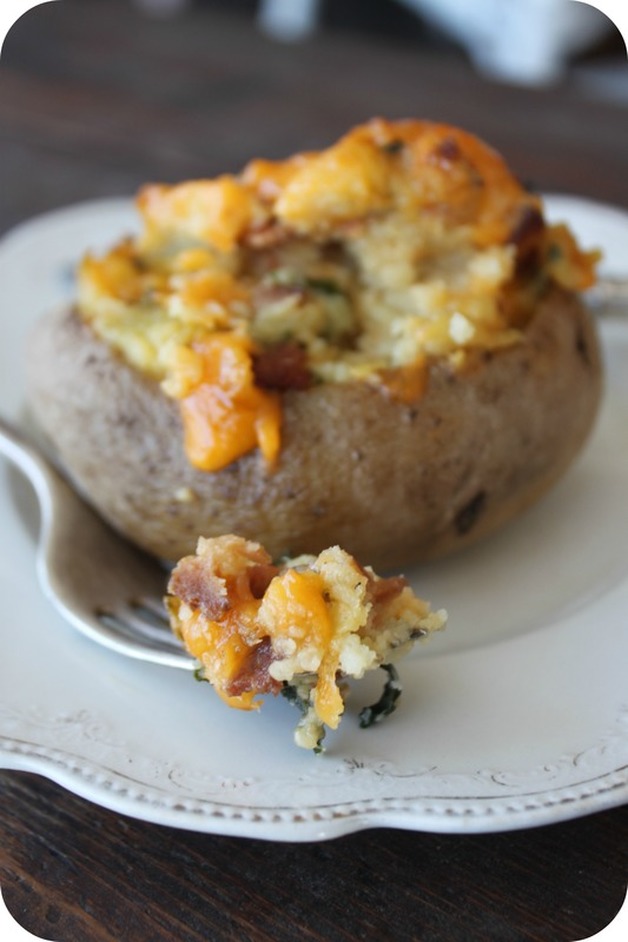 Though the paleo, cheese-free version of these may not seem as yummy, trust me, they are. The tops won't have that crispy cheese appeal, but the tops so get a nice golden brown, and the potato crisps up, and they are good.
The End. Have a lovely weekend world wide webbers! : ) Ok, well, the title warned you! You now enter this post at your own risk! : ) My husband's Belgian family celebrates and mourns with ham buns. A wedding, baby shower, anniversary, birthday, funeral - all involve "ham buns". This food item is EXACTLY what is sounds like. A bun. With ham. The bun is simply buttered, filled with a piece of ham, and that's it! It seems basic, but somehow it tastes like a dream! I dunno. Last year, my husband's Uncle passed away, and at the funeral luncheon we had, of course, ham buns. Adam's uncle specifically requested double ham on his ham buns though (extra delicious!), and my girls really enjoyed them. I was surprised by this because my girls have not eaten a sandwich in at least 5 years! I think the fact that the options were were limited, they gave the buns a try. Well, after the luncheon there were leftovers, and the wonderful women running the meal packed up lots of food for us to take home. We had at least 2 dozen ham buns that Adam took to work and the girls took to school over the next week! When they ran out, the girls asked if I could make them the buns. We are mostly a gluten-free family because I eat mainly paleo, and Caleb is fully gluten-free, so it’s easier for us all to eat similar. Plus, I told the girls, making the delicious buns that the ham was nestled in takes too much time to make. So, that was that. Well then, didn’t a neighbour come over one day not too long after with some rolls she'd made with her aunt that day. They were so good......so, so, so good! Belgian funeral good. I commented on how I don't usually make bread or buns because I hate waiting for it to rise. Yes, I'm occasionally impatient! Anywho, she told me that these particular rolls only took about an hour to make, and I thought - what? For Real? I thought she was pulling my leg, and was trying to make them sound easier than they were. Well, the next day she came over with the recipe for me to see, and promised that they only took an hour. So, I said, “well, let’s make them right now!”. And we did. And it was scary easy, and scary fast how we produced big, soft and fluffy rolls in an hour. If you’re not organized (or your kitchen isn’t), I could see this taking an hour and 15 minutes. Or if you got distracted while making these, perhaps it would take an hour and 30 minutes. But getting distracted while making these will be impossible because you’ll be so focused on the warm, delicious goodness you’ll have in an hour, you’ll just hone in and get ‘er done! So, here it is! My neighbours' aunt's recipe for "bread buns" as she called them, or "dangerously quick and simple buns" as I call them! 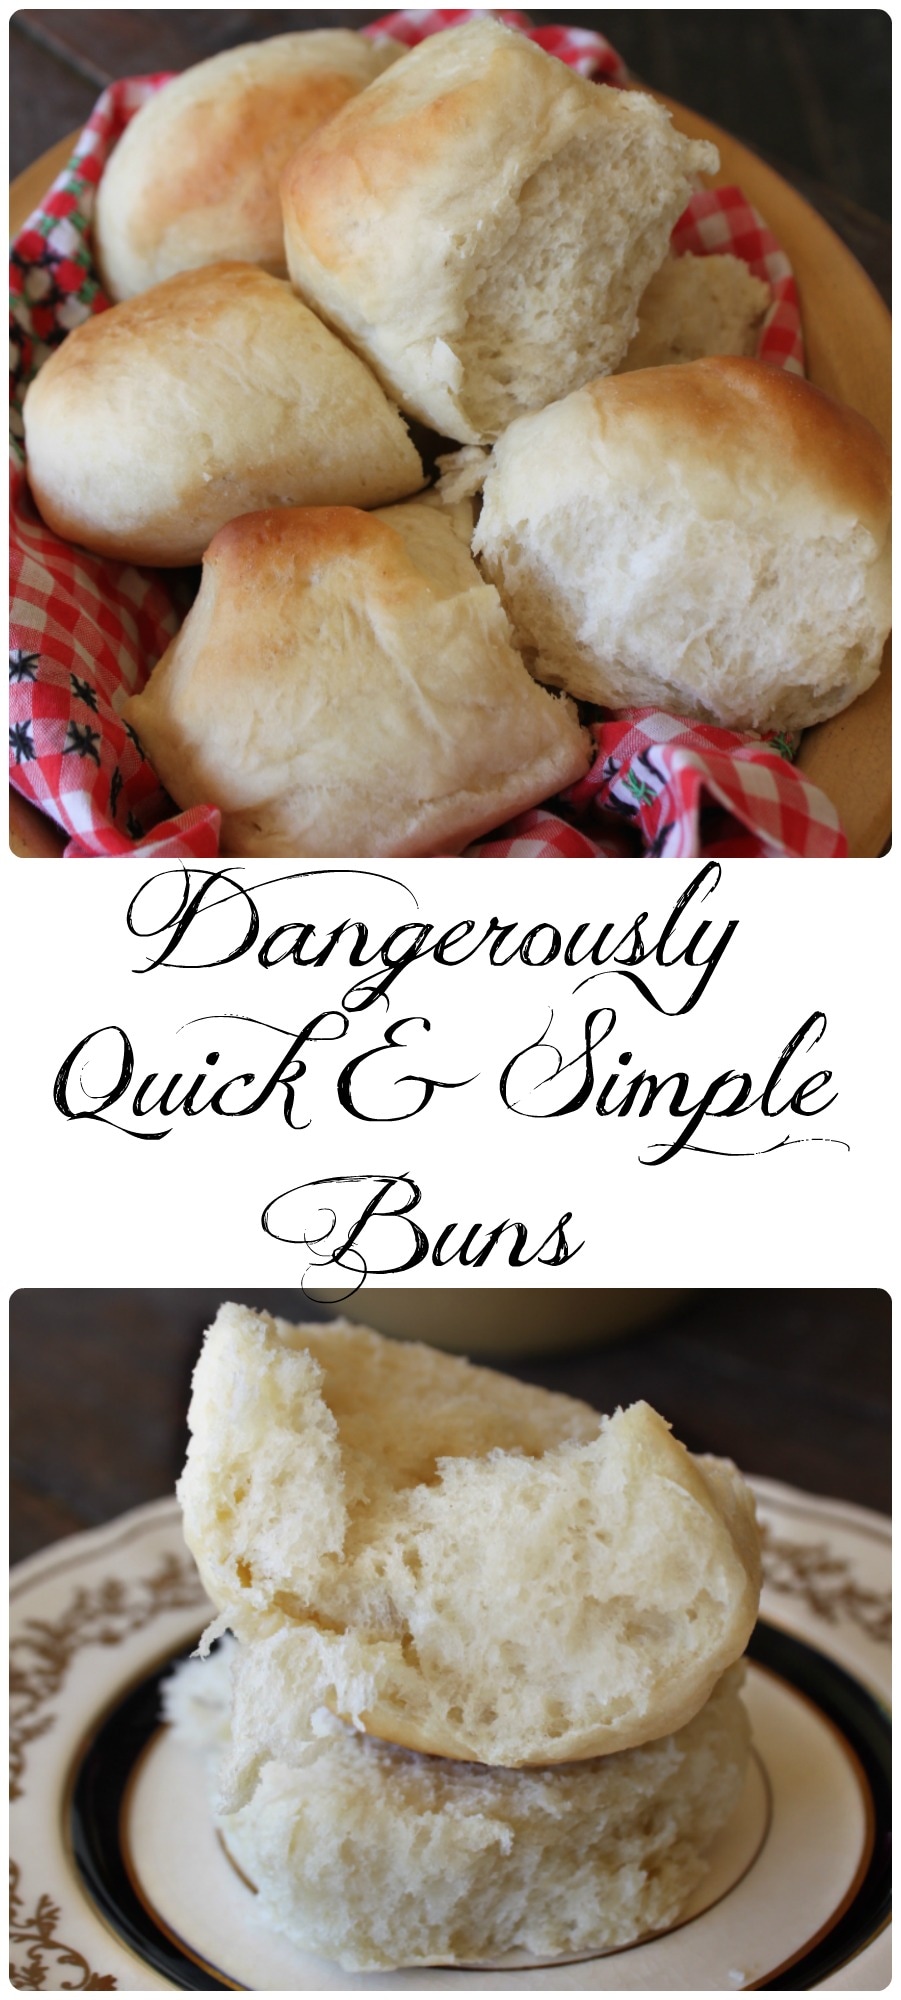 Dangerously Quick & Simple Buns (or dump pan buns!) Ingredients
Method:
It's honestly a really simple process to go from some humble ingredients to amazing, fluffy buns! 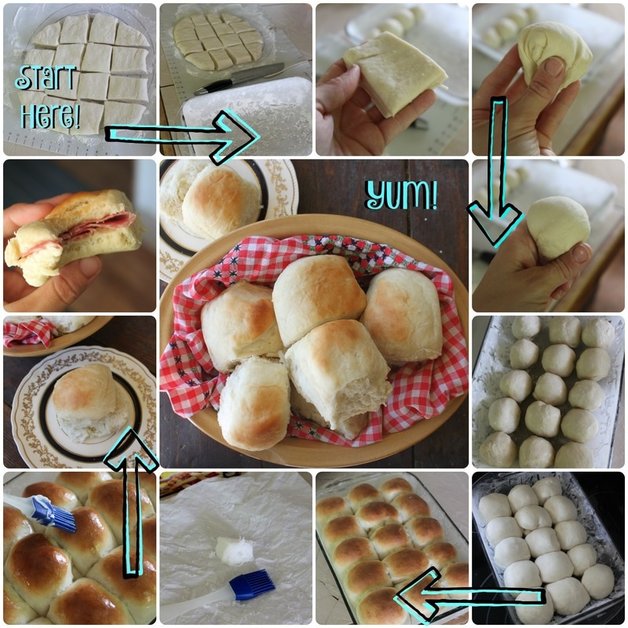 This is my Keziah who especially loves these delicious buns! She can hardly wait for them to cool a bit so she can devour one! 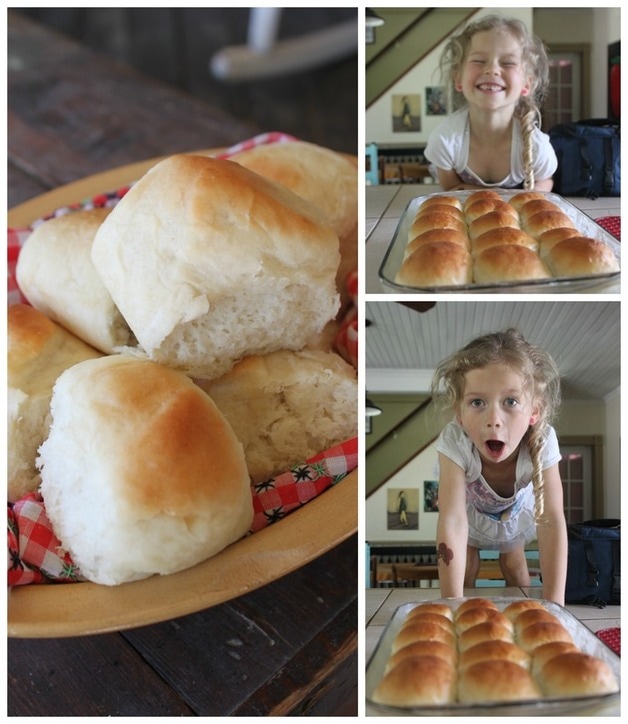 Can I just highlight some recipes for buns from the past.....specifically, from my book by Dr. Chase from 1884? I love looking through this old book when I'm thinking up a recipe because why re-invent the wheel, right? Well, sometimes the wheel needs some rounding out! This recipe below for "Buns, Better Than bakers" is a multi-day event! You'd start the water, sugar and yeast the night before you planned to make these rolls ("hooray for rapid rise yeast" shouts all the modern women!) : ) Anyway, it's a gem of a recipe, anyway!  Ok, I had to share one more recipe from Dr. Chase's book because......yuk. I mean, I might still try making it because it sounds so strange, but, yuk! It's called "Pork Cake", so, I think we can just right away agree (based on the name) that this is a recipe that maybe won't suit many peoples tastes...? I think it could be a breakfast style cake? Read the whole recipe, especially the last part about what you use to check for doneness. It's brilly-bobs (as my sister would say. Translation: brilliant) 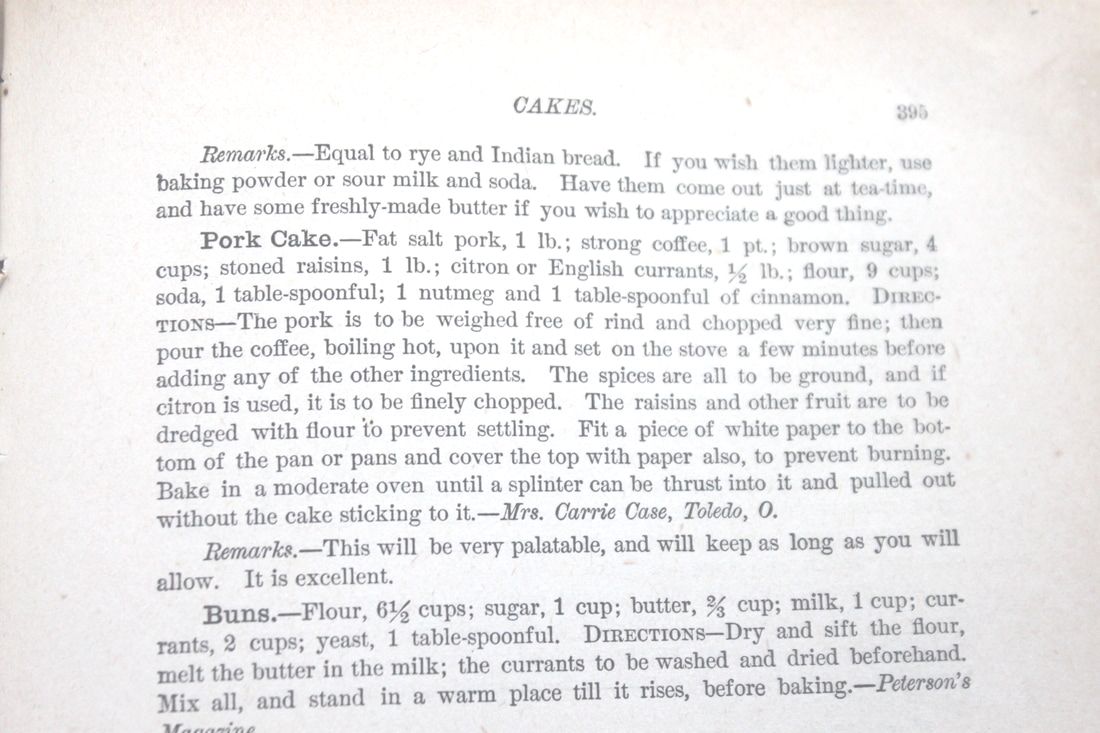 It is amazing, isn't it?! Anyway, this post seems too long? Sorry about that. I'll just get outta here then! Have a great weekend! It's a long weekend here in Ontario because Family Day is on Monday (also in Alberta and Saskatchewan!), and we have family visiting (how fitting!), and I'm excited! xoxo I will be the first to admit to being a bit of a Grinch about Christmas. There's no real reason, except that I hate being "told" that I need to hang mistle toe, cut down a fresh tree, decorate the house with things that have been stored away (hogging space) for the whole year, & be jolly! See? A Grinch. I want to clarify though that I had WONDERFUL Christmases as a child. Seriously, my Mom & Dad put on a great Christmas! Decorations, a big tree that we'd go out to hunt for and cut down, an advent wreath with candles we would light leading up to Christmas, wonderful stockings, lots of gifts, a Secret Santa exchange with the siblings (because there were a LOT of us and we couldn't buy for everyone!), and an amazing Dutch style Christmas breakfast. So, I don't dislike Christmas because of any childhood misery, I am just honestly a Grinch! But, one thing that I love about Christmas is iced sugar cookies! Seriously, you want me to get into the holiday spirit? Give me some iced sugar cookies. Yes, they DO need to be iced! C'mon-what's the point of a delicious, buttery sugar cookie that isn't covered in more sugar!?! Ok, so this post isn't as "tutorial-y" (oh my gosh! That for sure isn't a real word at all!) as I want it to be....but that's because doing this wonderful, beautiful, time-consuming art is equal parts calculation & guess work! I'll give you tips and tricks that I've learned, I'll share some mistakes I made, and how I improvised to fix some of the problems! And taking a ton of photos during the decorating process would have been extrememly difficult since I was busy decorating! Sorry! Also, the method seems crazy long, but really, just read through it, and you'll see it's very basic. The cookies are simple and strait forward, and the decorating is 2-step because you need to first pipe a border, and then you "flood" the cookies in the second step. That's the real "secret" to beautiful iced sugar cookies. FYI : ) Honestly, it's a little time consuming, but they can be as simple or as complicated as you (and your imagination!) want, so that adjusts the time it takes to decorate. Ok, here we go!!! 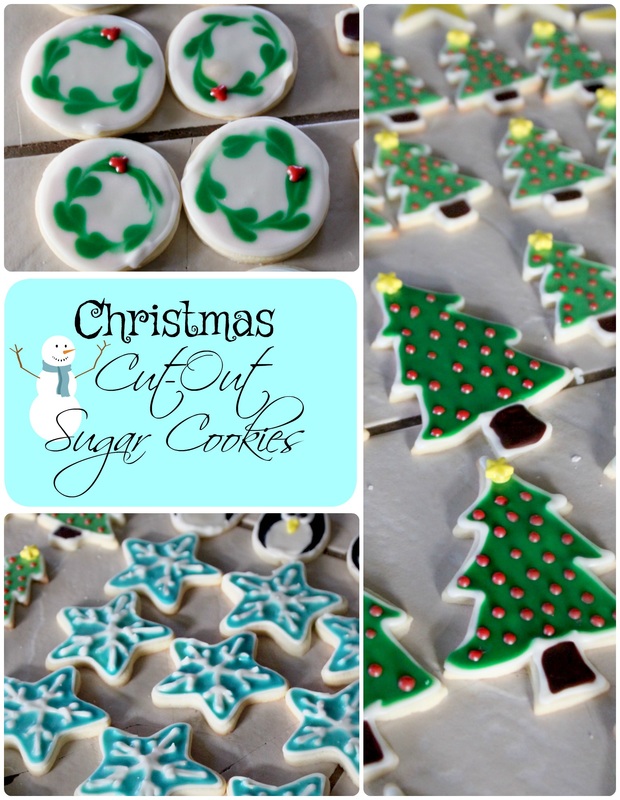 Cut-Out Sugar Cookies (these cookies need 1 hour of chilling before baking! Fair square warning) :) Ingredients: For the Cookies:
For the border icing:
For the flood icing:
***I use both zippered plastic bags, and proper piping bags, to decorate. As long as you have something that can give you a fine tip for the border icing you'll be good*** Method For The Cookies:
....after the dough has chilled....
Method For The Icing:
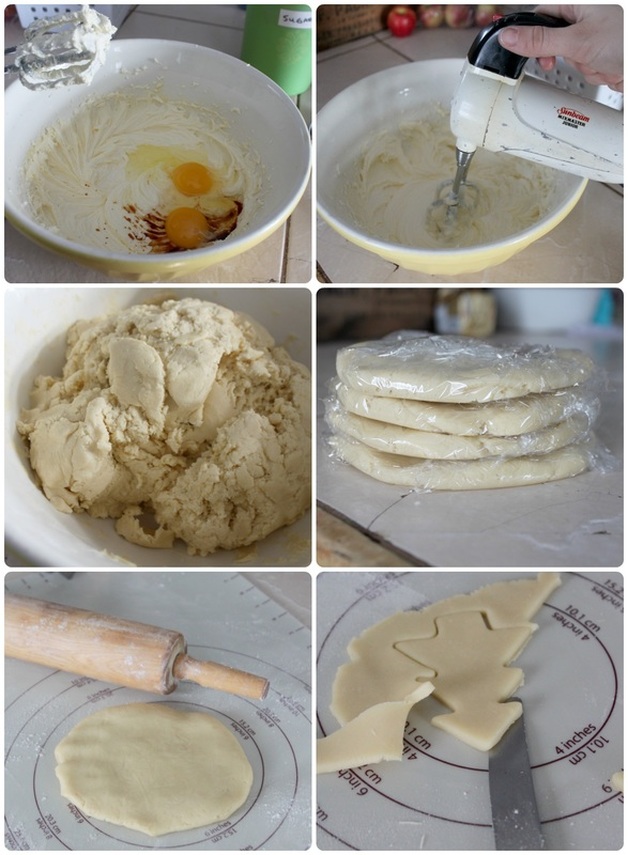 I made a double batch here So, preparing the cookie dough is simple! When you're done you just need to divide the dough into 4 disks, wrap 'em up, and stick 'em back into the fridge to cool. This step keeps the cookies from spreading and loosing their shape when baking. I'll actually often make the dough a day or more in advance from when I'll get a chance to bake them. 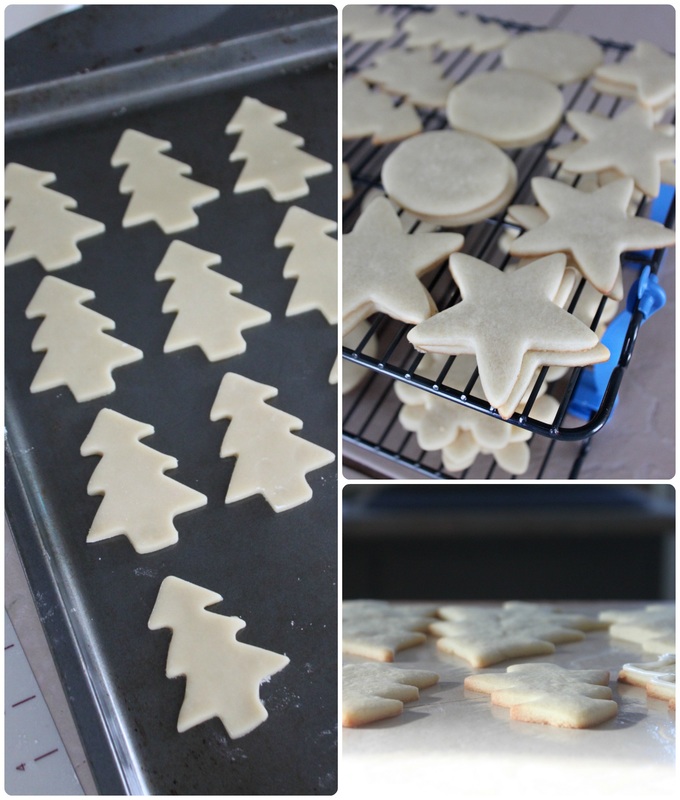 Bake and cool!!! 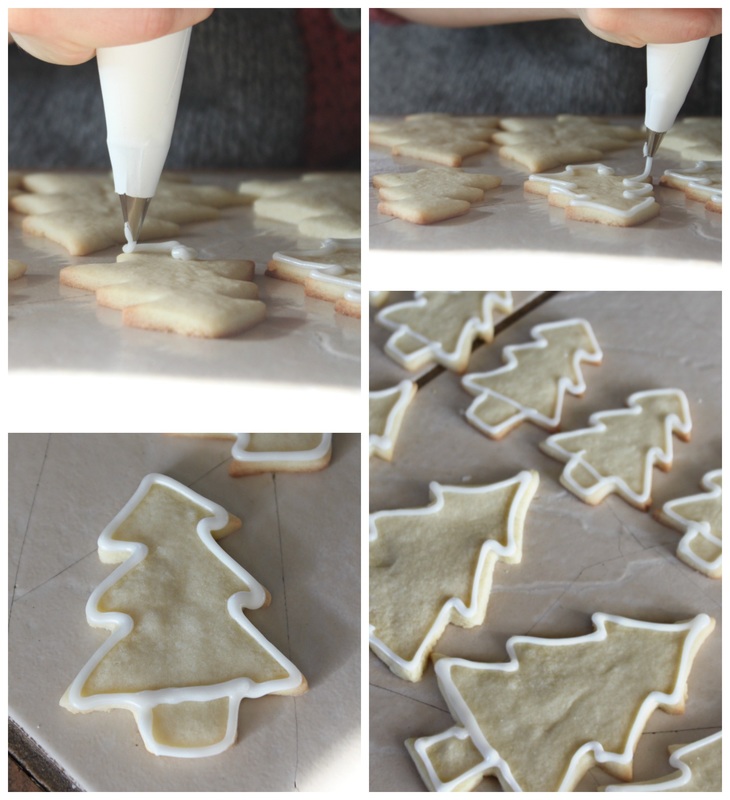 Now you'll need to create the borders on your cookies so that your inner icing stays where you want it and doesn't go dripping off your cookies! You can see that my piping skills are poor! Oh well, the cookies still look pretty good when all is said and done!  Ok, so here's a little tip! If you plan on making pretty snowflakes, save the pretty snowflake for after you've flooded the cookie! When I went to flood the blue snowflakes, the border and the snowflake design were so close to each other that I had to use a toothpick to gently and carefully flood around the design. And that was a huge time hog! So, for the smaller snowflakes I didn't even bother flooding them! Once I realized my blunder with the bigger snowflakes, I quickly grabbed some sprinkles and made my smaller snowflakes into sparkly pink snowflakes before the border icing dried fully! You can see those cookies above. To pipe a design over the flooded icing, you'll want to keep the flooding to a minimum so that you're not waiting around for it to dry before piping your design. Just flood a thinner layer than you might normally have used, allow it to dry to the touch, and use the border icing to pipe your design. For the wreath cookies, flood the cookie with white, then immediately add dots of green around the edge of the cookie. Use a toothpick to gently drag the green icing from one dot to the next. Then I piped red "berries" on after the green had set slightly. For the (super helpful!!!) photo tutorial I used to make my wreath cookies, look here at The Monday Box! 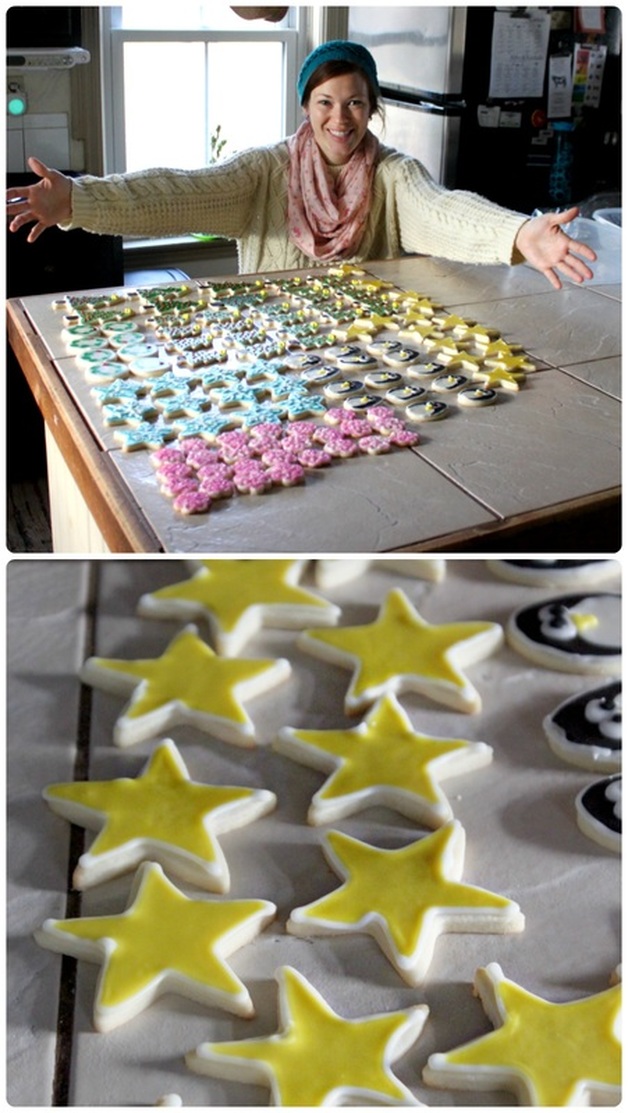 It doesn't look like a lot in front of me, but that's about 7 dozen cookies! The little penguins were time consuming! Geepers! I liked how they turned out, but I was also like, "Yeah, not doing that again!" Although I probably will because I'm a sucker for punishment when it comes to creat beautiful Christmas cookies!!!
Something that would make it not so awful would be to have little candy eyeballs, which I've seen at Michael's & WalMart, but never purchased of course because I'd rather take forever and ever piping my own eye balls onto cookies (sarcasm, people). I also could have made them more simple, like the ones pictured here, but, ya know. Too little too late. Also, the ones in the link bother me slightly because the eyes are technically on the pengiuns belly (look at the link to see)....but, they are cute, and more simple, and most people aren't painfully critical like I am and wouldn't mind or even notice that the eyes and beak are on the pengiuns belly! Anywho! I hope everyone has a good weekend, and got through this week in one piece! Let me know if you make these cookies, or if you have a special Christmas cookie you like to make for the holidays! Sharing is caring! xoxo Happy Thanksgiving weekend American friends! Here in Canada, we celebrate our Thanksgiving in October, but Canada has in the last few years started tagging along with “Black Friday” and all the sales that go along with it - so, for me, it’s a time to NOT go out because I’m not a big fan of crazed deal hunters! Don’t get me wrong, I am a deal hunter, and I am generally crazed, but I am a quiet deal hunter. For instance, if I see a shelf with a bunch of fantastic items and they are on clearance, I will silently use my arm to make one grand gesture of sweeping all of said item into my cart, and walking away. Pleased as punch. Well, that was all pretty random. Let’s talk about today’s recipe! I found it this summer while cooking at Pleasant Bay Camp. Someone had purchased an ungodly amount of frozen blueberries for us to use, and I needed the freezer space, so got looking for a blueberry muffin recipe that was basic, used simple ingredients, and came out looking like a million bucks. This recipe from Chef Savvy hit on all those points! The campers gobbled them up, the staff stole them from the kitchen when I wasn’t looking, AND I got to use up some expiring milk to make up the first batch! The recipe calls for sour cream, but we had an over-order of milk at camp, and it was expiring faster than we could make the campers and staff drink it! It is very common to use souring milk in recipes. A lot of recipes – mine included! – call for sour milk (or buttermilk), so don’t think “bleh! Using sour milk?!? Gross!”. It’s normal, it’s economical, and it creates a softer, fluffier baked good! Some people do say not to use actual souring milk for recipes, but that strange, sour milk taste that is unpleasant if you were to drink it strait changes, and the only taste that remains is a oh-so-slight tangy flavour that really compliments sweet baked goods. I pinky-swear promise it DOES NOT taste like sour milk! Anyway, all that being said, when I didn’t have actual souring milk, I made my own buttermilk by adding some vinegar or lemon juice to fresh milk (about 1 teaspoon to 1/4 Cup), stir, and allow to sit until it’s curdled. As for the streusel top, I hate when super moist muffins get sticky on the top after they’ve cooled and sat. It’s better than a gross, dry muffin, but still. So, when I first looked up the recipe, I looked up “streusel topped blueberry muffins”, knowing that A: streusel is freakin’ delicious, and B: it would keep the tops from becoming sticky. So, without further adieu, and sorry for blabbing on, here’s the recipe! 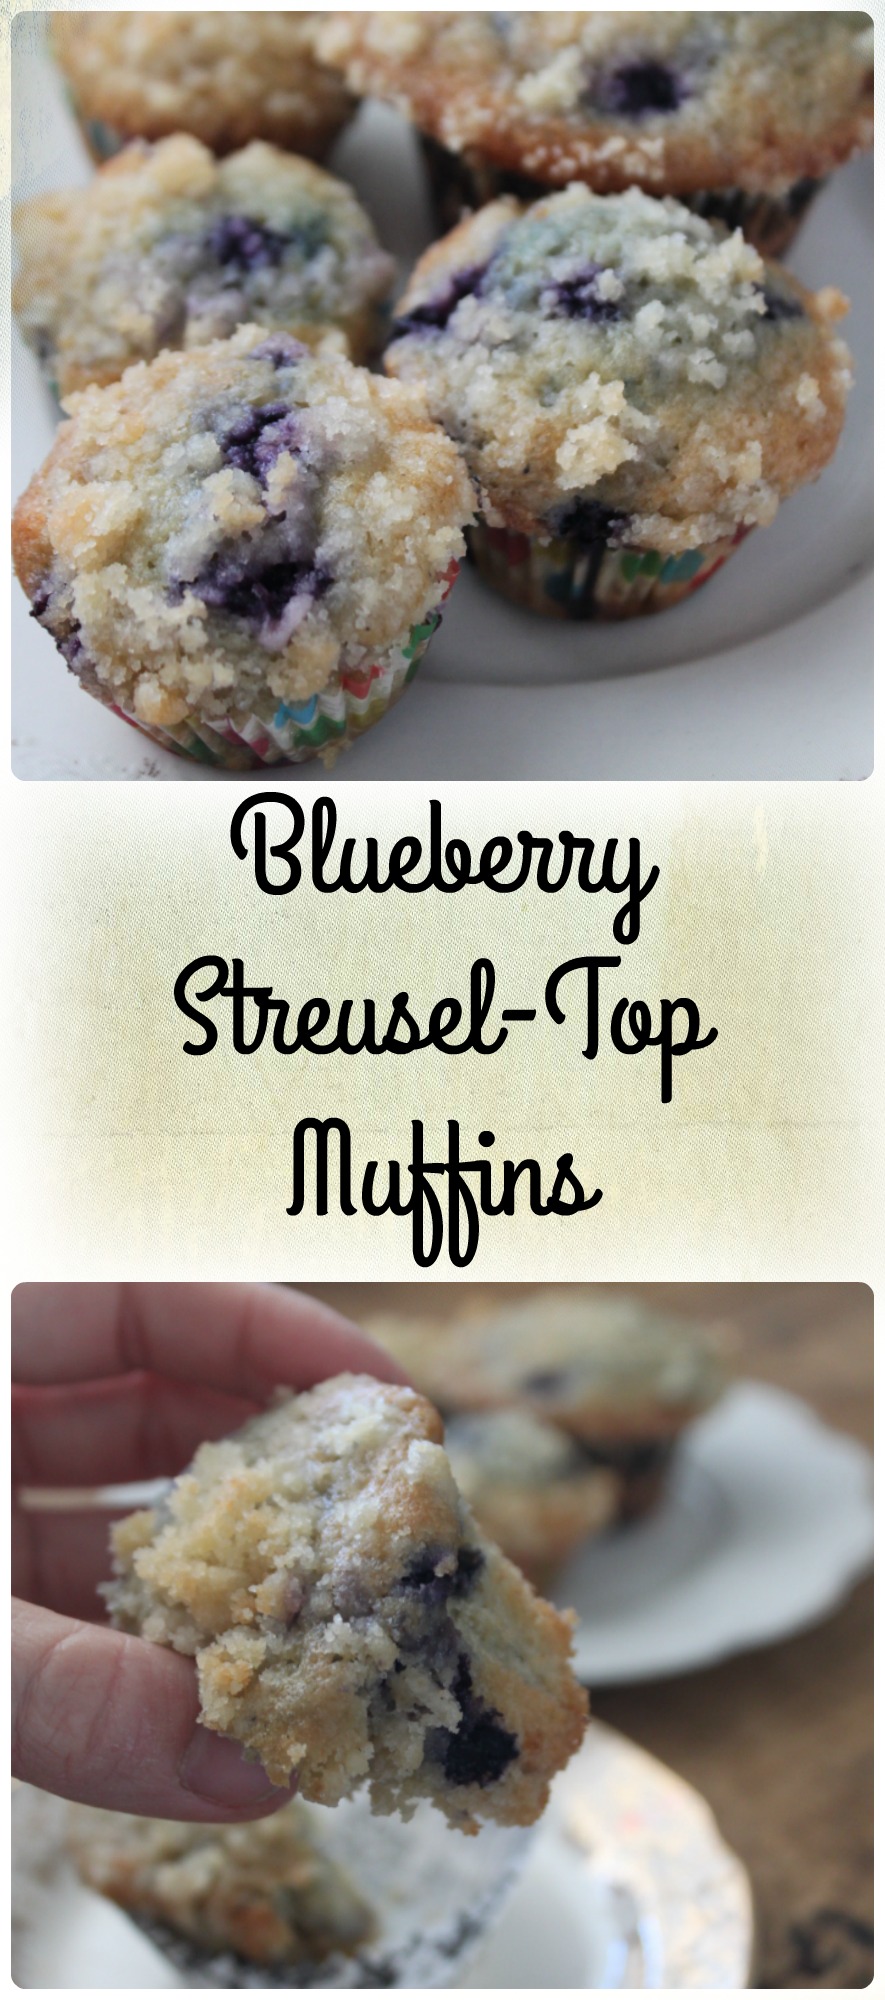 Blueberry Streusel Top Muffins Adapted from Chef Savvy's "Blueberry Streusel Muffins" Ingredients: For the Streusel Top:
For the Muffins:
For the Streusel Top:
For the Muffins:
Enjoy! I think these taste amazing if you eat them warm, with some butter and honey! 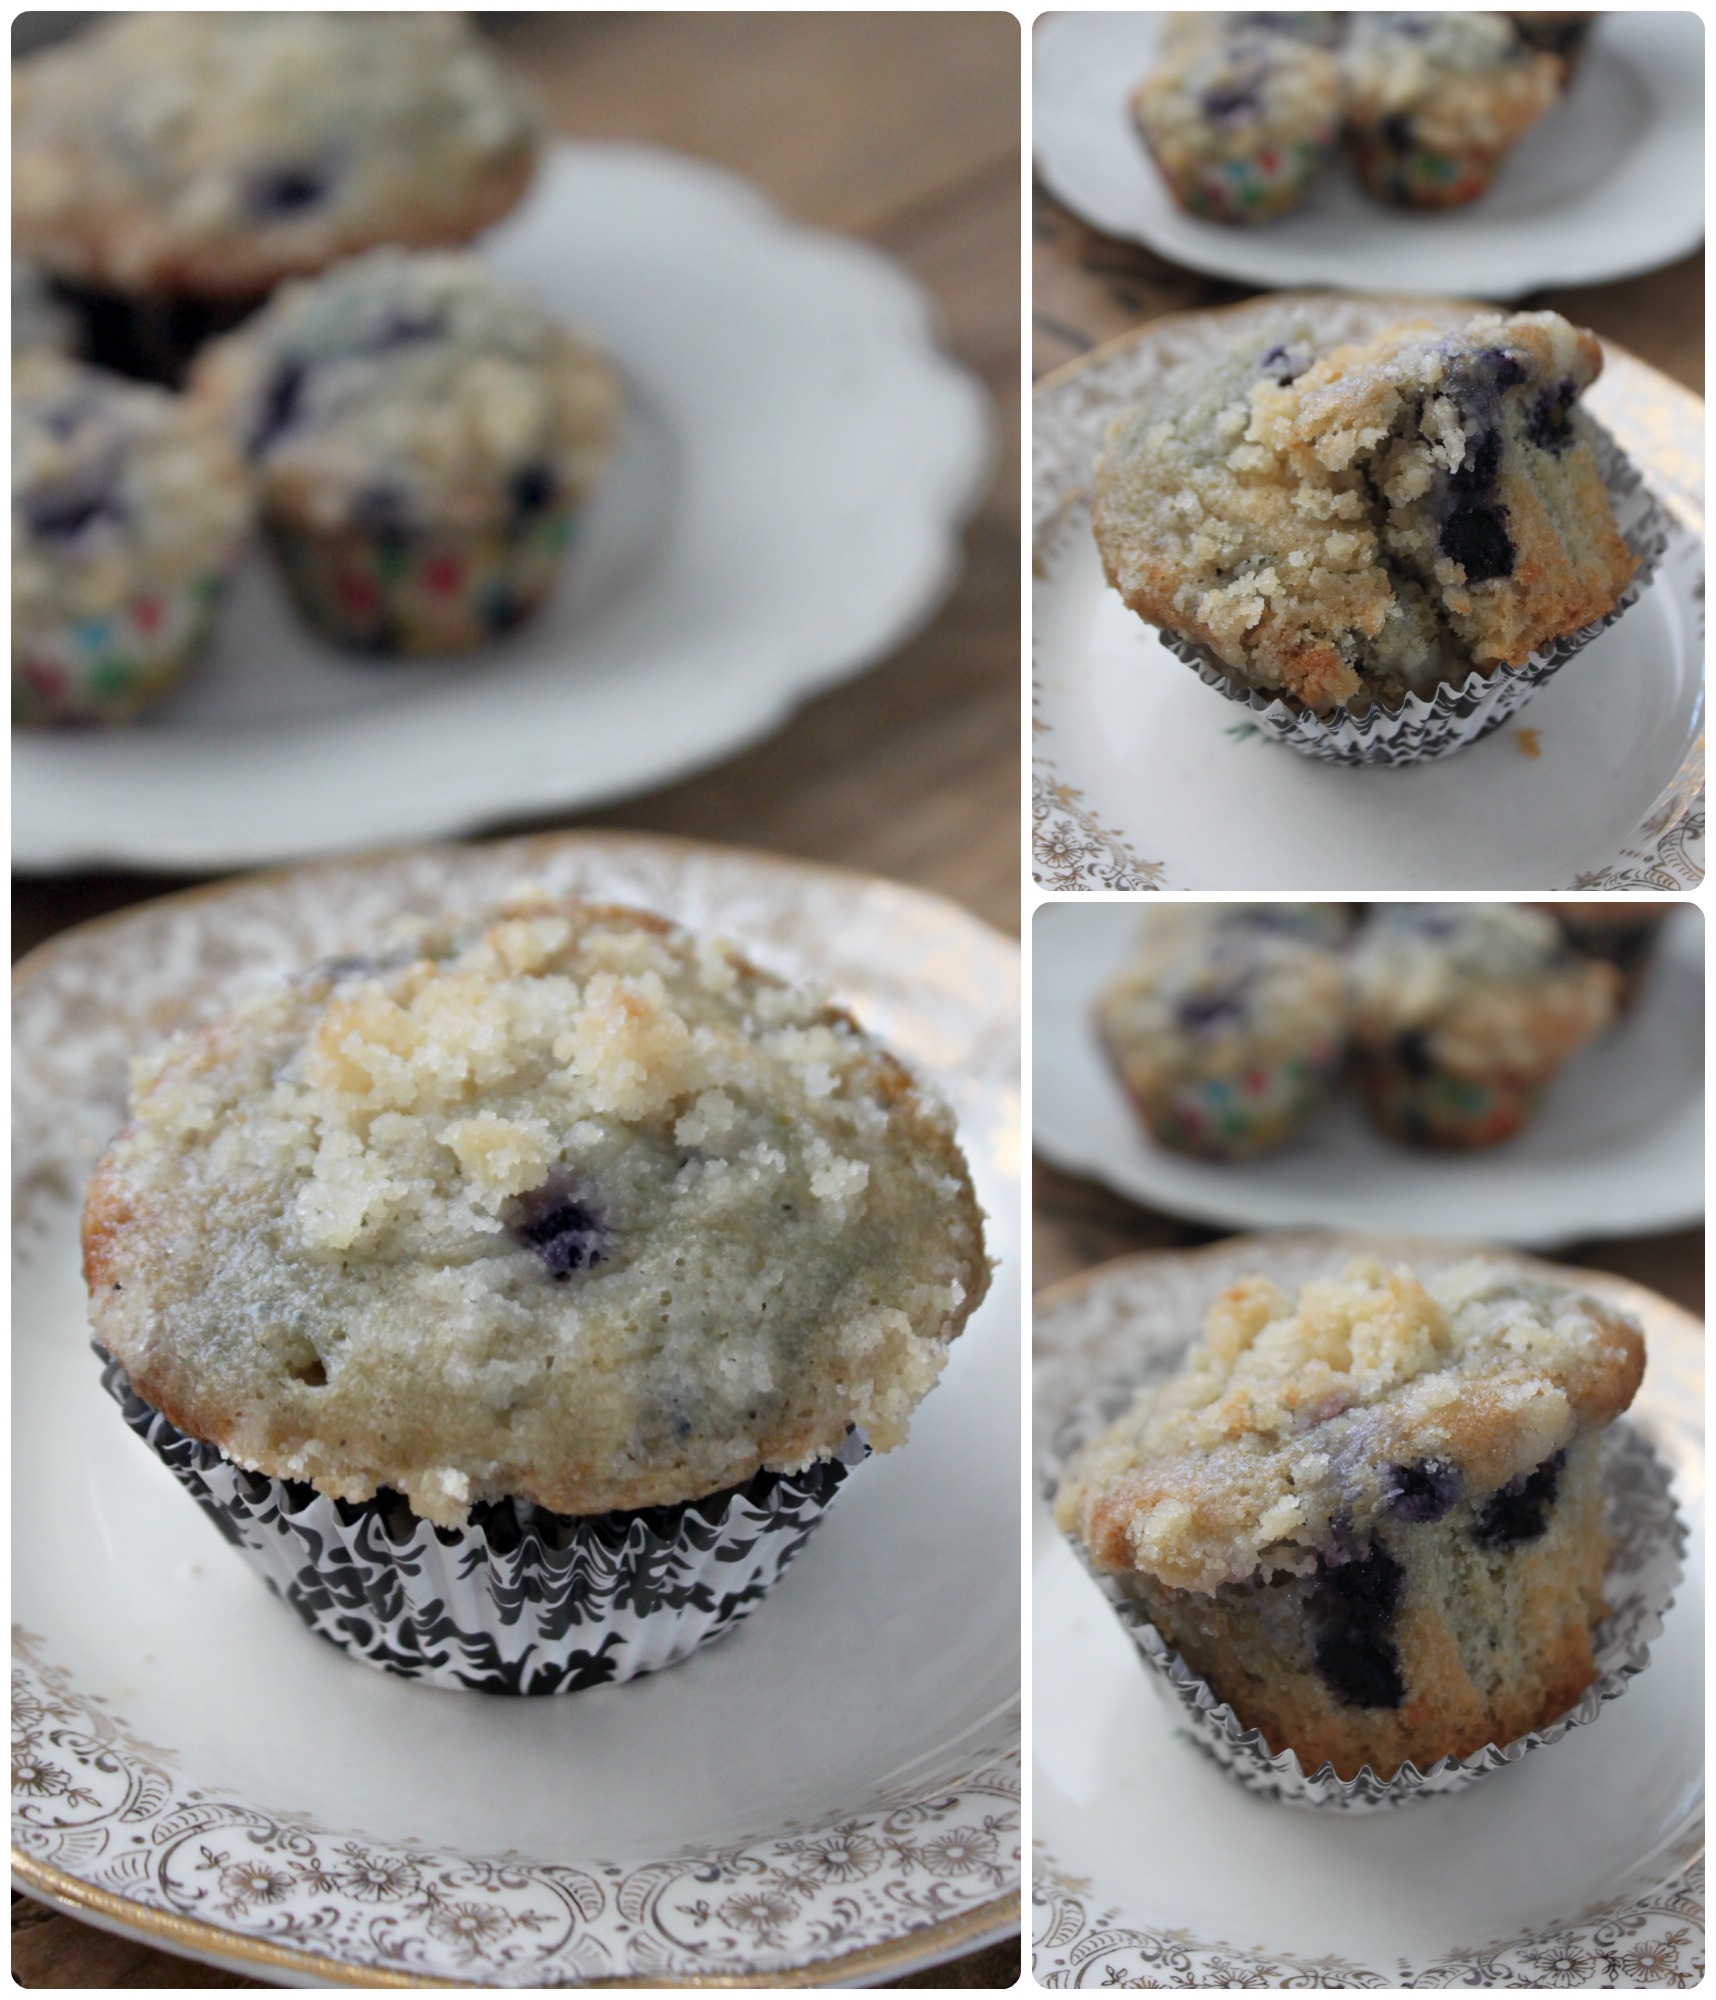 These lovely little muffins also freeze well, making them great to make ahead for school lunches, or to have on hand to randomly bring to someone who is in need of a pick-me-up!
Ok, well, I’ll see you later this week! On Thursday (the day I set aside for any autism writing I want to share), I’ll be telling you about something that happened last week with my son Caleb. If you’re new here and don’t know him, he’s my 12 ½ year old son with autism. He’s growing into an incredible young man, and last week he was involved in something that ordinarily might not leaving a Mom weeping with joy (several times in one day!), but that’s what was happening to me! I am overwhelmingly proud of him, his classmates, and his school! Stay tuned for that! xoxo As far as easy recipe go-this one is way up there on the list! It's some really simple ingredients that *most* people have on had at all times, and can be baked up and cooling on your counter in 30 minutes (ish - haha! The exact time depends on how organized your baking supplies are and how efficiently you can pull them together!). But still, they're easy going cookie bars! It's all the goodness of gooey, oatmeal chocolate chip cookies, but without the scooping! I found this recipe at Jamie Cooks it Up, and give it two whole-hearted thumbs up! :) I usually like to post a "Motivational Monday" & "Health & Fitness" post on Mondays.....and this is neither of those things! But, I decided that although I want to give readers something predictable, most readers who I hear from don't give a rip! :) So, it helps me prepare and be organized if I have a certain "thing" I will post about on a certain day, but sometimes, I just gotta post what I feel like! And this recipe is so simple to throw together for when last minute guests are coming over, or to make and tuck into an airtight container and put into the freezer for quick lunch treats, or after school snacks, well, I just needed to share it! Hope ya'll are ok with that!:) 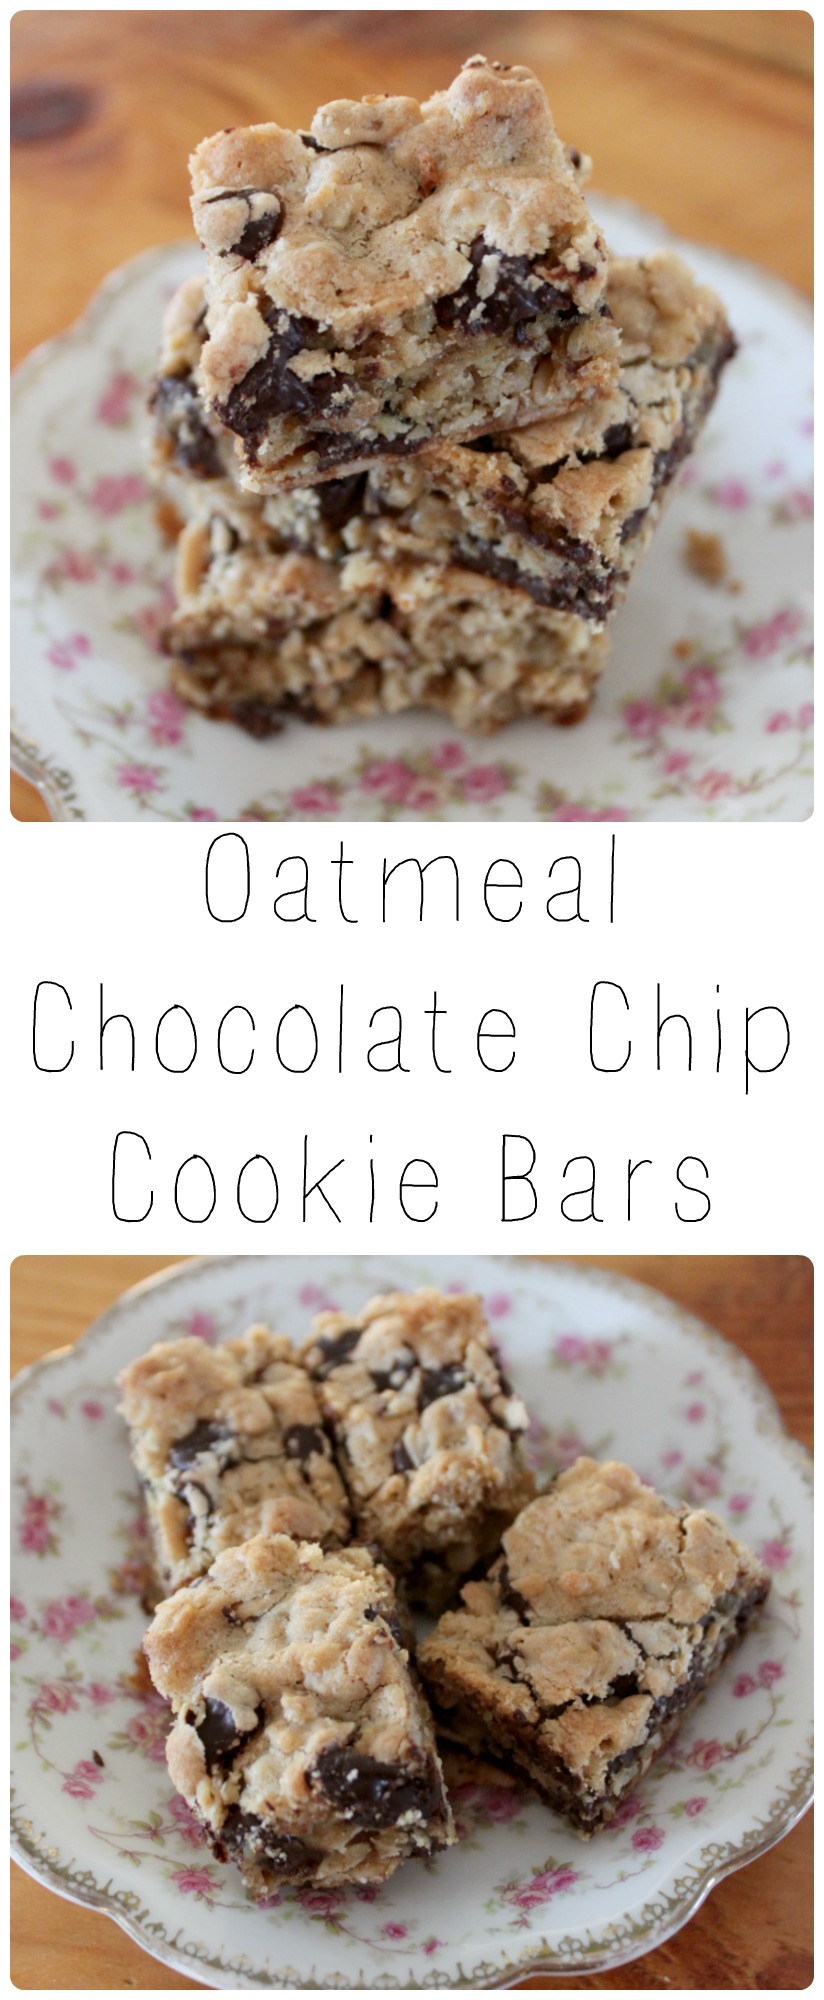 Oatmeal Chocolate Chip Cookie Bar Ingredients:
Method: 1. Preheat your oven to 350 degrees, and prepare a 9x13 baking pan by lining it with parchment paper, leaving overhang "handles" for later, and lightly greasing with butter or oil where the parchment doesn't cover the pan 2. Into into a large bowl, add all the dry ingredients and whisk to combine 3. Now add the melted butter to the dry ingredients and mix it up until it's all wet 4. Add the eggs and vanilla and mix well 5. Add chocolate chips, and stir to combine 6. Evenly press the dough into the prepared pan 7. Bake for 17-20 minutes, until a toothpick or knife inserted into the centre of the golden topped squares produces only melted chocolate and no wet dough 8. Lift the bars from the pan using your parchment "handles", and place onto a cutting board, and give them time to cool completely 9. Once cooled, cut into bars, squares, or triangles! And eat some, of course! 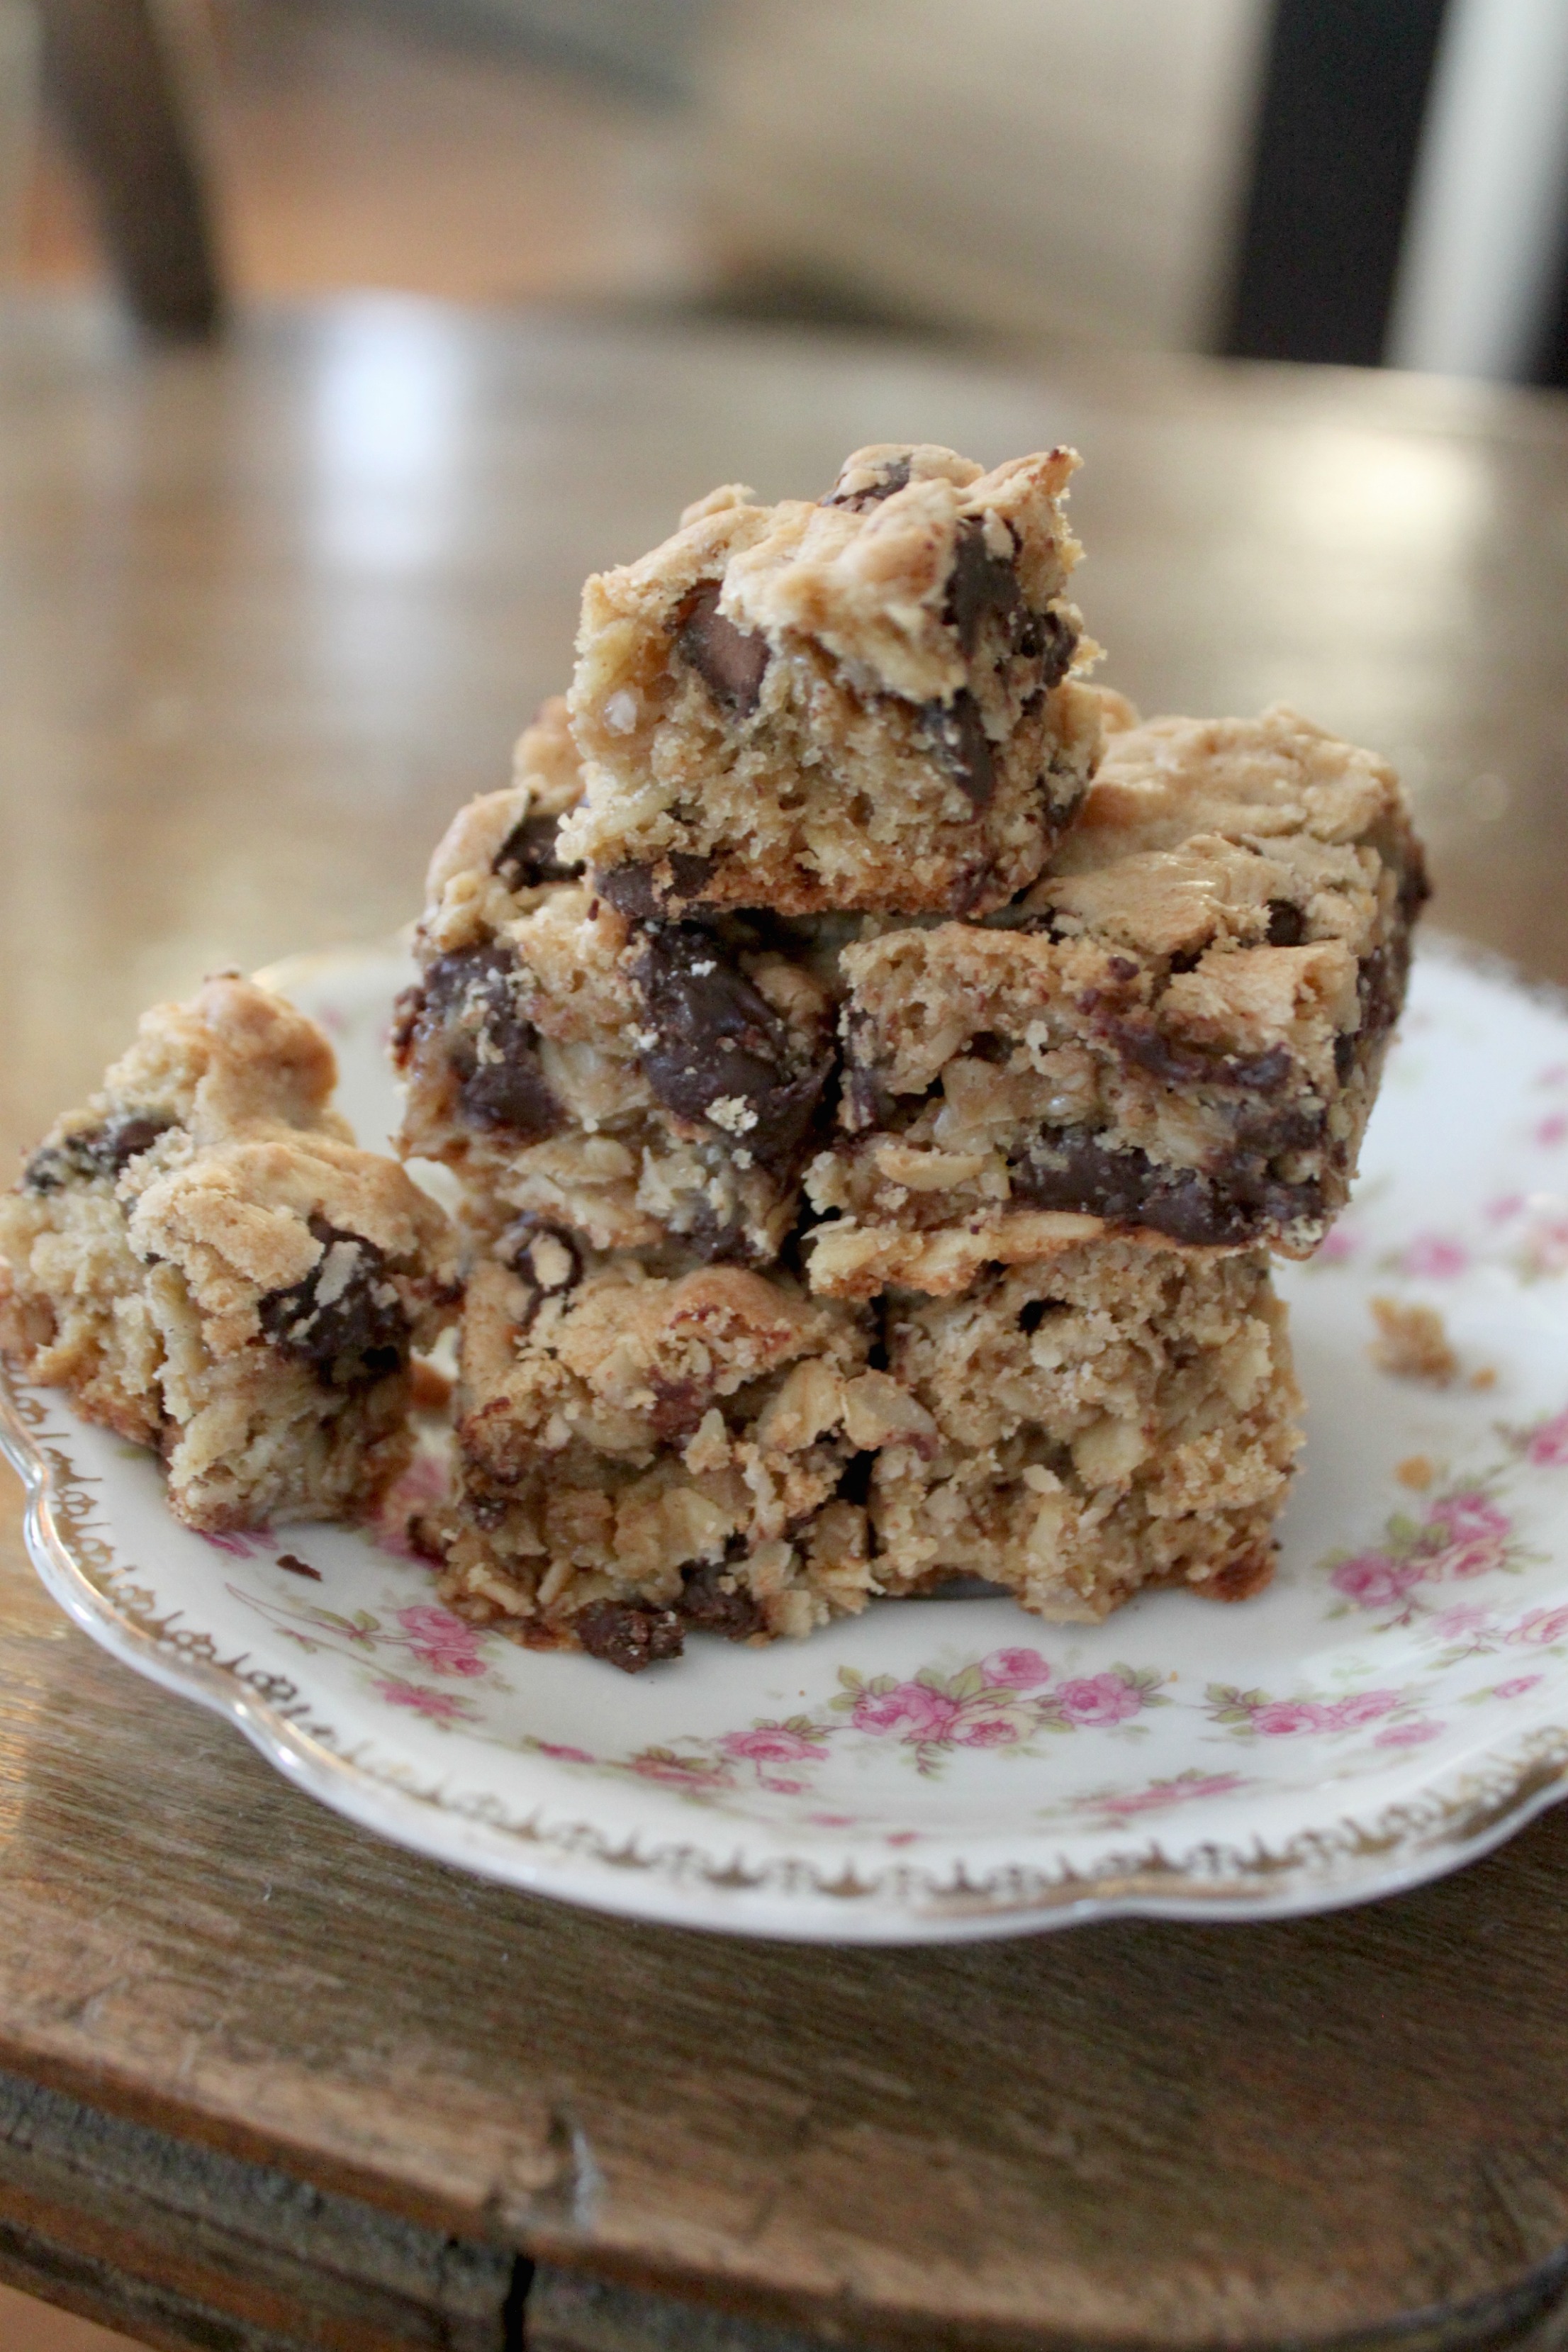 See, so simple, right?
Today was a suddenly wintry day (a no school, snow day included!), and we went from wearing t-shirts and no coats outside on Friday, to coats, hats, scarves, and mitts today! Oh Canada!!! :) We enjoyed it though with equal parts laziness (watching "Shrek The Musical" on Netflix), and playing outside. I hope you had a lovely day, whatever you were up to! If you've stopped by, please feel free to leave a comment! I'd love to know you were here, and to see how your day went! xoxoxo 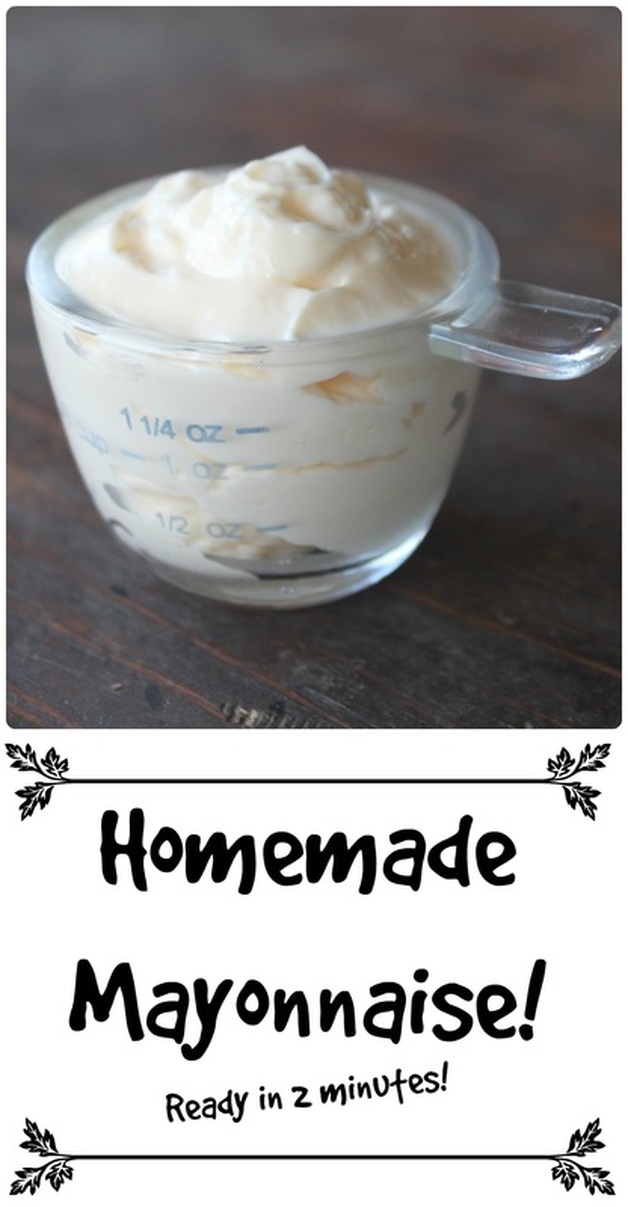 Can you tell I'm pretty excited about homemade mayo? Look at my title! Look at all those exclamation marks!!! Let me tell you though, my tale of mayo hasn't always been a happy one..... (.....insert depressing dream sequence music.....) Picture this with me, it's 2004.......(all of these ellipses are to help you stay in a dream sequence with me) :) .....I borrowed a cookbook from the library that had a homemade mayonnaise recipe in it. When I first saw you could even make your own mayonnaise, I thought, "sounds fun! I'll give it a try!". I think I was interested because I was eating sugar-free/low carb at the time, and regular mayo has sugar added, and "low carb" mayo was expensive. But, oh, I was so young and foolish. And not to mention wildly inexperienced as a food handler (for real, the newly married me from 12 1/2 years ago would have rolled around on the floor laughing if someone told her she'd be writing a blog that was food and recipe centred!)! Anyway, I digress, back to the story......). There I stood in my kitchen, doing as I was told from the cookbook I'd found the mayo recipe in. All I needed to do was to put an egg yolk, vinegar & some salt in a bowl, and slowly drip in oil while I whisked! And voila! I would have mayonnaise, made by me! And wouldn't I just be bursting proud! Well, about 15 minutes later, after I'd whisked until my arm felt like jello, and dripped each drop of oil in slowly (seriously, it said one DROP at a time!), all I had to show was a bowl of pretty gross looking, separated, curdle-y looking nastiness! And I had no internet at home, so I couldn't just quickly look up "how to fix ruined homemade mayonnaise!". Dream sequence date transition music..... It's now 2006, and I have a new recipe for mayonnaise that says if I use a hand mixer, the mayo will work out because it will be a steady beating, which is important for the emulsification process. You still need to put the oil in one drop at a time, but I thought, "well, at least the other hand won't be whisking, so it shouldn't be as hard?" I was wrong. Holding a hand mixer for 10 strait minutes IS hard, and my hand mixer was very overheated, and the mayo still didn't work out!!! Dream sequence date transition music..... Now it's 2011 (ish?), and I see a recipe for homemade mayo that says using a blender will do the trick! Apparently, hand whisking, and using a hand mixer doesn't whip fast enough. And for the egg and oil to properly emulsify. It has to happen slowly, but fully at each drop of oil, and that can only happen if it's being whipped fast enough! (hand slapped to forehead!). Well, I tried it. Long story short: it failed. I was a homemade mayo failure. I saw some time after, that using a food processor worked great, but after all the failures I'd had, I wasn't willing to try. Plus, I didn't own a food processor with the opening in the top to add food as it's whirling, and that was an important part of making mayo in said food processor. I wasn't about to go out and buy a new food processor either, just to attempt making mayo again! Dream sequence date transition music..... Here we are, it's 2015, and I'm standing in a second hand store in Tweed, looking at a immersion blender thinking, "well, I have been thinking about getting one of these because making homemade "cream-of" soups would be easier if I could just use this instead of having to dump the soup out into the blender....?". It was $5. So, I got it. And I was right, making "cream-of" soups is ridiculously easy with an immersion blender! And, not too long after getting the immersion blender, our regular blender broke, so I thought, "well, I sure am glad I bought the hand-held blender!". Then one day....one magical day....I was on a blog, The healthy Foodie, looking at a recipe, and somehow (by way of some rabbit trail I often find myself on when I'm on a blog I like!), I stumbled on "Foolproof Homemade Paleo Mayo", and there was a picture of mayo in a jar, and an immersion blender. I thought, "whaaaaaaa? Foolproof? She's never met a fool like me! I gotta try it". Dream sequence music changes to something triumphant and uplighting.... It worked!!! People, I am here as a bonafide homemade mayo failure to tell you that this is the FOR REAL foolproof method of making mayo. I've made it with cold ingredients, room temperature ingredients, fresh eggs, old eggs, using lemon juice, white vinegar, apple cider vinegar, pickle juice (which was amazing!!!-I used it to make tartar sauce for fish night!) adding dijon, adding yellow mustard, adding pepper, adding garlic powder, cayenne, rosemary, thyme-I've tried it so many ways, and this mayo hasn't failed me yet! I wanted to make a video of making it though, because while talking to my Mom on the phone one day about how crazy easy it was to make this mayo, I could sense some skepticism. That and she wasn't sure what size jar to use, and I told her "well, I'll video tape me making it, and post it to YouTube for you!" So, here it is, in all it's glory! I am so happy I'm making my own mayo that isn't a complete failure! Now, I eat paleo, and I believe in using healthy oil to make my mayonnaise. What is "healthy oil", well....quite frankly, I don't want to get into that right now.....I'm too happy about homemade mayo to argue about "healthy oil"! Now, I can tell you though that different oils produced different tastes. I use Extra Light Tasting Olive Oil because it has (duh) a light taste. I once used regular olive oil, and the mayo, although thick and lovely, was very olive oil-y tasting, and also kind of green in colour. Bleh. So, just keep that in mind when choosing an oil. Homemade Mayonnaise ****Super important note!!!*** You'll need a 16oz,(also called a Pint, or 500ml) wide mouth mason jar for this. Or, some immersion blenders come with a tall, wide mouth, cylinder shaped container that you can also use. The immersion blender needs to fit right in the container for this to work. Ingredients:
Something I add in regularly is dijon mustard, about 1 Tsp Method:
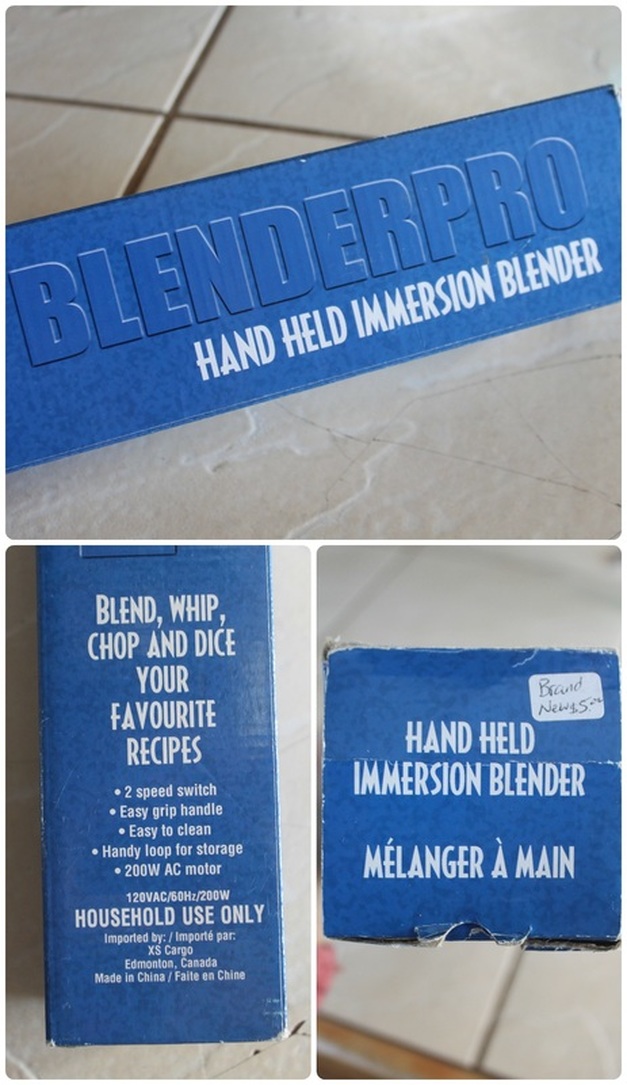 As you can see, my immersion blender is NOT fancy. Not even a little bit! But it works! So, incase you're thinking you need to go out and buy the best, most expensive immersion blender to make this work, you're thinking wrong! Heck, if you don't already own one, and you're in not a desperate hurry to make your own mayo, just keep checking into thrift shops to see if you can snag an immersion blender at a great price! I honestly think my mayonnaise tastes even better because the blender only cost me $5! : )
Ok, full disclosure, before I got this hand blender, I did manage to make ONE BATCH of homemade mayo using the whisking method. The recipe I used it in was for Shrimp Stuffed Tomatoes (which are so delicious!), but the effort to make the mayo was too much! I can be pretty lazy, ya know! Now, making those same shrimp stuffed tomatoes with this fast mayo? Game changer. Game. Changer. I had honestly gotten used to a no-mayo life. But , there were things I really wanted it for. Tartar sauce for fish nights, for example. Or to make a ranch dressing to eat with a pile of veggies as a bedtime snack. How about creamy coleslaw? Yes please. It is a welcome addition to my life! And, my kids eat it too, although I've never told them it wasn't store bought. I feel like they'd be skeptical if they knew I made it? They are my worst critics. Anyway, maybe they wouldn't be skeptical? Either way, I find immense pleasure in knowing that they'll eat it! : ) Well, that's it, I guess! I'm happy to be here writing a post and sharing something new that I'm excited about! I hope you had a great Monday! |
Hi, I'm Amy-Lyn! 
I am the lady behind this here blog! I live in the sticks with my animals, my super handsome husband, and my
3 amazing kids! Here you'll find things from recipes (gluten-free, paleo, and strait up junk food!), DIY ideas, thoughts on raising a son with autism, and whatever else pops into my brain! : ) Read more about me by clicking here! Want to Stay Connected?
Find What
|
 RSS Feed


