|
I will be the first to admit to being a bit of a Grinch about Christmas. There's no real reason, except that I hate being "told" that I need to hang mistle toe, cut down a fresh tree, decorate the house with things that have been stored away (hogging space) for the whole year, & be jolly! See? A Grinch. I want to clarify though that I had WONDERFUL Christmases as a child. Seriously, my Mom & Dad put on a great Christmas! Decorations, a big tree that we'd go out to hunt for and cut down, an advent wreath with candles we would light leading up to Christmas, wonderful stockings, lots of gifts, a Secret Santa exchange with the siblings (because there were a LOT of us and we couldn't buy for everyone!), and an amazing Dutch style Christmas breakfast. So, I don't dislike Christmas because of any childhood misery, I am just honestly a Grinch! But, one thing that I love about Christmas is iced sugar cookies! Seriously, you want me to get into the holiday spirit? Give me some iced sugar cookies. Yes, they DO need to be iced! C'mon-what's the point of a delicious, buttery sugar cookie that isn't covered in more sugar!?! Ok, so this post isn't as "tutorial-y" (oh my gosh! That for sure isn't a real word at all!) as I want it to be....but that's because doing this wonderful, beautiful, time-consuming art is equal parts calculation & guess work! I'll give you tips and tricks that I've learned, I'll share some mistakes I made, and how I improvised to fix some of the problems! And taking a ton of photos during the decorating process would have been extrememly difficult since I was busy decorating! Sorry! Also, the method seems crazy long, but really, just read through it, and you'll see it's very basic. The cookies are simple and strait forward, and the decorating is 2-step because you need to first pipe a border, and then you "flood" the cookies in the second step. That's the real "secret" to beautiful iced sugar cookies. FYI : ) Honestly, it's a little time consuming, but they can be as simple or as complicated as you (and your imagination!) want, so that adjusts the time it takes to decorate. Ok, here we go!!!  Cut-Out Sugar Cookies (these cookies need 1 hour of chilling before baking! Fair square warning) :) Ingredients: For the Cookies:
For the border icing:
For the flood icing:
***I use both zippered plastic bags, and proper piping bags, to decorate. As long as you have something that can give you a fine tip for the border icing you'll be good*** Method For The Cookies:
....after the dough has chilled....
Method For The Icing:
 I made a double batch here So, preparing the cookie dough is simple! When you're done you just need to divide the dough into 4 disks, wrap 'em up, and stick 'em back into the fridge to cool. This step keeps the cookies from spreading and loosing their shape when baking. I'll actually often make the dough a day or more in advance from when I'll get a chance to bake them. 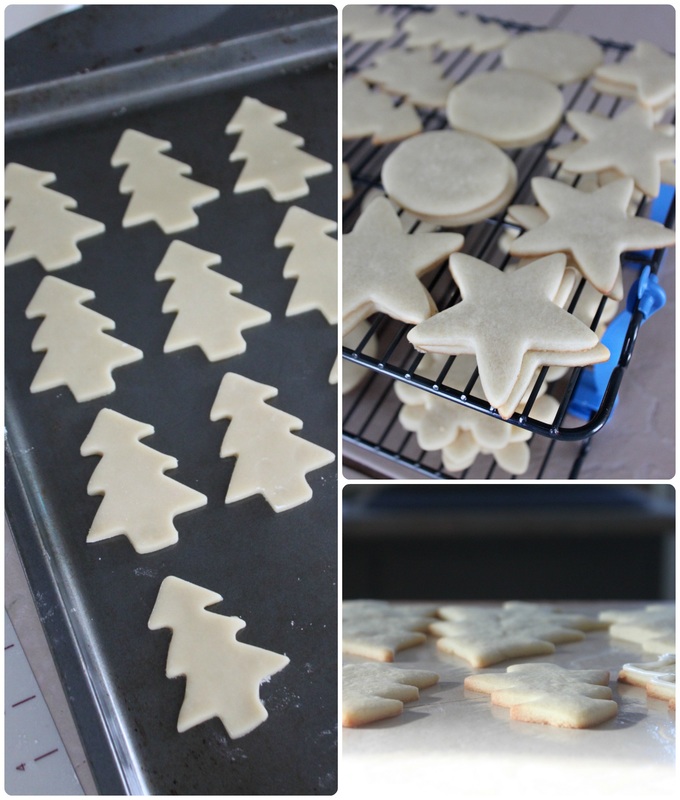 Bake and cool!!! 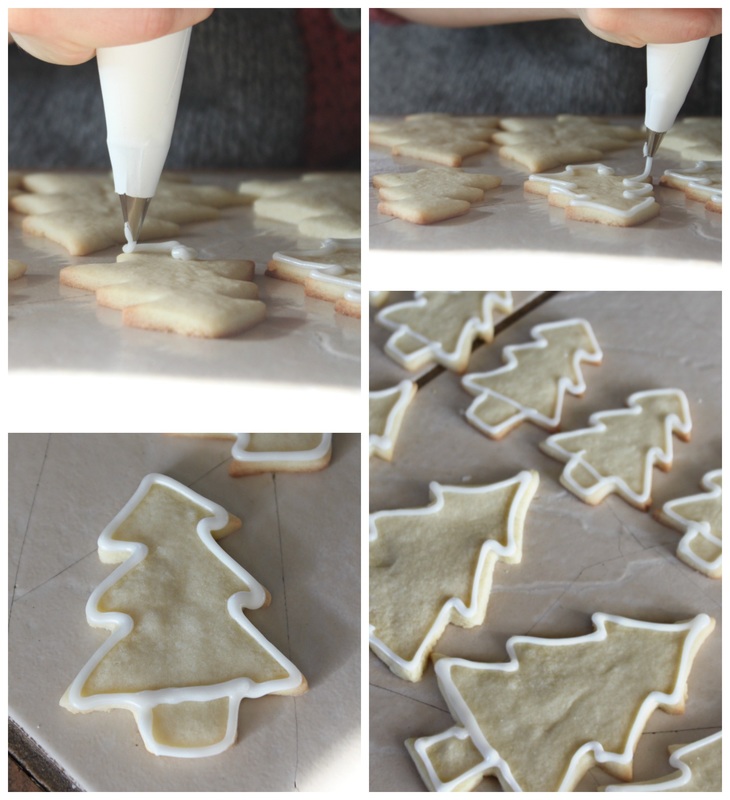 Now you'll need to create the borders on your cookies so that your inner icing stays where you want it and doesn't go dripping off your cookies! You can see that my piping skills are poor! Oh well, the cookies still look pretty good when all is said and done!  Ok, so here's a little tip! If you plan on making pretty snowflakes, save the pretty snowflake for after you've flooded the cookie! When I went to flood the blue snowflakes, the border and the snowflake design were so close to each other that I had to use a toothpick to gently and carefully flood around the design. And that was a huge time hog! So, for the smaller snowflakes I didn't even bother flooding them! Once I realized my blunder with the bigger snowflakes, I quickly grabbed some sprinkles and made my smaller snowflakes into sparkly pink snowflakes before the border icing dried fully! You can see those cookies above. To pipe a design over the flooded icing, you'll want to keep the flooding to a minimum so that you're not waiting around for it to dry before piping your design. Just flood a thinner layer than you might normally have used, allow it to dry to the touch, and use the border icing to pipe your design. For the wreath cookies, flood the cookie with white, then immediately add dots of green around the edge of the cookie. Use a toothpick to gently drag the green icing from one dot to the next. Then I piped red "berries" on after the green had set slightly. For the (super helpful!!!) photo tutorial I used to make my wreath cookies, look here at The Monday Box! 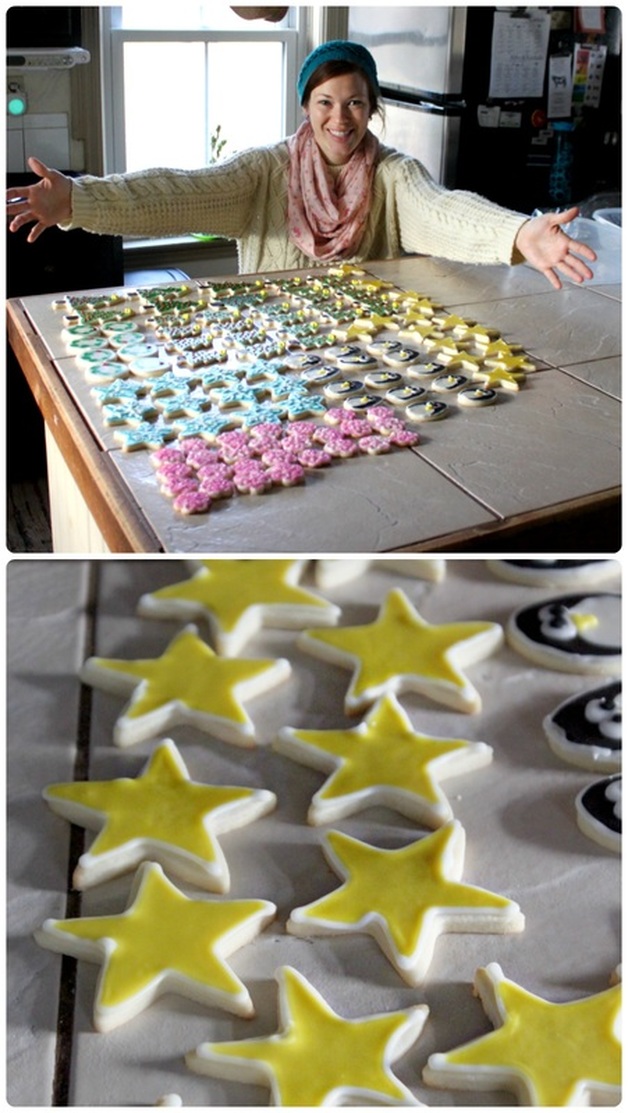 It doesn't look like a lot in front of me, but that's about 7 dozen cookies! The little penguins were time consuming! Geepers! I liked how they turned out, but I was also like, "Yeah, not doing that again!" Although I probably will because I'm a sucker for punishment when it comes to creat beautiful Christmas cookies!!!
Something that would make it not so awful would be to have little candy eyeballs, which I've seen at Michael's & WalMart, but never purchased of course because I'd rather take forever and ever piping my own eye balls onto cookies (sarcasm, people). I also could have made them more simple, like the ones pictured here, but, ya know. Too little too late. Also, the ones in the link bother me slightly because the eyes are technically on the pengiuns belly (look at the link to see)....but, they are cute, and more simple, and most people aren't painfully critical like I am and wouldn't mind or even notice that the eyes and beak are on the pengiuns belly! Anywho! I hope everyone has a good weekend, and got through this week in one piece! Let me know if you make these cookies, or if you have a special Christmas cookie you like to make for the holidays! Sharing is caring! xoxo
4 Comments
Let me cut to the chase and tell you that the guy with no shirt on is my new favourite YouTuber, Mike Donavanik! I share about him on my Health & Fitness page! Go check it out! Pleeeeeeeease!!! : ) As for Motivational Monday here, I'm just going to share a funny meme with you because I LOVE funny memes!!!  It's good, right!? Haha, seriously makes me laugh out loud every time! Also, I share the picture below on my Health & Fitness post, but I wanted to share it here too because I think it's great! It's a collection of fabulous photos from a photo booth at my husband's work Christmas party this past weekend!  Yup, we're unashamedly geeky! : )
I hope you had a good Monday, and have a great week! Have you ever set out on a task and thought, "I sure hope I can see this through...", only to realize that at some point, you've done it? And not only have you done it, you find that there were many moments that were beautiful? You've climbed the mountain, you've changed your health, you've worked at a summer camp as the cook (true story!), you worked your butt off and saved an important relationship, you did a total room make-over, saved for a down payment on a house? Whatever it was, didn't it take you by surprise? Yes, you set out to do it, but still, to turn around and find that the view from this new place in your life is beautiful and unexpected? Doesn't the view take your breath away? I was watching videos of my son Caleb, who has autism. The videos were from when we had our middle child, Abigail. Caleb was 4 years old at the time. That was 8 years ago. Watching videos of Caleb when he was young, and seeing how sweet & happy he was left me feeling overwhelmed. Those were hard times, and felt like dark days filled with uncertainty, but now, with my view from here, I see his ability, his character, his goofiness has always been there! Over the years, he's developed skills that have made him into an amazing pre-teen. My view now shows me & reminds me that even if today seems dark & endless and if hopelessness wants to take over, it will be ok!  Doubts about the future and how uncertain it all is feels like a boulder strapped to my back. But I turn and look, and I see it all. My pregnancy with him, his birth, his first birthday, the red flags of autism and the drowning feeling it brought on. The suggested day care, speech therapy, occupational therapy, Sunday School, years of potty training, bowel and food issues, starting a gluten free diet, refusing to put on footwear, running away, being brought home by the police, jumping in the lake and being saved numerous times. Starting school, riding the bus, bringing his baby sisters home......it goes on and on, playing like a film in my mind. You know when you're watching a movie, and everything seems hopeless, but you're sure it will work out. You're not at all sure how, but you are sure it will. I didn't feel like that back when Caleb was young, but now, from here, I do feel that. I feel it so deep down in my heart and soul. I still feel worried about him as an adult, him getting a job, or living on his own, but I also know it will be ok. I know this because I can see for miles behind me, and I can see that all along he's been getting stronger, smarter, more brave, more clever, more vocal, more friendly. He's learning, pushing, working hard, and becoming an amazing young man.  Last Wednesday I went to watch him play in his first volleyball tournament. And, I needed to keep myself from crying! His classmates are so kind and helpful, and Caleb, as goofy as he is, can serve that ball like it ain't nobodies business! He just subs in to serve, but that's more than enough for now! He's great at serving! He's included, and he's spending time with the boys in his class in a setting outside of the classroom, recess, and field trips! I watched him with so much pride in my heart, knowing what the journey has been for him. When he was 18 months old and I was leaving him at a day care that told me he's mostly trouble, doesn't fit in, and struggles with every task, I never ever, in a million years would have dreamt of the day that I'd watch his team fight and win the A Championship, with him helping to achieve that! The view from here...it's spectacular! I know from here, while looking back, that I also still have a long way ahead of me with Caleb. But stopping to look back brings clarity, brings hope, and brings so much joy to my heart that it gives me energy for the future! My heart today is for the parent of a child with autism who is reading this, and they are in the middle of their storm.
Please know that you aren't alone in this journey. And also know that with love, and consistency, using your gut instinct, and raising your child like they are precious, will yield temendous results - perhaps not outwardly as you may hope, but in your heart, and in the heart of your child, no matter how severe the autism. The view you have now is not the view you will have forever, take heart in that. This autism journey is tiring, it's emotional, it's so up and down! But it's also beautiful. Because one day you'll see something so amazing in your child that your heart will be filled to the top! But you need to be looking. You need to be seeing the big picture, forward and backward. Last year really sucked for Caleb. But this year? This year has been so absolutely amazing! But I only know that because I am taking stock. I am checking out the view! You can do this. You're not stuck here forever. Autism is forever changing, moving and growing. Trust me. Just trust me. The view will be (and is) amazing. xoxoxo |
Hi, I'm Amy-Lyn! 
I am the lady behind this here blog! I live in the sticks with my animals, my super handsome husband, and my
3 amazing kids! Here you'll find things from recipes (gluten-free, paleo, and strait up junk food!), DIY ideas, thoughts on raising a son with autism, and whatever else pops into my brain! : ) Read more about me by clicking here! Want to Stay Connected?
Find What
|
 RSS Feed


