Bushel & A Peck
  • Blog
  • Health & Fitness
  • Artist Biography
  • Paintings
  • Photography
  • Drawings, etc.
  • About Me
  • Contact Me


Paleo Brownies

8/26/2015

0 Comments

 
   Hey, so I guess I missed Monday and Tuesday this week??? Seriously, I thought today was Tuesday, I thought Tuesday was Wednesday, I think my brain is all scrambled up from summer! My (strange) kids are counting down the days for school to start. Seriously, who's kids are these? I wasn't ever happy to start school except for when I was home-schooled! I am a natural-born loner, and I'm happy to admit it! "14 days, 14 days" my girls were cheering this morning! I kept my mouth shut and let them be excited; who am I to project my fear/hatred of school onto my hilariously excited children? 
   Anyway, them reminding me of the impending school year got my mind working on things to pre-bake and put into the freezer to pack into lunches. These brownies are on the list. My kids are not paleo eaters, well, not completely. Caleb is gluten-free, and I'd say 70% of the girls food is gluten-free (by default because of Caleb being gluten-free and me being paleo), but I've been thinking about trying a little harder to clean up the kids' food a bit more this coming school year. Oh, I will still be feeding them McDonalds once in a while, and treats will always be in the house, but I want to try to get all our percentages closer together as far as what we eat. We'll see how it goes...it might be a complete failure, but I will at least try! So, these brownies are on the list (uh, I already said that...), and I've got some almond butter banana muffins to make, granola bars, and some sort of healthy/paleo cookies. Probably my double chocolate avocado cookies. 
   Moving on, here's the brownies! 
Picture


Ingredients:

  • 1/2 cup coconut oil (or ghee), room temperature (not melty and runny though. If you're oil or ghee is like that, put it into the fridge for 5-10 minutes to get it a little more solid) 
  • 3/4 Cup coconut sugar
  • 1 Egg
  • 1 Tsp vanilla
  • 1/2 Tsp baking soda
  • 1/2 Tsp arrowroot or tapioca starch
  • 1/2 Tsp salt
  • 1 Cup cocoa powder (use the best you can find, it will give you a more rich chocolate experience! If you prefer less chocolatey, use any cocoa)
  • 1/2 Cup walnuts (optional)


Method:

  1. Preheat oven to 325 degrees F.  Line an 8x8 baking pan with parchment, leaving some overhang as "handles" if you want to pull them out. You can also just grease the pan slightly, and you can just cut them in the pan and lift them out that way. I prefer to lift the whole lot out of the pan and onto a cutting board though, but that's just me!  :) 
  2. Cream together the oil and sugar. Add the egg and vanilla and mix until combined. 
  3. In a small bowl mix together the baking soda, the starch you chose, salt, and cocoa and add to the wet ingredients, mixing until combined (it can take a few minutes to work it all together). 
  4. Stir in the nuts if you're using 'em.
  5. Now just dump the whole mess into the prepared baking pan.
  6. Bake in pre-heated oven for 11-13 minutes. Test the centre by pricking with a fork or toothpick and see if it comes out with just a few crumbs, that means they're ready. 
  7. Remove from the oven and cool if you want....or just get a fork and start eating them warm out of the pan...whatever floats your boat! 
Picture
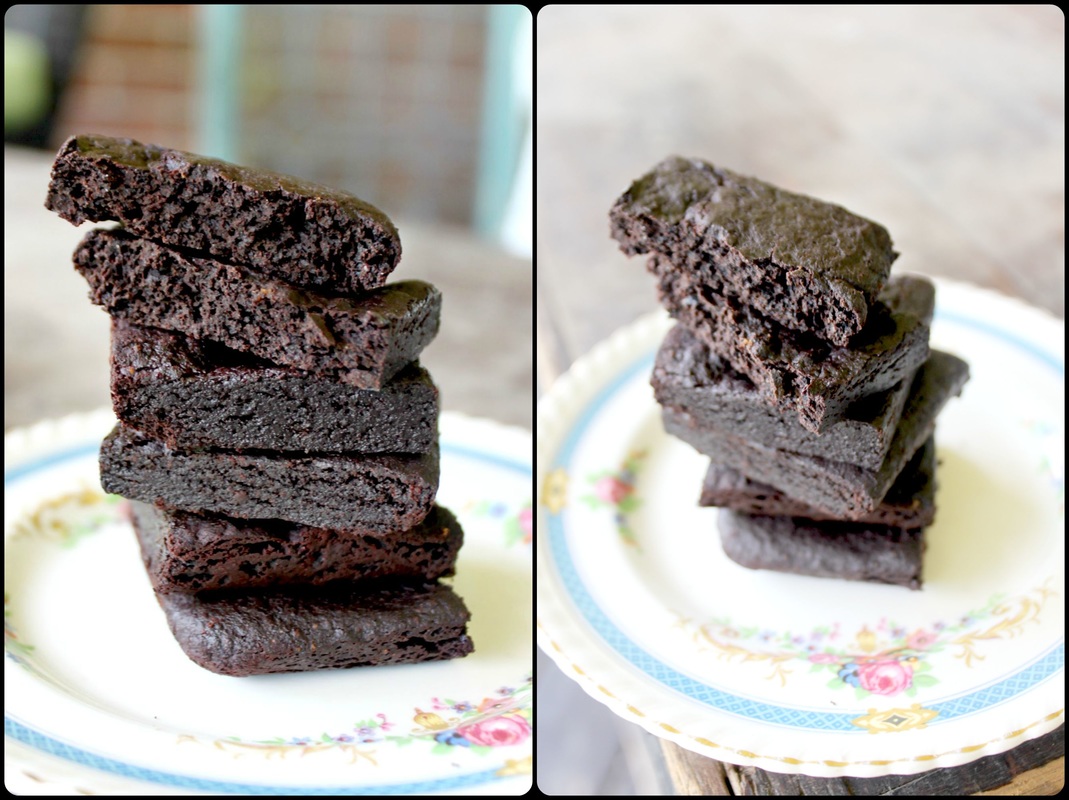
   The first time I made these it was an experiment (as expected!), but I was hilariously surprised by how they turned out! We were having friends over, and I had a small strawberry cake for the kids and the non-paleo adults, and I made this for myself, really (I was willing to share if it tasted good)! I cut them, and took a bite, and said out loud, "wow! These turned out really well!". My husband laughed and said, "I thought you weren't suppose to make dessert for guests that you hadn't tried before?". Yes, that is, or was, a rule at some point, but I rarely make dessert except for guests because I don't want to find myself eating all of what I've made by myself! I often make desserts for the first time for guests, sometimes it's a success, and sometimes it's a complete failure! 
   Anywho, that first time I made them I (super-duper) enjoyed it topped with coconut whipped cream and berries. Yummm-o. I've since made and enjoyed them plain, with almond butter sandwiched between two, and also with sliced banana on top. These brownies are dense, moist, and so very good! 
   
Happy Wednesday everyone!! 
0 Comments

Gluten-Free Chocolate Cake

8/21/2015

4 Comments

 
   Hello, hello, hello! It's Friday! Ok, well, in the summertime, Friday means little, unfortunately. Especially when my husband is on a weekend of night shifts. :(   Still, for the sake of those who feel elation by their Fridays, then happy Friday to you! 
   Today I am going to share with you the recipe for the chocolate cake I used for Caleb's birthday, as well as show you how I made his cake.
   When making gluten-free recipes, usually using a regular recipe and adapting it doesn't always work out. In fact, it's often a complete flop! But here's the thing: If you have a great gluten free flour blend, then add a little extra "glue" (like xanthan gum, guar gum-if your blend doesn't already have it), you can tweak at it, and make it into something delicious! 
   That is the case with this cake. The original recipe is from the back of a Hershey's Cocoa Can. It's really an old recipe, but it seemed tried and true. 
   With a few personal tweaks like using sour milk instead of regular, and coffee instead of water, then of course, using gluten-free flour, this cake turned out moist, super tasty, and  
was really easy to make!
Picture
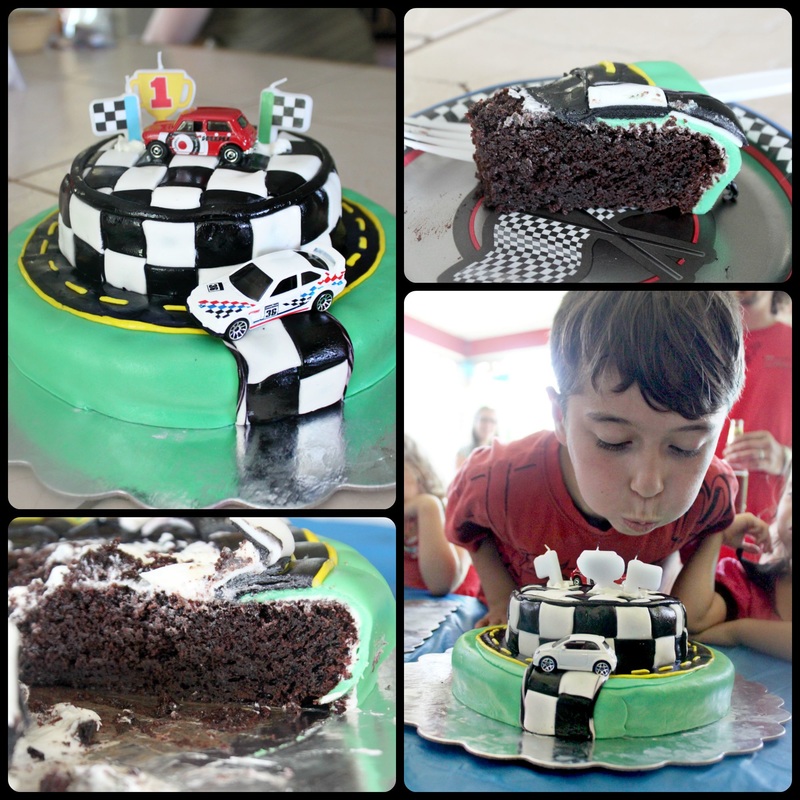
Gluten-Free Chocolate Cake
*As with many baking recipes, this turns out better if the milk & eggs have come to room temperature *

I'm sorry I don't (can't) offer a "PRINT" button, but you can click on and download the document if you'd like!  :) 
gluten-free_chocolate_cake.docx
File Size: 92 kb
File Type: docx
Download File


Ingredients:
  • 1  1/2 Cups white sugar
  • 1/2 Cup brown sugar
  • 1  3/4 Cups gluten-free flour blend
  • 1 Tsp xanthan or guar gum (omit of your blend has it)
  • 3/4 Cup cocoa powder 
  • 1 Tsp baking powder
  • 1 Tsp baking soda
  • 1 Tsp sea salt
  • 3 Eggs
  • 1 cup sour milk (place 2 tbsp of lemon juice into your measuring cup, then fill with milk to 1 cup. Let sit until curdled, about 5 minutes)
  • 1/2 cup oil (light tasting olive oil, avocado oil, or melted butter or coconut oil)
  • 2 teaspoons pure vanilla extract
  • 1 cup hot (decaffeinated) coffee


Method:
  1. Preheat the oven to 350 degrees
  2. Grease two 8-inch cake pans with cooking spray, and dust with cocoa powder. Set aside (for this cake I used a 6 inch pan, and a 9 inch pan)
  3. Combine the sugars, flour, xanthan or guar (if using), cocoa, baking powder, baking soda, and salt in a large mixing bowl. Whisk to combine
  4. In another bowl, whisk the eggs, sour milk, oil and vanilla, then add this to the dry ingredients, blending well
  5. Now carefully whisk in the hot coffee (this will make the batter runny, that's ok!)
  6. Evenly distribute the cake batter between the two prepared pans and bake for 30-35 minutes, or until a toothpick inserted in the middle of the cake comes out clean
  7. Let the cakes cool in the pans for 5 or more minutes, then turn out onto a rack to finish cooling completely. The best way to turn out a cake for cooling is to place the cooling rack on top of the cake pan, then gently flip the pan and cooling rack over so that the rack is now on the bottom, and the cake pan on top, upside down. Gently tap the cake pan to loosen the cake if it hasn't already come out 


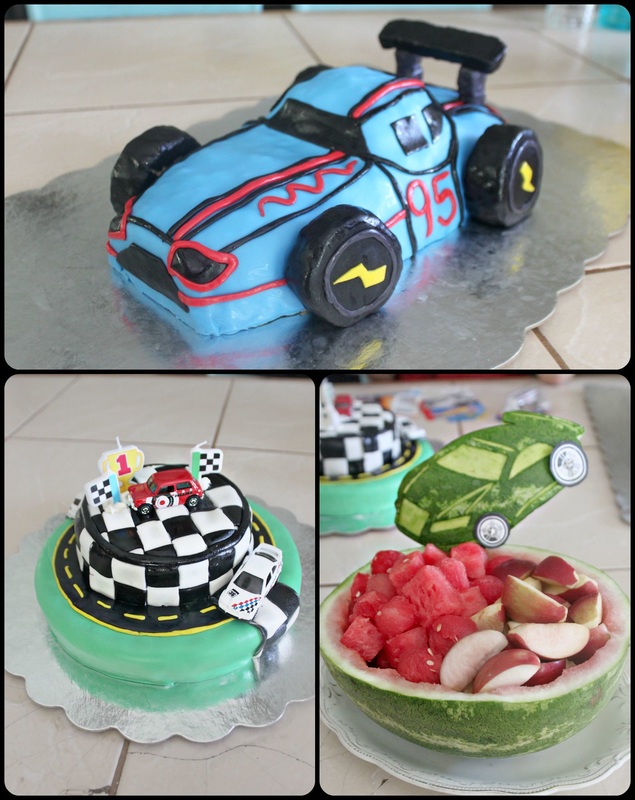
Making a Checkered Cake
Picture
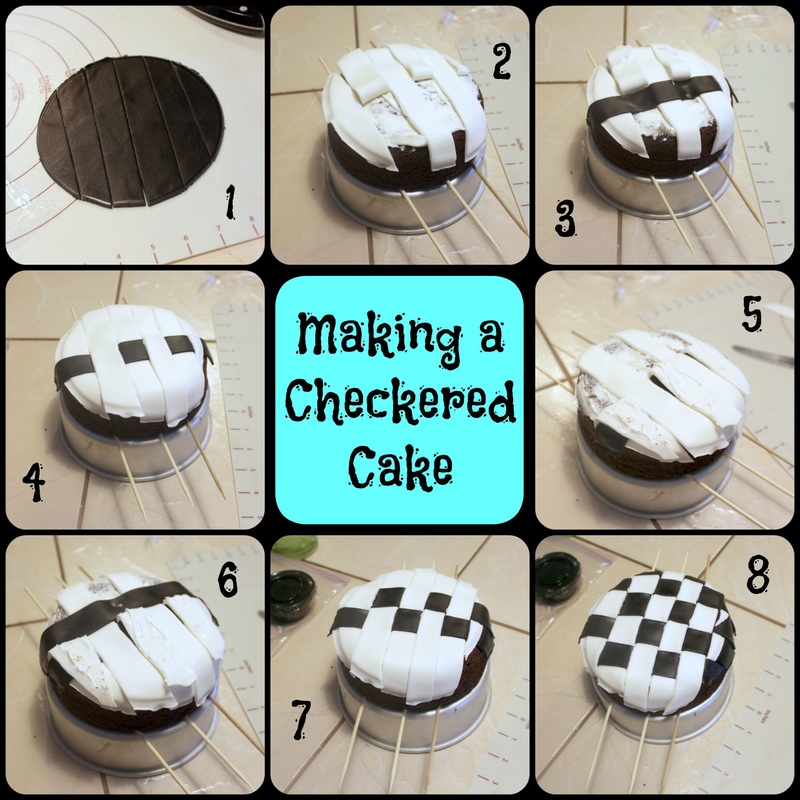
   So, in looking for ways to make a checkered cake, the only suggestions on the www were to cover the cake in white, then cut out black squares and stick 'em on. Seriously. Who wants to do that, and who could make their squares perfect, and stick them on perfect? Not me, that's for sure! 
   I decided instead to make the checkers like I would a lattice top for a pie. It worked out really well, and was not too difficult. I started by putting skewers onto the cake pan, and setting the cake onto it. I used the skewers as a "just in case" for lifting the cake off later. I didn't really need them, as it turned out, but I wanted to explain why they were there in the photos. :) 
   I used a vegetable shortening fondant (instead of marshmallow fondant) this time because marshmallow fondant can dry out faster and I knew I'd be fussing with the fondant for a while and needed it to stay soft and workable. Also (if you follow the recipe in that link), make some of the fondant with 1/4 cocoa and 3/4 icing sugar as a base for making black fondant). As a general rule, keep your shortening handy and keep rubbing it onto your hands as you work to help keep the fondant from drying out. Start by applying a layer of buttercream to the top of the cake as "glue" for the fondant. 

  1. In the first photo, you see the black fondant rolled out and cut to fit the top of the cake. I used the cake pan to measure the size I needed. I then cut it into (approximately) 1 1/2 inch strips. I did the same with white fondant 
  2. I started with the white fondant, and placed it onto the cake. Then, taking alternate strips, I folded them over at the centre
  3. Now, take a black strip of fondant and lay it over the white fondant, just tucked up close to the strips you folded back
  4. Lay the folded white strips over the black strip you just placed down
  5. Now, take the opposite white strips from what you just had flipped, and carefully pull them over the black strip you laid down
  6. Take another black strip of fondant, and lay it down, tuck up close to the folded back white strip
  7. Fold the white strips down over the black
  8. Continue this every other white strip and laying down a black strip until you have the top finished. You can carefully trim around the edges a bit once you've got the top done


   This is not a difficult method, but you do need to be a little focused to make sure you're paying attention and actually pulling back every-other strip, and alternating strips properly.
Picture
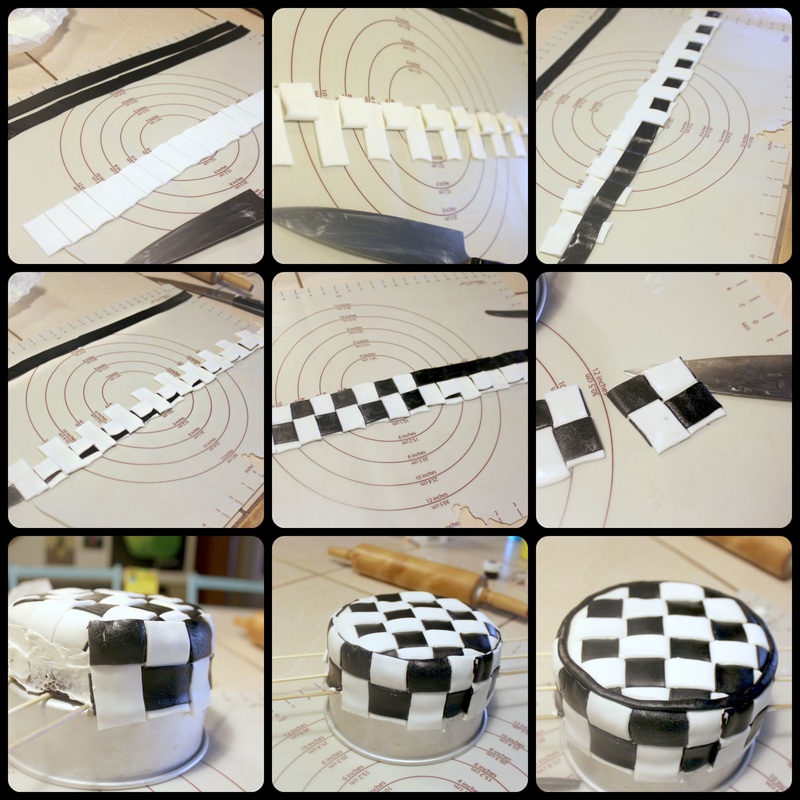
   Making the side checker uses the same process of folding every other piece back (photo 2), laying down the black, then folding the pieces back up (photo 3), and repeating with the opposite pieces (photo 4 and 5).
   Once you've got that finished, apply some buttercream to the sides of the cake for "glue". Cut the long checkered piece you've made into sections of about 4 (moving the whole, long strip of checkered fondant was too fussy), and attach to the side of the cake, pressing each section into the buttercream to make sure it's well attached (photos 6 and 7).
   The final photo shows a little trim I added (by rolling out some black fondant)
   Wrap this top portion of the cake in plastic wrap as you work on the bottom of the cake, you don't want it drying out!
Picture
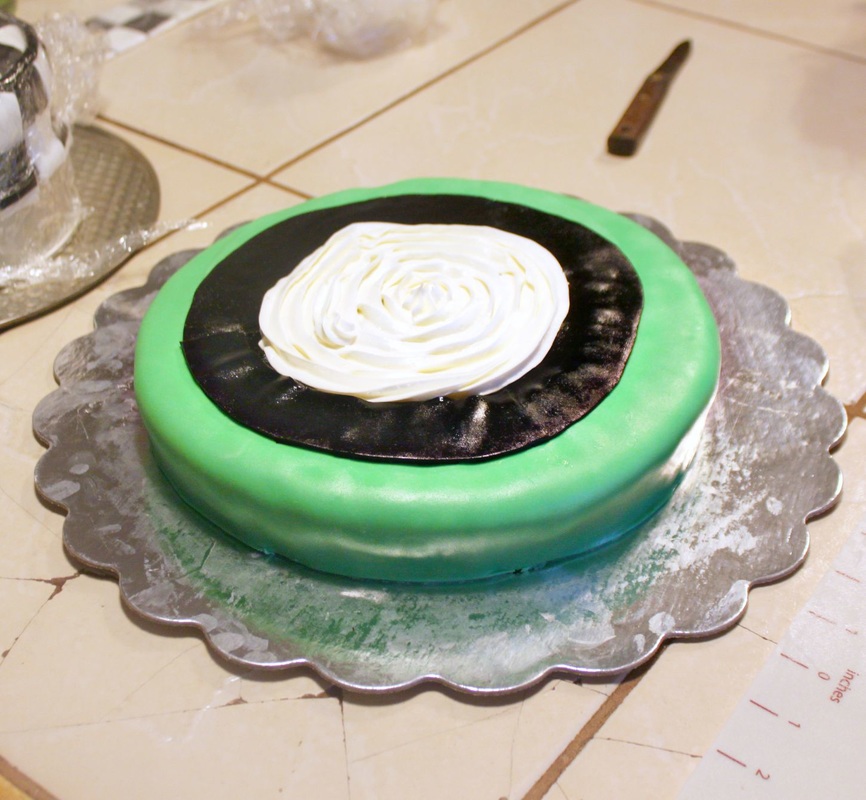
   The bottom of the cake was just covered in buttercream for "glue", and then green "grass" fondant, and a little black fondant "track". Then I added a little more buttercream to the spot where the top layer would be sitting.
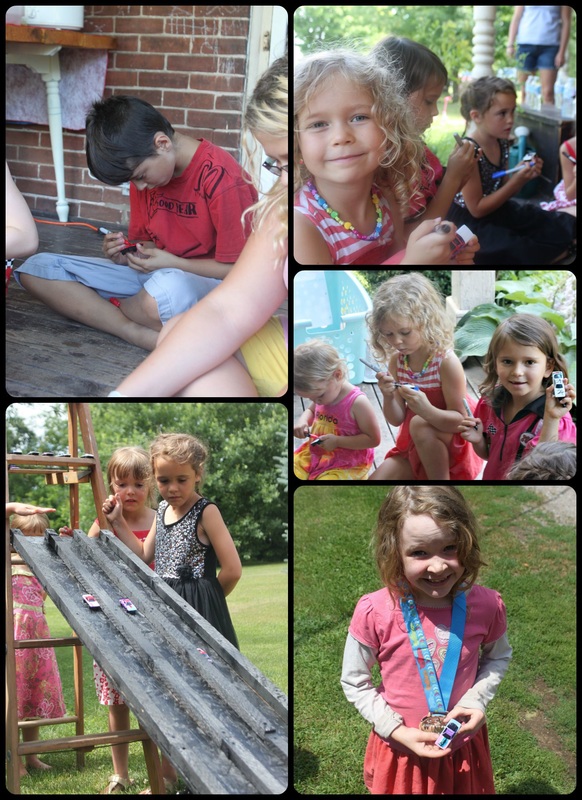
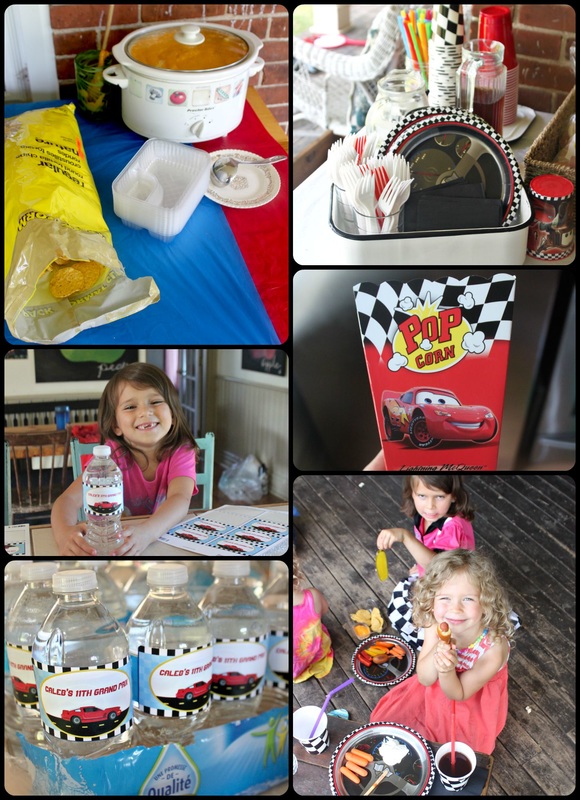
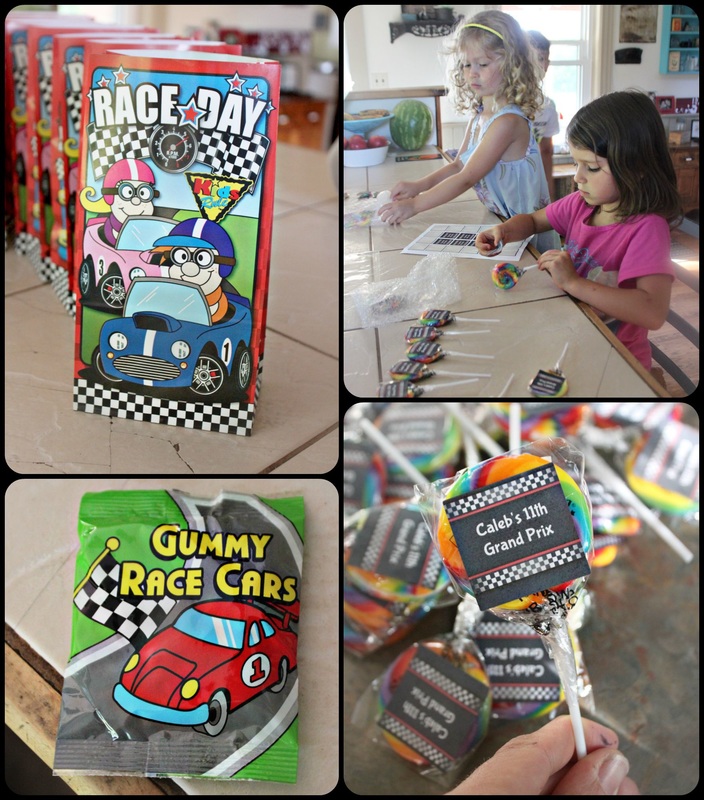
   Now to put the 2 cakes together I left the plastic wrap on top of the top-layer cake, I then put my hand onto the top of the cake, and carefully flipped it over (onto my hand), and set it down onto the base. Oh, uh, remove the skewers (if you were using them) before you place the top of the cake onto the bottom.  
   After this I added some details like using the leftover checker I had from the sides and added them, and also adding a little yellow dotted line on the "road", and I also added some more trim with rolled out fondant. Then I added Caleb's favourite (and throughly cleaned) cars and candles to it. Oh, and don't forget to wipe off your serving plate/tray/whatever. See the photo above and all those greasy little smudges I made?  

   I'll share next week how I made the other car for Caleb's party! 

   Sometimes it's so difficult to come up with an "ending" for a post! How about "the end"? Perfect!

The End   :)  Oh, and have a great weekend! 


4 Comments

Race Day Birthday Party

8/18/2015

0 Comments

 
   Weeks and weeks ago we had Caleb's 11th birthday party! I wasn't able to post about it sooner because of being busy having family over, and planning for our trip, but I still want to share about it. He wanted a Lightening McQueen (From Disney's Cars movies) theme, but he happily agreed to just "race cars", with a touch of "Cars" (the movie) here and there..  
Picture
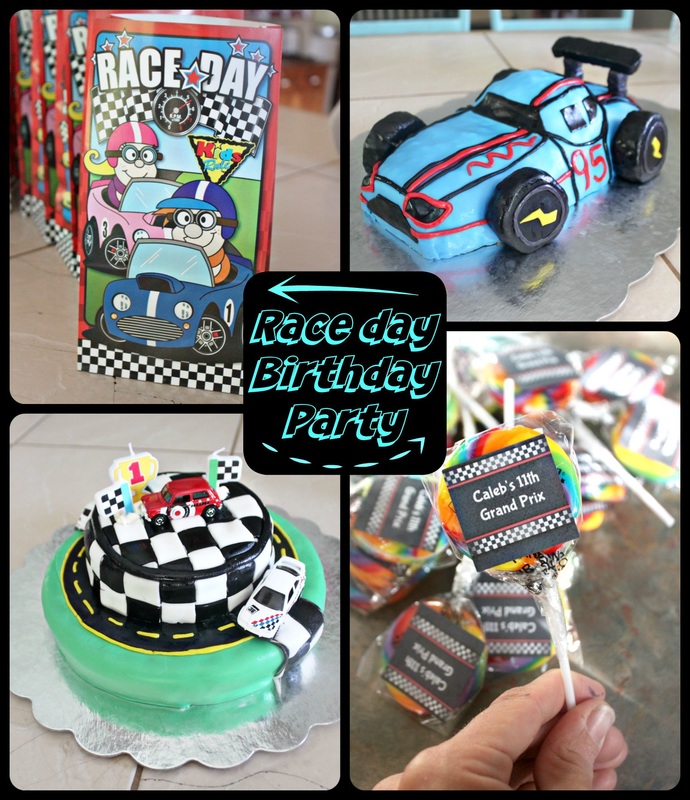
  It was a lot of work in some ways, and fairly simple in other ways. For instance, making the cakes (which I'll share about later this week) took hours to put together, but really, that can be expected. Having activities for the kids to do stressed me out a little more than usual this year though. In years past we've rented a big bouncy castle/waterslide thingy. But Caleb passed the age and weight restrictions on it this year, so we didn't get one. That was the activity we usually "planned" on for his parties! So, after some Googling and Pinterest hunting, we came up with a simple plan for a car race using cars the kids would decorate themselves
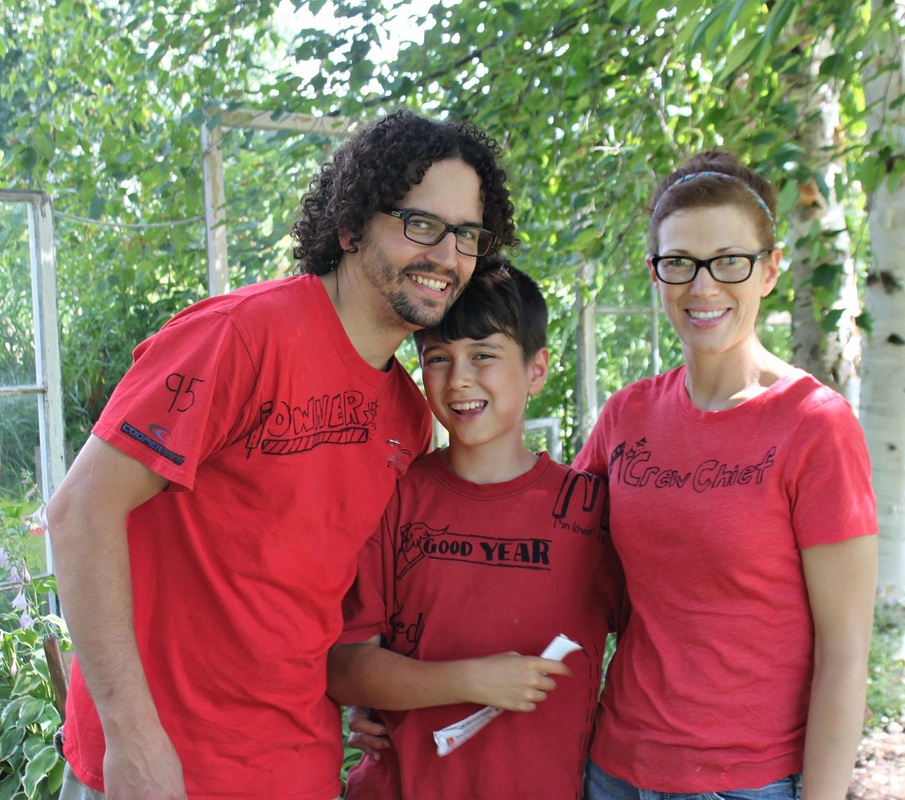

The Race Track

Picture
   So, I had seen a few different ideas on Pinterest about making a race track, and I had settled on an idea where you cut a pool noodle in half lengthwise and use that, but I could not find any pool noodles that had a big enough hole through the centre to make that work! Plan B was to root though my barn loft, get some wood that might work, and make my own race track! That plan worked out, and it was really very simple to do. 
   I used a (roughly) 8ft x 2 ft piece of chip board, and some 1x1inch strips to make the track. I used 1 1/2inch screws to attach the strips to the chip board, then I simply used a saw to trim the edges. After that I spray painted the track black, that took about 2 coats.  
    To set up the track, I simply stood it in an a-frame ladder, and that was it!


The Cars

    We bought the cars through a website called "Open A Party". I choose that website for this party because they had the most race car themed supplies. You can find the cars by clicking here.
   These DIY race cars were affordable ($14.99 for 30 cars), and were easy for the kids to colour using permanent markers. 
Picture
   We simply put the cars into a bowl, had a bunch of permanent markers, and let the kids colour! 
   Then my husband took care of the racing part, working it out "round robin" style, so that each child raced against each other, and from each race the winner became part of the final races and so-on until we had a winner!  
Picture


The Food

   We decided on the super tasty, and extremely unhealthy option of serving race-track food for the party! 
   We had hamburgers (regular and sliders), Pogos (regular and minis), nachos and cheese, and also veggies and dip. There was also little boxes of popcorn for the kids to munch on while they decorated their cars and during the races. 
   I bought a huge can o' nacho cheese sauce from our grocery store that has a bulk section, and the big bag of nachos from there too. I dumped the can of cheese into my slow-cooker, and it was good-to-go. Everything else was just regular grocery items, though hunting down mini Pogos proved harder than I wanted it to be! I finally found them at FreshCo. in Belleville. 
   I bought the plates, cups, etc. from Open A Party. The popcorn boxes were on clearance for $0.59 for a 6 pack! Woot woot! The plates can be found here, and the cups here. I liked the variety I found on Open A Party, but their search engine/names of products is fussy, so I had to look up a variety of names to find everything they had to offer under this theme. Just an FYI. 
   I had water bottle labels made from Zazzle, and they turned out really well. This is a detail that wasn't necessarily important, but Caleb really liked them, and that was the point! The girls helped me attach the labels to the water bottles.
   Oh, and I got the nacho and cheese "trays" from a super-duper nice vendor at the Tweed Fair! I had been looking for those trays that divide the nachos from the cheese, but couldn't find them (except online in packs of 500 or more!). Anyway, I just asked a vendor if he would be willing to sell me 30-40 trays, and he happily obliged! 
Picture


Dessert

   I'll show in detail how I made the cakes later this week, but for now, I shall share some photos! We also had fruit with dessert. I used this website, as the inspiration for the watermelon bowl with the race car. I didn't use any special tools though, just a regular knife to cut it out, and a spoon to scrape/etch in the details. I just looked up different race car images and decided on the one I wanted to use, then I printed off images of tires and attached those...to the wrong spots. See that? I put the bigger tire on the back of the car, and the smaller on the front. Oops. 
Picture


The Treat Bags

   I bought the bags (I can't find them on the website anymore?), gummy car candies, and suckers & labels from Open a Party. I added some extra candy too. The girls helped attach the labels to the suckers. They were great helpers! 
Picture
   
    I also bought some shirts from our local thrift store, and used a permanent marker to make them into specific shirts: The owner, the crew chief, and a race car driver.. I wanted to make pit crew shirts for the girls too, but couldn't find any red shirts at the thrift store, so yup,  that was that! 
Picture
   And that was Caleb's party! The weather was nice, the kids had fun, and it all went really well! The best part was how happy Caleb was. He was pooped (x100000) by the end of the day, but he was happy! I love that kid!
0 Comments

Gluten Free Waffles

8/17/2015

3 Comments

 
   We're back! It's been 16 days of being away, but we've made it back safe and sound!

   We landed in Amsterdam on August 2nd, then travelled to Haaltert, Belgium where we spent a week visiting Adam's family, and also visiting Brussels, and many of the cities around the western side of the country. After that, we headed south where we spent 2 days in paris, France. Oh boy, that's a story! I'll get to it eventually, but not right now! After those 2 days, we travelled north, stopping again in Belgium, in a place called "Londerzele". Look familiar? It's where my husband and his family (the Van Londersele's) are named after. "Van" in a lot of European names means "of", or "from", so our last name is "from Londerzele". Anywho, we continued on our journey, going to the place where my Dad was born and spent the first 7 years of his life. A lovely place called Breda, in The Netherlands. We spent the day there visiting my family, then headed more north/west toward Rotterdam (for 1 night and day), then Haarlem (for one night and day), and finally ending in Amsterdam for 3 nights and 3 days! 

   I took a lot of photos....a LOT! I plan to share many of the photos in the next few weeks (or months), as I share recipes from the places I visited. I also ate a lot of different foods! I had chocolate everywhere I went (big surprise there, right?). I had kaas (cheese), croquettes (a small breadcrumbed fried food roll containing, usually as a main ingredient, mashed potatoes), saucijzenbroodje (sausage rolls) & stroopwaffle (thin waffles with a syrup filling) in The Netherlands. Crepes, baguettes and croissants in France, and frieten (fries-NOT french fries), waterzooi (a fish or chicken stew), crevette grise (little, tiny shrimps), and, of course, waffles in Belgium! Belgium is famous for mussels too, but I couldn't go there, I'm not into mussels. I did try some nice Belgian beers though (they sure do like their beer!), which I don't generally enjoy, but I did find a few that I quite liked. Anyway, back to waffles!!!


   The recipe today is for a simple gluten-free waffle, which, incidentally, more closely resembles a real Belgian waffle in taste and texture than our very Canadian or American version. Over on this side of the pond, our waffles are very light, fluffy, and barely coloured (not browned too much). Oh, and we drown our waffles in syrup! In Europe, waffles aren't even really a breakfast food at all. They are served in restaurants, but mostly by street vendors and small shops. Also, in Belgium.....get ready for this....there are no "Belgian Waffles". That made me laugh! 


   There are two main types of waffles, the Brussels waffle, and the Liege waffle. The really, really, really simplified way to distinguish the 2 waffles is that Liege waffles are made with a thicker batter that is similar to bread dough, and they have uneven edges. Pearl sugar is mixed in with the dough, which caramelizes when the waffle is cooked. Ya, I know....drool! The Brussels waffles are made with a yeast-leavened batter, which makes them lighter and crispier. They are rectangular with defined edges, and they also have deeper pockets or holes. 


   So, my waffles are North American is shape and size today, but they are more Belgian in texture. It's the love child of the two countries. Whomp whomp. I plan on getting my apron on and experimenting with my waffles to share with you both types of Belgian waffles very soon! But, for today, I share these. Alstublieft! ("here you go", or "if you please" in Dutch and Flemish....which, incidentally, is the same language)  :)
Picture
Gluten-Free Waffles

Ingredients:
  • 1 Cup gluten-free flour blend (I use my homemade, or Bob's Red Mill gluten-free flour blend)
  • 2 Tsp Cinnamon
  • 1 Tsp baking powder
  • 1/4 Tsp salt
  • 2 Eggs
  • 1/2 cup sour milk (add 1 tbsp lemon juice or vinegar to measuring cup, then add milk to 1/2 cup. Let sit for a few minutes to curdle)
  • 1 Tbsp oil (melting butter or coconut oil, ghee, olive oil, whatever you want to use!)


Method:

  1. Pre-heat your waffle iron (I generally use the hottest setting)
  2. In a large bowl, combine the flour, cinnamon, baking powder and salt
  3. In a smaller bowl, whisk the eggs, then add the sour milk and oil, and blend well
  4. Add the wet ingredients to the dry, and whisk/mix up until it's a smooth batter
  5. Grease the hot waffle iron with spray oil, or using a pastry brush and oil (or butter, etc.)
  6. Pour whatever amount your waffle iron takes (mine is a scant 1/4 cup), and cook until 'done'-this is a preference that varies widely between people! 
  7. Top with fruit, whip cream, whatever! I like putting some nut butter on mine, and lots of maple syrup! :)  
Picture
      Eating a waffle in Ypres, Belgium. I chose a Liege waffle with banana and chocolate. Yummm-o! :)  And you can see a window display of some of the waffle toppings available. Oh, and that's Adam with "Manneken Pis" (translation: "little man pee"), a famous statue in Brussels. The real statue is actually only about 2ft tall. And it isn't teal.  
Picture
   Caleb and Keziah eating their waffles. We generally eat ours as dinner with syrup, bacon and fruit.

   I'm glad to be back! Travelling was really fun, meeting family in Europe was wonderful, walking between 10-20 kilometers a day was something I actually enjoyed! But being back to real life is my favourite. I love our house, and the farm. I like every day, there is beauty in it, though it's easier to see the beauty when you've been away for a time. 

   Until next time, tot ziens ("so long")!     
3 Comments


    Welcome To
     Bushel &
    A Peck!

    Hi, I'm Amy-Lyn!

    Picture
    I am the lady behind this here blog! I live in the sticks with my animals, my super handsome husband, and my
    ​ 3 amazing kids! 
    Here you'll find things from recipes (gluten-free, paleo, and strait up junk food!), DIY ideas, thoughts on raising a son with autism, and whatever else pops into my brain! : )  

    Read more about me by clicking here!

    Want to Stay Connected?

    RSS Feed


    Subscribe to my mailing list!

    * indicates required

    Find What
    ​You're Looking For on the Site!


    Vitacost.com

     Most Popular Posts

    Meat & Potato Casserole
    Gluten-Free Meat & Potato Casserole
    Picture
    D.I.Y Tea Cup Bird Feeder
    Picture
    Mini Caprese Kabobs

    Featured in The Huffington Post

    Picture
    Paleo Double Chocolate Avocado Cookies

    Featured in Woman's Day

    Picture
    Chicken Bundles


    Categories

    All
    Antiques
    Autism
    Birthday
    Breakfast
    Chocolate
    Dessert
    Diy
    Family
    Five Minute Friday
    Giveaway!
    Gluten Free
    Health-fitness
    Lunch/Dinner
    Miscarriage
    Motivational Monday!
    Muffins
    My Thoughts...
    Nifty Ideas
    Paleo
    Primal
    Recipes
    Sandwiches
    Soup
    Tea Party


    Some of my favourite products! 


    Archives

    September 2017
    August 2017
    June 2017
    May 2017
    April 2017
    March 2017
    February 2017
    January 2017
    December 2016
    November 2016
    August 2016
    July 2016
    June 2016
    May 2016
    April 2016
    March 2016
    February 2016
    January 2016
    December 2015
    November 2015
    October 2015
    September 2015
    August 2015
    July 2015
    June 2015
    May 2015
    April 2015
    March 2015
    February 2015
    January 2015
    December 2014
    November 2014
    October 2014
    September 2014
    August 2014
    July 2014
    June 2014
    May 2014
    April 2014
    March 2014
    February 2014
    January 2014
    December 2013
    November 2013
    October 2013

    my foodgawker gallery
  • Blog
  • Health & Fitness
  • Artist Biography
  • Paintings
  • Photography
  • Drawings, etc.
  • About Me
  • Contact Me