|
Hello, hello, hello! It's Friday! Ok, well, in the summertime, Friday means little, unfortunately. Especially when my husband is on a weekend of night shifts. :( Still, for the sake of those who feel elation by their Fridays, then happy Friday to you! Today I am going to share with you the recipe for the chocolate cake I used for Caleb's birthday, as well as show you how I made his cake. When making gluten-free recipes, usually using a regular recipe and adapting it doesn't always work out. In fact, it's often a complete flop! But here's the thing: If you have a great gluten free flour blend, then add a little extra "glue" (like xanthan gum, guar gum-if your blend doesn't already have it), you can tweak at it, and make it into something delicious! That is the case with this cake. The original recipe is from the back of a Hershey's Cocoa Can. It's really an old recipe, but it seemed tried and true. With a few personal tweaks like using sour milk instead of regular, and coffee instead of water, then of course, using gluten-free flour, this cake turned out moist, super tasty, and was really easy to make! 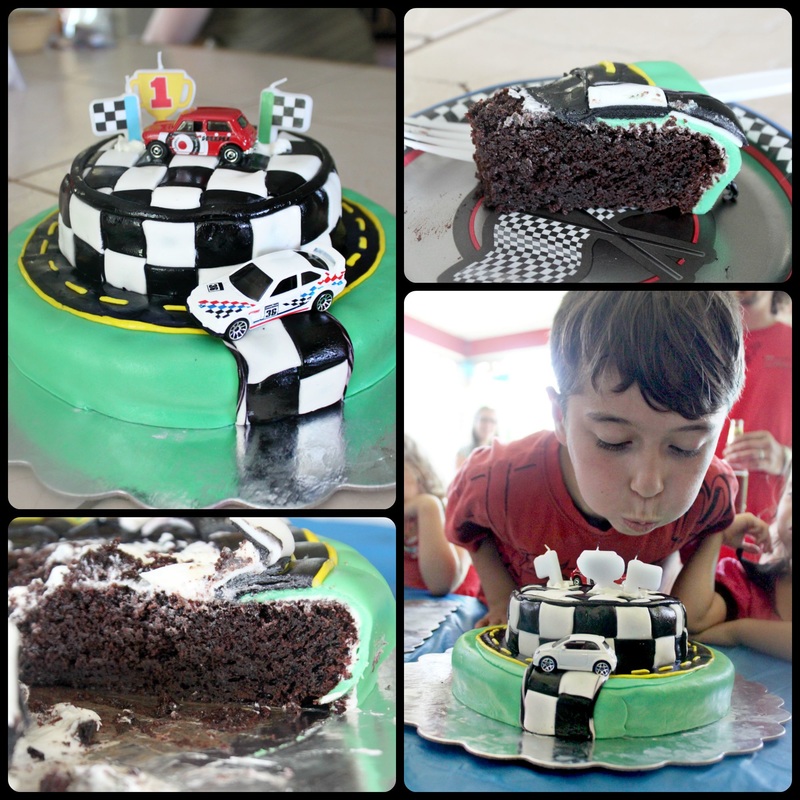 Gluten-Free Chocolate Cake *As with many baking recipes, this turns out better if the milk & eggs have come to room temperature * I'm sorry I don't (can't) offer a "PRINT" button, but you can click on and download the document if you'd like! :)
Ingredients:
Method:
Making a Checkered Cake 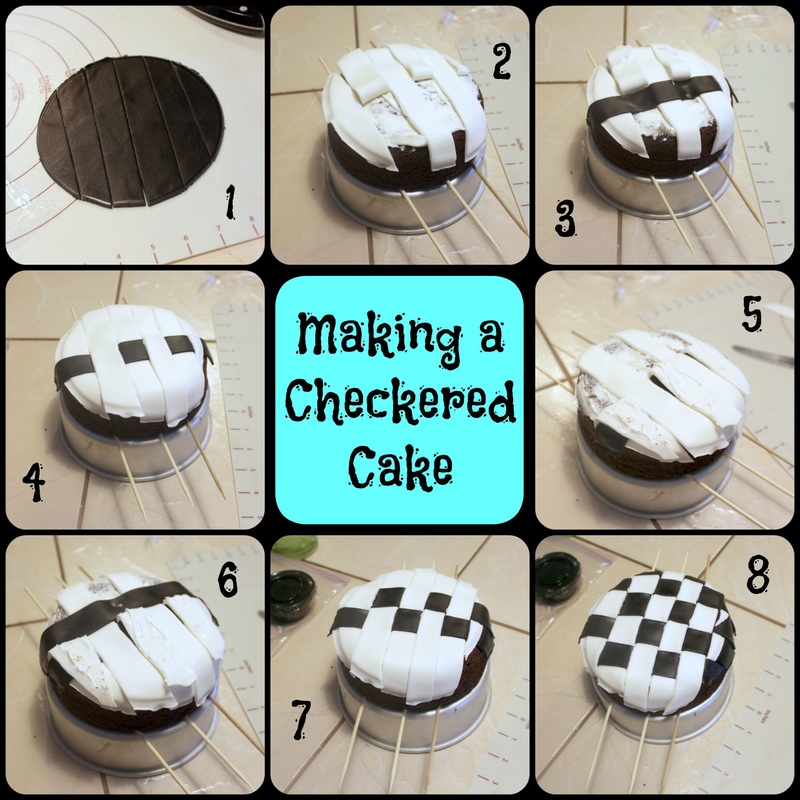 So, in looking for ways to make a checkered cake, the only suggestions on the www were to cover the cake in white, then cut out black squares and stick 'em on. Seriously. Who wants to do that, and who could make their squares perfect, and stick them on perfect? Not me, that's for sure! I decided instead to make the checkers like I would a lattice top for a pie. It worked out really well, and was not too difficult. I started by putting skewers onto the cake pan, and setting the cake onto it. I used the skewers as a "just in case" for lifting the cake off later. I didn't really need them, as it turned out, but I wanted to explain why they were there in the photos. :) I used a vegetable shortening fondant (instead of marshmallow fondant) this time because marshmallow fondant can dry out faster and I knew I'd be fussing with the fondant for a while and needed it to stay soft and workable. Also (if you follow the recipe in that link), make some of the fondant with 1/4 cocoa and 3/4 icing sugar as a base for making black fondant). As a general rule, keep your shortening handy and keep rubbing it onto your hands as you work to help keep the fondant from drying out. Start by applying a layer of buttercream to the top of the cake as "glue" for the fondant.
This is not a difficult method, but you do need to be a little focused to make sure you're paying attention and actually pulling back every-other strip, and alternating strips properly. 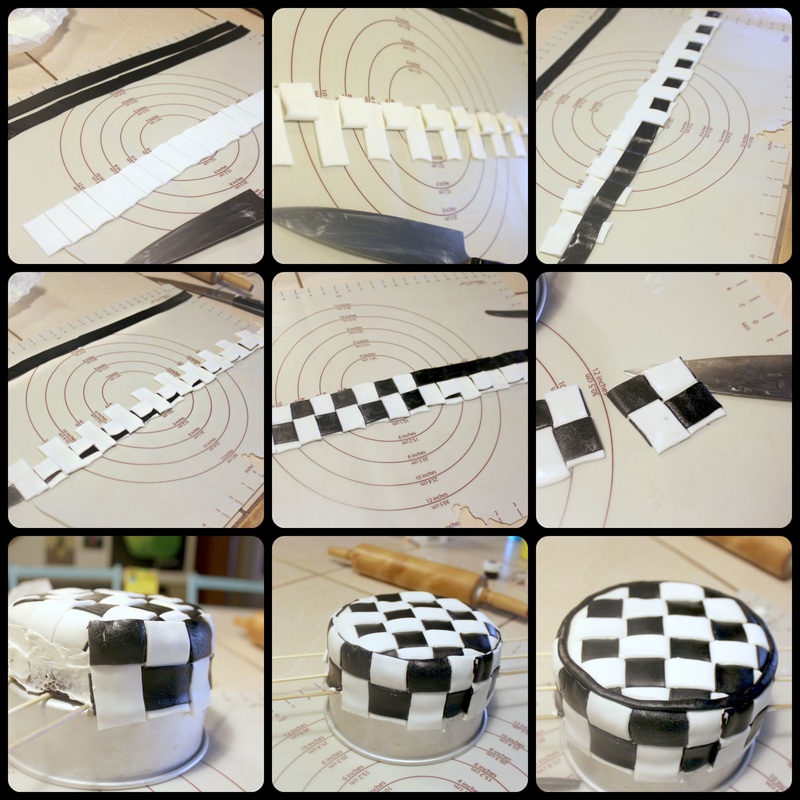 Making the side checker uses the same process of folding every other piece back (photo 2), laying down the black, then folding the pieces back up (photo 3), and repeating with the opposite pieces (photo 4 and 5). Once you've got that finished, apply some buttercream to the sides of the cake for "glue". Cut the long checkered piece you've made into sections of about 4 (moving the whole, long strip of checkered fondant was too fussy), and attach to the side of the cake, pressing each section into the buttercream to make sure it's well attached (photos 6 and 7). The final photo shows a little trim I added (by rolling out some black fondant) Wrap this top portion of the cake in plastic wrap as you work on the bottom of the cake, you don't want it drying out! 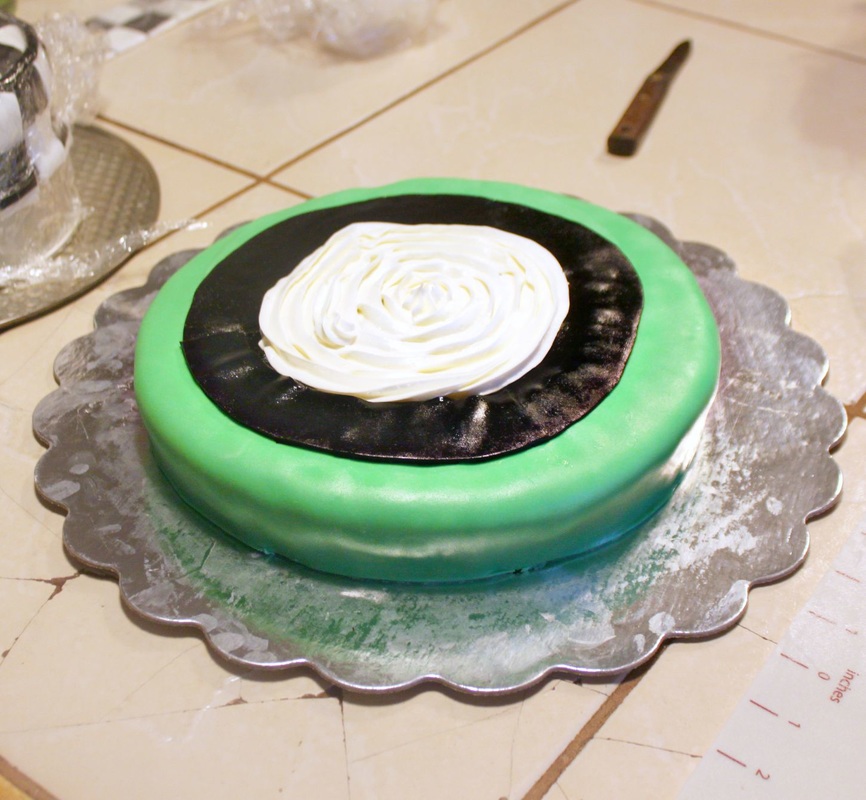 The bottom of the cake was just covered in buttercream for "glue", and then green "grass" fondant, and a little black fondant "track". Then I added a little more buttercream to the spot where the top layer would be sitting.
Now to put the 2 cakes together I left the plastic wrap on top of the top-layer cake, I then put my hand onto the top of the cake, and carefully flipped it over (onto my hand), and set it down onto the base. Oh, uh, remove the skewers (if you were using them) before you place the top of the cake onto the bottom. After this I added some details like using the leftover checker I had from the sides and added them, and also adding a little yellow dotted line on the "road", and I also added some more trim with rolled out fondant. Then I added Caleb's favourite (and throughly cleaned) cars and candles to it. Oh, and don't forget to wipe off your serving plate/tray/whatever. See the photo above and all those greasy little smudges I made? I'll share next week how I made the other car for Caleb's party! Sometimes it's so difficult to come up with an "ending" for a post! How about "the end"? Perfect! The End :) Oh, and have a great weekend!
4 Comments
Rebecca
1/18/2017 09:21:40 am
I made this cake this past weekend, and it was such a huge hit! Even people who weren't gluten-free couldn't get over how moist and flavourful it was!
Amy-Lyn
9/25/2018 06:30:22 am
I love when people don't know it's gluten free, that's the real test of it being good or not! :)
Laura
7/11/2018 09:00:19 pm
I used this recipe for a birthday cake for my son and it turned out perfect. Thanks!
Amy-Lyn
9/25/2018 06:29:26 am
Awesome! Thanks for taking the time to comment on it! Leave a Reply. |
Hi, I'm Amy-Lyn! 
I am the lady behind this here blog! I live in the sticks with my animals, my super handsome husband, and my
3 amazing kids! Here you'll find things from recipes (gluten-free, paleo, and strait up junk food!), DIY ideas, thoughts on raising a son with autism, and whatever else pops into my brain! : ) Read more about me by clicking here! Want to Stay Connected?
Find What
|
||
 RSS Feed


