|
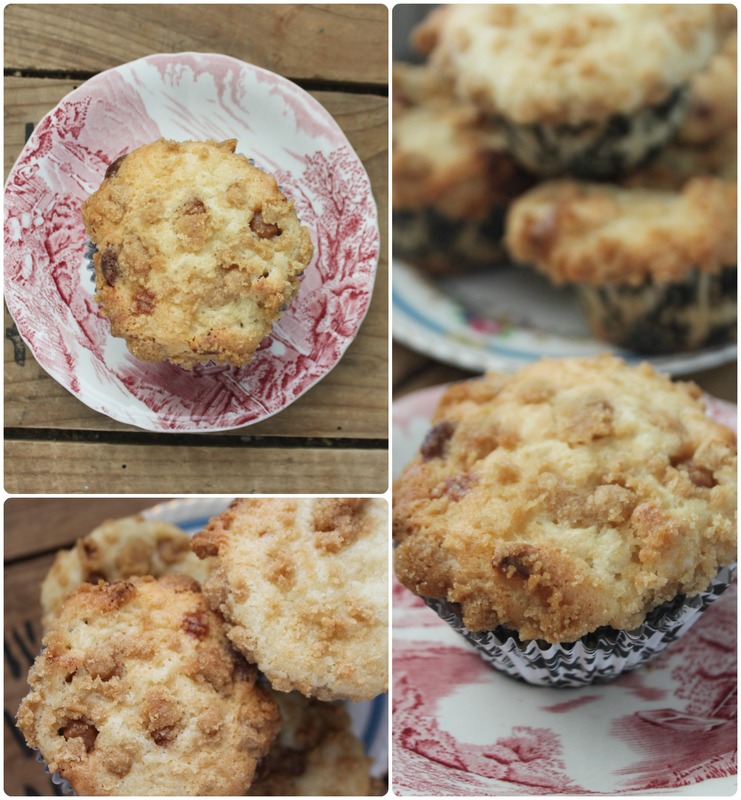
Hello! Happy first day of autumn! :) Truthfully, it's not been terribly "autumn-y' around here! We've had hotter days than we had all summer, and we've had them more continuously than we had all summer! But, the earth temperature aside, our apple and pear trees are still making fruit (although not as happily as usual), and making muffins from some of that fruit needed to happen! I saw this recipe for Caramel-Apple Streusel Muffins from Tracey's Culinary Adventures! They looked so good, and I had apples to spare, so I gave them a shot! Of course, because I had a ton of apples, I made this recipe x 3 and stored most of them away in the freezer to use in school lunches, breakfasts, or after school snacks. They are delicious & full of fall flavour! Enjoy!!!  Caramel Apple Muffins Ingredients: Muffins
Streusel Topping
Method:
 Let's shift gears a little here....and look at my kids from the last 4 years of the first day of school! I mean, they go from babies to beautiful, grown-up kids! *tear*  Let's shift gears again....to a little company that is starting up that I'd love to briefly share about! It's called Little Red Canoe Book Co., and they are a Canadian book subscription business! I was asked to review a book box with Abby and Keziah, but that only involved getting the boxes, and doing an online survey for the woman who got in touch with me from the company - me talking about it here is all me!!! The girls (and I) loved the boxes! They were beautiful, filled with wonderful things, awesome books, and so much fun (which then makes reading even more fun!). So, check them out!  That's all for now!
happy Friday! xo
5 Comments
Ok, well, the title warned you! You now enter this post at your own risk! : ) My husband's Belgian family celebrates and mourns with ham buns. A wedding, baby shower, anniversary, birthday, funeral - all involve "ham buns". This food item is EXACTLY what is sounds like. A bun. With ham. The bun is simply buttered, filled with a piece of ham, and that's it! It seems basic, but somehow it tastes like a dream! I dunno. Last year, my husband's Uncle passed away, and at the funeral luncheon we had, of course, ham buns. Adam's uncle specifically requested double ham on his ham buns though (extra delicious!), and my girls really enjoyed them. I was surprised by this because my girls have not eaten a sandwich in at least 5 years! I think the fact that the options were were limited, they gave the buns a try. Well, after the luncheon there were leftovers, and the wonderful women running the meal packed up lots of food for us to take home. We had at least 2 dozen ham buns that Adam took to work and the girls took to school over the next week! When they ran out, the girls asked if I could make them the buns. We are mostly a gluten-free family because I eat mainly paleo, and Caleb is fully gluten-free, so it’s easier for us all to eat similar. Plus, I told the girls, making the delicious buns that the ham was nestled in takes too much time to make. So, that was that. Well then, didn’t a neighbour come over one day not too long after with some rolls she'd made with her aunt that day. They were so good......so, so, so good! Belgian funeral good. I commented on how I don't usually make bread or buns because I hate waiting for it to rise. Yes, I'm occasionally impatient! Anywho, she told me that these particular rolls only took about an hour to make, and I thought - what? For Real? I thought she was pulling my leg, and was trying to make them sound easier than they were. Well, the next day she came over with the recipe for me to see, and promised that they only took an hour. So, I said, “well, let’s make them right now!”. And we did. And it was scary easy, and scary fast how we produced big, soft and fluffy rolls in an hour. If you’re not organized (or your kitchen isn’t), I could see this taking an hour and 15 minutes. Or if you got distracted while making these, perhaps it would take an hour and 30 minutes. But getting distracted while making these will be impossible because you’ll be so focused on the warm, delicious goodness you’ll have in an hour, you’ll just hone in and get ‘er done! So, here it is! My neighbours' aunt's recipe for "bread buns" as she called them, or "dangerously quick and simple buns" as I call them! 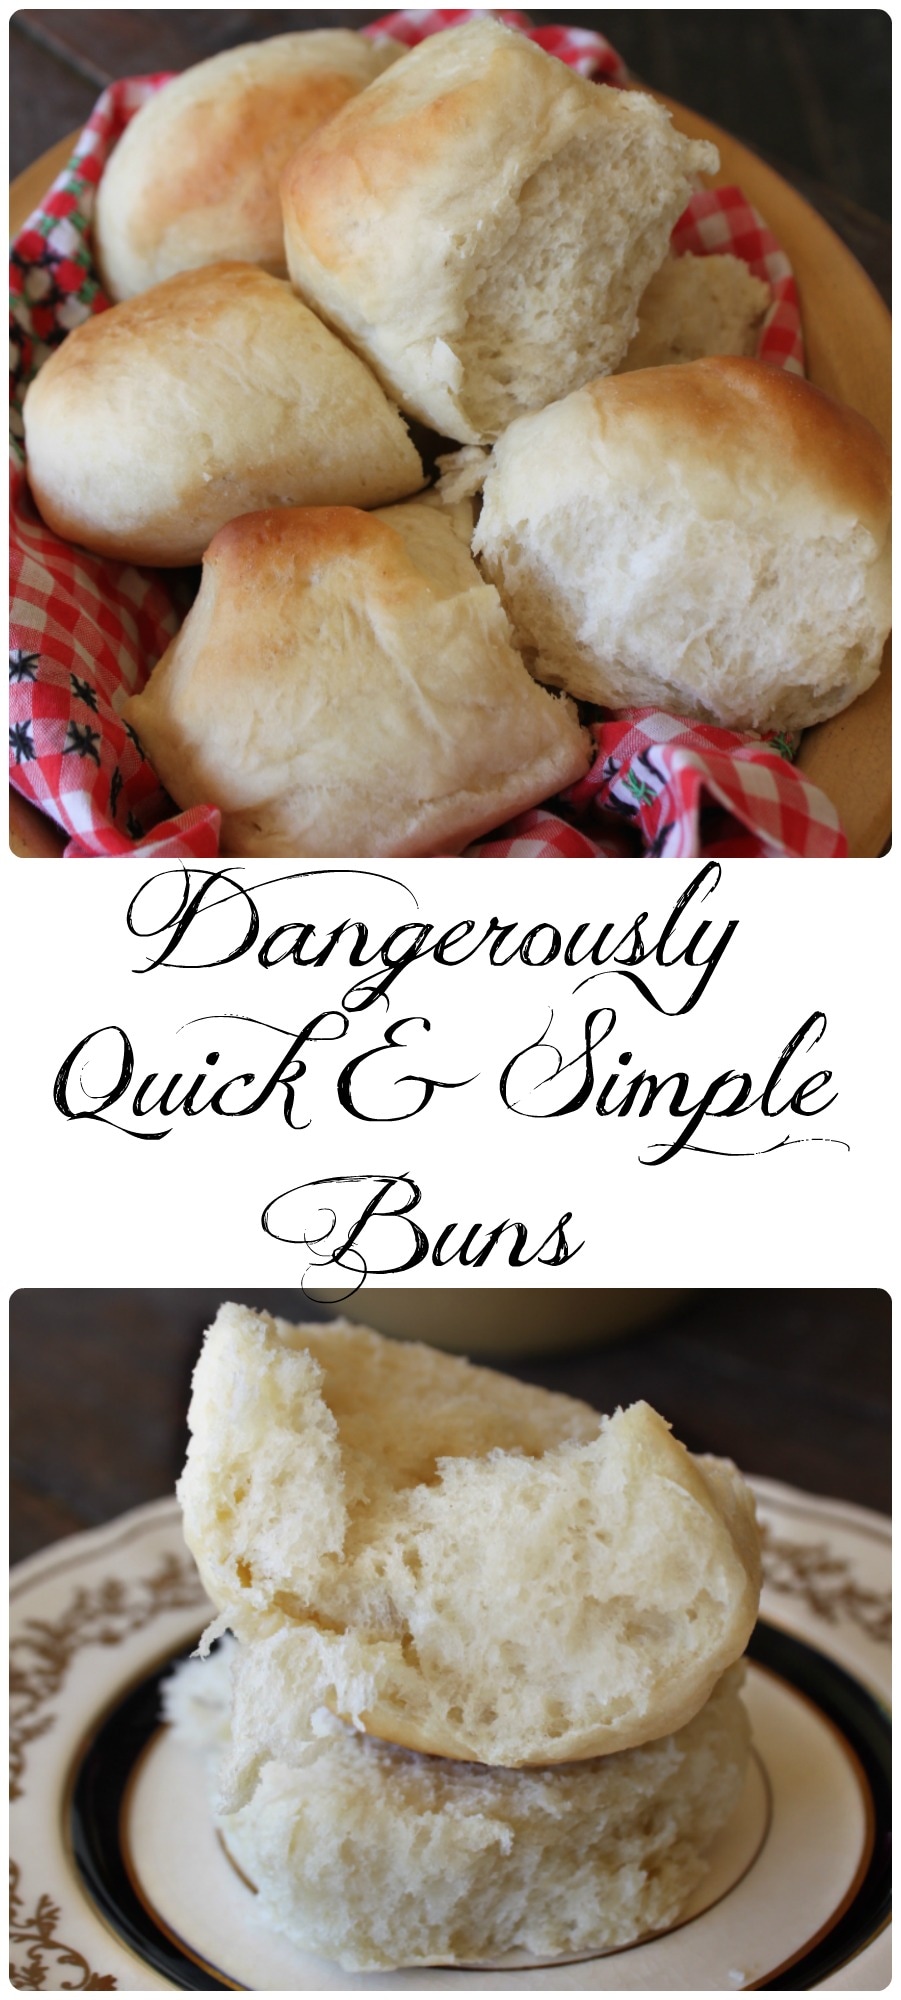 Dangerously Quick & Simple Buns (or dump pan buns!) Ingredients
Method:
It's honestly a really simple process to go from some humble ingredients to amazing, fluffy buns! 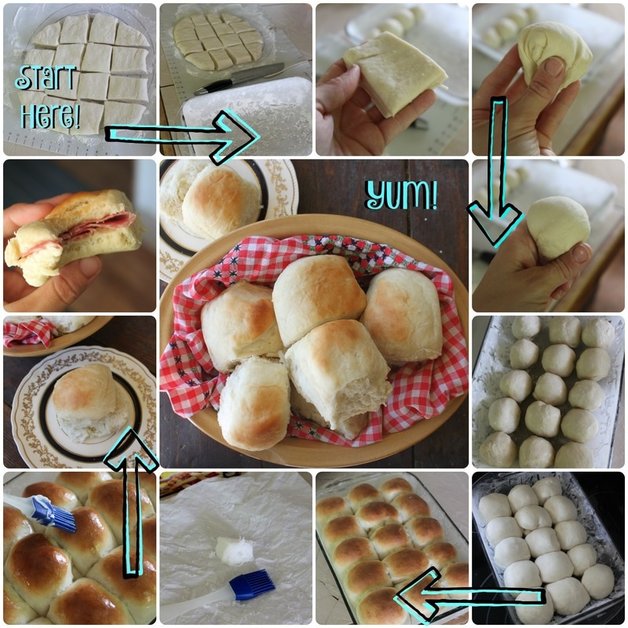 This is my Keziah who especially loves these delicious buns! She can hardly wait for them to cool a bit so she can devour one! 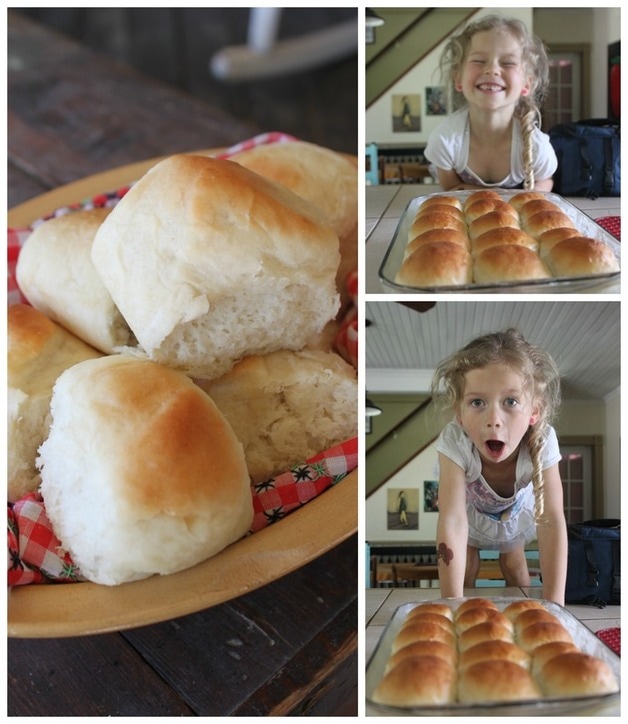 Can I just highlight some recipes for buns from the past.....specifically, from my book by Dr. Chase from 1884? I love looking through this old book when I'm thinking up a recipe because why re-invent the wheel, right? Well, sometimes the wheel needs some rounding out! This recipe below for "Buns, Better Than bakers" is a multi-day event! You'd start the water, sugar and yeast the night before you planned to make these rolls ("hooray for rapid rise yeast" shouts all the modern women!) : ) Anyway, it's a gem of a recipe, anyway!  Ok, I had to share one more recipe from Dr. Chase's book because......yuk. I mean, I might still try making it because it sounds so strange, but, yuk! It's called "Pork Cake", so, I think we can just right away agree (based on the name) that this is a recipe that maybe won't suit many peoples tastes...? I think it could be a breakfast style cake? Read the whole recipe, especially the last part about what you use to check for doneness. It's brilly-bobs (as my sister would say. Translation: brilliant) 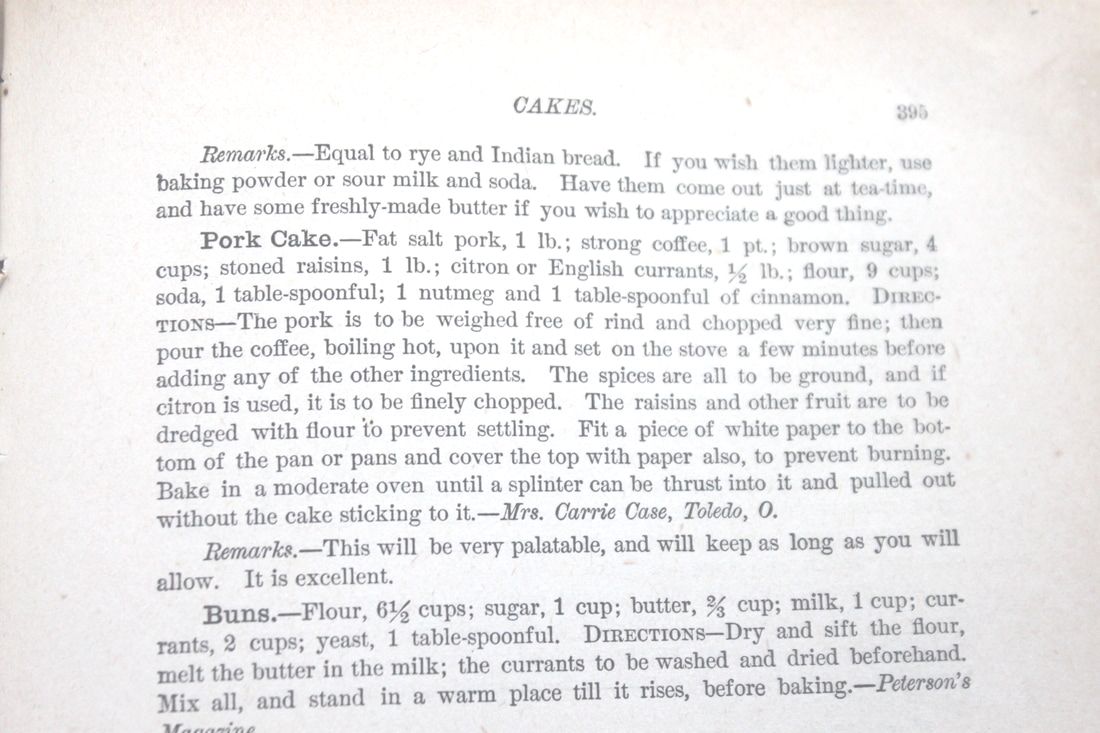 It is amazing, isn't it?! Anyway, this post seems too long? Sorry about that. I'll just get outta here then! Have a great weekend! It's a long weekend here in Ontario because Family Day is on Monday (also in Alberta and Saskatchewan!), and we have family visiting (how fitting!), and I'm excited! xoxo Happy Thanksgiving weekend American friends! Here in Canada, we celebrate our Thanksgiving in October, but Canada has in the last few years started tagging along with “Black Friday” and all the sales that go along with it - so, for me, it’s a time to NOT go out because I’m not a big fan of crazed deal hunters! Don’t get me wrong, I am a deal hunter, and I am generally crazed, but I am a quiet deal hunter. For instance, if I see a shelf with a bunch of fantastic items and they are on clearance, I will silently use my arm to make one grand gesture of sweeping all of said item into my cart, and walking away. Pleased as punch. Well, that was all pretty random. Let’s talk about today’s recipe! I found it this summer while cooking at Pleasant Bay Camp. Someone had purchased an ungodly amount of frozen blueberries for us to use, and I needed the freezer space, so got looking for a blueberry muffin recipe that was basic, used simple ingredients, and came out looking like a million bucks. This recipe from Chef Savvy hit on all those points! The campers gobbled them up, the staff stole them from the kitchen when I wasn’t looking, AND I got to use up some expiring milk to make up the first batch! The recipe calls for sour cream, but we had an over-order of milk at camp, and it was expiring faster than we could make the campers and staff drink it! It is very common to use souring milk in recipes. A lot of recipes – mine included! – call for sour milk (or buttermilk), so don’t think “bleh! Using sour milk?!? Gross!”. It’s normal, it’s economical, and it creates a softer, fluffier baked good! Some people do say not to use actual souring milk for recipes, but that strange, sour milk taste that is unpleasant if you were to drink it strait changes, and the only taste that remains is a oh-so-slight tangy flavour that really compliments sweet baked goods. I pinky-swear promise it DOES NOT taste like sour milk! Anyway, all that being said, when I didn’t have actual souring milk, I made my own buttermilk by adding some vinegar or lemon juice to fresh milk (about 1 teaspoon to 1/4 Cup), stir, and allow to sit until it’s curdled. As for the streusel top, I hate when super moist muffins get sticky on the top after they’ve cooled and sat. It’s better than a gross, dry muffin, but still. So, when I first looked up the recipe, I looked up “streusel topped blueberry muffins”, knowing that A: streusel is freakin’ delicious, and B: it would keep the tops from becoming sticky. So, without further adieu, and sorry for blabbing on, here’s the recipe!  Blueberry Streusel Top Muffins Adapted from Chef Savvy's "Blueberry Streusel Muffins" Ingredients: For the Streusel Top:
For the Muffins:
For the Streusel Top:
For the Muffins:
Enjoy! I think these taste amazing if you eat them warm, with some butter and honey!  These lovely little muffins also freeze well, making them great to make ahead for school lunches, or to have on hand to randomly bring to someone who is in need of a pick-me-up!
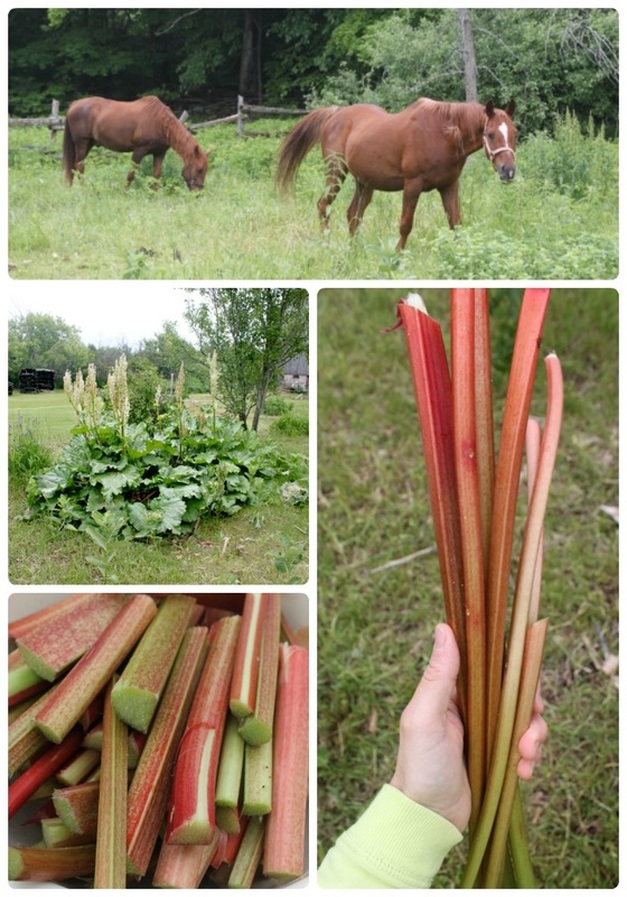
Ok, well, I’ll see you later this week! On Thursday (the day I set aside for any autism writing I want to share), I’ll be telling you about something that happened last week with my son Caleb. If you’re new here and don’t know him, he’s my 12 ½ year old son with autism. He’s growing into an incredible young man, and last week he was involved in something that ordinarily might not leaving a Mom weeping with joy (several times in one day!), but that’s what was happening to me! I am overwhelmingly proud of him, his classmates, and his school! Stay tuned for that! xoxo Truthfully, the first time I heard the words "ruhbarb cake" I thought, "bleh!"I couldn't imagine how a cake made with rhubarb could taste good at all. In one of our horse paddocks we have a large rhubarb patch though, and a neighbour asked if she could take some to make this "rhubarb cake". I only really use it to eat the crazy sour stuff raw (it's alarming and refreshing!), and I've made a paleo strawberry rhubarb bare bottom pie last year for national strawberry rhubarb day, but that's it. I never even went out to cut it down and freeze it because I just never really loved much that was made from rhubarb. Anywho...back to my neighbour....she got some rhubarb from our field, made some cake, and brought some over for me to try...and, let me tell you people, this freakin' cake was so good! So, so, soooo good!!! I'm a little excited about this cake. I plan on making 2 more today! I feel some sadness over the rhubarb I've let go to waste because I didn't know about this delightful cake. This cake is a very simple white cake with rhubarb mixed in, and a crumbly, buttery, cinnamon-sugary topping. It is very moist, and not too sweet, not too sour. After I had made 3 pans of my own rhubarb cake, I brought some over to another neighbour who said that he quite hates rhubarb, and has never had any cake, pie or jam of it that he enjoyed. So I told him I wouldn't be offended if he didn't try it, but he said he would anyway. He said he was always willing to try something, just in case. Well, didn't I go back to see him the next day and he couldn't believe how good the cake was! He said (in a thick Italian accent) that his face didn't pucker, and that the sweetness wasn't too much and he loved the cinnamon in it. Enough said. 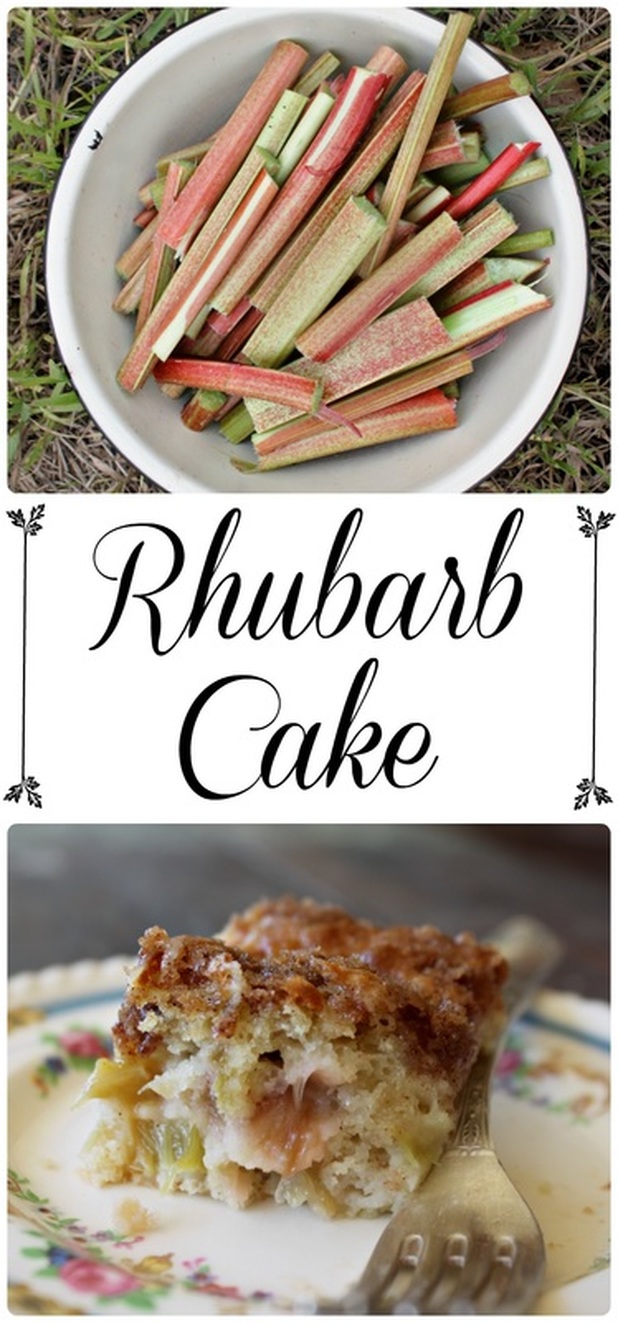 Rhubarb Cake Adapted from Oma's Rhubarb Cake Ingredients: For the Cake:
For the Topping:
Method:
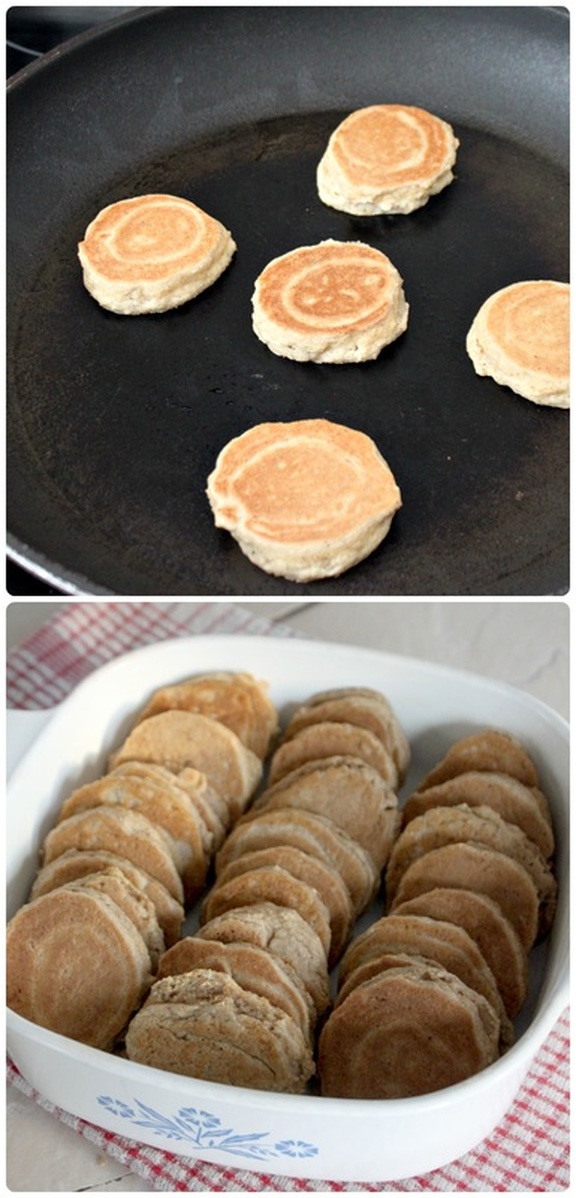
 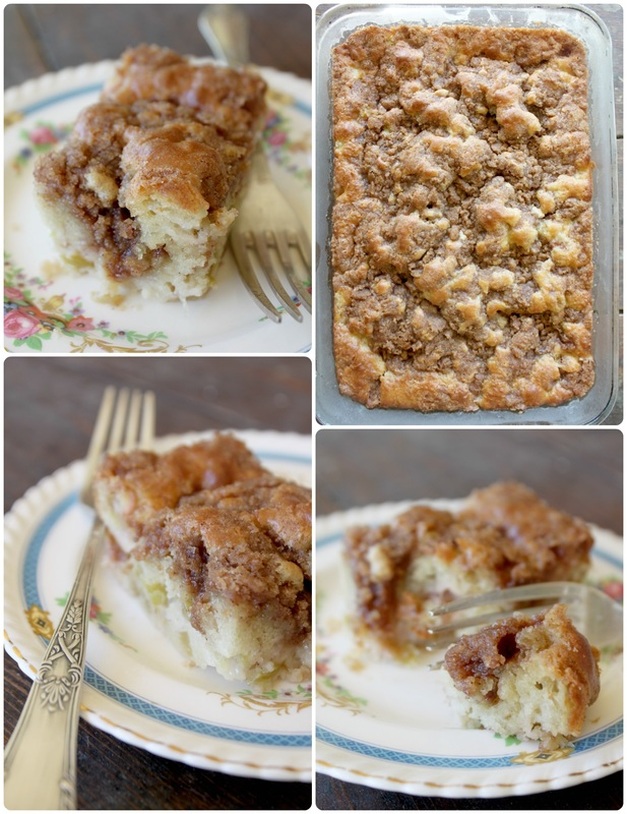 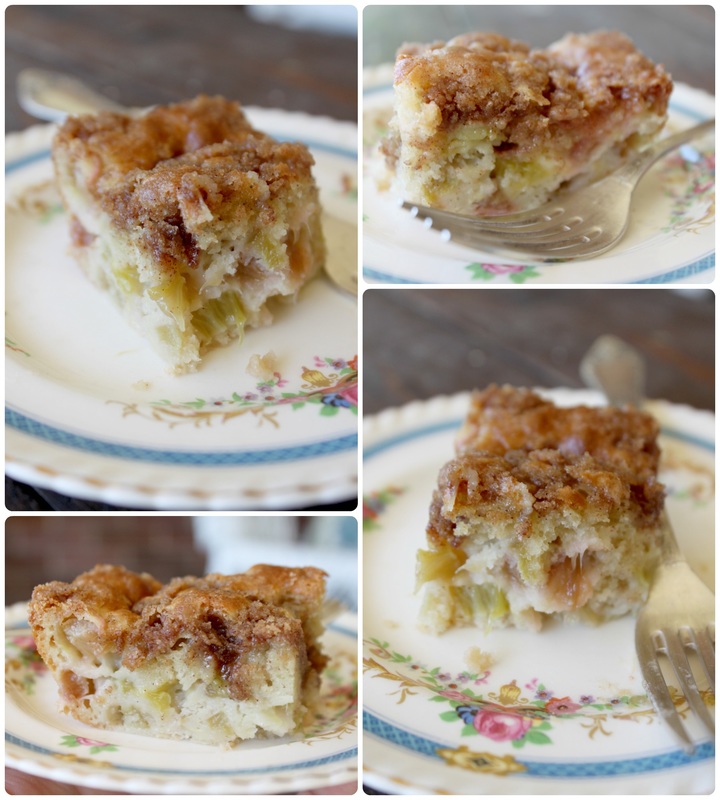 The first time I tried making this it was a gloomy Saturday. The weather was gloomy, and I felt gloomy. By the time the cake was finished and cooled, the sun had come out and the weather was no longer gloomy - and neither was I! The cake smelled so good, and looked so beautiful, and tasted so wonderful! So, that's all there is to this lovely little cake! Tonight the girls have a soccer game, then I think we'll let them have some time playing at the splash pad, and maybe we'll have a campfire tonight too. We plan to go and visit some friends tomorrow who we don't get to see too often, so I am looking forward to that also. I hope you all have a lovely weekend. xo Hello there! I'm sharing a recipe today that was from Paleo Parents, who shared if from Julie Bauer's cookbook "Paleo Cookbook" So much sharing! I like to do a syrup based breakfast for the kids on Saturday mornings - wait, what? You don't know what a "syrup based breakfast", is? Well, it's a food item that gives you an excuse to eat maple syrup!!! :) I am truly Canadian. Anyway, making great paleo pancakes can be difficult, but I've made a few that I liked a lot (like these Chocolate Monkey Pancakes), but I was wanting to try something new, and also something I could make ahead. Well, I found this little dream of a recipe, and we loved it! I made the mini pancakes on Friday night (and wanted to eat them right then!), then I simply stuck 'em into an airtight container overnight, and got the rest whipped up in no time in the morning! This is so good! If you make the mini pancakes and think "why can't I just eat these like this?". Well, you can if you want to! But, making them into a delightful little pancake bake just makes it seem more like a cozy bread pudding. It seems more filling and satisfying somehow. I also changed the recipe slightly, and swapped out the coconut milk for applesauce in the mixture you make that gets poured over the mini pancakes before being baked. It made these a wonderful, apple cinnamon pancake bake! Anywho, it's the bees knees, and I think you should give it a whirl! 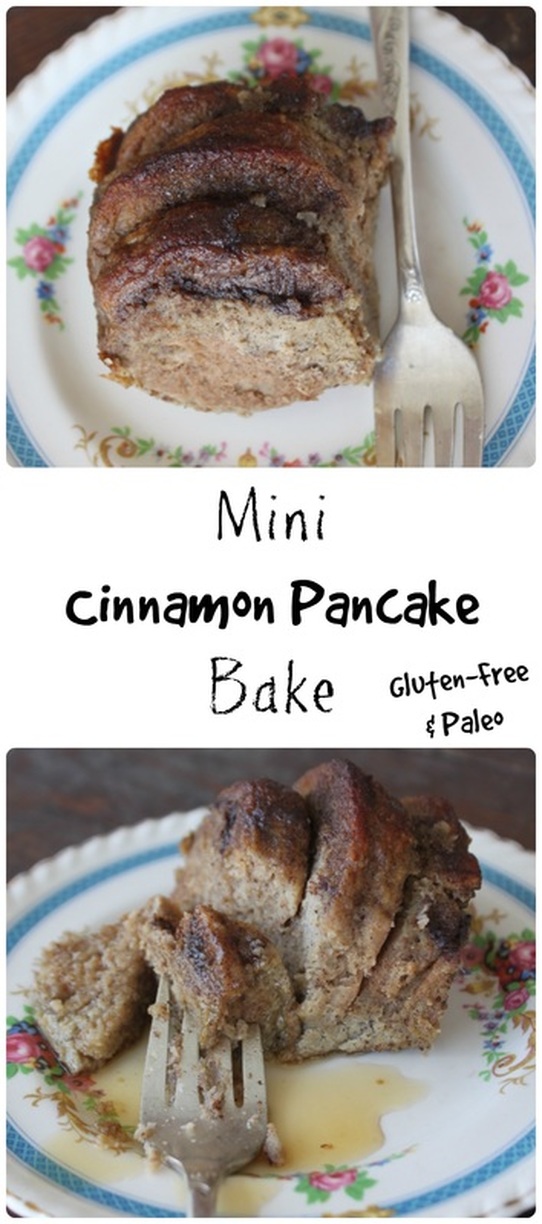 Mini Cinnamon Pancake Bake From Paleo Parents, with some adjustments of my own The Mini Pancakes Ingredients:
Method:
The Mini Cinnamon Pancake Bake Ingredients
For the topping:
Instructions
 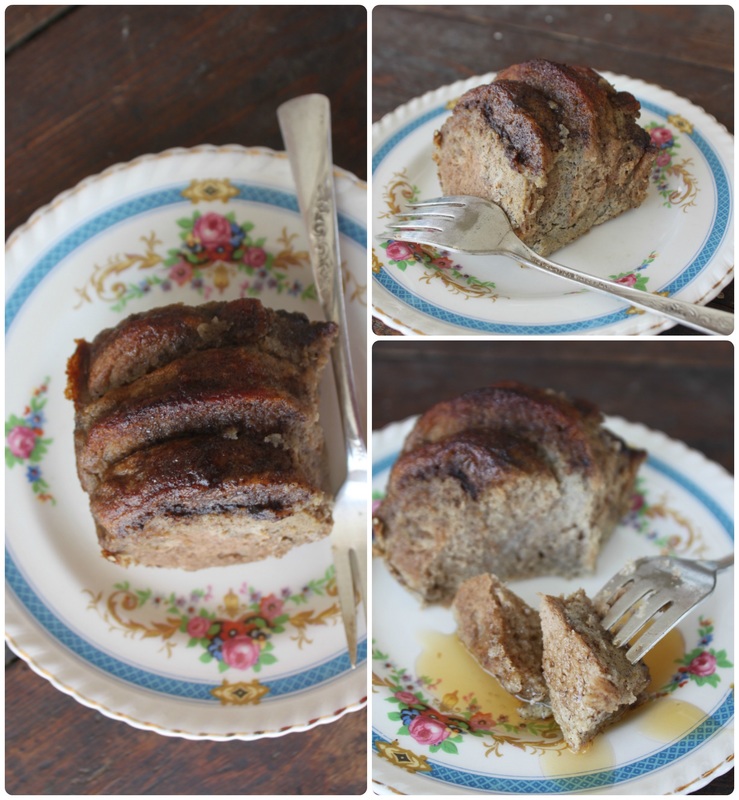 I have a very (VERY!) wiggly 6 year old on my lap while I'm writing this and when she saw the pictures she said, "Oooooohhhh! I looooove these french toasts!!!" : ) So, I think that sums this up nicely! Have a wonderful weekend! Hello! Happy first day of autumn! :) Truthfully, it's not been terribly "autumn-y' around here! We've had hotter days than we had all summer, and we've had them more continuously than we had all summer! But, the earth temperature aside, our apple and pear trees are still making fruit (although not as happily as usual), and making muffins from some of that fruit needed to happen! I saw this recipe for Caramel-Apple Streusel Muffins from Tracey's Culinary Adventures! They looked so good, and I had apples to spare, so I gave them a shot! Of course, because I had a ton of apples, I made this recipe x 3 and stored most of them away in the freezer to use in school lunches, breakfasts, or after school snacks. They are delicious & full of fall flavour! Enjoy!!! 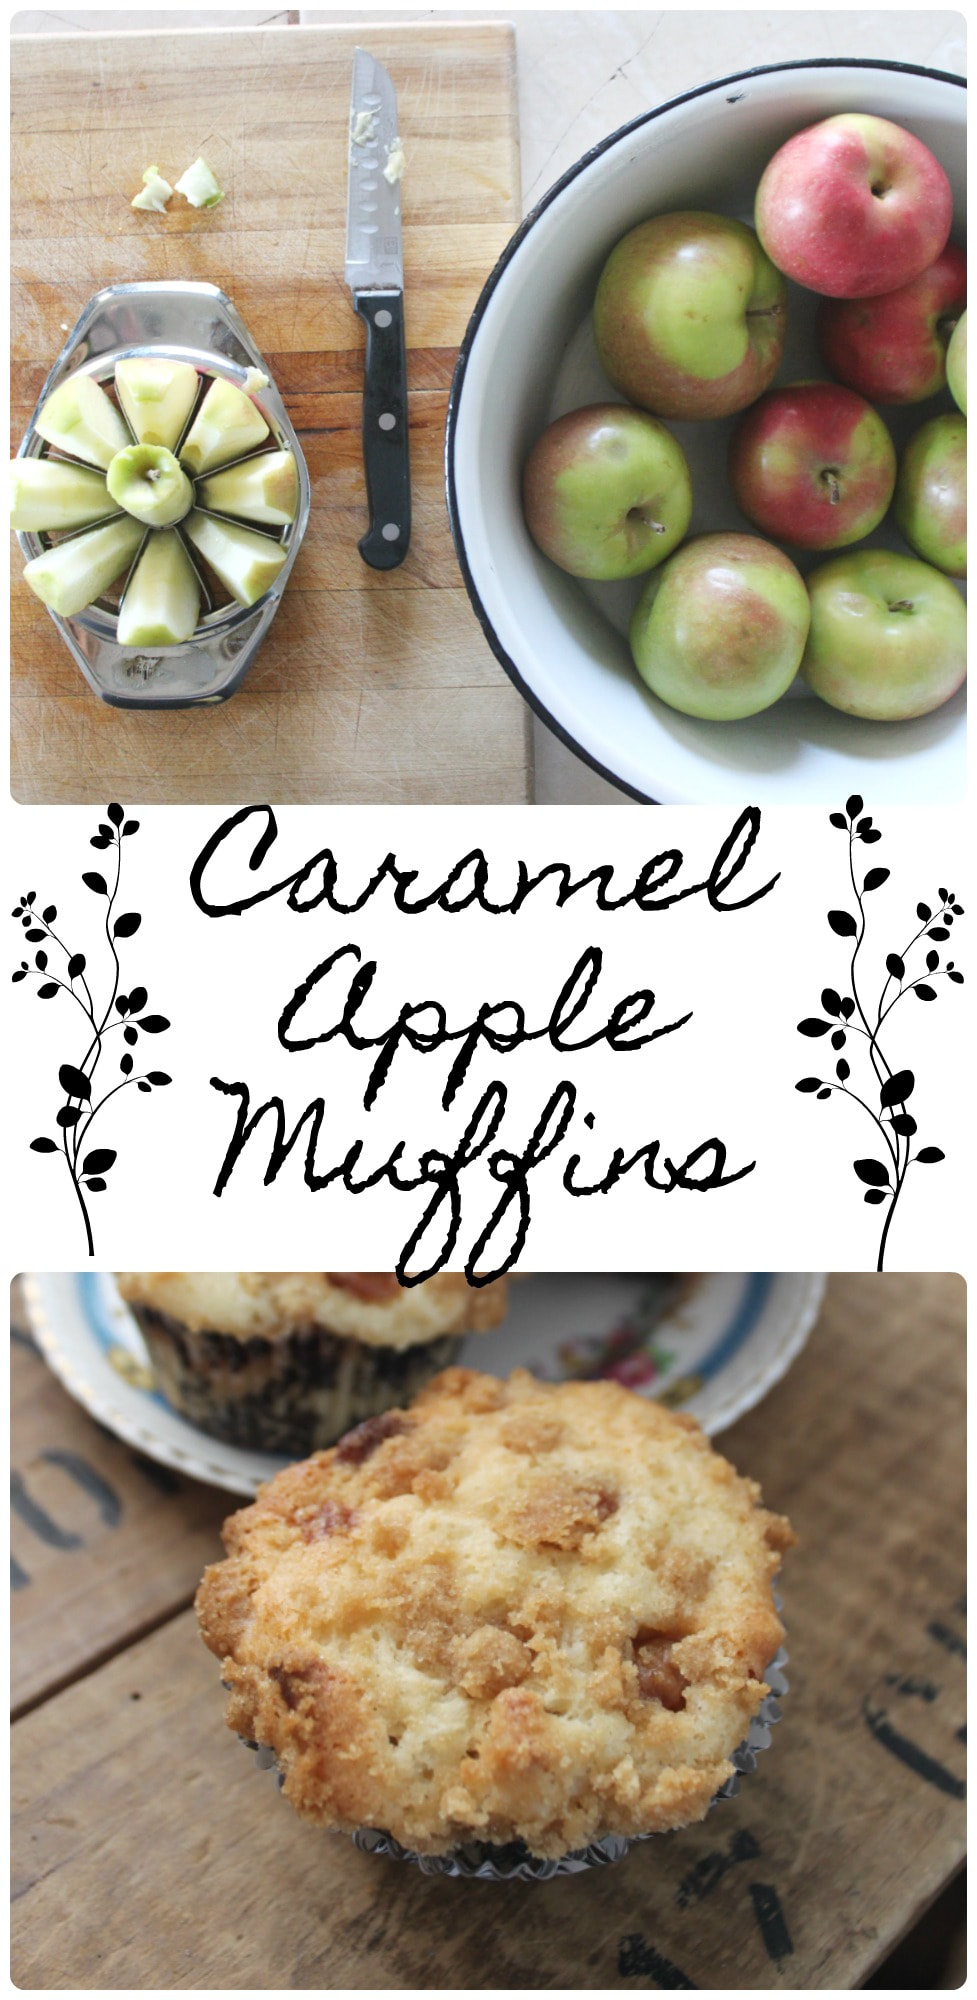 Caramel Apple Muffins Ingredients: Muffins
Streusel Topping
Method:
 Let's shift gears a little here....and look at my kids from the last 4 years of the first day of school! I mean, they go from babies to beautiful, grown-up kids! *tear* 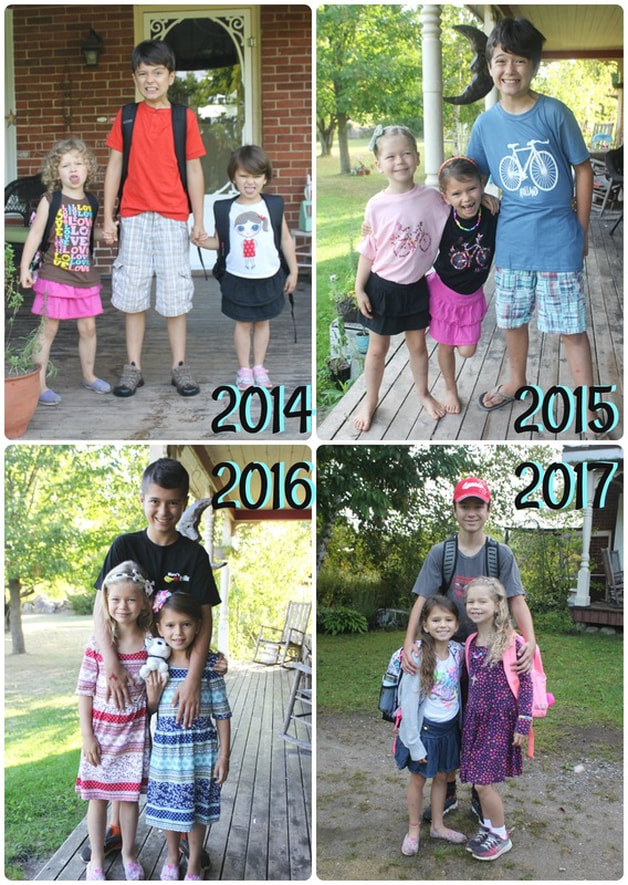 Let's shift gears again....to a little company that is starting up that I'd love to briefly share about! It's called Little Red Canoe Book Co., and they are a Canadian book subscription business! I was asked to review a book box with Abby and Keziah, but that only involved getting the boxes, and doing an online survey for the woman who got in touch with me from the company - me talking about it here is all me!!! The girls (and I) loved the boxes! They were beautiful, filled with wonderful things, awesome books, and so much fun (which then makes reading even more fun!). So, check them out! 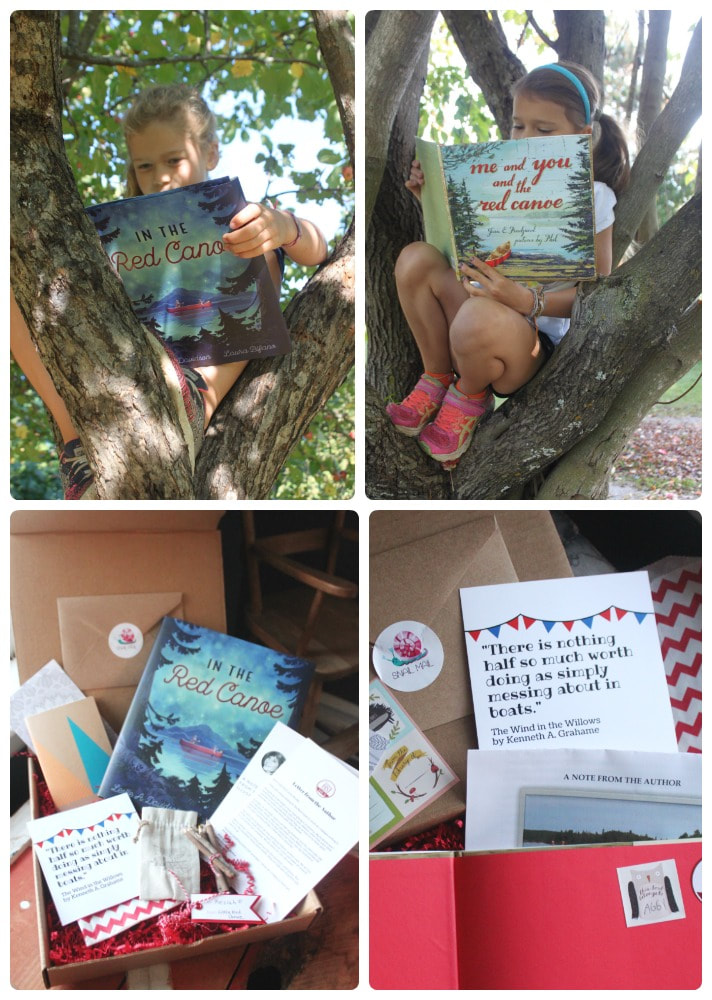 That's all for now!
Sorry I've been so absent! I've been super duper busy!!! xoxoxox Happy Thanksgiving American friends! It is not Thanksgiving here in Canada, we celebrate back in October! Anywhooo, I hope wherever you are reading this, and whenever it is, that you can stop and find something to be thankful for! So, I have a few recipes I've been fussing with, and I still love creating my own recipes, but the truth is, I'm often just surfing the web, looking for recipes that'll suit something I have in my mind, but spare me the grief of trial and error! This is one of those recipes! I had nice, fresh blueberries in the summer, and wanted a simple and strait forward recipe that yielded deee-licious muffins! I also wanted a streusel top because I find that muffins that are just so crazy-delicious moist tend to get sticky on top. It's better than them getting dry on top, but still, I don't like sticky top muffins! And because I'm the kind of person who likes to freeze baked goods for later, if the tops are too moist, they get all icicle-y. Ya know? Well, anyway, when these came out the first time looking like a million bucks, and then having all the teen staff at the summer camp I was cooking at DEVOUR them, I figured they were a good recipe! And the batches I made at home that friends and neighbours gobbled up confirmed that this recipe was a good one. So, here it is, adapted oh so slightly from Chef Savvy and her Blueberry Streusel Muffin recipe! The muffins in my photos are (stupidly) shy on streusel! I made a double batch of the muffins when I was going to take the pictures, and didn't make enough topping, but when I realized it, I had already packed ingredients up, and done dishes, and I'm a little anal about cleaning and tidying as I go which can backfire in situations like these! Phew, what a run-on sentence!!! Also, the muffins I made at camp were a lot of "bakery style" with the domed top because the oven there isn't a weeny like my oven at home..... (sigh...) Anyway, with a lot or a little toping, with the tops perfectly domed or not, these muffins are so good. For realz. 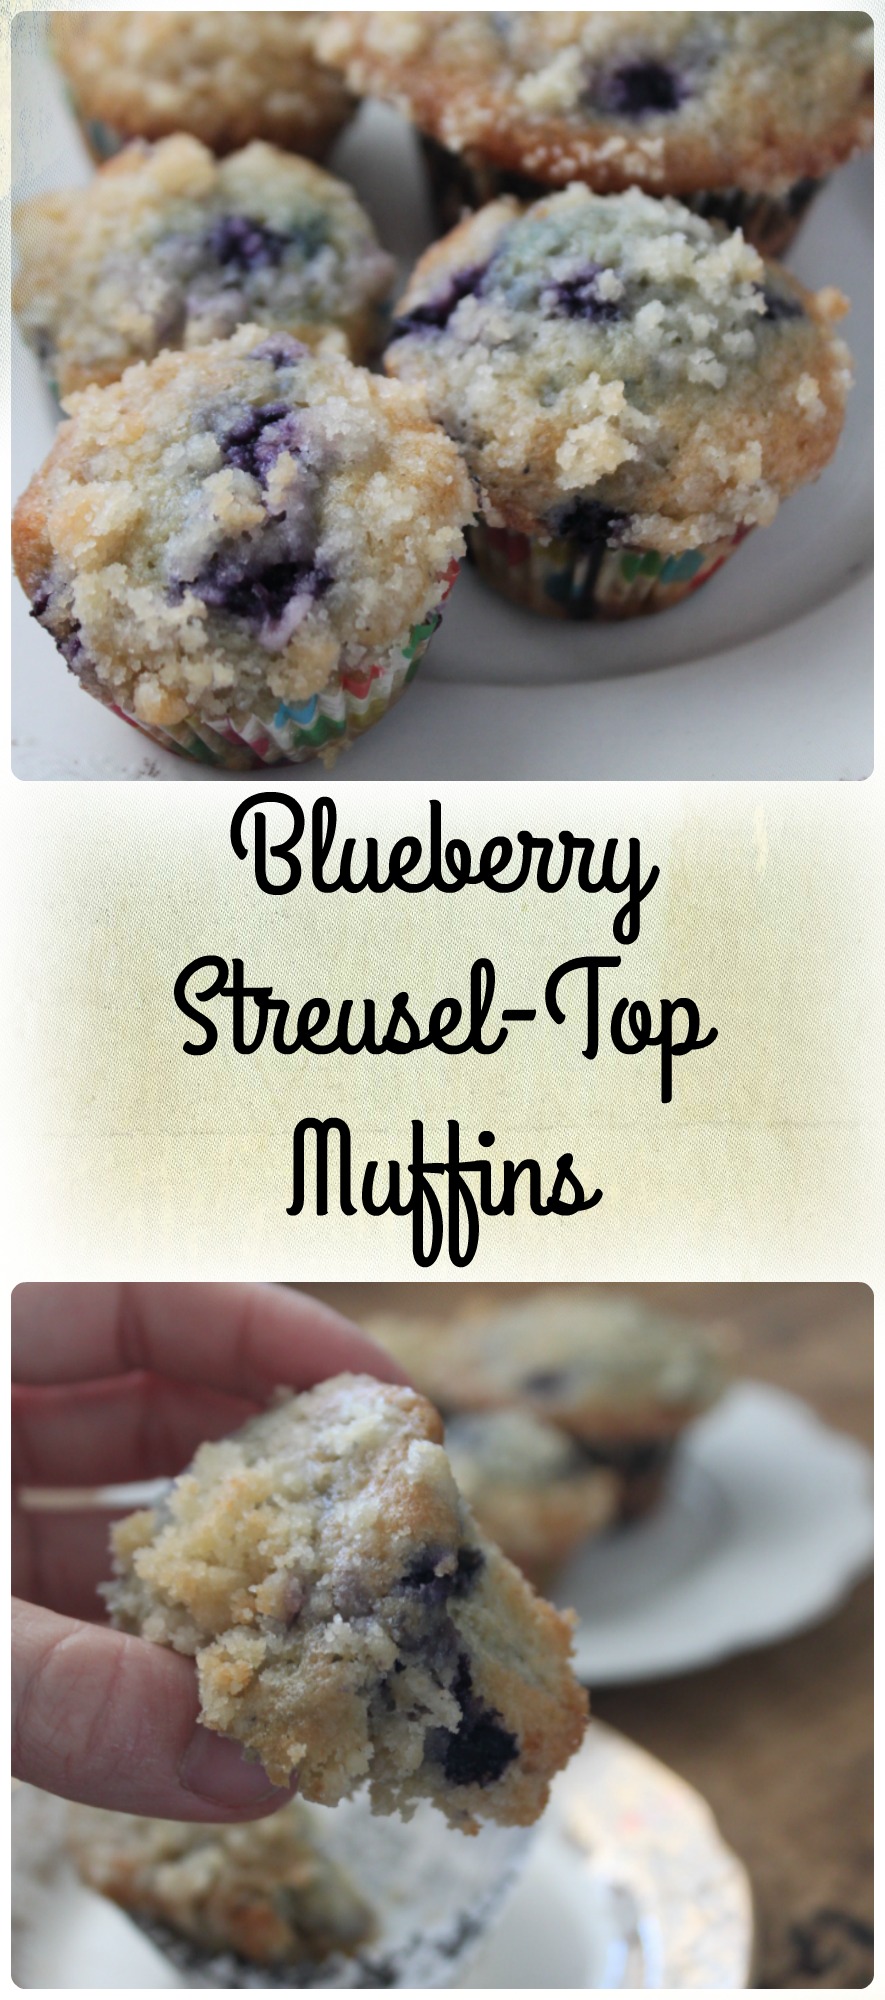 Blueberry Streusel Top Muffins From "Blueberry Streusel Muffins" from Chef Savvy Ingredients: For the streusel Topping:
For the Muffins
Method: Streusel Topping:
For the Muffins:
The best way to eat these? Still warm, with some butter and honey. Yum!!! 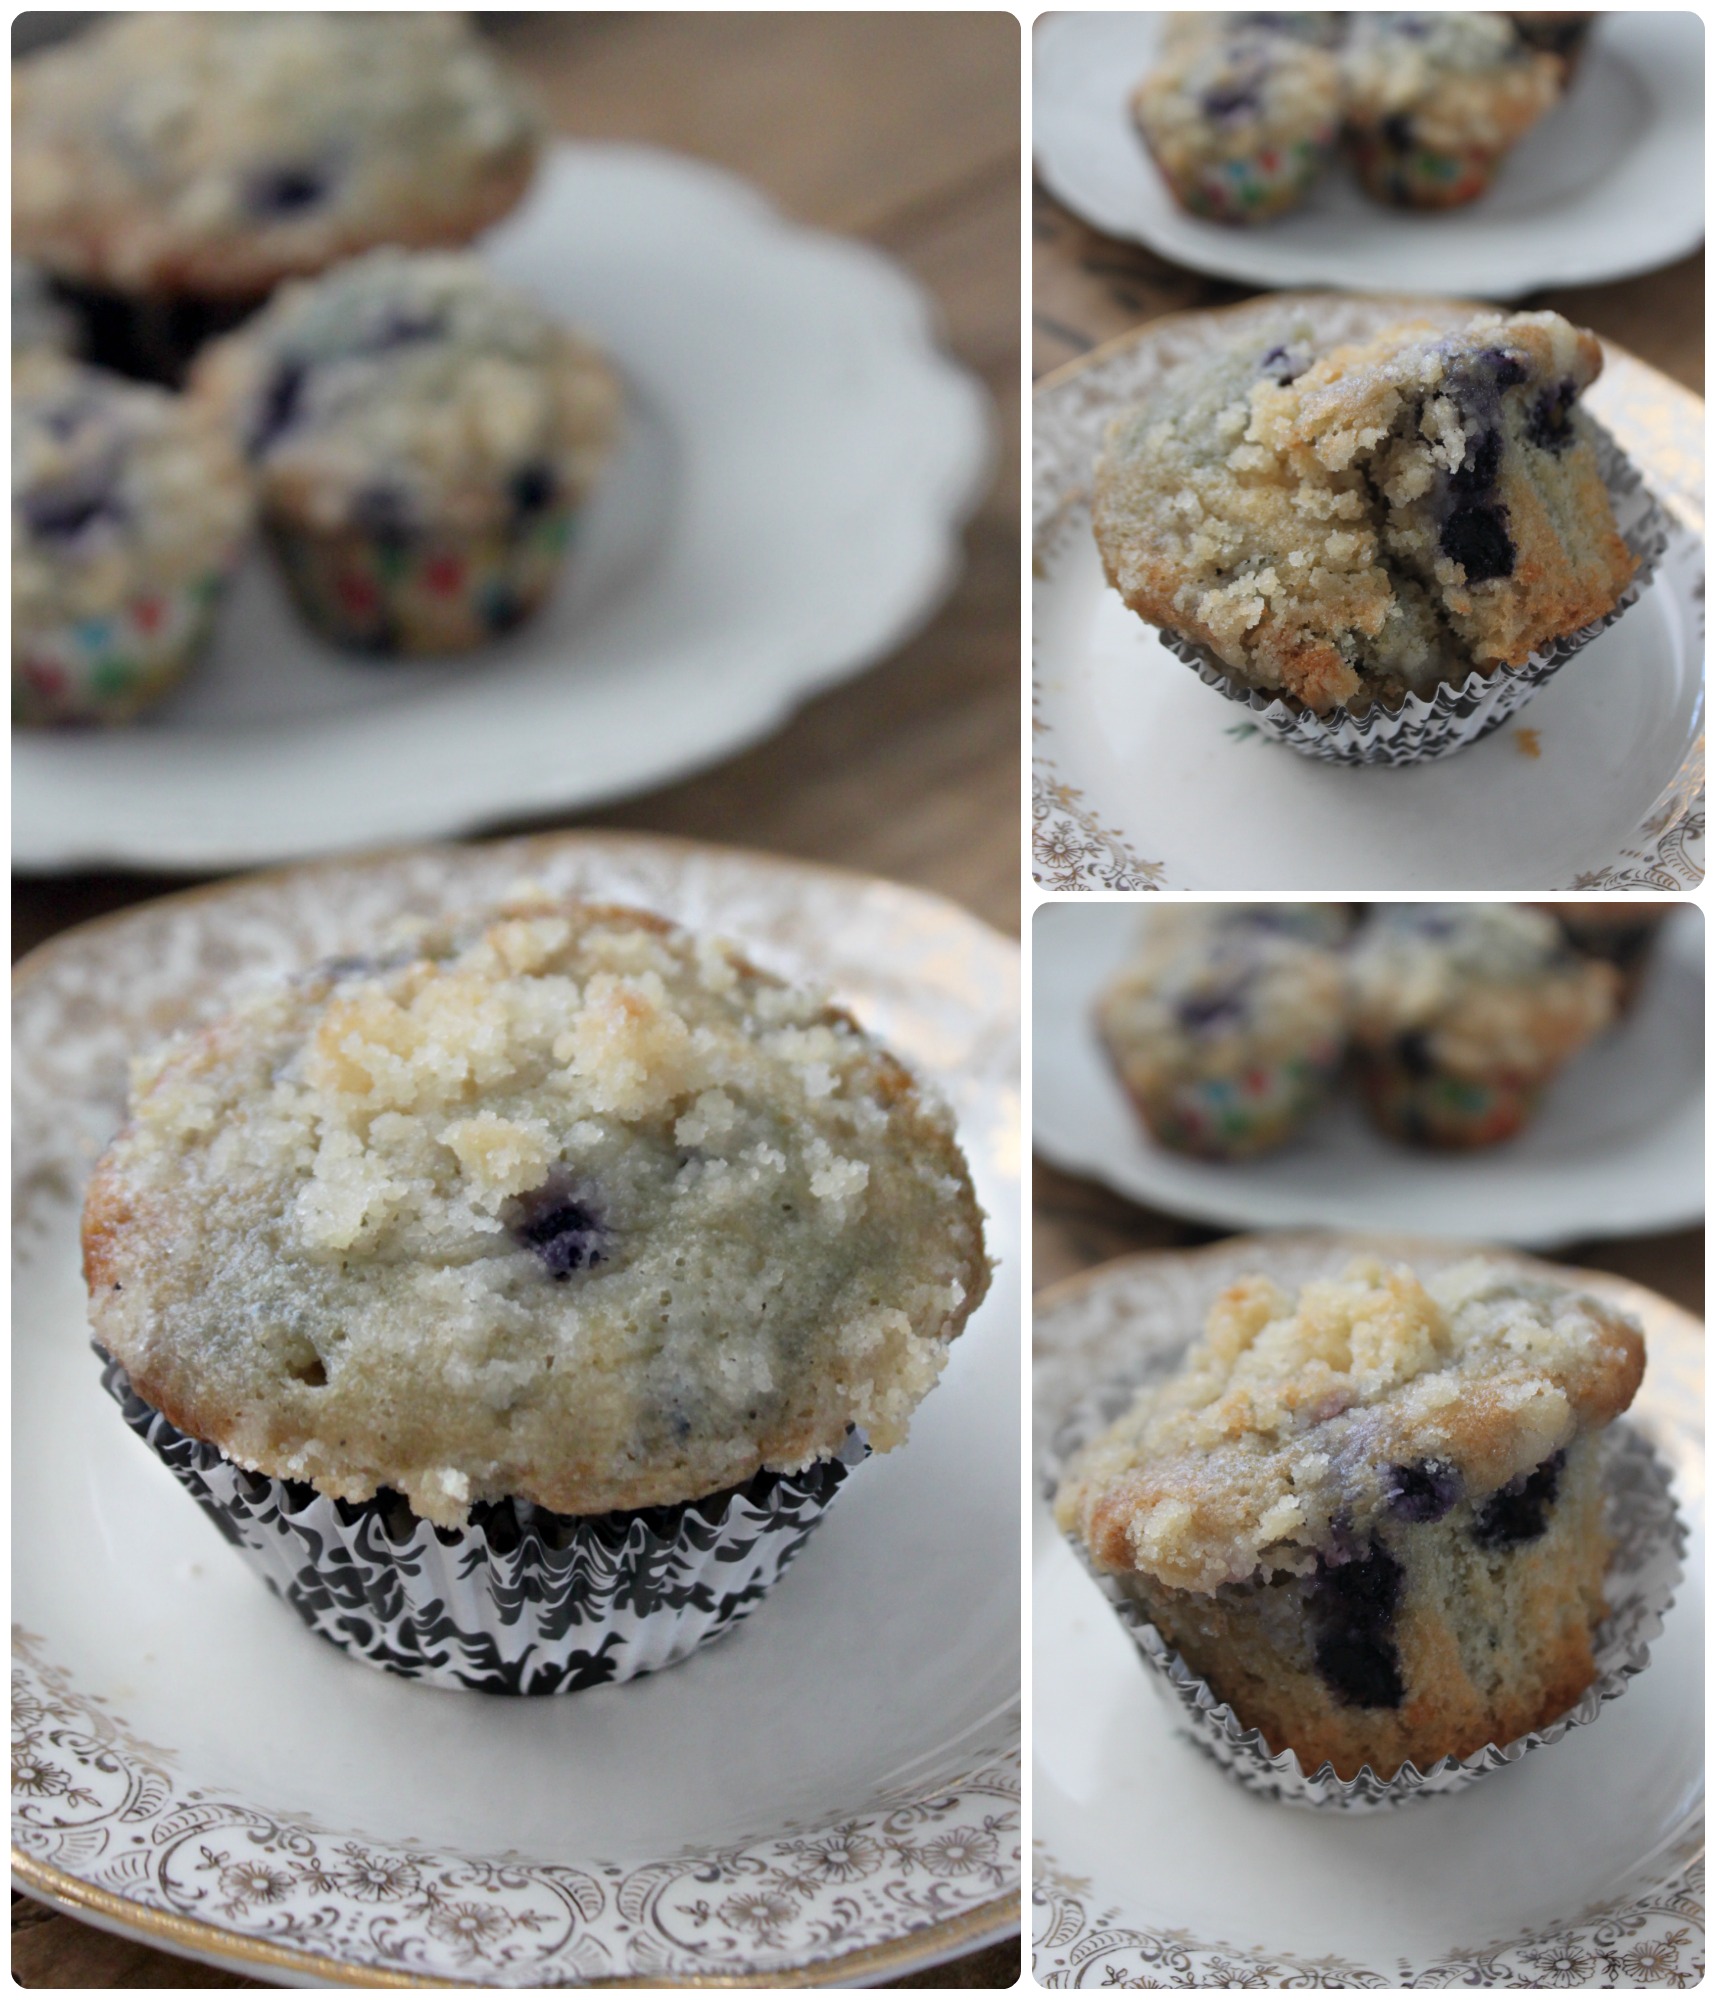 Well, I wanted to have this posted earlier today. I also had a post ready for yesterday that I never got to actually finish and post. Last week the kids missed school on Friday because we drove to Toronto to see Matilda The Musical (which we had so much fun seeing!), then this week Monday was a snow-day, and Thursday was too - but we drove the kids to school (because we're mean) and because we had a meeting to be at, and also because we wanted to go into the school to be involved in the training for Caleb's new iPad. Again, with the run-on sentences! Then today was a P.A. day!!! So, I mean, this week was all wonky, and I didn't really get all the things done that I wanted to, but, oh well! I'm trying this new thing where I don't beat myself up about every failure, whether real or perceived. It's a hard task, but I think it's important to not be my #1 critic 24/7!!!
I will share next Thursday about my Caleb, my amazing Caleb and something that happened this past week that left me weeping like a sappy, happy Mother numerous times! For now, just have a wonderful weekend, and I'll see ya next week! xoxo It's Shrove Tuesday, otherwise known as pancake Tuesday! Shrove Tuesday is the day that precedes Ash Wednesday, which marks the beginning of the 40 days of Lent leading to Easter. The name Shrove Tuesday comes from shrive (to absolve), meaning absolution for sins by doing penance (desiring to repent and to do so by works). The day gets its name from the tradition of Christians trying to be 'shriven' (or having a clean heart) in preparation for Easter. So, some people make a special point of self-examination, of considering what wrongs they need to repent from, and what amendments of life or areas of spiritual growth they especially need to ask God's help in dealing with, and they do so by restricting certain foods (some people now participate in Lent by giving up certain habits that are bad, distracting, or not useful to a full life). On the day before the 40 days of Lent (shrove Tuesday), families would want to use up all the rich foods in their homes (fats, eggs, milk and sugar) because those foods weren't eaten during Lent, and they likely wanted all that yummy and tempting stuff out of the house for the 40 days of fasting for the Lent season! And eventually, it became (for some) to be called Pancake Tuesday because of the fact that pancakes are a pretty obvious dish to make from the ingredients being fasted from! There are all sorts of stories about the real start of "pancake Tuesday", and about different traditions through history and around the world regarding pancake Tuesday. Very interesting stuff! Listen to this one: On Pancake Day, "pancake races" are held in villages and towns across the United Kingdom. The tradition is said to have originated in 1445 when a housewife from Olney, Buckinghamshire, was so busy making pancakes that she forgot the time until she heard the church bells ringing for the service. She raced out of the house to church while still carrying her frying pan and pancake, tossing it to prevent it from burning. The pancake race remains a relatively common festive tradition in the UK, especially England, even today. Participants with frying pans race through the streets tossing pancakes into the air and catching them in the pan while running. The most famous pancake race, at Olney in Buckinghamshire, has been held since 1445. The contestants, traditionally women, carry a frying pan and race over a 415-yard course to the finishing line. The rules are strict: contestants have to toss their pancake at both the start and the finish, as well as wear an apron and a scarf. Traditionally, when men want to participate, they must dress up as a housewife (usually an apron and a bandanna). The race is followed by a church service (found this story here). Anywho, every year I post some pancake recipe, but this year I wanted to point a few of my own recipes out, and also some super delicious recipes that I love from a few other bloggers! In this round up I've got the perfect (regular) pancake, specialty pancakes, gluten-free and paleo pancakes. There is something for everyone! Just click on the name of the pancake to see the recipe! Enjoy! Perfect Pancake Recipe Easy peasy, simple-as-can-be pancakes From Grace & Good Eats 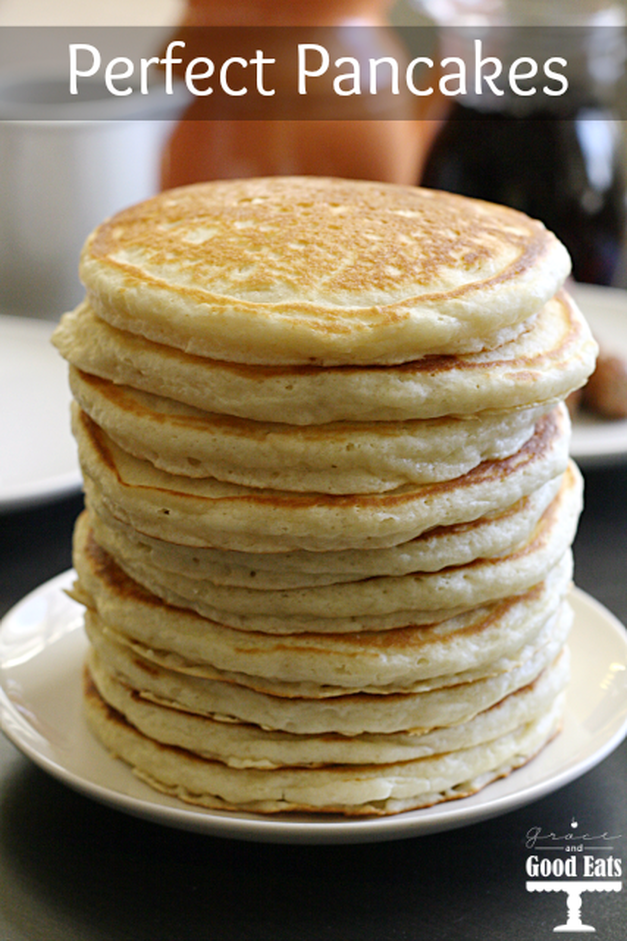 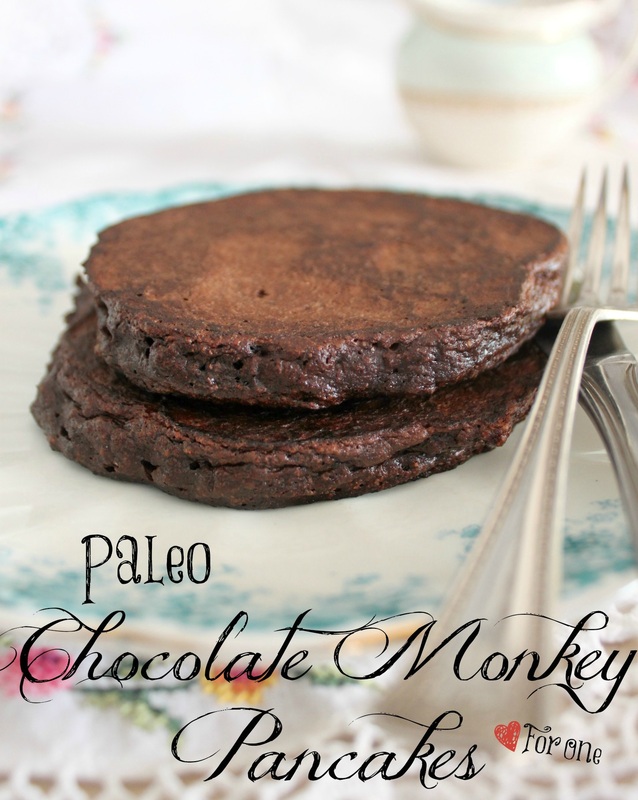  Gluten-Free Pancakes Just a strait forward g.f. pancake recipe (with a few chocolate chips hiding in there)! From Bushel & A Peck 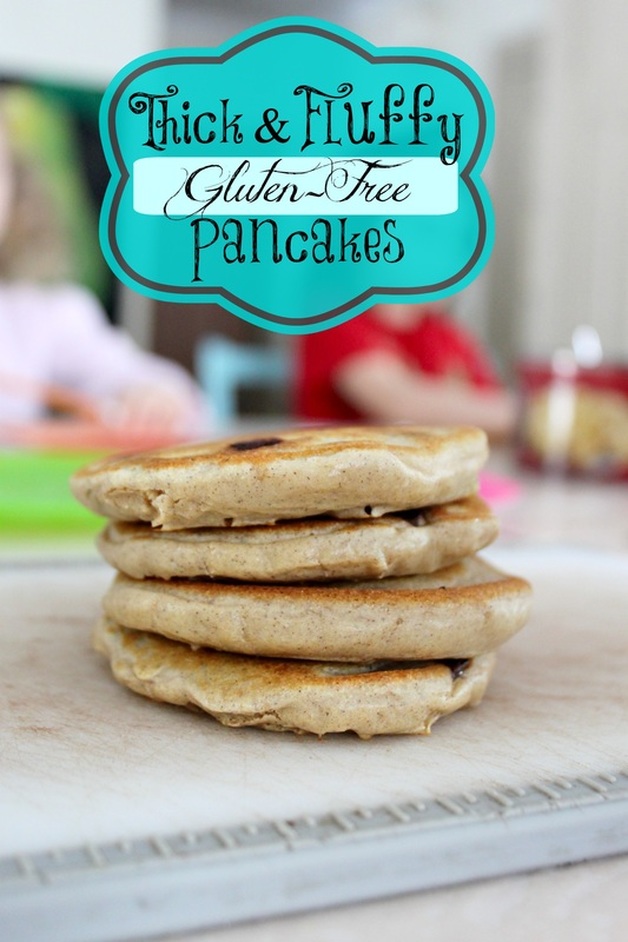   Chocolate Chip Oatmeal Cookie Pancakes Gluten free, and like a large, soft, pancake-y oatmeal cookie! From Chelsea's Messy Apron 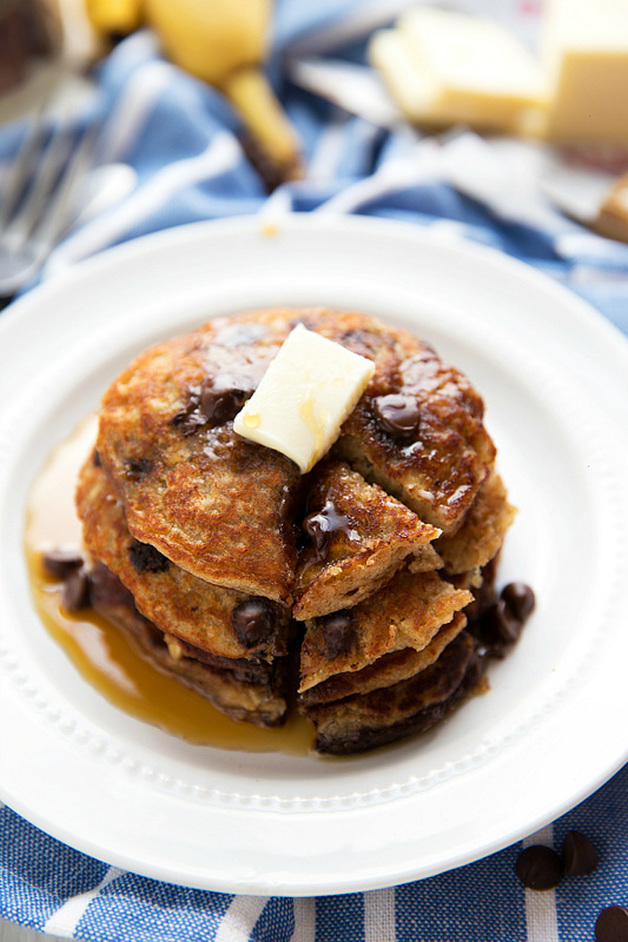 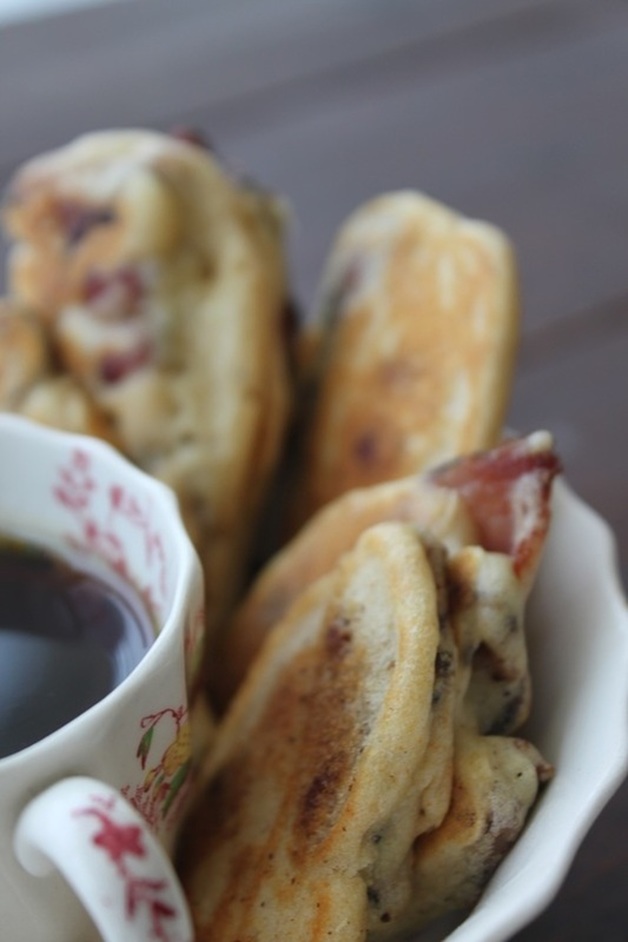 Baked Pancakes Perfect if you don't have time to stand in the kitchen flipping pancakes! From Eating on A Dime 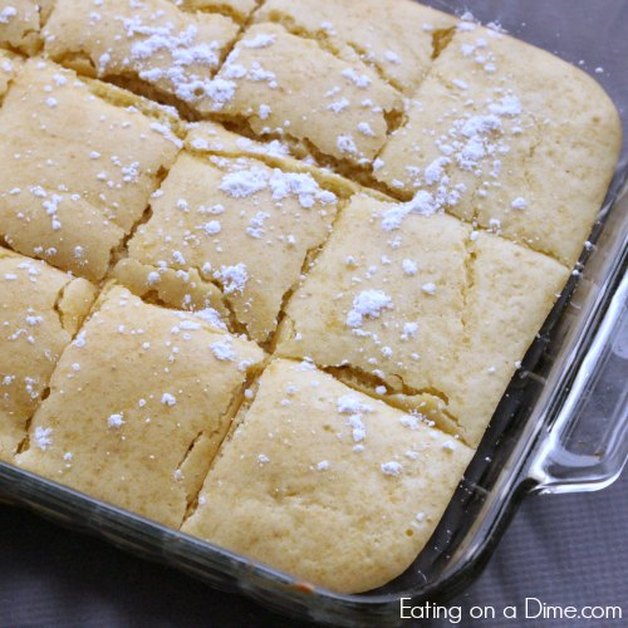 Just a little ditty to close here.....last night while cleaning up from dinner, I took the lid off my slow cooker to get the leftovers out of it, and a ladybug came careening out of no-where and landed right in the food in the crock-pot! And I dropped an f-bomb (that's the f-word, FYI). Confession time. I have a serious potty mouth. I mean, it's pretty bad. I don't say things my kids think are bad, like dumb or stupid, but I sure do say the ones I really don't want them to use! So, last night when I swore about a lady bug ruining the leftovers (I know it's just a small bug, but you agree with me that it ruined all the food?!?), I looked at my husband who's face was saying, "really? An f-bomb because of a bug in the food?" , so I said, "maybe I should give up swearing for Lent?" And, even though I don't always give something up for lent, I am going to do this. I swear more than is useful, and I should tame this beast! So, that's what I'm giving up for Lent! Are you giving anything up for Lent? Are you having pancakes for dinner? Are you sick of all my questions!?! : ) Granola bar recipe # 3! I first posted THIS gluten-free granola bar recipe back in December 2013, then just this past October I shared THIS recipe for my gluten-free, nut free, & refined sugar free granola bars. The reason I even made the second version was because I wanted a more clean ingredient bar to send with my kids to school, and it was good....for a time.... I mentioned in the post for the second granola bar recipe that my eldest son hates raisins, or any dried fruit at all. That recipe calls for dried fruit puree, and if I didn't get every single little lump of dried fruit pulverized, my autistic son's eagle eyes picked it out! Geez! So then I have this big batch of granola bars, and the girls will eat them and take them to school, but Caleb would not! Then one day I was prepping a butternut squash for dinner, and was cutting out the seeds to wash and roast. When they came out of the oven, Caleb descended on the salty, roasted seeds like an un-welcomed seagull and ate them all!!! I was like "whaaaaaa?" because I had no idea he liked roasted squash seeds! Well, since he clearly liked roasted butternut squash seeds, I thought I would offer him a handful of raw pumpkin seeds to see what he thought. He ate them and his only comment was, "these will not be very salty?" (the kid loves salty snacks and was a little bummed at the lack of saltiness in the raw seeds-but he still ate them!). Then I offered him raw sunflower seeds and he ate those up too, without any comments whatsoever! So, with this new knowledge I thought, "why the heck am I not adding more super-heathy seeds to my kids granola bars?!?" Well, I set out again to make a new granola bar for my kids to take to school, one with more seeds, no pureed fruit, still no nuts (nut-free school), no refined sugar, but still super tasty obviously or else my kids wouldn't eat them! 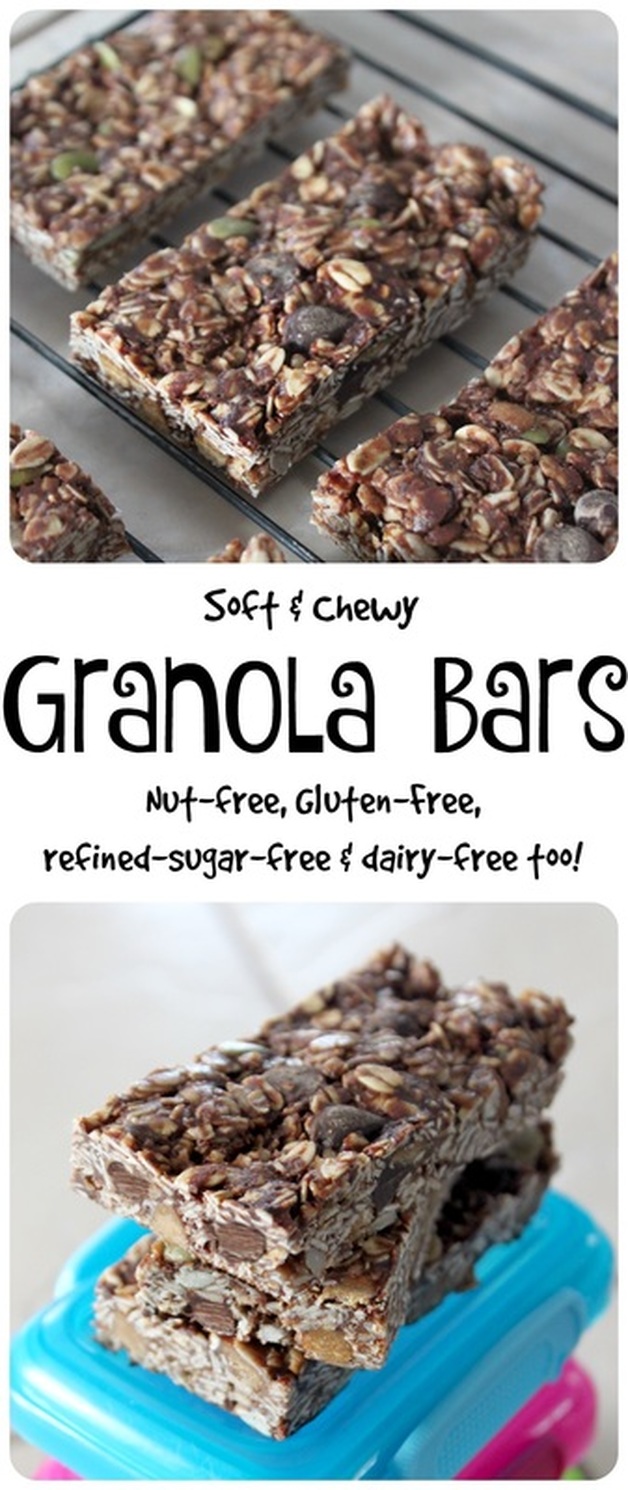
More Granola Bars!
Nut-free, gluten-free, refined sugar-free & dairy free Adapted from Keeper Of The Home Ingredients:
Method:
***Store these bars in the fridge or freezer*** Because of the sunflower seed butter, and the pumpkin and sunflower seeds, these bars need to stay refrigerated or frozen
 I am an affiliate marketer for Vitacost which is where I buy these products (which I use to make these bars!). What that means is that if you buy anything from Vitacost through my blog here, I make a small percentage at no extra cost to you at all! I know there are some other great online food companies out there, but Vitacost doesn't take an annual fee (like some other discount food companies do), and if you're in Canada it's the BEST place to get a ton of healthy, organic & whole foods at super-duper prices, and for a low flat fee shipping rate. Trust me, I spent a lot of time trying to find a good health food & product store online that would ship to Canada! Vitacost rant over!!! I just really love them, otherwise I wouldn't go on and on about it! : ) 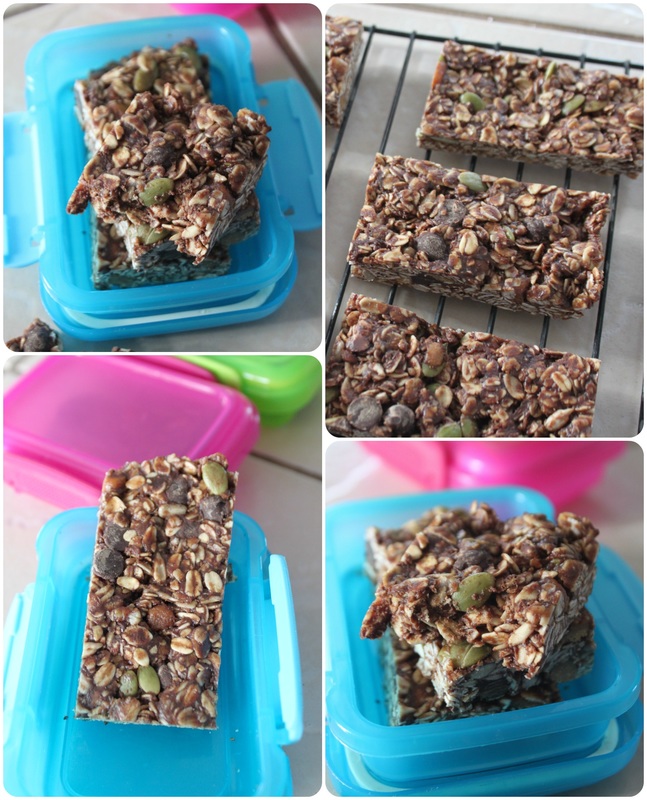
So, these granola bars turn out soft and chewy, just sweet enough, and with nice flavour and crunch from the sunflower butter and seeds. Yumm-o. And they last for quite a while in an airtight container in the freezer, which is great! So, let's move on from granola bars, shall we....? I'm working on choreography for The Belleville Theatre Guild's "The Music Man" right now, and I'm listening to that music a lot because I like to be extremely familiar with the music in a show I'm in or working on. However, I have been distracted and listening to another musical sound track lately because I am obsessed with the musical "Matilda"! Remember the book by Roald Dahl? They made it into a movie in 1996, but in 2010 it opened as a musical in England, then opened on Broadway April 2013.....and it's amaaaaaaa-zing! I mean, you've got this cast of freakin' talented people, mostly children, and it makes me go, "golly"! (actually more like, "gaaaaau-lee!"-see the difference?) : ) Because my random blog here is about whatever seems to pop into my head, I wanted to share a video clip from the 2013 Tony Awards where the Broadway cast of "Matilda The Musical" performed a medley from the show! Can I just say that these amazing kids perform this show 8 times a week, and then do performances like this, or on David Letterman and other late night shows, as well as the Macy's Thanksgiving Day Parade, I mean, geepers x 1000! At the end of the clip you see 4 Matilda's and that's because there are 4 girls who share the role (2 shows per week, and being a stand-by 2 days a week). Why do I know so much about this show? I already told you, I'm obsessed!!! I have always loved performing, but I was pretty bad at it as a child! I still did it here and there, but I wasn't any good. Then there's these kids! Hokey dina! How many more strange expletives can I use here?!? Golly, geepers, hokey dina, golly gee, gee willikers, hot-dog, oh boy, heavens to Betsy, jumpin' jahosaphat K, I'm done. The good news is that "Matilda The Musical" is having it's Canadian premiere in July, so I will get to see it! Two thumbs up! I'm signing off now dear readers! Leave a comment if you'd like about these granola bars, granola bars in general, or your favourite musical! : ) FYI, "Matilda" isn't my favourite musical, "Into The Woods" is, and has been since I was probably 8 or 9 years old! I listened to the cassette tape of the original Broadway cast recording a LOT! Anywho...I digress.... G'bye! A peach recipe?!? Yes, I know, I know. Peach recipes are only for the summer months! Ok, there is no real rule about when one can post peachy recipes, but generally bloggers like to post seasonally.....and, well, I would have posted this back in the summer, but I got behind because of travelling, enjoying the great outdoors, and wanting to post about other things. So, this very summery recipe got put on hold! I made it several times throughout the summer, with wonderful, fresh Ontario peaches, but it wasn't until canned peaches went on sale a few weeks ago, and I tried making it with those that I knew this recipe could not be contained by any season! Finding canned fruit that is basically Paleo is tricky, but not impossible. I really and truly prefer fresh fruits and vegetables, but sometimes something is on such a great sale, and you know you might end up needing it, so you grab a can or two. In the end, I not only ended up trying this recipe with canned peaches, I also ended up using canned peaches to send with the kids to school one day (the day before grocery shopping, so fresh anything was scarce at our house!), and I even enjoyed (thoroughly) a bowl full of peaces as a bed-time snack on the same pre-grocery trip day! Canned peaches saved the day! : ) The canned peaches I bought were Del Monte 100% Juice halved peaches. The 100% juice kind are packed with water, peach & pear juice & ascorbic acid. So, while not a wonderful, fresh peach, they are a pretty fantastic second! N-E-who, the pictures for this post are from a fresh peach cobbler, but I wanted you to know it could be done with canned peaches too! 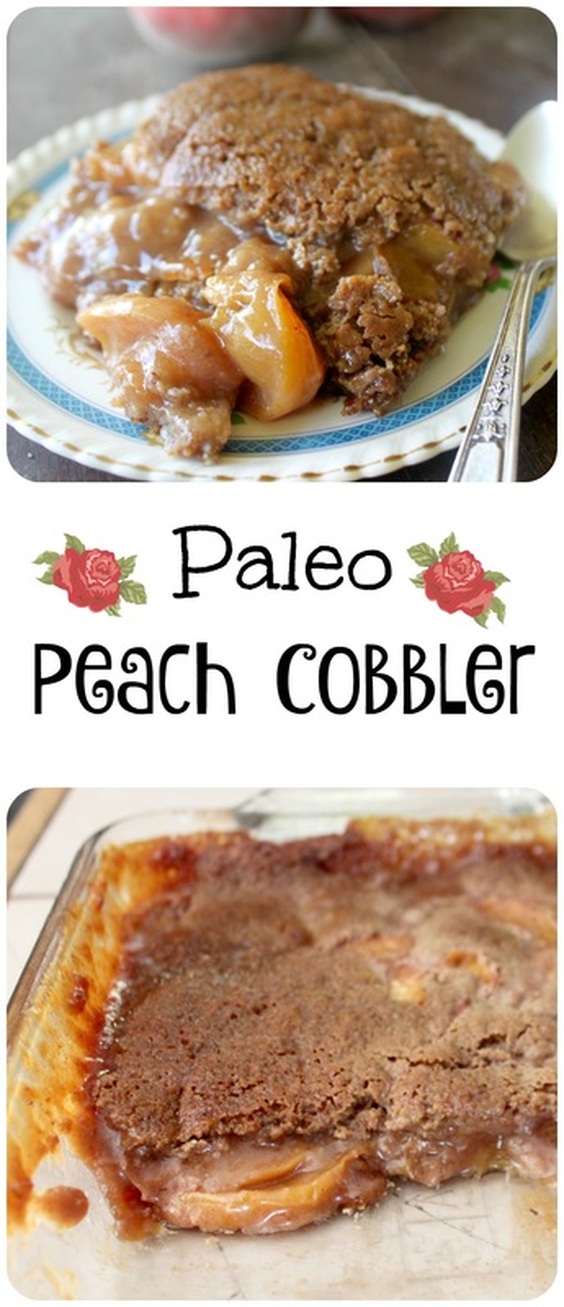 Paleo Peach Cobbler Adapted from Center Cut Cook Ingredients:
Method: ***The method may seem strange, but just do it!***
Strange order, yes? Oil, batter, peaches, no stirring together? Crazy town! The batter bakes up and over the peaches, and the oil gets all saucy with the sugars & the peach juices, and creates a caramel sauce of sorts. It is divine! Trust this lady! 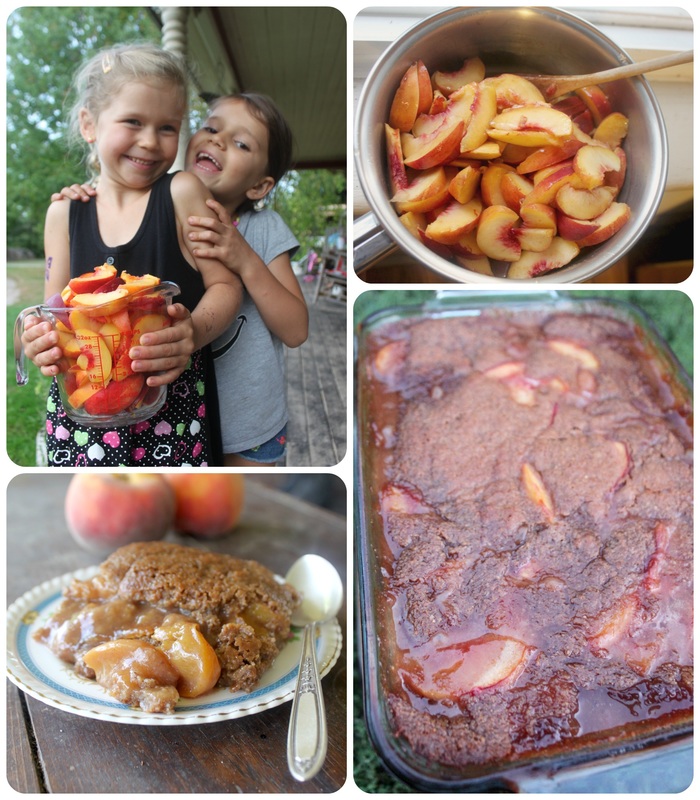 You can see the crazy delicious caramel that has bubbled around the edges of the cobbler in that bottom, right hand photo. Ya know what? Today in Tweed it is gloriously sunny! Still cool, obviously, because it is is the fall, but this day feels just as worthy of peaches as any other day! I'm liberating peaches from being stuck in the summer! Why am I so excited about this....? Hahaha...oh boy, perhaps I'm more tired than I realize? I have mentioned many times before that I actually don't even really like baked fruit desserts at all, so if I'm tooting my horn about this here cobbler, well, you's better try it! "You's" is something people 'round here say. It's not a real word at all. It's "you" made strangely plural. More strange is that some people say "you's guys". Double plural?! I love this place! Seriously, I'm not judging, I love it! That was an interesting tangent I just wondered off to..... This weekend I'll be Belleville at an artisan sale, which I am excited about, though uncharacteristically unprepared for! So, I need to get my act together today and get ready! I hope everyone had a good weekend! If you stopped by here on purpose or by accident, leave comment! Any random thought will do! : ) |
Hi, I'm Amy-Lyn! 
I am the lady behind this here blog! I live in the sticks with my animals, my super handsome husband, and my
3 amazing kids! Here you'll find things from recipes (gluten-free, paleo, and strait up junk food!), DIY ideas, thoughts on raising a son with autism, and whatever else pops into my brain! : ) Read more about me by clicking here! Want to Stay Connected?
Find What
|

 RSS Feed


