|
Well, hello there! Merry Christmas (belated)! We are still away visiting family, but we'll be heading home today. Our time away has been good, bad, and itchy. Yes, itchy. As in chicken pox itchy! We had barfers, skooters, accidental double bookings for Christmas dinners (which left us driving back and forth through town to be at both parties). Then there were chicken pox (which meant another family gathering got altered because some of my siblings who have younger babies didn't want them exposed). I'm griping a lot here...but the truth is, it was still good to come "home for the holidays". I went to the opening night of "Into the Woods" with my sister, ate some great food (3 full-on Christmas meals at 3 different family get-togethers!), had some great conversations, stayed up late, slept in, sang carols, laughed and was merry. I had to give myself a little pep-talk after our first day or two away. I was feeling overwhelmed and seriously blue. I talked to myself about my attitude, and how no matter what I get to choose how I react to situations, how I feel about the situation. I can be crabby and sad, or I can feel grateful for what I have and who I have in m life. So, all that to say, I had a pretty good time away. The things making up my time might not have always been the best, but there was always something worth enjoying in every place we were in. Now, onto the cookies I am sharing today! Christmas brings out a lot of memories from my childhood, and my Christmas childhood memories involve Dutch traditions and Dutch treats. So, here's another for you! Arnhem is a city in the Netherlands, the capitol of it's Province, actually. And "meisjes" means girls, so, these are "Arnhem Girls", and not the "lady of the night" kind of girl, but it's meant as a sweet little girl. And that's just what these cookies are, sweet little cookies. Some people think you can just get store bought puff pastry, cut out a circle, cover it in sugar and bake it. But that's not really quite right. Puff pasty is made by folding a simple dough over butter, and doing more and more folds, while rolling the dough flat in between each fold over. That gives you a very layered pastry. These little darlings are simpler than that by far! They turn out with a slight poof, and a few layers, but the dough is bread-like and buttery. In fact, as you bake these the house will smell like you are baking bread. They are a wonderful coffee cookie (just ask any Dutch person), and you will be happy to have them! :) 
Arnhemse Meisjes The dough needs at least 2 hours fridge time Ingredients:
Method:
The cookies will puff up, the sugar will caramelize and you will have a wonderful and unique cookie to serve with coffee, Dutch style! 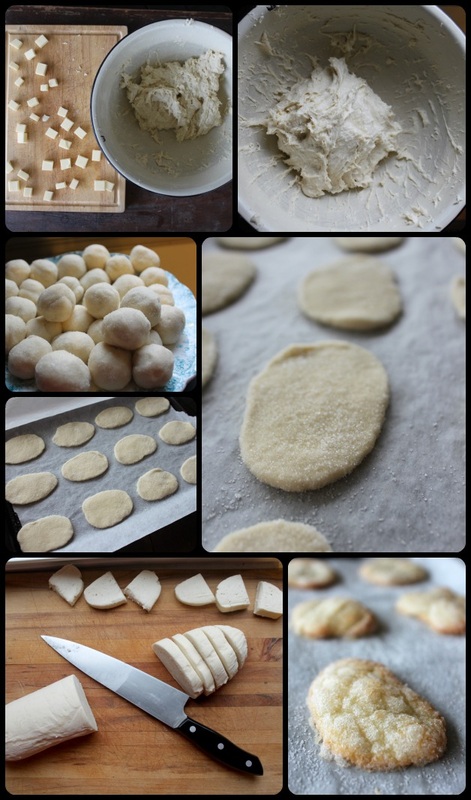
These cookies require some work, but really nothing that is too complicated or difficult, and the end result is very much worth it! Trust me! 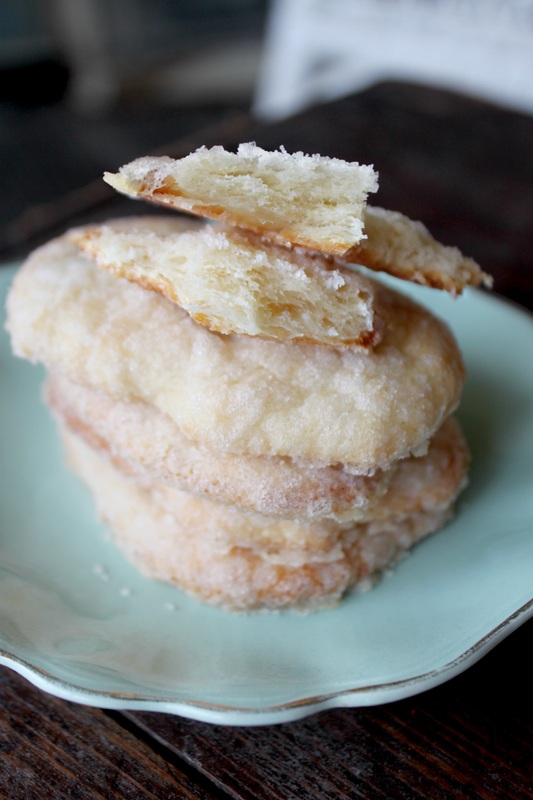
Look at the inside of this fantastic cookie! Yumm!
Alright, well, I hope everyone has a good Monday. I am looking forward to the drive home and getting settled into "normal" life again. You'll hear from me again this week, so you had better look forward to that! :)
5 Comments
I had a friend who I have not seen for years and years and years. He (and his Mom and Dad) used to make the best boterkoek in the whole wide world!!! This is not their recipe, but it is really good! What? I just told you I hadn't seen this friend in forever and you expect me to have his recipe? I haven't seen him since long before I was married and I was not baker-lady back then. Back then I ate others baked good and said, "yummmm", and that was it. Anyway, boterkoek is what it sounds like boter=butter, koek=cake. See, so simple. Now, I ask you, why would you not want to try making this? It's called butter cake!?!? It's kind of a no-brainer! :) 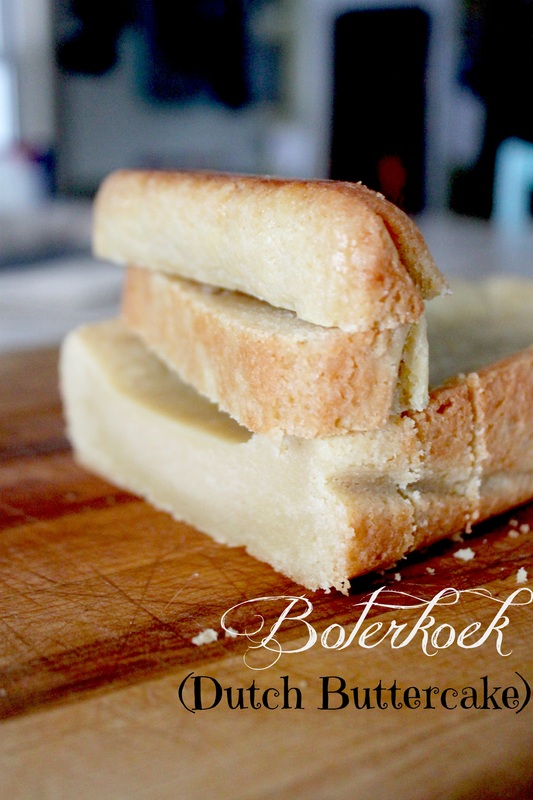
Boterkoek (Buttercake) Ingredients:
Method:
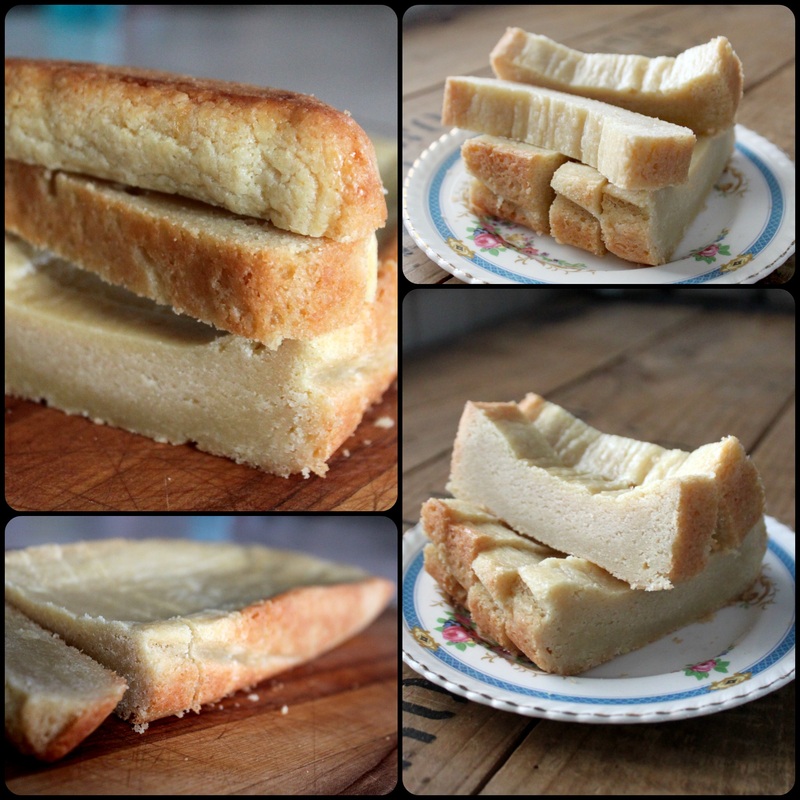
You can see how the outside has a beautiful golden, crunchy finish, and the centre is super dense and moist. This is really a fantastic cake, and whether or not you're Dutch, you will like it!
I hope everyone had a great weekend, and is looking forward to the week ahead with Christmas celebrations! When I was a child we celebrated St. Nicholas day on December 5th. It was always a lot of fun; my Opa and Oma would dress up as St.Nic and black Pete (memories of my Oma with a painted black face....oh boy), and we had lots of traditional Dutch treats. I must have been feeling Christmas sentimental (semi-mental, as my Dad would say!) because I wanted to make some speculaas, a treat we would always have for St. Nicholas day. Speculaas is a spiced shortbread/shortcrust style cookie that's not quite a ginger snap because the texture is a bit different, and you also add pepper to the dough as a seasoning! I know, pepper! After researching (aka-Googling!) a bunch of recipes I decided on Martha Stewart's version. The only thing I didn't do that was instructed was to freeze the cookies once they've been cut and placed on the baking sheet. Why didn't I do it, you may ask? Because I did the classic bad recipe maker move, and didn't fully read through the instructions! I already had my oven on, warmed up, and out-loud said, "damn you Martha!". I was mad. I think I may have been hungry. Anyway, they turned out nicely so I'm not sure what the freezing business was all about. Generally if you freeze a shortcrust dough once it's cut out it is intended to preserve the shape/size of the cookie, but I didn't find I had a problem without freezing. So, anywho, you decide what you want to do in that regard! 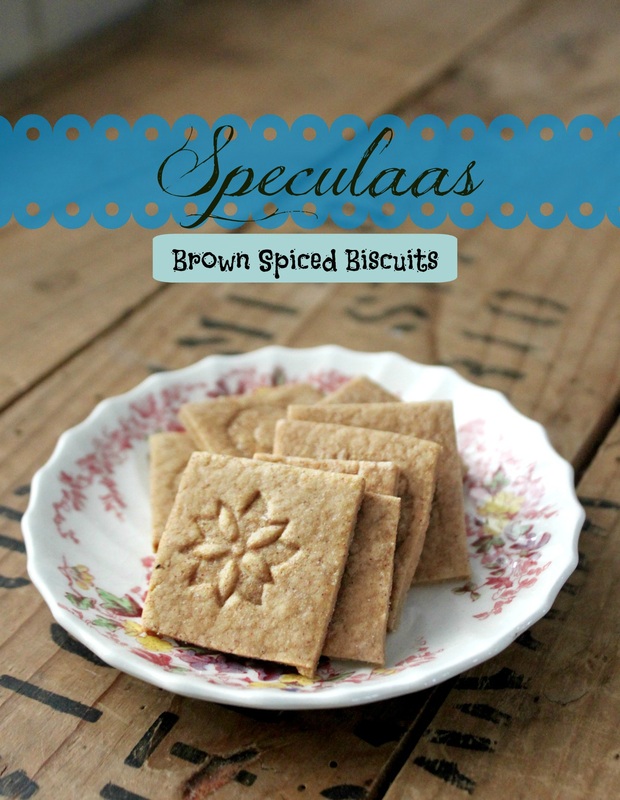 Speculaas Ingredients:
But you can't skip the pepper!
Method:
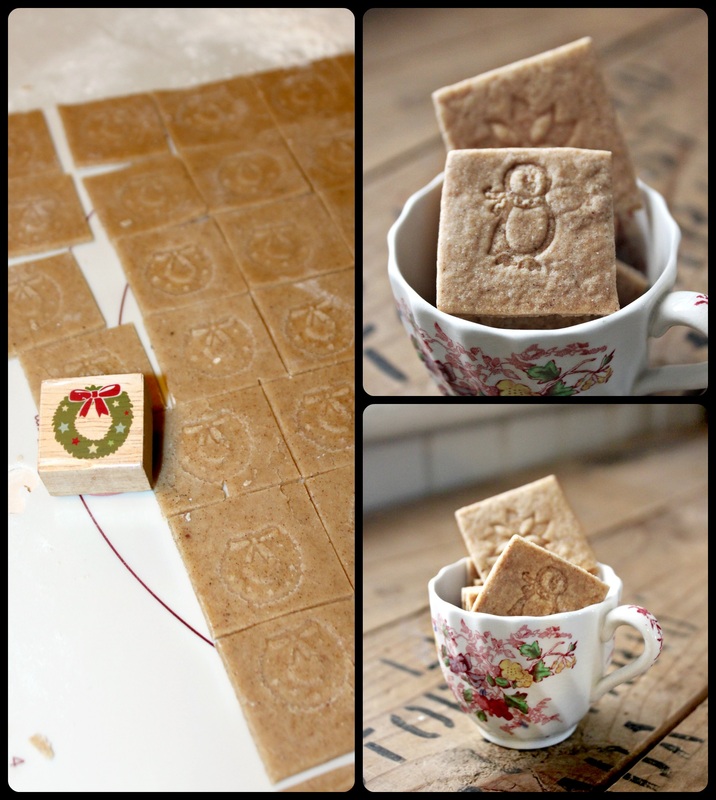 Some versions of these cookies are flakier than others. This particular recipe comes up as a nice, crunchy style cookie. Either way, you've got some fantastic spices nestled away in there, including the secret ingredient-pepper, and that just makes for a nice treat.
We are visiting family over the holidays, and I am looking forward to it! I hope you can make up a batch of these traditional Dutch Christmas cookies (although, they are usually served as part of St. Nicholas Day on December 5th). No worries, I'm sure St. Nick won't mind! Have a great weekend everyone! xo Caleb has spent the last few weeks playing with cars. I mean actually playing with them. In all of Caleb's 10 years of life, he has only ever sat and spun the wheels on toys cars, which is a "normal" thing for a child with autism to do. Actually, spinning wheels on a toy is one of the listed symptoms of autism because it is something a lot of children do due their lack of ability to see the "big picture" and get transfixed by the details. 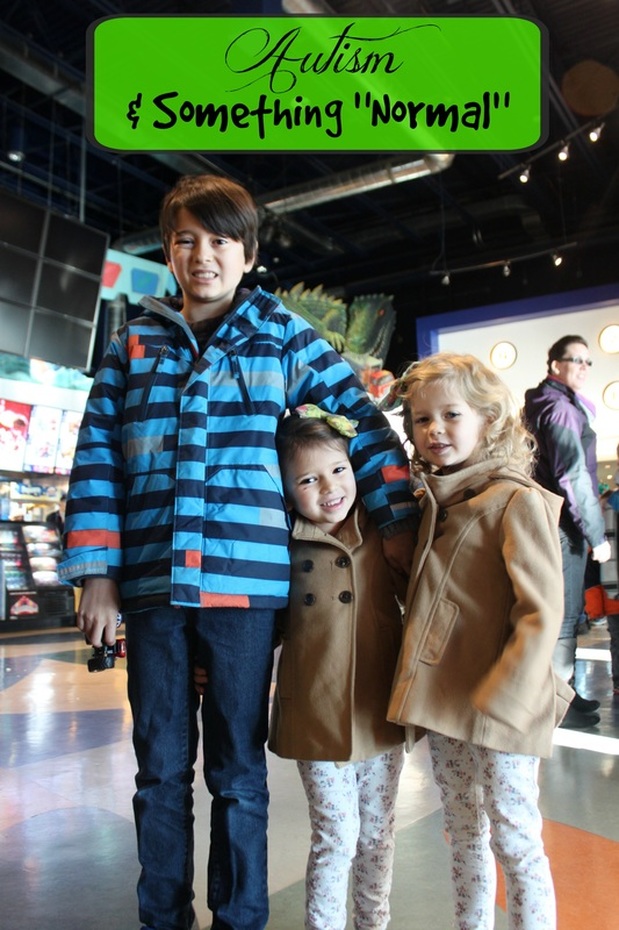 See him holding a car in the photo above? It started with my Mom giving Caleb a hot wheels track thingy that gets attached to a wall and shoots cars out of it. I know, it sounds awesome/dangerous, right? Then he got a remote controlled car (which, instead of standing still and driving it around him, he would be driving it and chasing it around!). Then, at Thanksgiving we went to a demolition derby, which Caleb enjoyed fully (in years past he's only lasted a short time before having a breakdown), then he went to a friends house where she had Lightening McQueen (from the Disney movie "Cars") as well as some other characters and toy cars, and suddenly, it clicked. Toy cars can be made to do things real cars do!
It's strange that something so small could be noticed, because in a "typical" boys life, playing with cars is one of the first things they do! For us, it's been years of getting cars, trucks, and tractor toys as gifts for our boy, only to have him like or dislike it based on it's wheel spinning abilities. Then, something else happened. Caleb started playing with a toy Nerf gun he had been given. I showed him how to load and shoot it, and he took it from there. He played with it outside for a long time, shooting at our enormous apple tree, then the next day he set himself up in our front entry way to shoot after I told him shooting in the house would likely be a bad idea because he would break something. He got a chair, sat down, and said, "Caleb will shoot small!" (translation-"If I shoot sitting here it won't go far and I won't break anything"). It was logical, he had problem solved, and then he said, "Mom will make a video of Caleb!". He insisted I get his iPad out and film him playing with the gun. I'm glad he made me though, as it was a big moment for him. He's had guns in the past that he had no interest in because it would have required him to remember the process (multiple step things are difficult for Caleb, and a lot of children with autism), and it would have required him to play pretend, which he certainly didn't do. Now suddenly, and I am really not sure why, he is playing with it like it's meant to be played with! These little things, these "normal" things that other kids are doing naturally are such a big success for Caleb. He has come a long way in the last few years (a very long way!), but when he starts something like playing with cars properly or shooting a toy gun, things that no-one has taught him specifically, things that he has just observed and figured out on his own, those moments really bring me joy. I want to know he can be school/book taught, but I really want to know he can look, observe, and learn from the world around him on his own. As an adult he'll need to do that more and more; he won't necessarily have anyone there with him all the time pointing things out and leading him. As a Mom of a special needs boy, it gives me a chance to let out a little sigh, knowing that everyday he's stepping up, and growing up. It's not that I want him to be a "normal" kid, that would change him completely, and that's not what I want at all! I just sometimes want some normal things for him and his life, to bring him a new and more fulfilling type of enjoyment. These two "normal" things can open up doors for him for playing with friends and making friends too. Spinning wheels on cars may have been fun for him in his own way, but he did it silently, in his own world, shutting the rest of us out. Now, him and the cars are a full-blown, wildly noisy event that sometimes involves building ramps out of toys and books, and seeing how far he can launch a car and make his sisters laugh. That is friendship building, that is problem solving (getting the right height for a ramp to ensure it ends up where he wants it!), and it looks like a lot of fun! Caleb impresses me with how far he's come, he also reminds me that "normal" is relative. He's been on a changing scale of "normal" his whole life, refusing to be put into any box. I don't believe he does it purposefully thinking, "I will not be labelled!", but it's his natural drive, his fire and stubbornness (aka-European heritage!!!). It reminds me that we are who God made us deep down, but we can always be trying to do things better, with more excellence. I can't expect Caleb to do this if I'm never doing it myself. I'm being his example, and he is being mine. Besides, as my husband always says, "normal" is just a setting on a dryer. And nobody wants to be that! :) A few years ago I made these cookies....and they were terrible! I have a recipe from a book I bought for a fund raiser, and I was certain the recipe was good, it was just me that sucked. Well, me and my seriously crappy, circa 1960's oven I had been given. O.k, I still was getting my real "sea legs" (or, um, baking legs?), but it was a pretty close race in suckiness between me, and the oven. This same oven decided to fully crap out on me while I was trying to bake a multi-layered, multi-coloured cake for a birthday. My husband ended up having to buy a sheet cake from the grocery store. They let him buy a froze, un-iced one because I had already made a jumbo bowl of buttercream frosting I needed to use up! I digress....also, I think I've told this story before... Anywhooo, I hadn't tried making them again since that time years ago, but I sure wanted to try! I'm not a big fan of letting any baked good beat me, so round 2 was on! These cookies are super-fudgey, and simple to make for how beautiful they turn out. I mean, really, look at those beautiful cracked (crinkled) cookies? Lovely. Simply lovely. I added mint extract to make them more Christmas-y, but you can use vanilla extract if you would prefer! 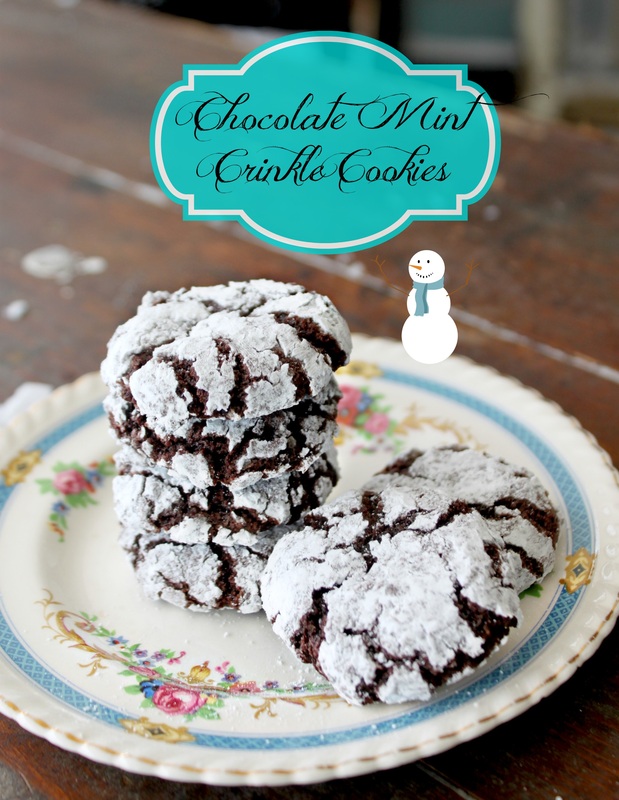
Chocolate Mint Crinkle Cookies Ingredients:
Method:
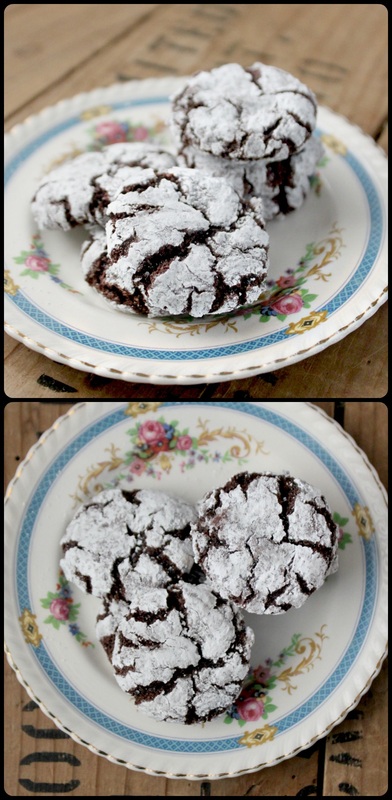
The best thing about these cookies? They are super-duper freezable (as opposed to just plain old freezable?). Would I share a possible holiday get-together cookie with you if it weren't freezable? I made mine, stashed 'em in an airtight container, and have been pulling cookies out about 4 at a time to add to give boxes and dessert plates. Oh, just be careful to only touch the sides of these though, a giant finger print in the middle of a cookie you're giving too someone else seems yucky.
Today I have a wonderful (beautiful) friend coming over and we're going to try to make Nanaimo bars! I've been told it's easy to do, but I had never tried! So, I'm looking forward to trying something new! I'll let you know how it goes! :) Pet peeve confession. I hate when I reckon I've thought up some brilliant, new, amazingly different recipe.....and then I Google it, and there's a ba-zillion of my idea. MY idea! Golly, well, on that note, here's a delicious idea I came up with.....and so did everyone else. 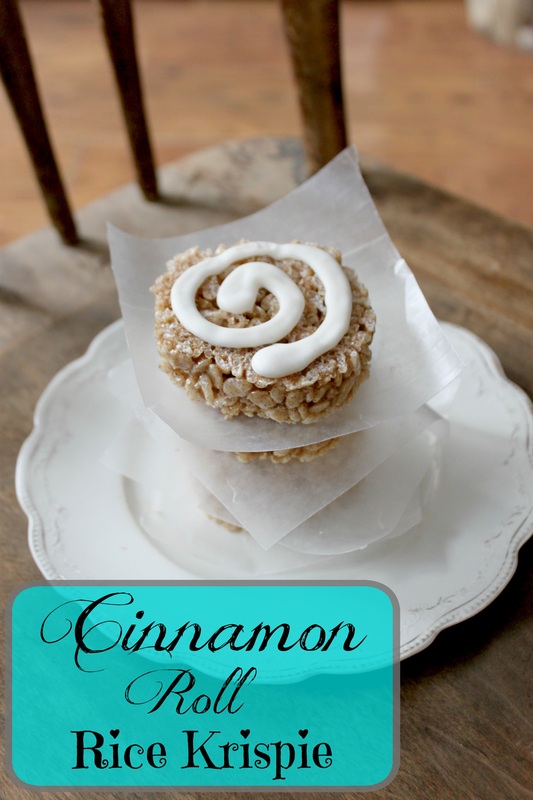
Cinnamon Roll Rice Krispie Ingredients:
Icing Swirl
Method: Rice Krispie Treats
Royal Icing Swirl 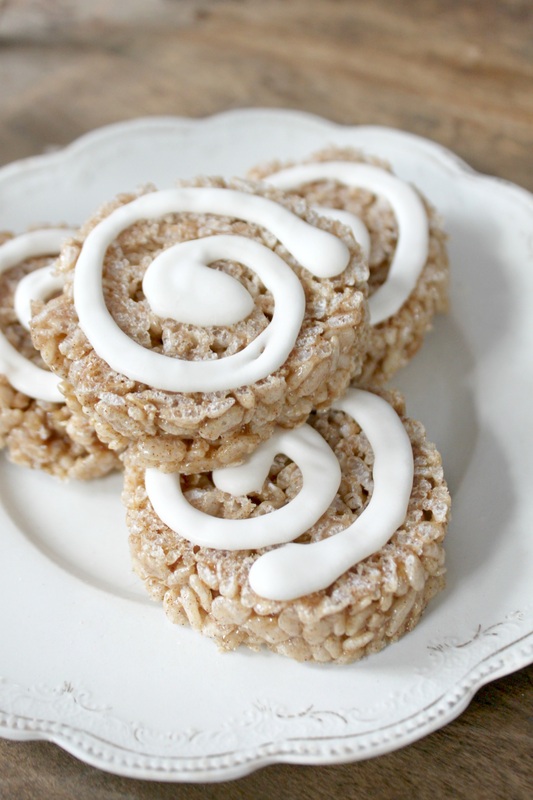
I quite enjoyed these particular treats. Now, I do love (x 100000) Rice Krispie treat anythings, but these had a delightful, grown-up, breakfast feel. I dunno. It makes sense to me!
G'bye for now! Well, I've seriously dropped the ball! I have a bunch of Christmas cookies I want to post about, and I feel the hands of time chasing me down, wagging it's clock arms at me shouting, "it's too late! It's tooooo laaaaaaate!!!!". I know Christmas is not technically for another 13 days (yiiiiikes!!!), but we leave to stay with family in 6 days, so I've got less time to cram all my projects into! I'm not sure if I'll be blogging while I'm away or not, so I wanted to be sure I got all my pre-Christmas ideas out into the world before Christmas. Anywhooo.....I'm rambling. Let's just move onto today's lovely treat. It's a cookie. It's a brownie. Need any more info? I thought not. Oh, p.s., if you're looking for a gluten free brownie cookie, look here. :) 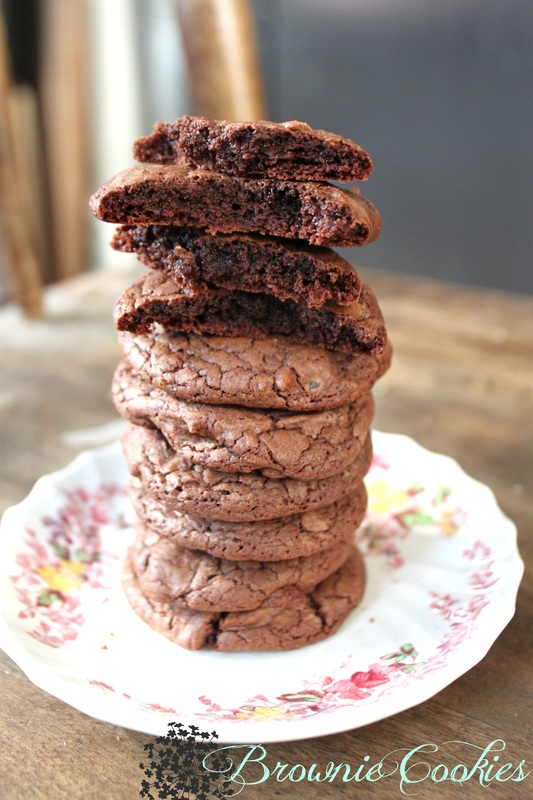
Brownie Cookies The dough requires a teeny bit of cooling time before baking it. This recipe is from A Bakers House Ingredients:
Method:
Like all the cookies I make for the Christmas season, these are freezable. Thumbs up!
I hope everyone has a great weekend. We have another busy one ahead of us, but it's all good things, so I'm not too stressed. I am moderately stressed, but that's acceptable, I think! Hello one and all! I'm sitting drinking my coffee and eating a piece of warm, chocolate chunk banana bread. I had a serious problem that consisted of me having one million over-ripe bananas in my freezer, threatening to start a revolt and take over my whole kitchen! O.k, well, that may be a slight exaggeration, but only slightly. The truth is that I did have way too many bananas in my freezer, and I needed a banana something recipe to use some of them up. Preferably a large number of them! I have a paleo banana bread recipe already here, but it only calls for 1 cup of mashed banana, and that wasn't going to do! Then I found the Civilized Caveman Cooking and his banana bread recipe and I was sold! 2 1/2 cups mashed banana? Hot dog, we have a wiener! Yikes, that looks more strange typed out than when I just say it out loud. No matter, enjoy the recipe! Oh, I added chocolate chunks to it too, because, well, do I even need to explain why? 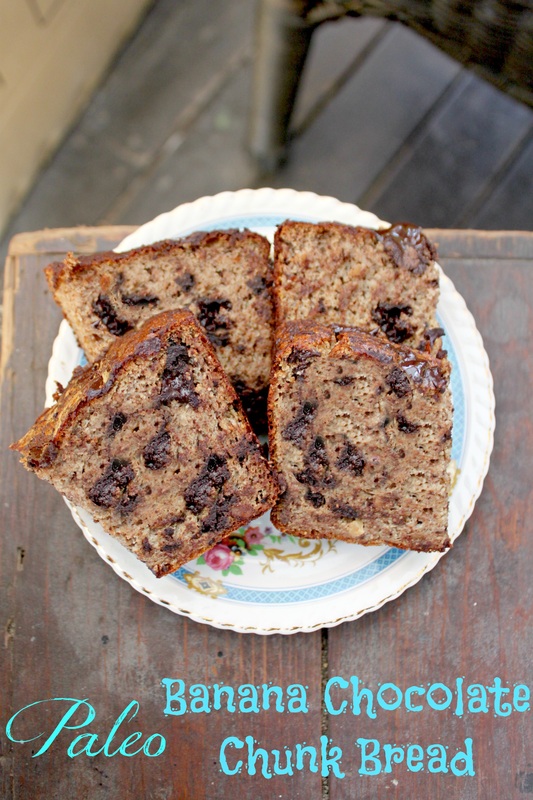
Paleo Banana Chocolate Chunk Bread From the Civilized Caveman Cooking. Find his recipe here Ingredients:
Method:
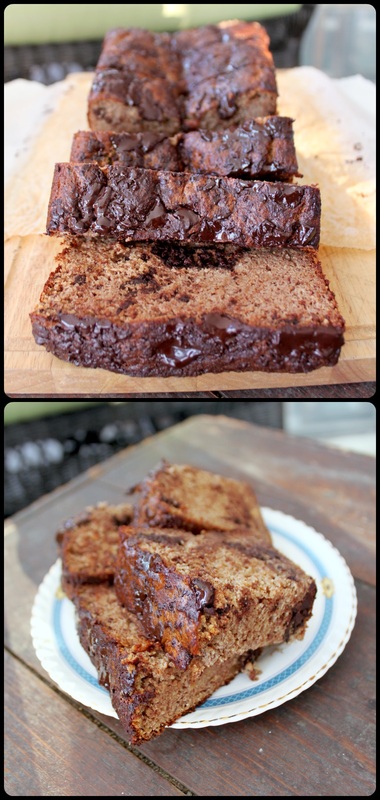
I have made this loaf a few times, and to store it I cut it up, then stick it into an airtight container and put it into the freezer. My favourite way to eat it out of the freezer is to put it into the oven for 15 minutes or so (just on the rack, not on a baking sheet or anything), and let the outside get crisp while the inside get warm. Yumm-o.
Anyway, I hope you all have a great Wednesday! I hope to bake and bake and bake today! That's the plan, at least. I need to get a workout in too, as well as do my usual things like tidying/cleaning, making dinner for the fam, and doing the chores at the barn. The whole day is in front of me, and I'm ready to go! Well, after one more cup of coffee. More Rice Krispie square recipes anyone? O.k! :) These particular treats are round like the Mint Chocolate treats I made. Again, I just think making them round is different and pretty, and make them seem a smidge more fancy (aka-you can bring them to a Christmas party with adults and not feel like the child bringing Rice Krispie treats!). These rounds are the basic treats, but the top is drizzled with the easiest homemade fudge ever! P.S., if you make a bigger batch of the fudge you can pour it into a greased and parchment lined baking dish to use as an extra Christmas treat to keep or give away. 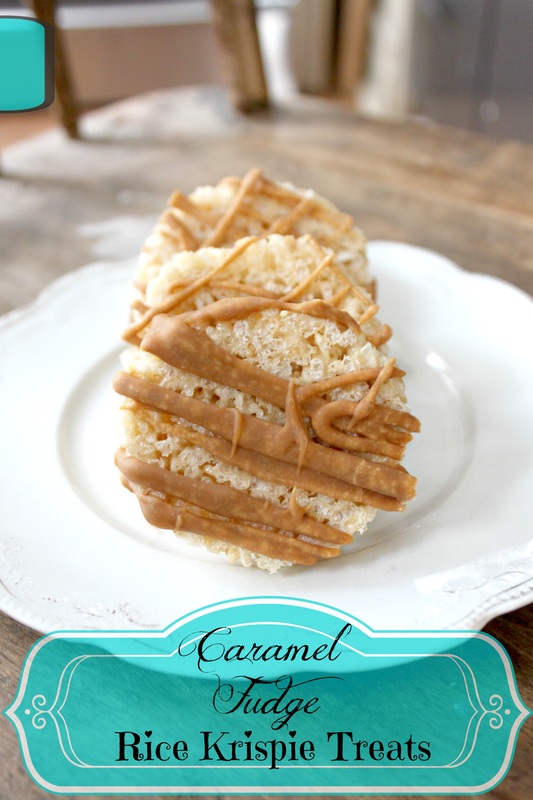
Caramel Fudge Rice Krispie Treats Ingredients: For the Rounds:
For the Fudge:
* Use 1 can of the sweet milk, 2 cups of brown sugar and 1 cup of butter to make a full batch of fudge. Look here for instructions on that and scroll down for a photo of the fudge Method:
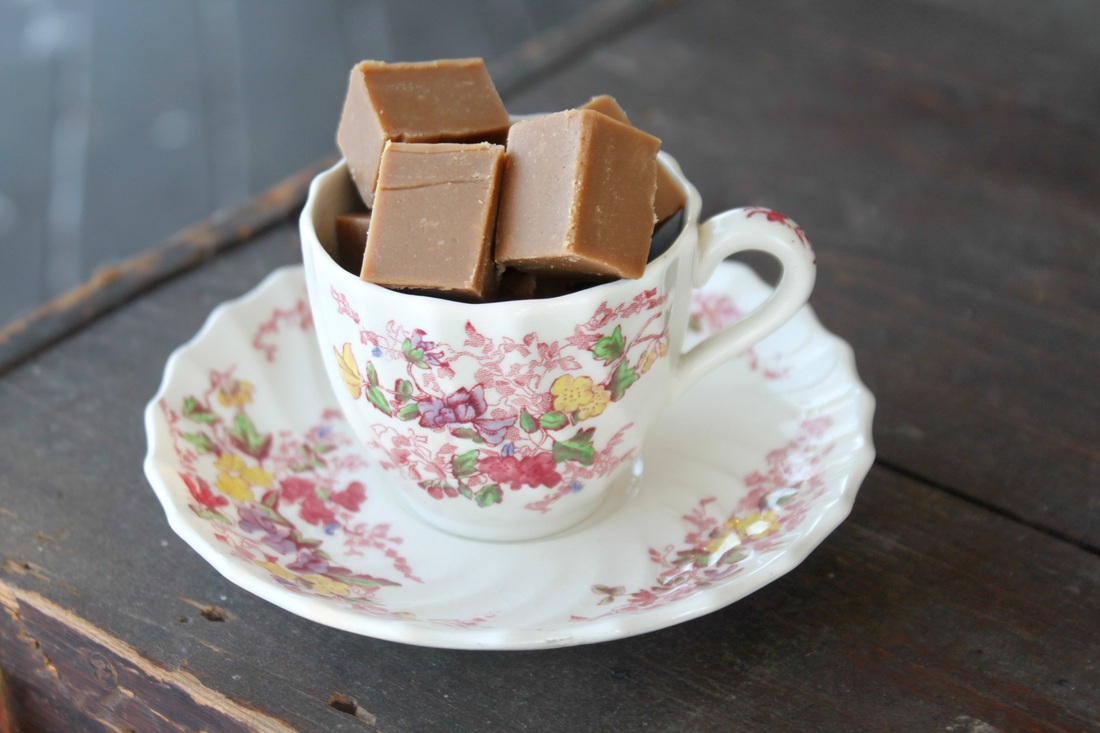
The fudgey topping in it's true form as fudge! :)
These treats last for a few weeks in an airtight container in the fridge, though the fudge gets "spotty" (it dries out slightly). They can also be frozen, but again, you get the spotty look from the fudge. I can assure you though, the spotty look doesn't effect the taste at all!
Anyway, Monday people, I hope you have a good day, and are looking forward to a new week! Something strange has happened to me...I started playing Christmas music long before my usual grinchy December 1st date....in fact, I started playing it in the 2nd week of November....I'm not sure what's happening? Maybe it's because I'm finally medicated and not so derned grumpy....? I'm not sure, but whatever the reason, I'm enjoying it, I'm feeling festive, and festive-ness says shortbread to me! Make it a crazy simple, freezable shortbread, and I'm over-the-moon! I make a mean whipped shortbread, and seriously, it's so buttery and good, but these adorable Scottish shortbread have been calling to me. This is a recipe I pinned on Pinterest from Gourmet Photography, and these seriously buttery and scrumptious cookies only have 3 ingredients! Woot woot! Anyone can pull these off, and did I mention they freeze? Yes I did! Well, what are you sitting and reading this for? Get out the 3 ingredients, a freezer friendly bag or plastic container, and get baking for the holidays! :) 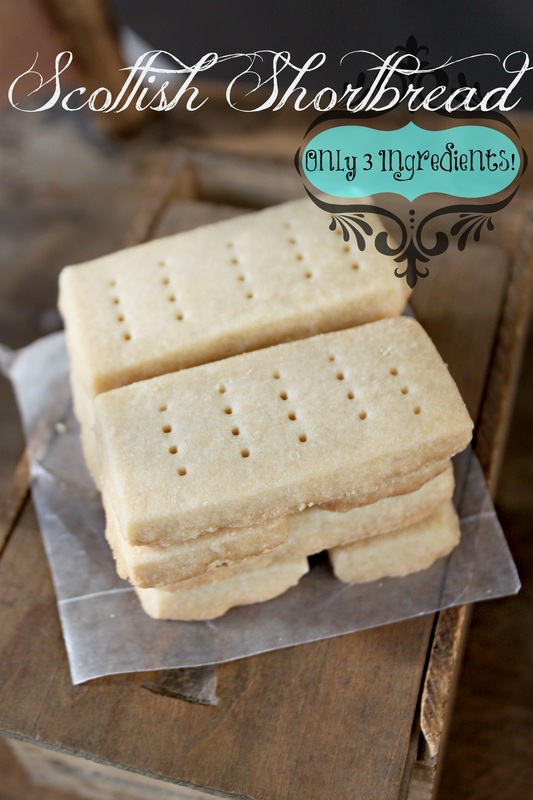
Scottish Shortbread Ingredients:
Method:
This batch makes about about 4 dozen cookies and it doubles (and triples) well. Woot woot! 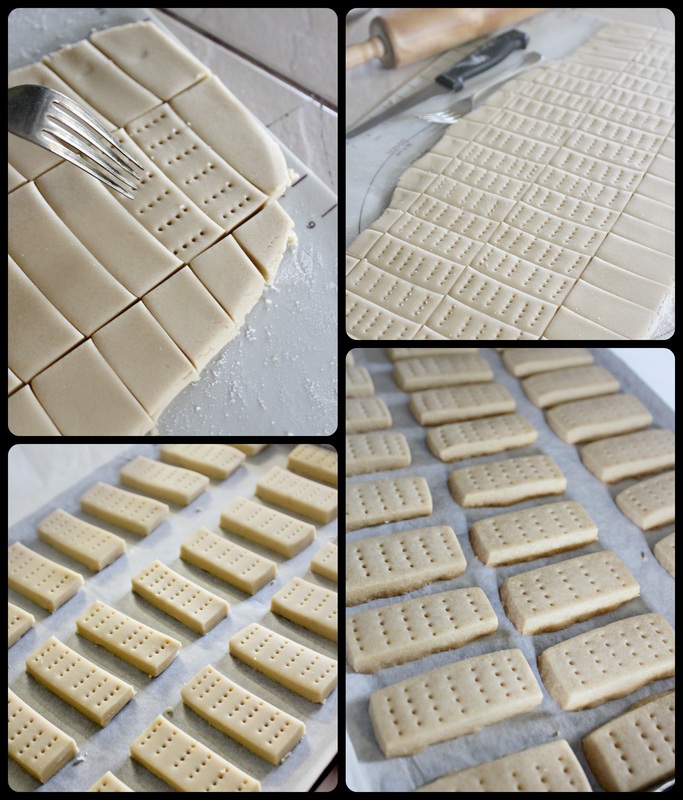
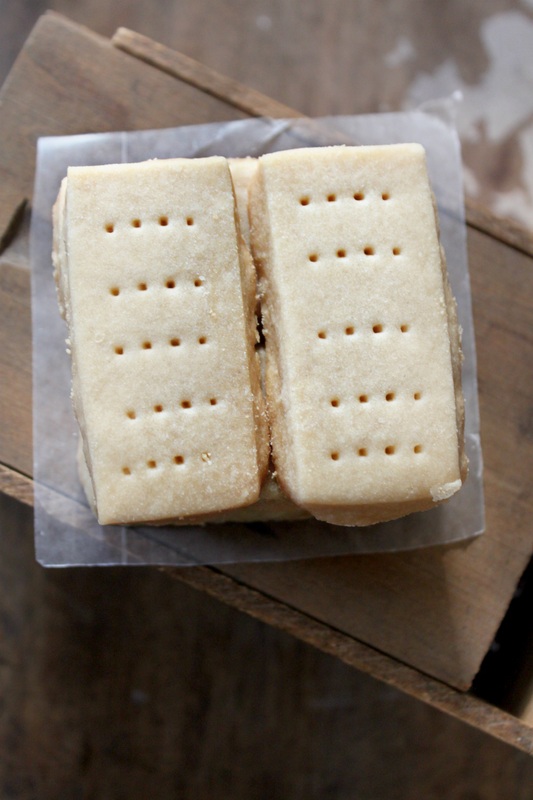
I hope you all try these out! They are worth it for sure!
So, this weekend has my husband work party tonight, then Saturday is our Tweed Santa Clause Parade, as well as the Tweed Festival of Trees. Later in the day we hope to make a trip and visit with some friends who we had lost touch with, then Sunday is my husband's work party for the kids! So, it's a busy weekend up ahead, but I'm looking forward to it! It's a weekend full of Christmas activities! I hope you have some festive plans for the weekend, and if you don't, well, bake some cookies! :) xo |
Hi, I'm Amy-Lyn! 
I am the lady behind this here blog! I live in the sticks with my animals, my super handsome husband, and my
3 amazing kids! Here you'll find things from recipes (gluten-free, paleo, and strait up junk food!), DIY ideas, thoughts on raising a son with autism, and whatever else pops into my brain! : ) Read more about me by clicking here! Want to Stay Connected?
Find What
|
 RSS Feed


