|
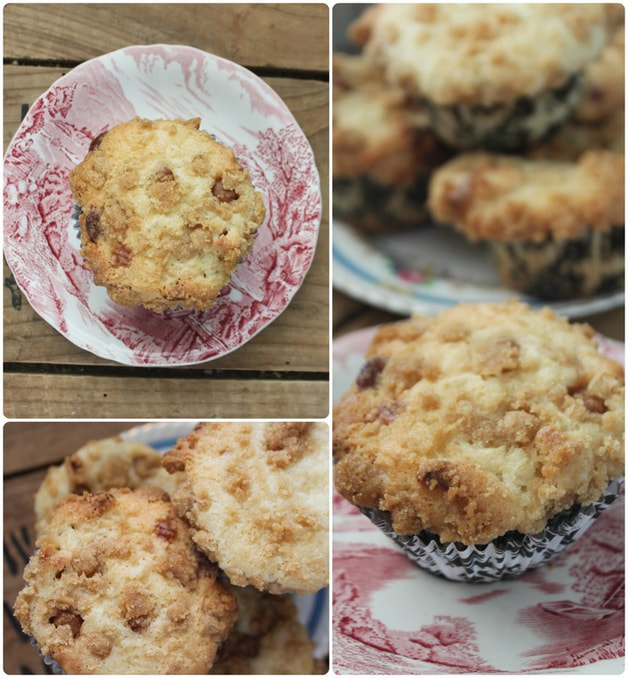
Hello! Happy first day of autumn! :) Truthfully, it's not been terribly "autumn-y' around here! We've had hotter days than we had all summer, and we've had them more continuously than we had all summer! But, the earth temperature aside, our apple and pear trees are still making fruit (although not as happily as usual), and making muffins from some of that fruit needed to happen! I saw this recipe for Caramel-Apple Streusel Muffins from Tracey's Culinary Adventures! They looked so good, and I had apples to spare, so I gave them a shot! Of course, because I had a ton of apples, I made this recipe x 3 and stored most of them away in the freezer to use in school lunches, breakfasts, or after school snacks. They are delicious & full of fall flavour! Enjoy!!! 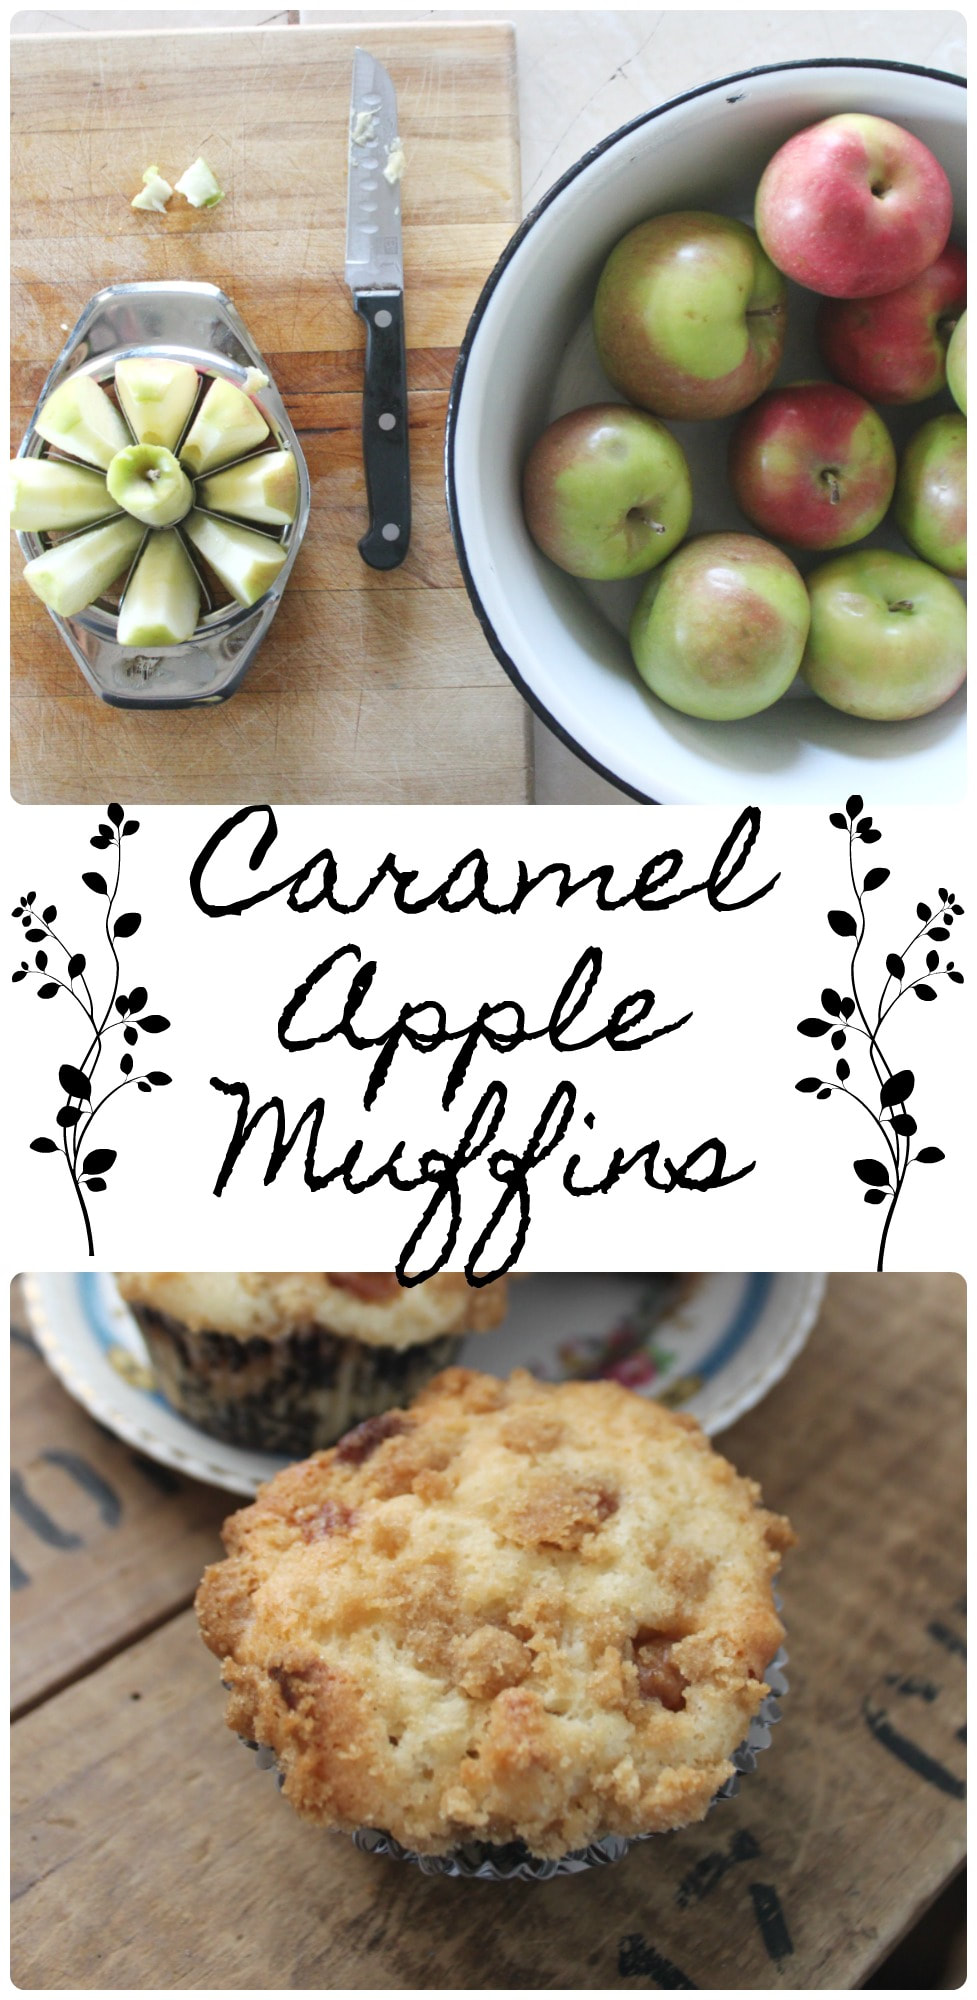 Caramel Apple Muffins Ingredients: Muffins
Streusel Topping
Method:
 Let's shift gears a little here....and look at my kids from the last 4 years of the first day of school! I mean, they go from babies to beautiful, grown-up kids! *tear* 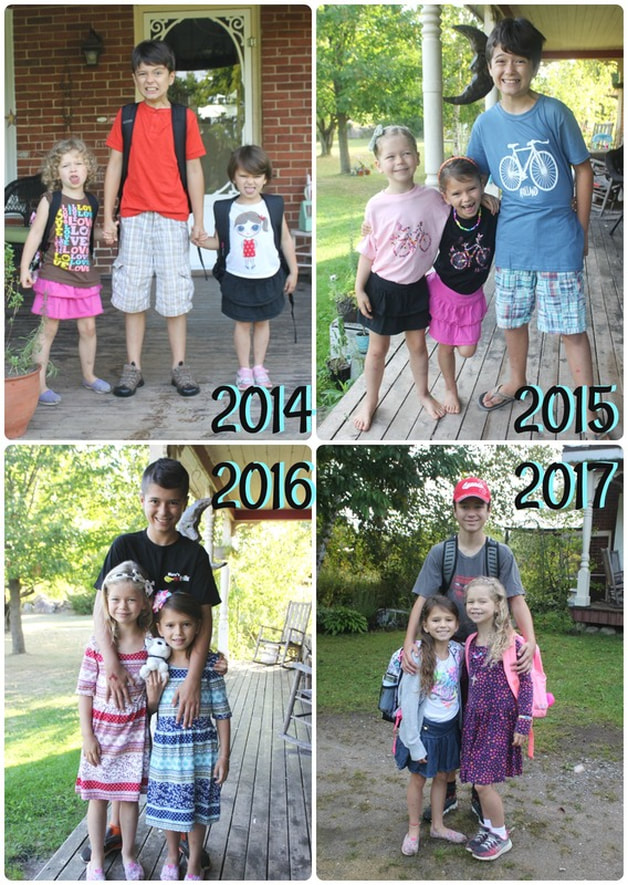 Let's shift gears again....to a little company that is starting up that I'd love to briefly share about! It's called Little Red Canoe Book Co., and they are a Canadian book subscription business! I was asked to review a book box with Abby and Keziah, but that only involved getting the boxes, and doing an online survey for the woman who got in touch with me from the company - me talking about it here is all me!!! The girls (and I) loved the boxes! They were beautiful, filled with wonderful things, awesome books, and so much fun (which then makes reading even more fun!). So, check them out! 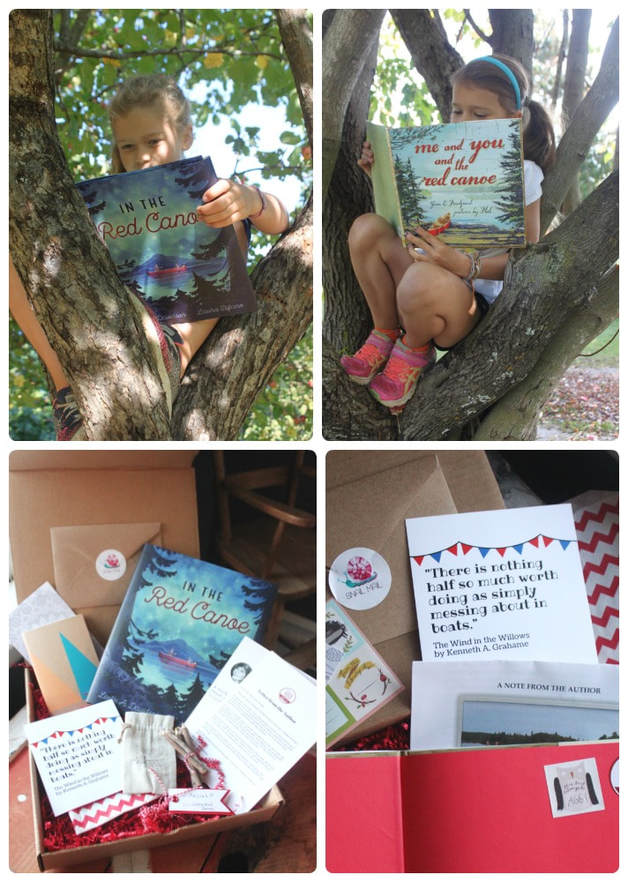 That's all for now!
happy Friday! xo
5 Comments
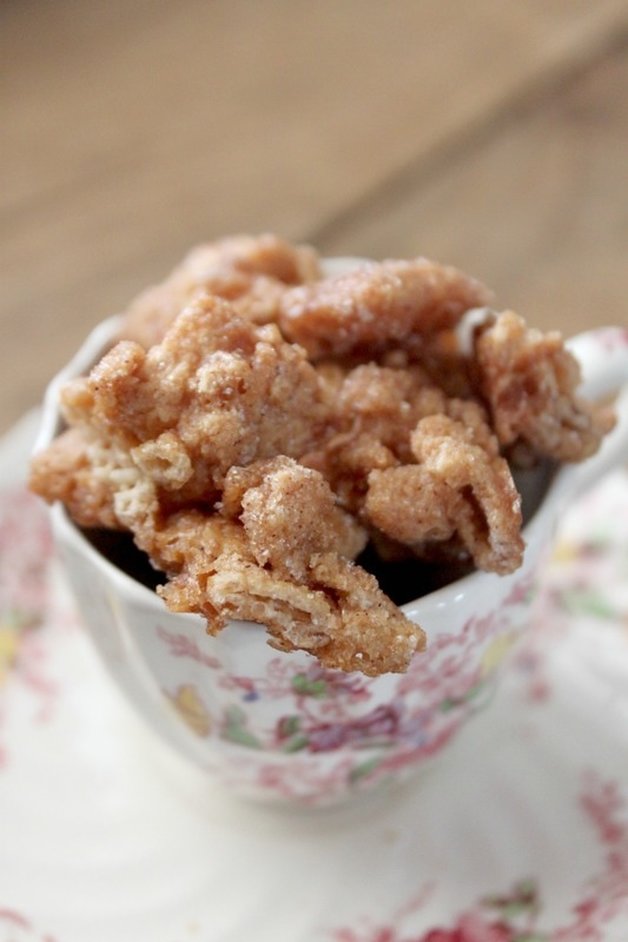
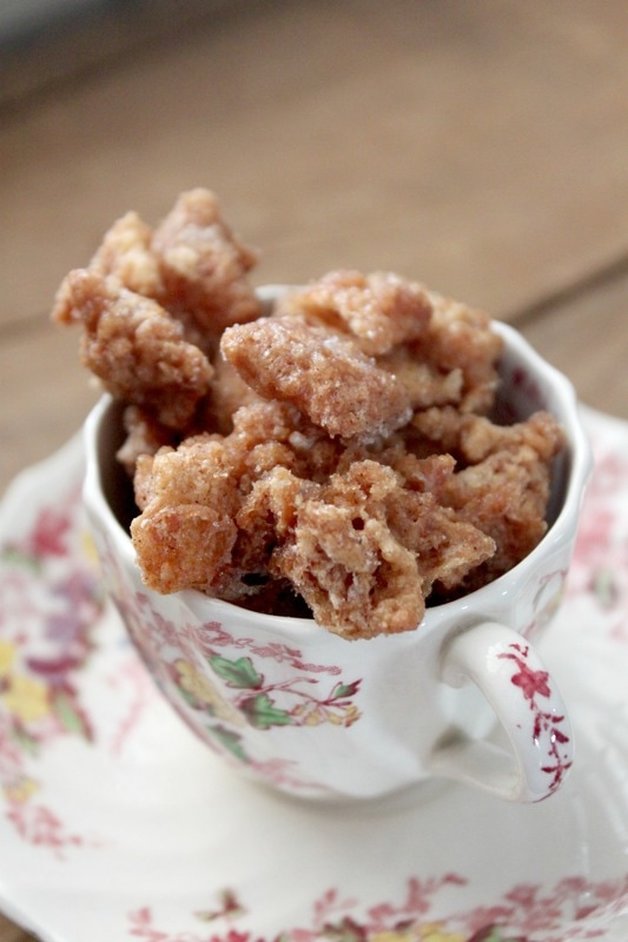
I'm sorry I've been away for soooooooo long!!! I've been home, but I've been busy and have hardly had any time at all to sit at the computer, write a blog, edit some pictures, stay still for more than 15 minutes! But I am still here! I wanted to super-quick show up today to share this oh-so-simple and fabulous treat! I first saw it on Confessions of a Cookbook Queen, and thought it looked really (reeeeaaaaally!) good! But, I hadn't gotten around to making it yet, mostly due to having a really tight grocery budget the last few months. I wasn't buying whatever I wanted to make whatever I wanted, and Chex cereal just wasn't making it on the grocery list week after week! So, when I was in a grocery store I don't normally go to, and saw they had slightly beat-up boxes of Cinnamon Chex at clear-out prices (because the boxes were a little squashed), I did a little happy dance, and grabbed two boxes! I may have also out loud said, "Oh Boy!!!". I got some side-wise glances, but, whatever! I knew the recipe I'd pinned didn't call for Cinnamon Chex, but I didn't see how it would effect this treat negatively? If anything, I imagined them being even better because of the extra cinnamon-iness. That's a word. So, here it is, a sweet treat worthy of every Canada Day, 4th of July, and summer BBQ you will attend! 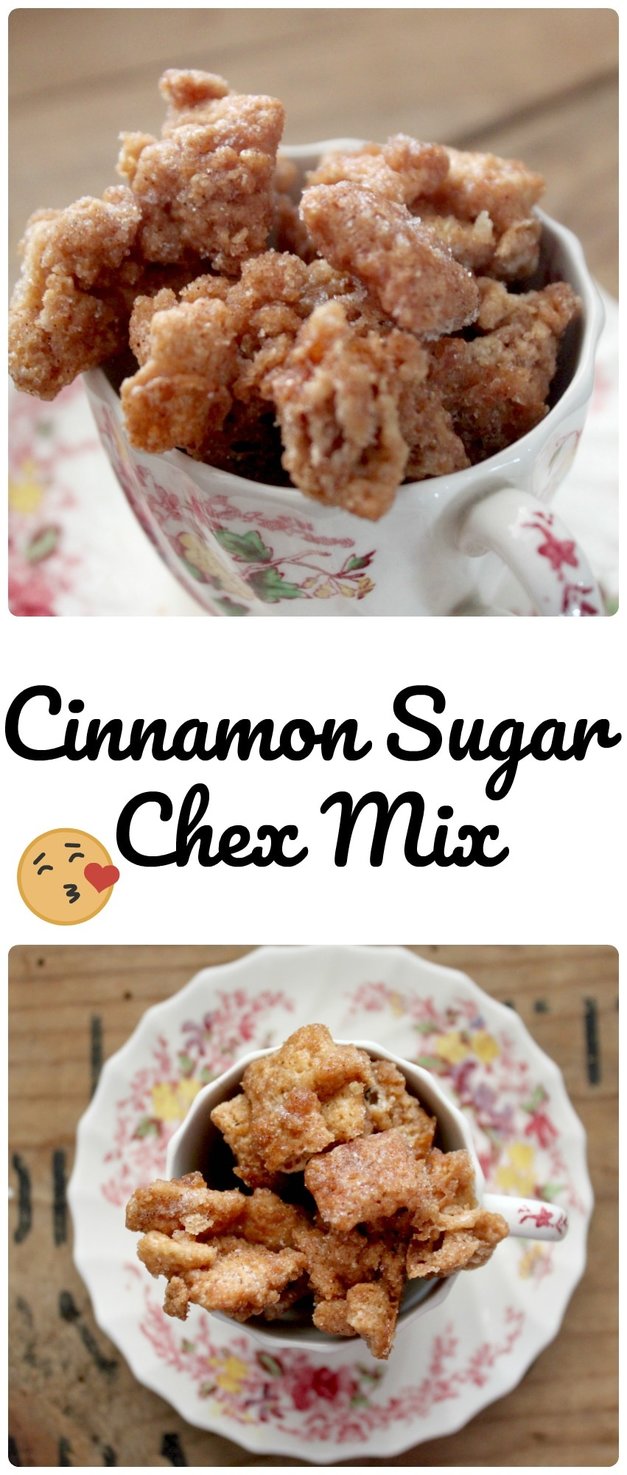 Cinnamon Sugar Chex Mix (Gluten-Free!) From Confessions of a Cookbook Queen Ingredients:
Method:
  In order for me to mentally be ok with sitting down for a while at the computer, I had to promise myself to keep this post short! No gabbing, no going on about what I've been busy with, no nonsense, just a recipe! So, I'm signing off now!
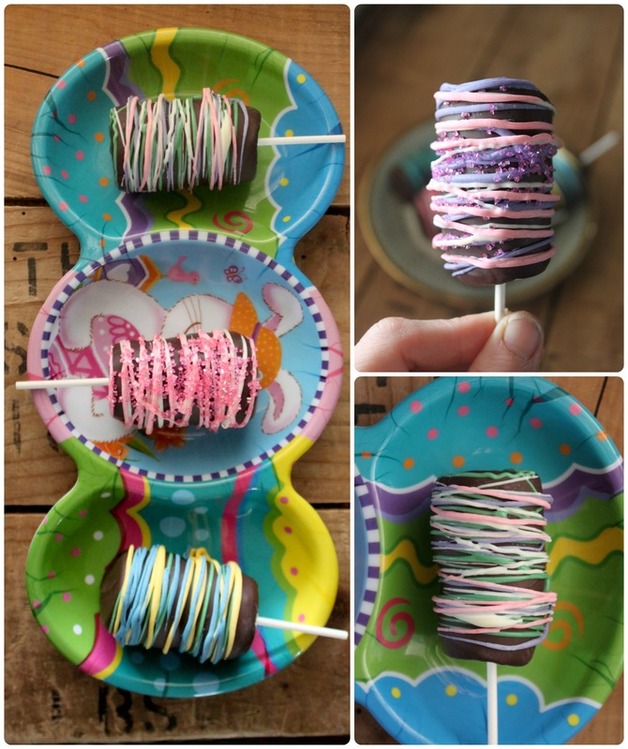
I really hope to check back in here soon with a few more posts over the summer, and be sure to let me know what your plans are for the summer! xoxoxo Hello! We head out today to spend the weekend with family, but I wanted to make a quick appearance here to share some delicious and simple treats you can make for Easter (or anytime, really!) I've got 2 treats to share, both wheat free, both could be gluten-free too (if you used gluten-free Rice Krispies). I recently saw some little rice krispie nests from Crafty Morning, and thought they looked so gosh darned cute! I knew they'd be easy to make, but I was going to make some personal preference adjustments. For starters, the beautiful nests that Michelle at Crafty Morning made had an edible grass in them...? I've never even heard of such a thing, so I decided I would make a quick and small batch of green buttercream, and pipe some grass into my nests. Also, she uses Robin Eggs candies (chocolates?), again, I don't know what they are. But I do know what Cadbury mini eggs are, and I know we all loooooove them in this house, so that swap was a no-brainer! The second sweetie I saw was Springtime Marshmallow Wands from Two Sisters. I love mallows, and chocolate, and my brain said, "Hey! You have sticks!", so then it just seemed like a natural step to go ahead and make these! So, here you go! Enjoy! 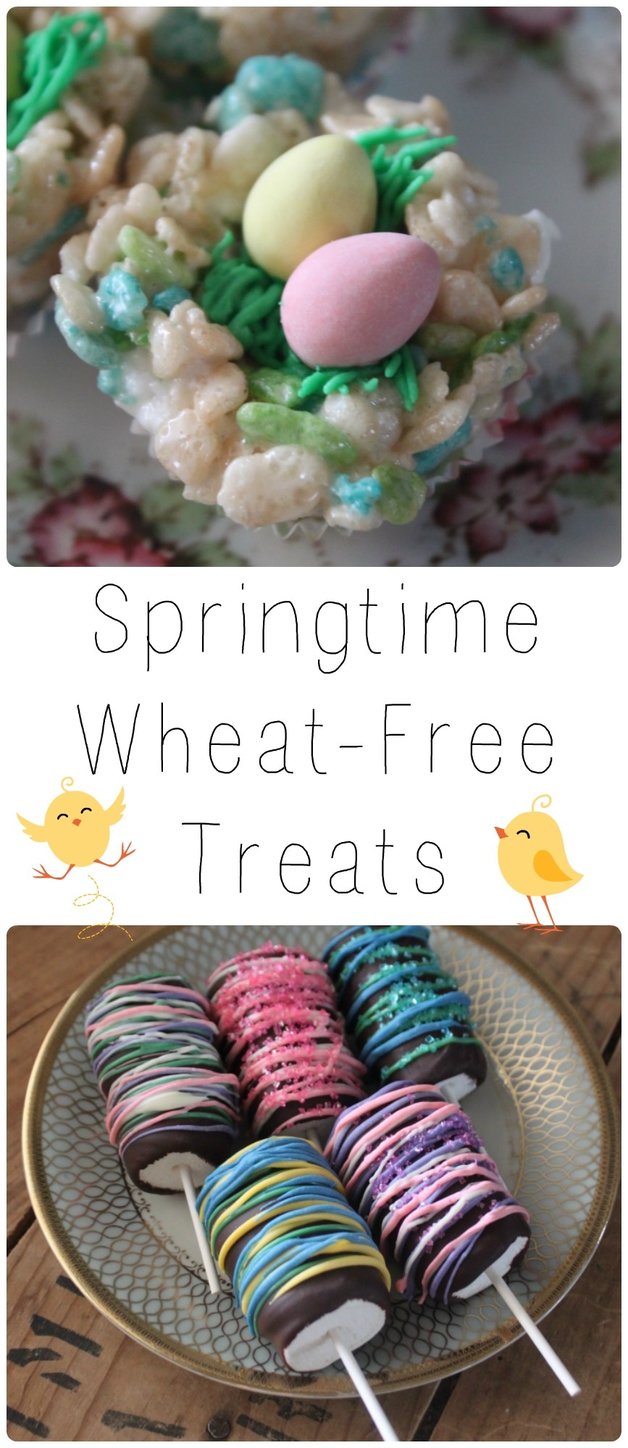 Rice Krispie Nests Makes about 36 mini nests Ingredients:
Method:
 Marshmallow Wands Ingredients/Supplies
Method:
 Ok, that's all for now!
Check out a post from last year of a delicious round-up of Easter Treats, all no bake, and most gluten-free! I will be the first to admit to being a bit of a Grinch about Christmas. There's no real reason, except that I hate being "told" that I need to hang mistle toe, cut down a fresh tree, decorate the house with things that have been stored away (hogging space) for the whole year, & be jolly! See? A Grinch. I want to clarify though that I had WONDERFUL Christmases as a child. Seriously, my Mom & Dad put on a great Christmas! Decorations, a big tree that we'd go out to hunt for and cut down, an advent wreath with candles we would light leading up to Christmas, wonderful stockings, lots of gifts, a Secret Santa exchange with the siblings (because there were a LOT of us and we couldn't buy for everyone!), and an amazing Dutch style Christmas breakfast. So, I don't dislike Christmas because of any childhood misery, I am just honestly a Grinch! But, one thing that I love about Christmas is iced sugar cookies! Seriously, you want me to get into the holiday spirit? Give me some iced sugar cookies. Yes, they DO need to be iced! C'mon-what's the point of a delicious, buttery sugar cookie that isn't covered in more sugar!?! Ok, so this post isn't as "tutorial-y" (oh my gosh! That for sure isn't a real word at all!) as I want it to be....but that's because doing this wonderful, beautiful, time-consuming art is equal parts calculation & guess work! I'll give you tips and tricks that I've learned, I'll share some mistakes I made, and how I improvised to fix some of the problems! And taking a ton of photos during the decorating process would have been extrememly difficult since I was busy decorating! Sorry! Also, the method seems crazy long, but really, just read through it, and you'll see it's very basic. The cookies are simple and strait forward, and the decorating is 2-step because you need to first pipe a border, and then you "flood" the cookies in the second step. That's the real "secret" to beautiful iced sugar cookies. FYI : ) Honestly, it's a little time consuming, but they can be as simple or as complicated as you (and your imagination!) want, so that adjusts the time it takes to decorate. Ok, here we go!!! 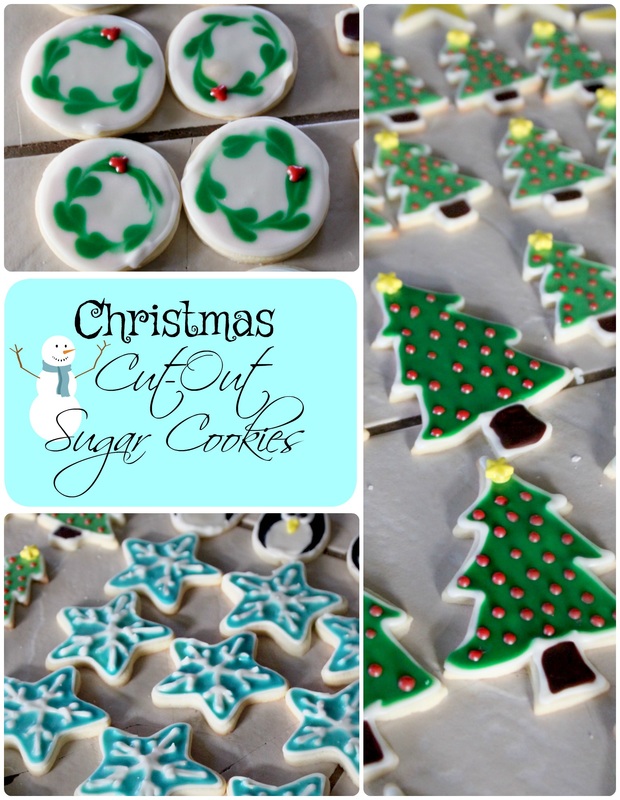 Cut-Out Sugar Cookies (these cookies need 1 hour of chilling before baking! Fair square warning) :) Ingredients: For the Cookies:
For the border icing:
For the flood icing:
***I use both zippered plastic bags, and proper piping bags, to decorate. As long as you have something that can give you a fine tip for the border icing you'll be good*** Method For The Cookies:
....after the dough has chilled....
Method For The Icing:
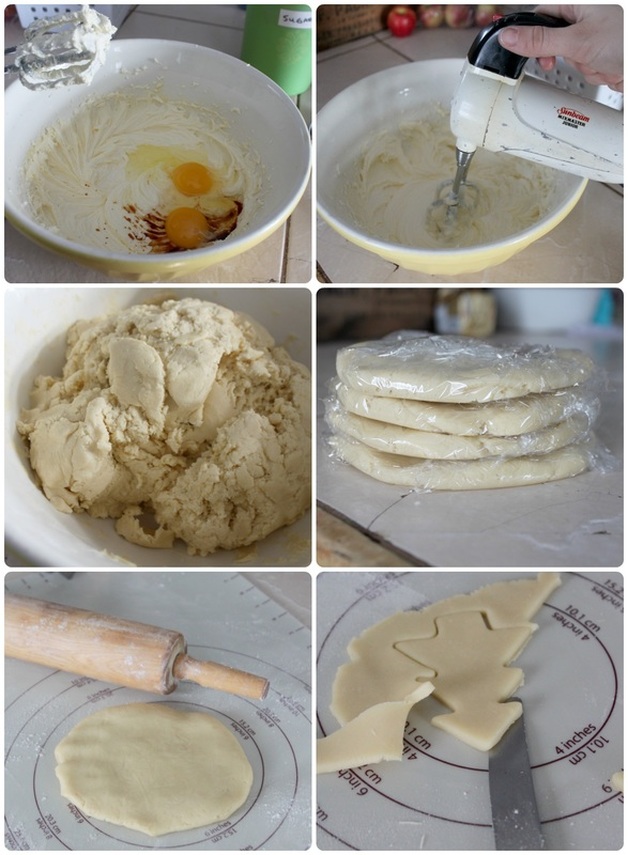 I made a double batch here So, preparing the cookie dough is simple! When you're done you just need to divide the dough into 4 disks, wrap 'em up, and stick 'em back into the fridge to cool. This step keeps the cookies from spreading and loosing their shape when baking. I'll actually often make the dough a day or more in advance from when I'll get a chance to bake them. 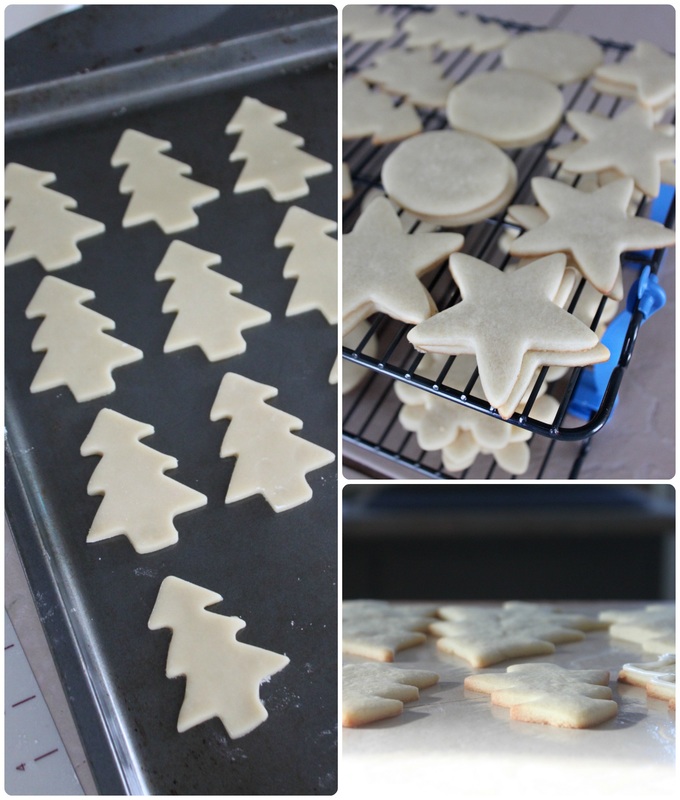 Bake and cool!!! 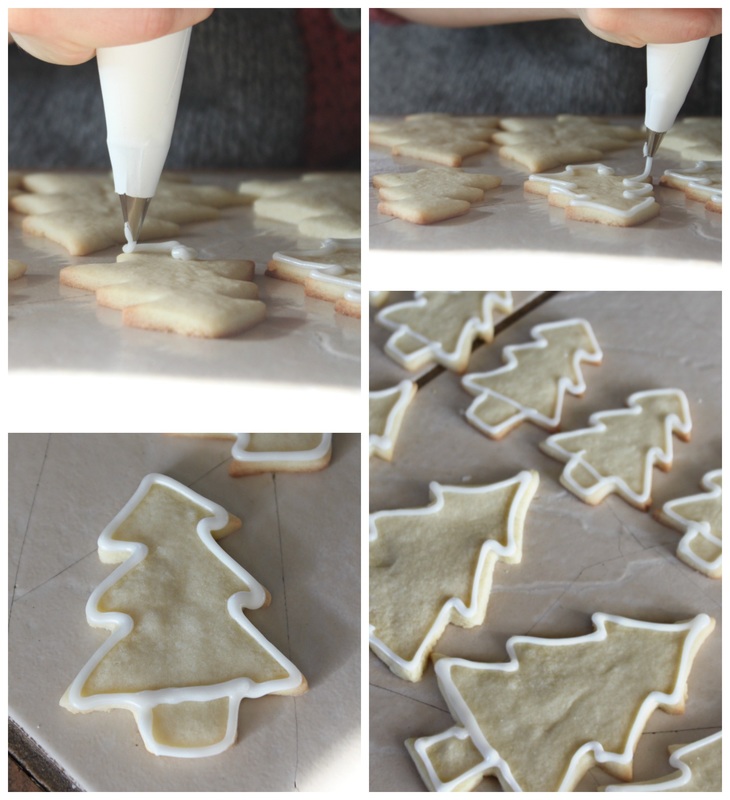 Now you'll need to create the borders on your cookies so that your inner icing stays where you want it and doesn't go dripping off your cookies! You can see that my piping skills are poor! Oh well, the cookies still look pretty good when all is said and done! 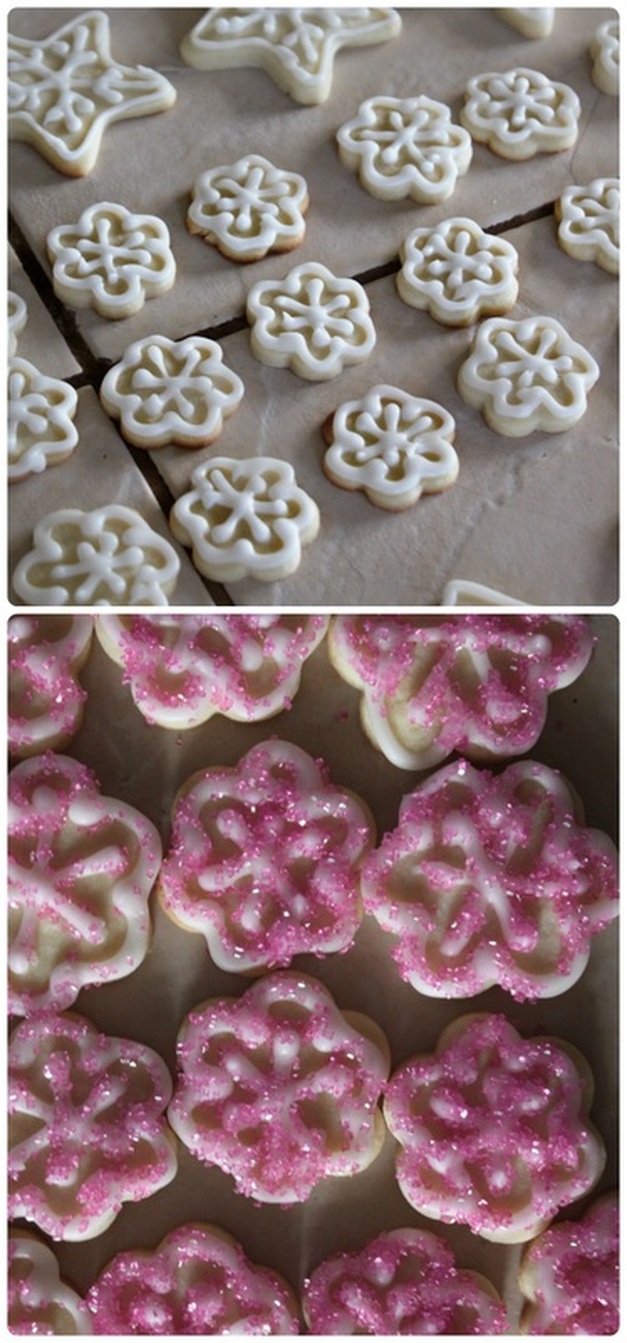 Ok, so here's a little tip! If you plan on making pretty snowflakes, save the pretty snowflake for after you've flooded the cookie! When I went to flood the blue snowflakes, the border and the snowflake design were so close to each other that I had to use a toothpick to gently and carefully flood around the design. And that was a huge time hog! So, for the smaller snowflakes I didn't even bother flooding them! Once I realized my blunder with the bigger snowflakes, I quickly grabbed some sprinkles and made my smaller snowflakes into sparkly pink snowflakes before the border icing dried fully! You can see those cookies above. To pipe a design over the flooded icing, you'll want to keep the flooding to a minimum so that you're not waiting around for it to dry before piping your design. Just flood a thinner layer than you might normally have used, allow it to dry to the touch, and use the border icing to pipe your design. For the wreath cookies, flood the cookie with white, then immediately add dots of green around the edge of the cookie. Use a toothpick to gently drag the green icing from one dot to the next. Then I piped red "berries" on after the green had set slightly. For the (super helpful!!!) photo tutorial I used to make my wreath cookies, look here at The Monday Box! 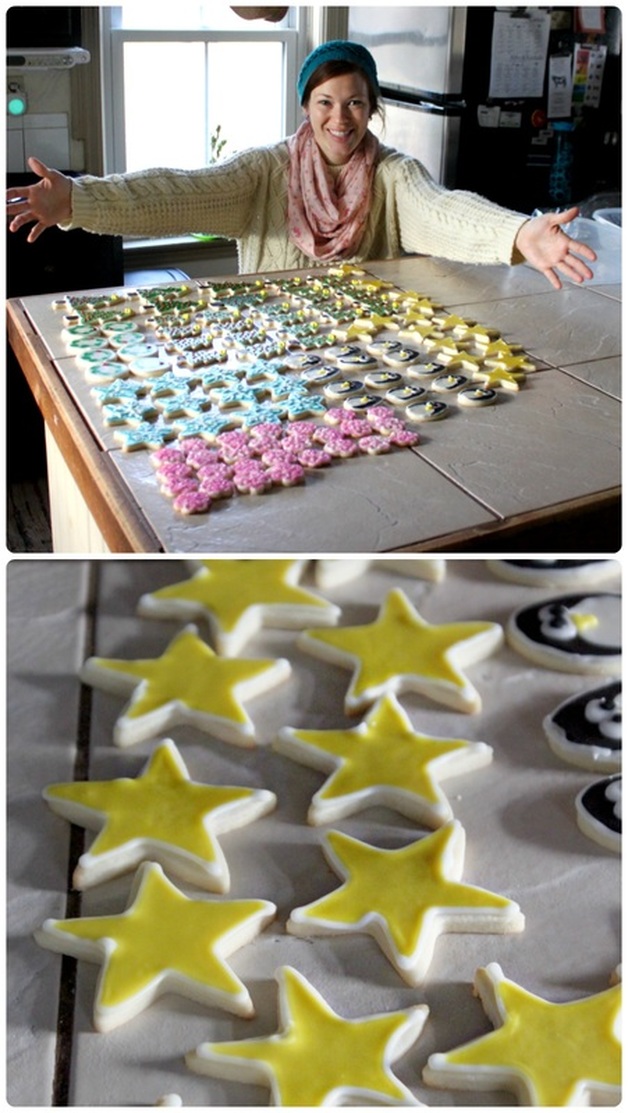 It doesn't look like a lot in front of me, but that's about 7 dozen cookies! The little penguins were time consuming! Geepers! I liked how they turned out, but I was also like, "Yeah, not doing that again!" Although I probably will because I'm a sucker for punishment when it comes to creat beautiful Christmas cookies!!!
Something that would make it not so awful would be to have little candy eyeballs, which I've seen at Michael's & WalMart, but never purchased of course because I'd rather take forever and ever piping my own eye balls onto cookies (sarcasm, people). I also could have made them more simple, like the ones pictured here, but, ya know. Too little too late. Also, the ones in the link bother me slightly because the eyes are technically on the pengiuns belly (look at the link to see)....but, they are cute, and more simple, and most people aren't painfully critical like I am and wouldn't mind or even notice that the eyes and beak are on the pengiuns belly! Anywho! I hope everyone has a good weekend, and got through this week in one piece! Let me know if you make these cookies, or if you have a special Christmas cookie you like to make for the holidays! Sharing is caring! xoxo As far as easy recipe go-this one is way up there on the list! It's some really simple ingredients that *most* people have on had at all times, and can be baked up and cooling on your counter in 30 minutes (ish - haha! The exact time depends on how organized your baking supplies are and how efficiently you can pull them together!). But still, they're easy going cookie bars! It's all the goodness of gooey, oatmeal chocolate chip cookies, but without the scooping! I found this recipe at Jamie Cooks it Up, and give it two whole-hearted thumbs up! :) I usually like to post a "Motivational Monday" & "Health & Fitness" post on Mondays.....and this is neither of those things! But, I decided that although I want to give readers something predictable, most readers who I hear from don't give a rip! :) So, it helps me prepare and be organized if I have a certain "thing" I will post about on a certain day, but sometimes, I just gotta post what I feel like! And this recipe is so simple to throw together for when last minute guests are coming over, or to make and tuck into an airtight container and put into the freezer for quick lunch treats, or after school snacks, well, I just needed to share it! Hope ya'll are ok with that!:) 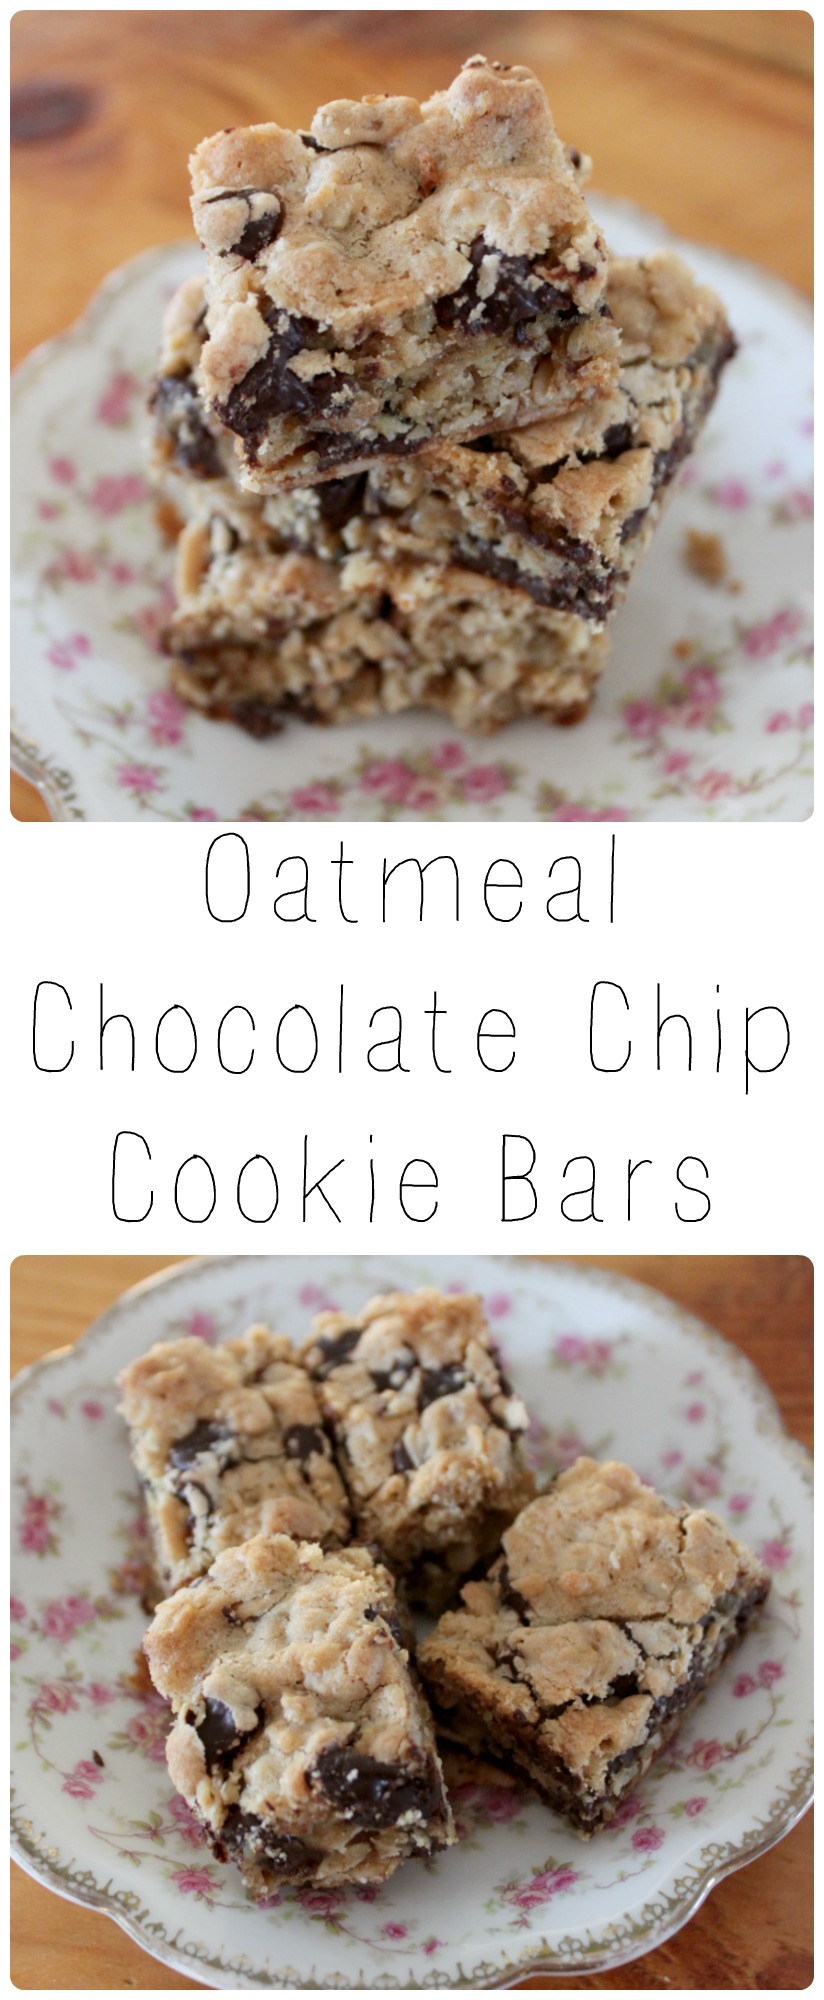 Oatmeal Chocolate Chip Cookie Bar Ingredients:
Method: 1. Preheat your oven to 350 degrees, and prepare a 9x13 baking pan by lining it with parchment paper, leaving overhang "handles" for later, and lightly greasing with butter or oil where the parchment doesn't cover the pan 2. Into into a large bowl, add all the dry ingredients and whisk to combine 3. Now add the melted butter to the dry ingredients and mix it up until it's all wet 4. Add the eggs and vanilla and mix well 5. Add chocolate chips, and stir to combine 6. Evenly press the dough into the prepared pan 7. Bake for 17-20 minutes, until a toothpick or knife inserted into the centre of the golden topped squares produces only melted chocolate and no wet dough 8. Lift the bars from the pan using your parchment "handles", and place onto a cutting board, and give them time to cool completely 9. Once cooled, cut into bars, squares, or triangles! And eat some, of course! 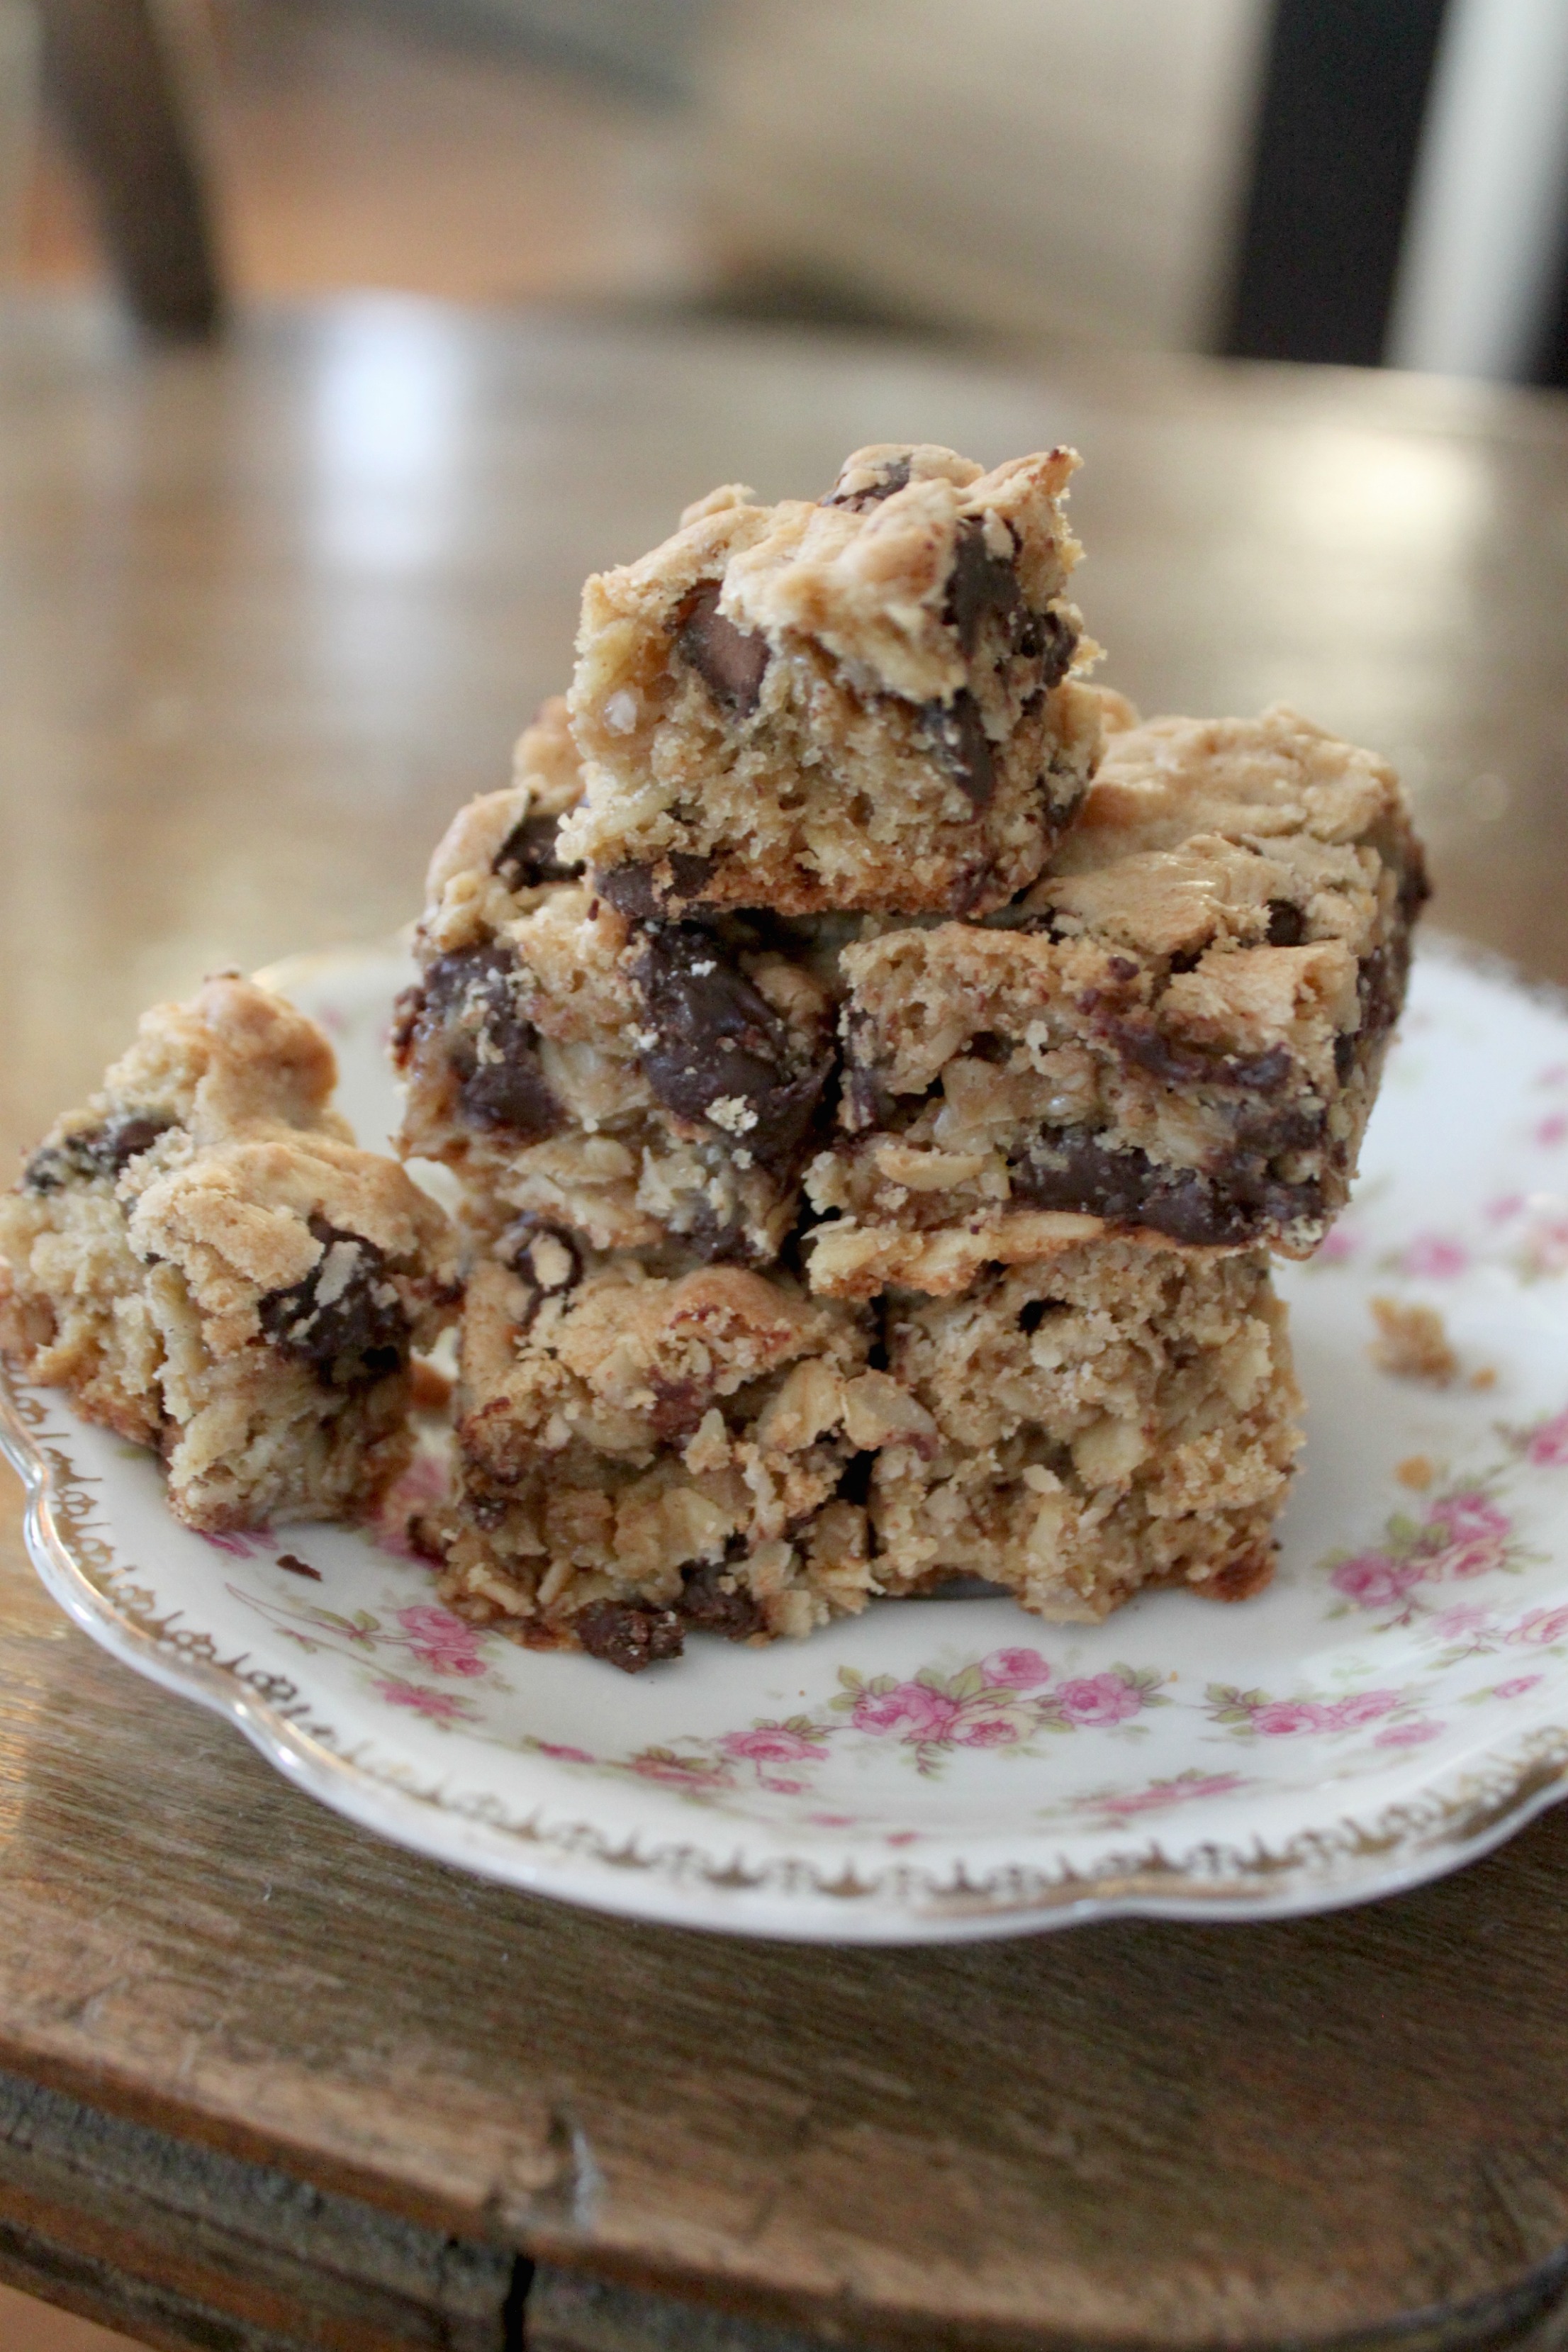 See, so simple, right?
Today was a suddenly wintry day (a no school, snow day included!), and we went from wearing t-shirts and no coats outside on Friday, to coats, hats, scarves, and mitts today! Oh Canada!!! :) We enjoyed it though with equal parts laziness (watching "Shrek The Musical" on Netflix), and playing outside. I hope you had a lovely day, whatever you were up to! If you've stopped by, please feel free to leave a comment! I'd love to know you were here, and to see how your day went! xoxoxo Oh yes, dear friends, there is definitely still more s'mores ideas out there! ....Hello. How are we today? I am EXHAUSTED!!!!!! : ) No, but seriously, I've been more stressed lately than I ever thought I could possibly be - I've had a constant headache for a week, my body is aching, I have hardly slept, and I even developed a canker sore on my lip!!! K, I'm done now. I'm just whining to all of you, to whoever will be a listening ear! I think it's time we got back to s'mores though, because s'mores always make me feel better! : ) In August of 2014 I wrote a s'more compilation post called "Please Sir....I Want S'more...", and last July I compiled another list of s'more-ific ideas in "It's Time For S'more!". I love-LOVE-LOVE s'mores! They have been a passion of mine for years and years! So, when I recently received an e-mail from Julia Arangure of Shari's Berries with a request to share their 9 unique s'more ideas on Bushel & A Peck, I thought, "well, it's worth looking at". Let me say that when I opened the link she sent, I went "whaaaaaaaaaaaaaa?!?!?!". For. Realz. When Julia said "unique" she meant it, and I have honestly never seen s'mores like the ones she shared with me, and that I am going to share with you! These amazing s'more ideas where created and photographed so beautifully, and I want to try every single one of them! So, here they are -9 unique ways to make s'mores from Sharis Berries!
........I mean, c'mon, right?!?!
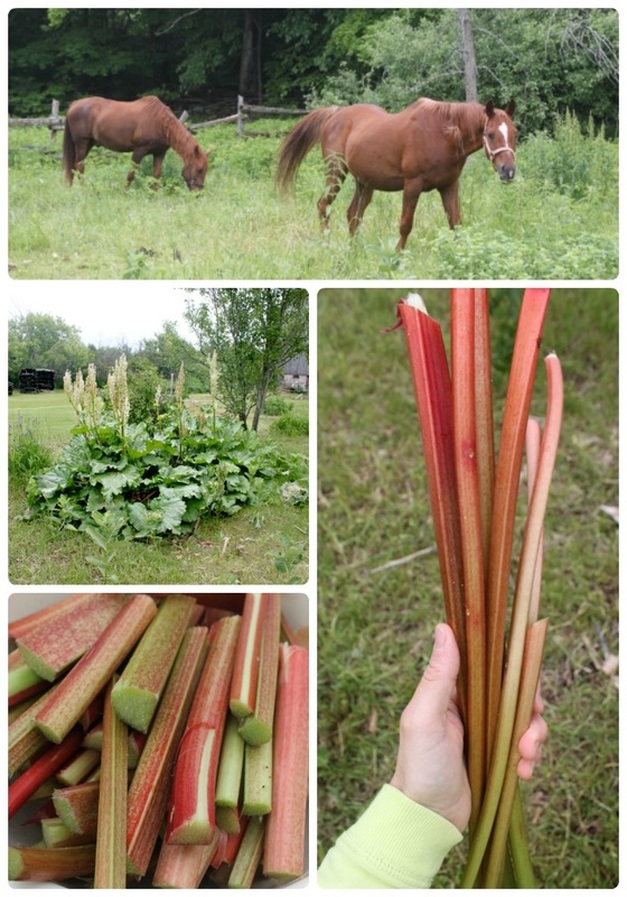
I am so excited about these s'mores, and I think I want to try the birthday one first! TO find out how to make all of theses, hop on over to Sharis Berries and the original post about these 9 amazing and unique s'more ideas! Today is Canada Day here in (obviously!) Canada! We've got the usual fun things to do in our wonderful little town of Tweed: a parade, face painting, boat tours, kids crafts, fireman water activities, live entertainers, hot dogs and cupcakes! Then, this evening we're heading to a Canada Day BBQ, where we'll be saying goodbye to some military friends who are moving to Seattle. Thumbs down to people leaving. Anyway, I hope if you live in Canada you have a wonderful Canada Day! If you live outside of Canada, have a wonderful Friday! Either way, any day is a good day to try out a new s'more (in my opinion, at least!). On Tuesday I'm going to share with you how we do s'mores around here so that it isn't a complete and utter disaster! Have a great weekend! Truthfully, the first time I heard the words "ruhbarb cake" I thought, "bleh!"I couldn't imagine how a cake made with rhubarb could taste good at all. In one of our horse paddocks we have a large rhubarb patch though, and a neighbour asked if she could take some to make this "rhubarb cake". I only really use it to eat the crazy sour stuff raw (it's alarming and refreshing!), and I've made a paleo strawberry rhubarb bare bottom pie last year for national strawberry rhubarb day, but that's it. I never even went out to cut it down and freeze it because I just never really loved much that was made from rhubarb. Anywho...back to my neighbour....she got some rhubarb from our field, made some cake, and brought some over for me to try...and, let me tell you people, this freakin' cake was so good! So, so, soooo good!!! I'm a little excited about this cake. I plan on making 2 more today! I feel some sadness over the rhubarb I've let go to waste because I didn't know about this delightful cake. This cake is a very simple white cake with rhubarb mixed in, and a crumbly, buttery, cinnamon-sugary topping. It is very moist, and not too sweet, not too sour. After I had made 3 pans of my own rhubarb cake, I brought some over to another neighbour who said that he quite hates rhubarb, and has never had any cake, pie or jam of it that he enjoyed. So I told him I wouldn't be offended if he didn't try it, but he said he would anyway. He said he was always willing to try something, just in case. Well, didn't I go back to see him the next day and he couldn't believe how good the cake was! He said (in a thick Italian accent) that his face didn't pucker, and that the sweetness wasn't too much and he loved the cinnamon in it. Enough said. 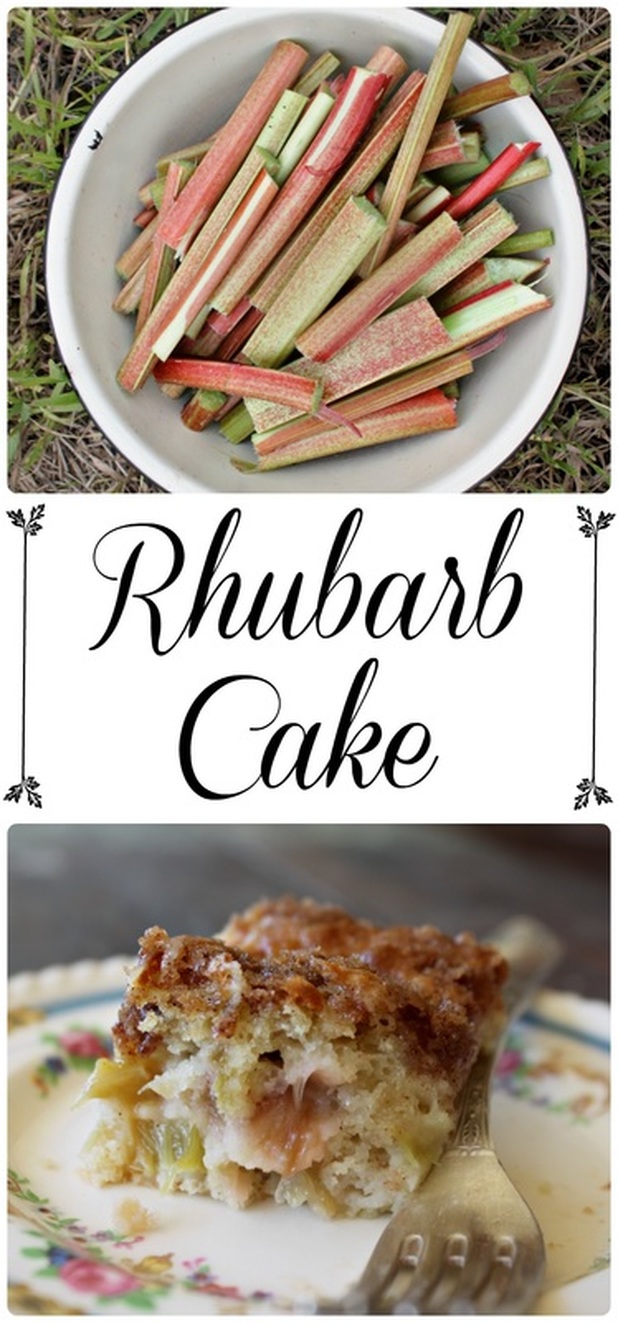 Rhubarb Cake Adapted from Oma's Rhubarb Cake Ingredients: For the Cake:
For the Topping:
Method:
 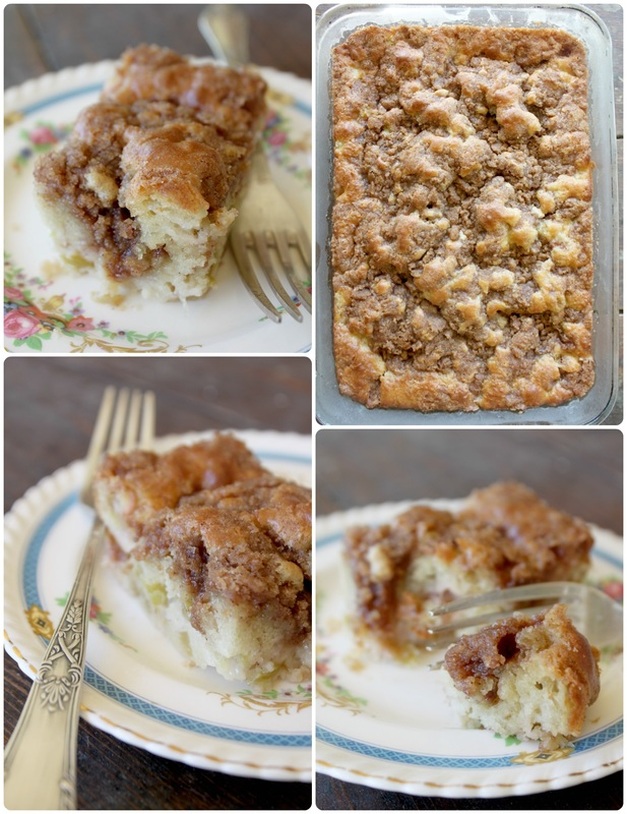 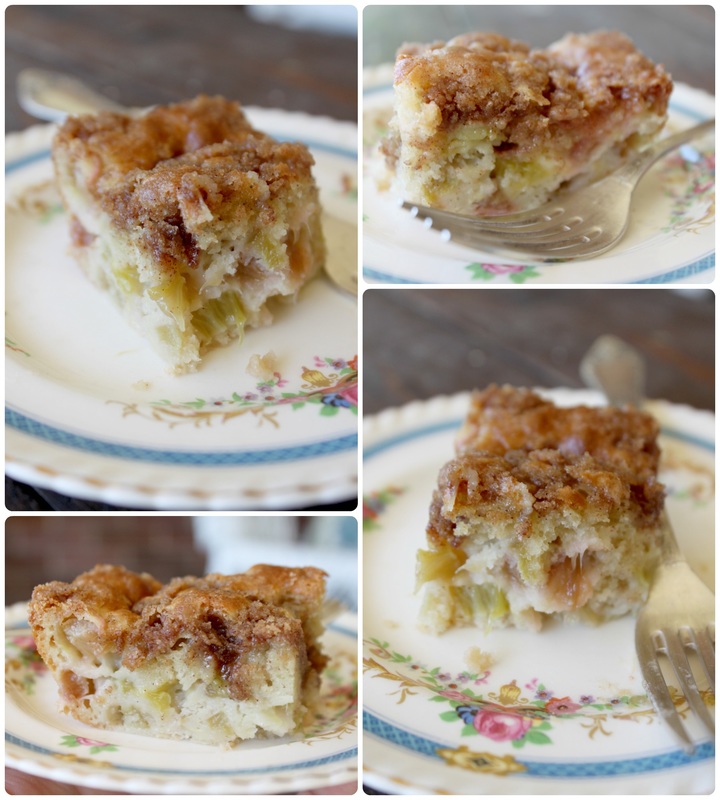 The first time I tried making this it was a gloomy Saturday. The weather was gloomy, and I felt gloomy. By the time the cake was finished and cooled, the sun had come out and the weather was no longer gloomy - and neither was I! The cake smelled so good, and looked so beautiful, and tasted so wonderful! So, that's all there is to this lovely little cake! Tonight the girls have a soccer game, then I think we'll let them have some time playing at the splash pad, and maybe we'll have a campfire tonight too. We plan to go and visit some friends tomorrow who we don't get to see too often, so I am looking forward to that also. I hope you all have a lovely weekend. xo Is it true?! Is it really real?!? Is spring finally, finally here?!?!?! : ) Our spring here has been warm...and then snowing! And then warm....and then snowing!!!! And then all the kids got sun-burnt one Saturday.....then we had an ice storm! I mean, good golly. Anywho, I'm washing the snow pants and winter coats for the third time to put away for the warmer months, and am hoping it'll stick this time! Well, when the winter won't end, more and more cookies get made! These super simple gems are made using a cake mix, and we added some super fun mini candy covered chocolate chip thingies.....I honestly can't remember what they are really called...? Anyway, enjoy! 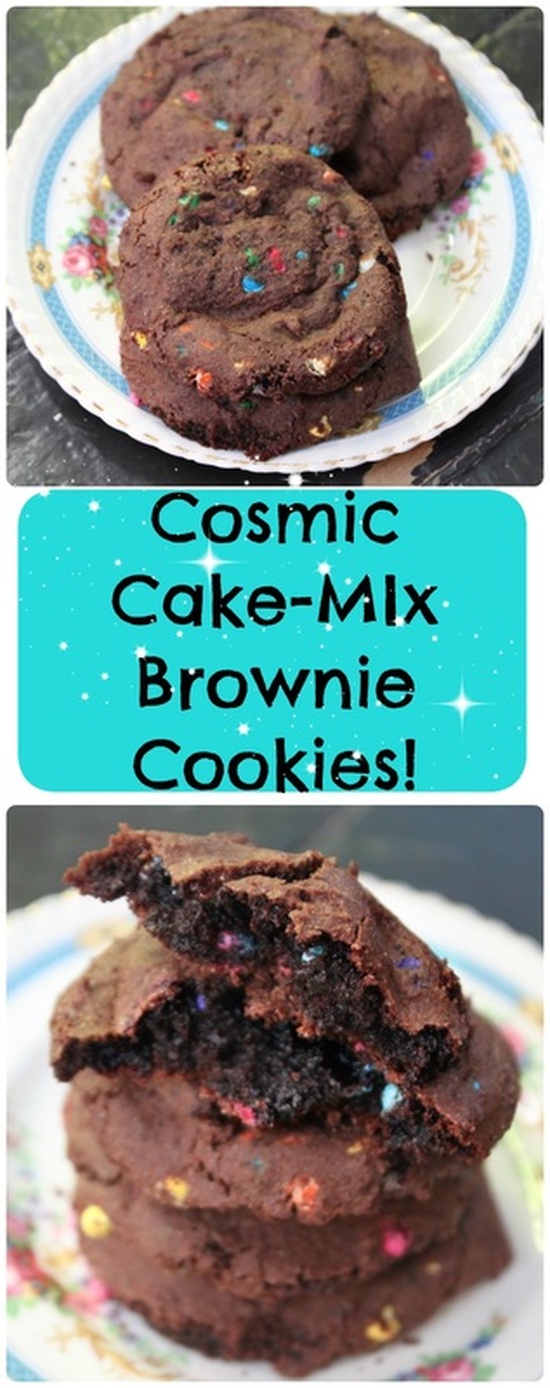 Cosmic Cake Mix Brownie Cookies I get approx. 22 cookies using a 2 Tbsp sized scoop from one batch Ingredients:
Method:
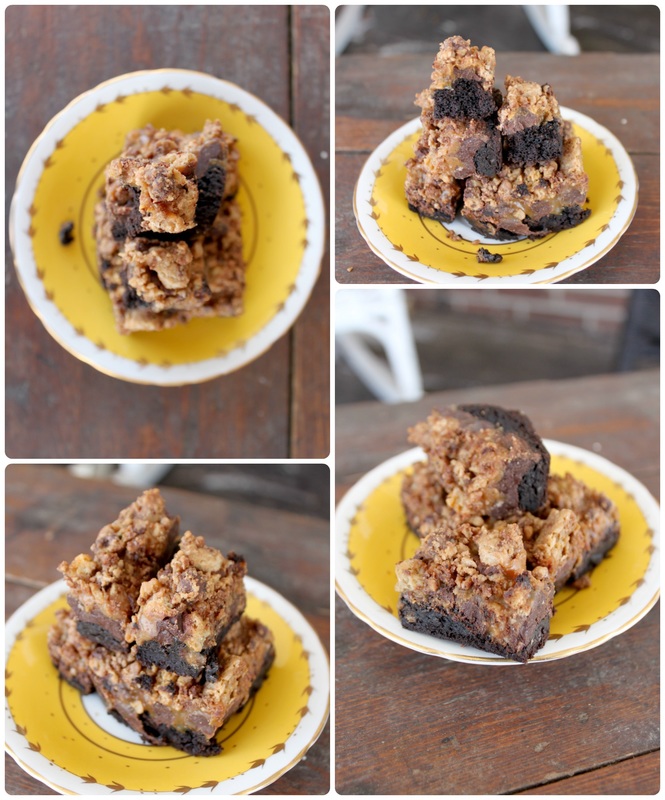
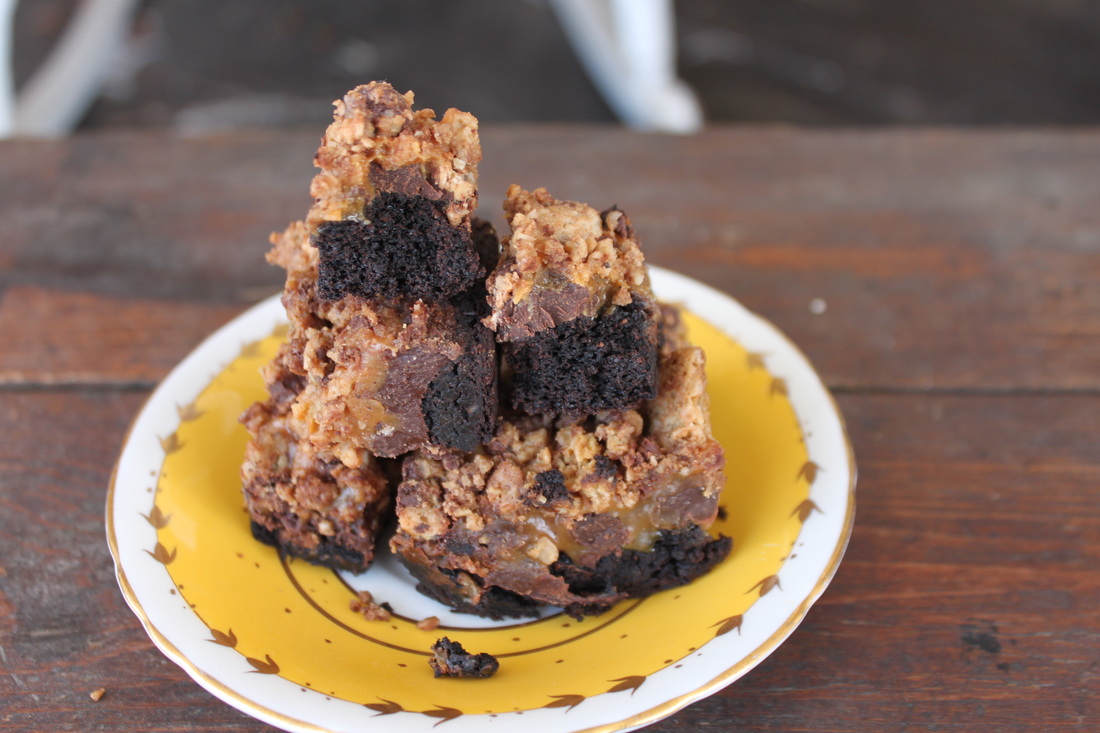
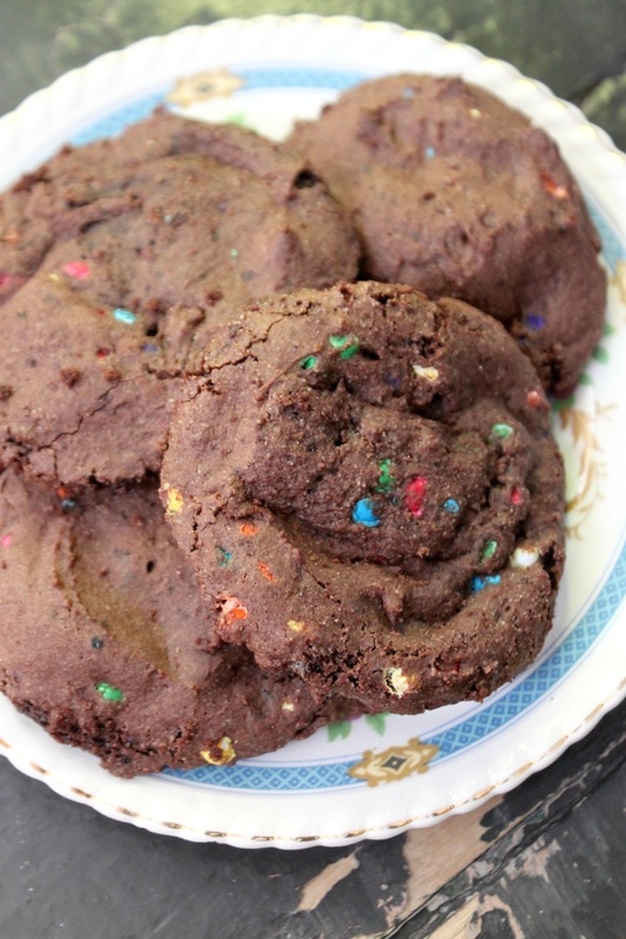 I made this particular batch o' cookies with a President's Choice Gluten-Free Chocolate Cake Mix. Someone at church gave it to me because their son who used to eat gluten free wasn't anymore, so she kindly gave us a bag of random gluten-free goodies! I basically never need a gluten-free cake though except for Caleb's birthday, and my homemade recipe is so darn good, so using the mix for cookies was definitely more up my alley. I was able to pack away a bunch of the cookies in the freezer and have them ready to take-along for my gluten-free Caleb if we went somewhere I knew there would be some treats he couldn't partake in. Well, that's it, I guess. My mind feels like bleh....yesterday I was filling out a form for a police check, and I wrote my birthday year as 1893. Then I put a 5 instead of an S at one spot, and I also wrote my address one line above each line I was actually supposed to write it on. Golly gee willikers. Hopefully my brain is taking some sort of rest to get ready for some sort of awesomeness....? Yes? Fingers crossed? Have a great weekend - and a great Mother's Day! Be sure to show some love to some motherly figure in your life! This recipe is a wonderful concoction of brownie, caramel, and cookie! The first time I made this it was because I had some leftover oatmeal chocolate chip cookies from a sale I had been a vendor at. The cookies had gotten too hard to be able to eat (well, unless you dipped them into tea or coffee, which was yummy!), so I needed to just get them used up in another way. I thought if they were a crumb or crumble type thing for something else, it would be deee-lish! I found this recipe from Chelsea's Messy Apron, and adapted it to suit me and what I had one hand. I've made this with from-scratch brownies, boxed brownie mix, even a modified-to-brownies chocolate cake mix. I've used wrapped caramels, as well as caramel bits, and I used my leftover cookies, but also store-bought oatmeal chocolate chip cookies! So, I mean, you can make this treat in many ways! And you should! Perfect, fudgy brownies topped with caramel and more chocolate, then topped with a crumble made from cookies? Yes, it is every bit as delicious as it sounds! 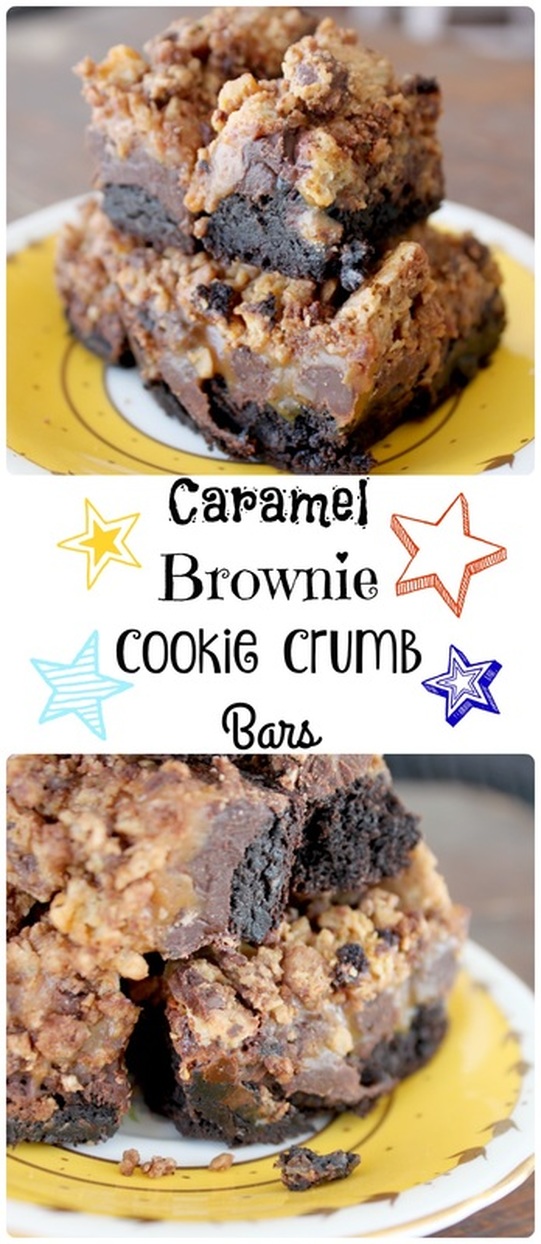 Caramel Brownie Cookie Crumb Bars Adapted from Chelsea's Messy Apron Ingredients: For the Brownie Base:
For the Caramel Layer:
For The Cookie Top:
Method:
  Oh, yum. These bars are just the tops! For real, they are just too tasty to fully describe! So, this weekend-any plans? Saturday we go over to the neighbours for an annual pancake breakfast! My wonderful neighbour has a huge maple syrup shack (it's an enormous shop, really!) where he's been really, really, really busy, working away at turning the sap from our beloved maple trees into wonderful maple syrup! He doesn't even personally like maple syrup, but his father made it, and he wants to carry on in his tradition. So he hosts a wonderful pancake breakfast to share/get rid of some of the syrup he's made! : ) It's really so great, we always enjoy it a lot! Have a good weekend! Hello! I don't know about you or where you live, but here in Tweed, it's been feeling more like spring this week. It's actually raining right now....which is just yucky and miserable, but the spring makes me want something bright, light, and palate cleansing as a treat. Am I the only one? We spend the cold winter months eating comfort foods, then when it feels like the warmer weather is approaching we feel the need to switch it up? Maybe it's just me? I know I would, and have, eaten these cookies any time of the year, but they feel particularly "springy" to me because of the refreshing lemony-ness of them. This recipe is one I've been using for a while now, but I made some changes, basically because I needed it to reflect what I usually have on hand! The original recipe is from a blog I frequent, Lauren's Latest. She's shares about home, travel, family, and she's got some wonderful, delicious and simple recipes (one of my favourites is her copy-cat Cinnabon cinnamon rolls! They are sooooooooo good!!!). Anyway, I'm keeping this post short and sweet....and sour? Get it? Lemons? Sour? Hardy har-har, I know, I'm funny. : ) 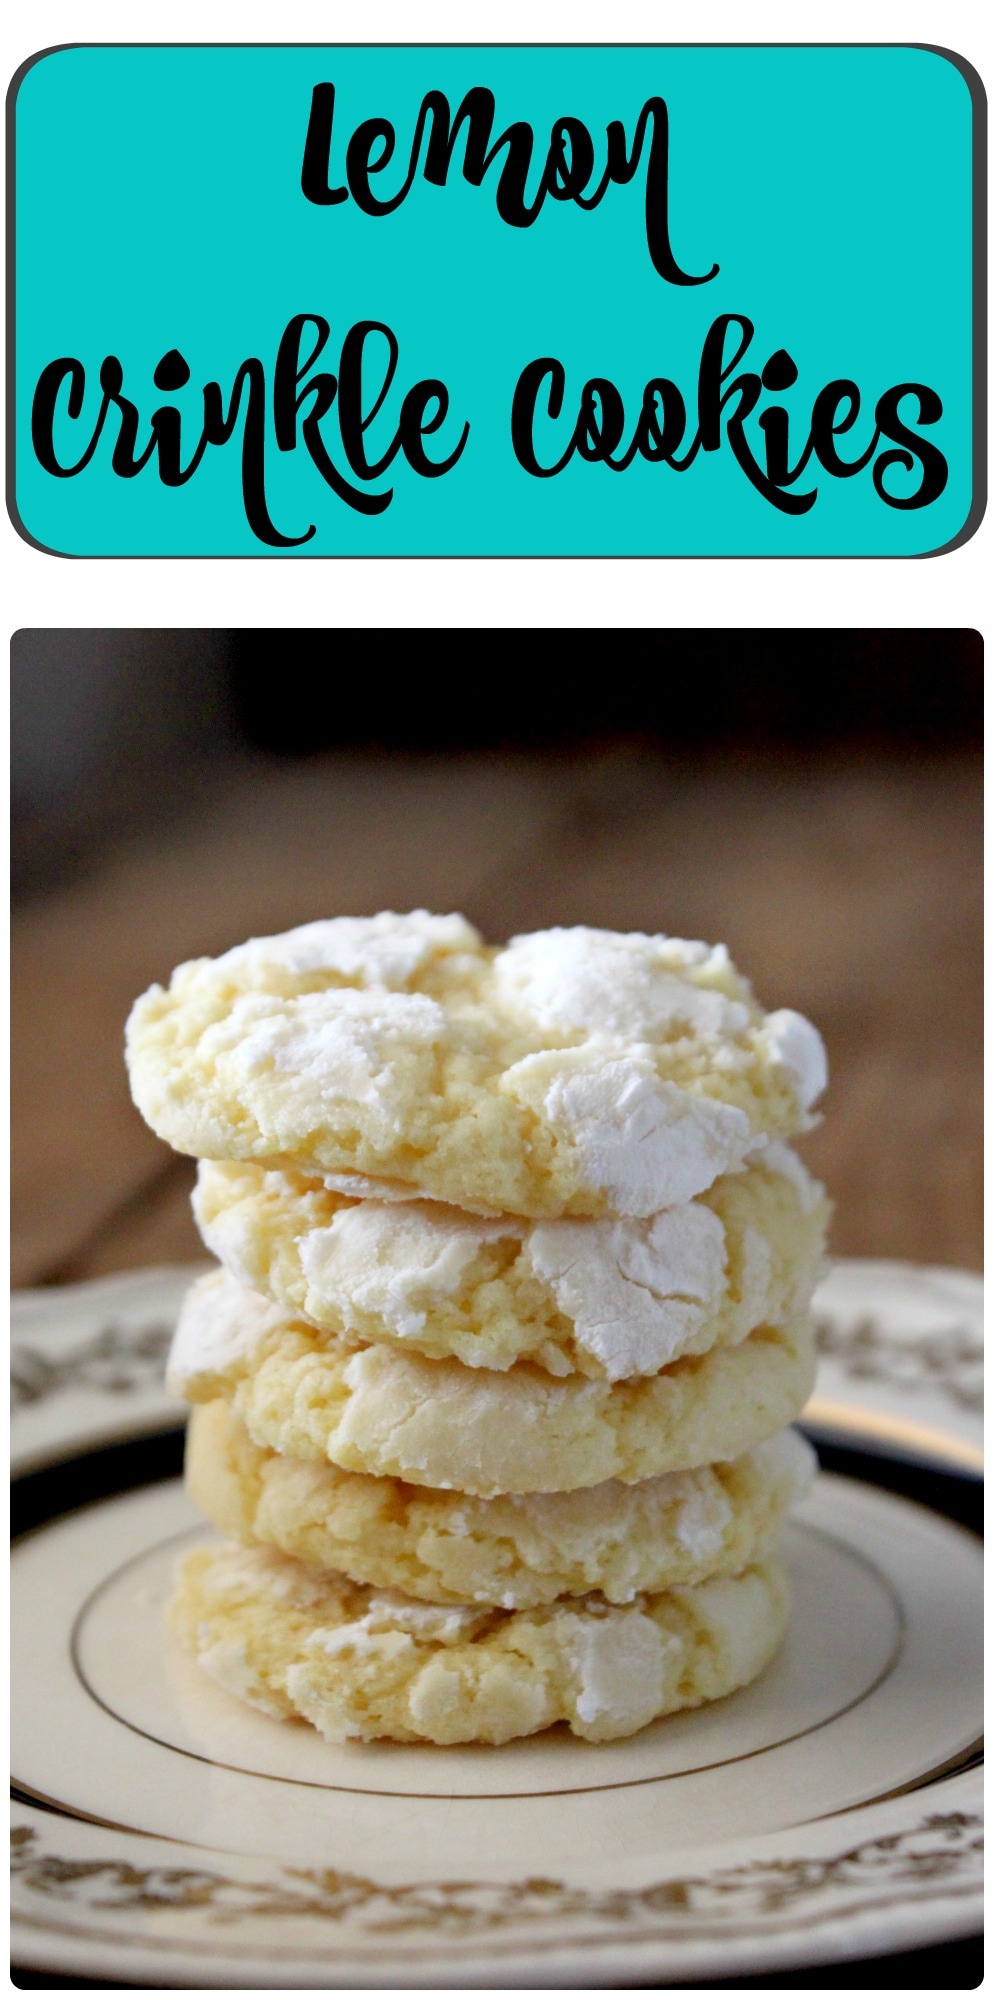
Lemon Crinkle Cookies Adapted oh-so-slightly from Lauren's Latest Lemon Crinkle Cookies Ingredients:
Method:
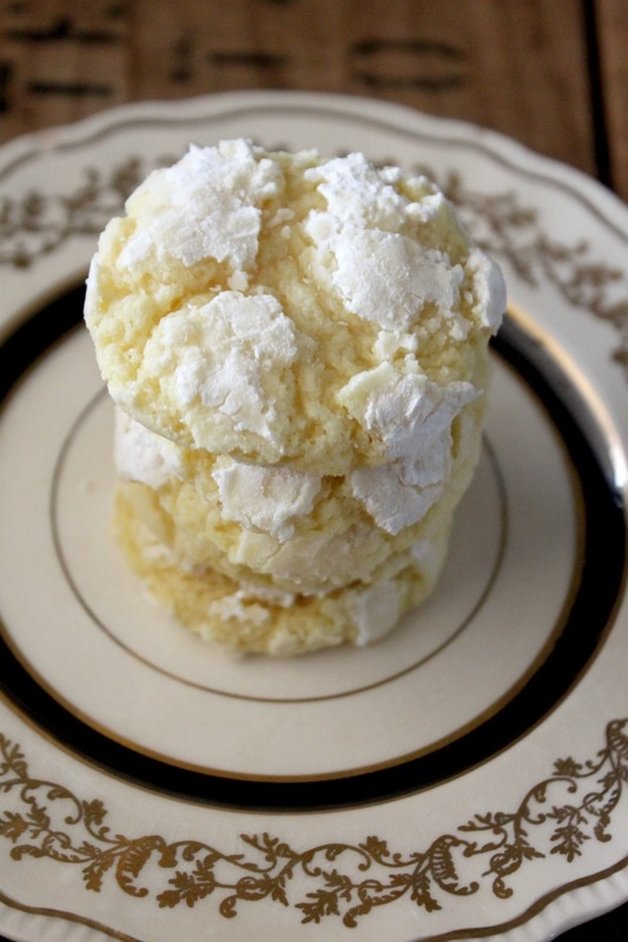 So lovely looking, right? They are just delightful, soft on the inside, lightly crisp on the outside, and so refreshing! Well, as "refreshing" as a cookie can be, I guess! Haha! Have a great weekend friends! |
Hi, I'm Amy-Lyn! 
I am the lady behind this here blog! I live in the sticks with my animals, my super handsome husband, and my
3 amazing kids! Here you'll find things from recipes (gluten-free, paleo, and strait up junk food!), DIY ideas, thoughts on raising a son with autism, and whatever else pops into my brain! : ) Read more about me by clicking here! Want to Stay Connected?
Find What
|
||

 RSS Feed


