Bushel & A Peck
  • Blog
  • Health & Fitness
  • Artist Biography
  • Paintings
  • Photography
  • Drawings, etc.
  • About Me
  • Contact Me


Christmas Cut-Out Sugar Cookies

12/8/2016

4 Comments

 
    I will be the first to admit to being a bit of a Grinch about Christmas.

   There's no real reason, except that I hate being "told" that I need to hang mistle toe, cut down a fresh tree, decorate the house with things that have been stored away (hogging space) for the whole year, & be jolly! See? A Grinch.

   I want to clarify though that I had WONDERFUL Christmases as a child. Seriously, my Mom & Dad put on a great Christmas! Decorations, a big tree that we'd go out to hunt for and cut down, an advent wreath with candles we would light leading up to Christmas, wonderful stockings, lots of gifts, a Secret Santa exchange with the siblings (because there were a LOT of us and we couldn't buy for everyone!), and an amazing Dutch style Christmas breakfast. 

    So, I don't dislike Christmas because of any childhood misery, I am just honestly a Grinch!

    But, one thing that I love about Christmas is iced sugar cookies! Seriously, you want me to get into the holiday spirit? Give me some iced sugar cookies. Yes, they DO need to be iced! C'mon-what's the point of a delicious, buttery sugar cookie that isn't covered in more sugar!?! 

     Ok, so this post isn't as "tutorial-y" (oh my gosh! That for sure isn't a real word at all!) as I want it to be....but that's because doing this wonderful, beautiful, time-consuming art is equal parts calculation & guess work! I'll give you tips and tricks that I've learned, I'll share some mistakes I made, and how I improvised to fix some of the problems! And taking a ton of photos during the decorating process would have been extrememly difficult since I was busy decorating! Sorry!

    Also, the method seems crazy long, but really, just read through it, and you'll see it's very basic.  

    The cookies are simple and strait forward, and the decorating is 2-step because you need to first pipe a border, and then you "flood" the cookies in the second step. That's the real "secret" to beautiful iced sugar cookies. FYI  : )

     Honestly, it's a little time consuming, but they can be as simple or as complicated as you (and your imagination!) want, so that adjusts the time it takes to decorate.

​      Ok, here we go!!!    

Picture
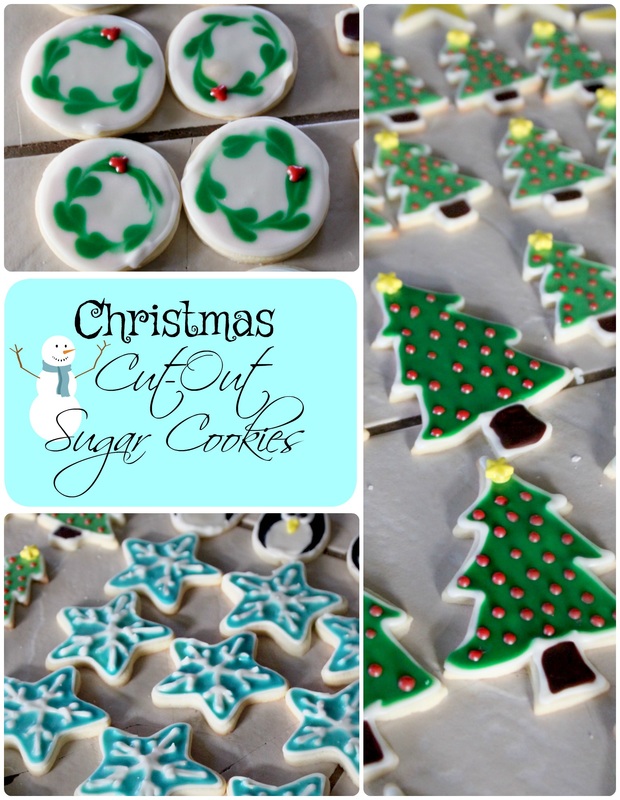
Cut-Out Sugar Cookies
(these cookies need 1 hour of chilling before baking! Fair square warning) :)


Ingredients:

For the Cookies:
  • 1 Cup butter, room temperature
  • 3/4 Cups sugar
  • 1/2 Tsp vanilla extract
  • 1 Egg
  • 2 1/2 Cups all-purpose flour
  • 1 Tsp baking powder
  • 1/4 Tsp salt


For the border icing:
  • 1 Cup icing (powdered) sugar
  • 1/2 Tsp vanilla or other flavoring extract
  • 2 to 2 1/2 Tbsp milk or water
  • Food coloring, optional

For the flood icing:
  • 1 Cup icing (powdered) sugar
  • 1/2 Tsp vanilla or other flavoring extract
  • 2 1/2 – 3 Tbsp milk or water
  • Food coloring, optional

   ***I use both zippered plastic bags, and proper piping bags, to decorate. As long as you have something that can give you a fine tip for the border icing you'll be good***


Method For The Cookies:


  1. Using a large bowl, use a stand mixer, or hand mixer, and cream the butter and sugar until it's light and fluffy. 
  2. Beat in egg and vanilla, scraping down bowl as needed. 
  3. In another bowl, whisk the dry ingredients and then gradually add to creamed ingredients. Beat well.  The formatting is being weird and the words I type are spreading apart!!! 
  4. Divide dough into fourths, flatten and wrap the portions with plastic wrap (dividing it helps with 2 things: 1. It cools faster so you can get working with it sooner, and 2. It keeps you from over-working the dough to help the cookies stay nice and buttery)
  5. Refrigerate for at least 1 hour before cutting into shapes (trust me, if you don't, the dough will be too soft, and you'll just squish your shapes trying to lift them onto your baking sheet, and then you'll be grumpy.)  

....after the dough has chilled....

  1. Pre-Heat oven to 375 and prep baking sheets with parchment paper (unless you have VERY trusthworthy baking sheets and you're sure you don't need to use the parchment)
  2. Take one portion of dough out of the fridge, and let it soften for a few minutes for easier handling. Roll out dough on a floured surface to approximately  1/8” thickness. 
  3. Cut into desired shapes. And using a small aptula or a butter knife, place on parchment lined cookie sheet and bake for 5-7 minutes or until lightly browned (just on the bottom, not brown on top or these will dry out!) Time may need to be adjusted depending on the shape and exact thickness.. Smaller cookie=less time. Bigger cookie=more time. I know, rocket science
  4. Continue with each portion of dough until completed.
  5. Cool completely on wire racks. These really need to be fully cooled before icing! 


Method For The Icing: 

  1. Iced cookies need at least 24 hours to dry, so clear a good amount of counterspace or tablespace where you can ice the cookies and leave them undisturbed
  2. Have all your cooled cookies ready and within arms reach. I like to work right in front of me, moving each cookie in and out of my space rather than moving around the table or counter to work. Does that make sense? Whatever, do it however you want!
  3. Now it's time to get the icing together! Mix together the icing sugar, vanilla, and 2 tablespoons of milk or water for the border icing using a spoon or a fork. It should be quite thick.  A tip from The Kitchn "If you drizzle a little from your spoon, the ribbon should hold for a few second before melting back into the icing. This border icing should be just thick enough to pour easily". If you plan on making your boarder have colour, add it in now.  If you use gel colour, the consistency should still be good, but if you use liquid, you may need to readjust the thickness by adding a little more icing sugar
  4. Transfer the border icing to a piping bag, zippered plastic bag with a tiny corner cut out, or whatever tool you may own for piping! I generally set my bag into a cup, and then roll the edges over the cup to give me a big opening to scoop/spoon my icing into the bag
  5. Now trace along the outside out your cookies to create a border. Squeeze gently and with consistent pressure so the border is the same width all the way around. I say this, but I'm not really that great at it. : )  
  6. As the border icing sets, prepare your flooding icing by mixing together the icing sugar, vanilla and 2 1/2 - 3 tablespoons of milk or water using a fork or a spoon. This icing should still be fairly thick, but it should drizzle easily and a bit of drizzled icing should sink immediately back into the icing. Add colour now if you're using any! Prepare as many batches of flooding icing as you need in different bowls, and place a piece of plastic wrap right onto the top of each so that the icing doesn't harden on top. Transfer the flood icing to a piping bag, zippered plastic bag, or whatever you are using! 
  7. The first cookies you did border icing on should be dry to the touch by now, and you can start flooding!
  8. Flood the interior of the cookie with flood icing by gently squeezing the icing out of whatever you've chosen to use. You may need to nudge the icing around a little. If it isn't runny enough, you'll need to squeeze the icing out and back into a bowl and add a smidge more milk or water, then "re-load" it into your piping tool
  9. Once you've finished icing all your cookies, you'll need to leave the cookies undisturbed for at least 24 hours to fully dry. Depending on the thickness of your icing and the layers on the cookie, it may take shorter or longer. When the cookies are dry, the surface of the cookies will be completely smooth, dry, & won't smudge
  10. Once dry, you can stack the cookies between sheets of parchment paper in an airtight container at room temperature for several weeks
Picture
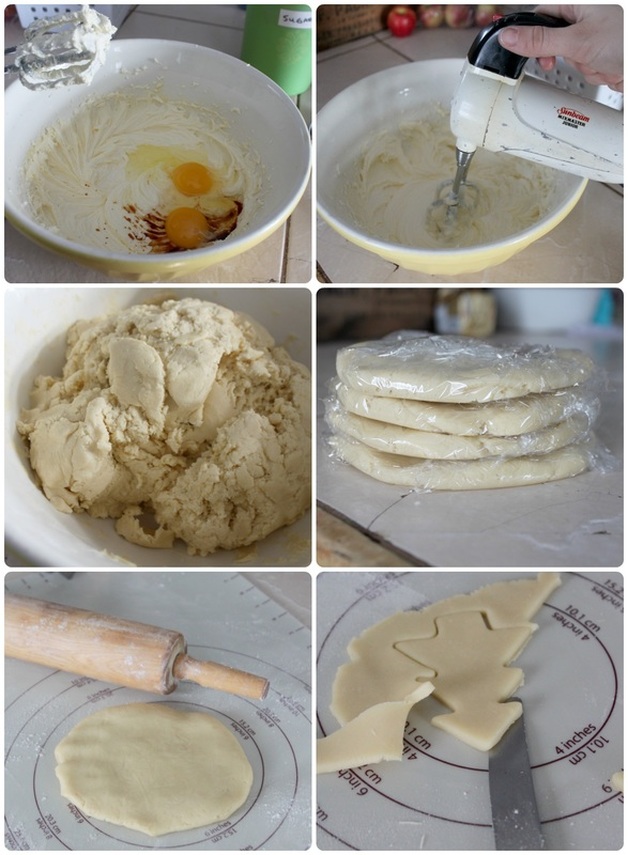
I made a double batch here
    So, preparing the cookie dough is simple! When you're done you just need to divide the dough into 4 disks, wrap 'em up, and stick 'em back into the fridge to cool. This step keeps the cookies from spreading and loosing their shape when baking. I'll actually often make the dough a day or more in advance from when I'll get a chance to bake them. 
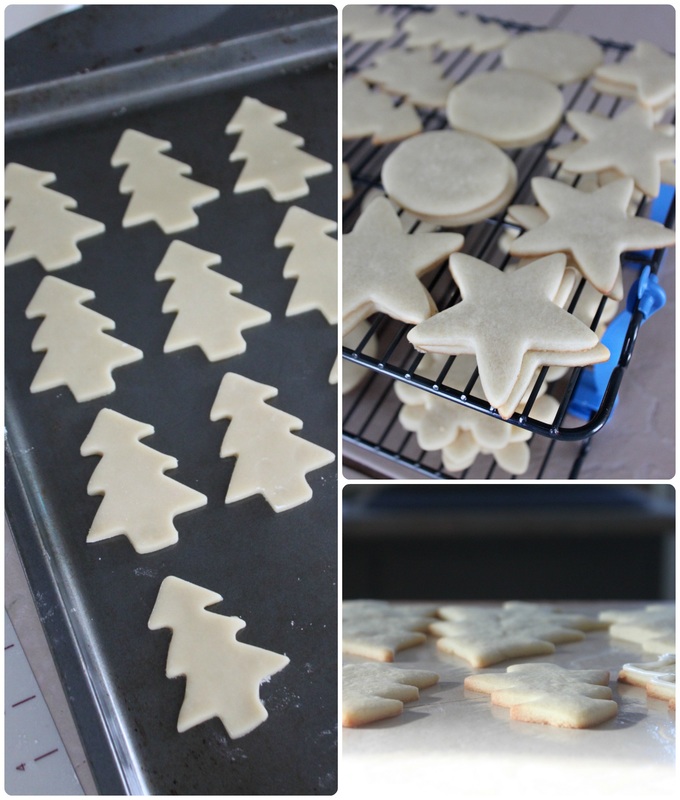
Picture
       Bake and cool!!! 
Picture
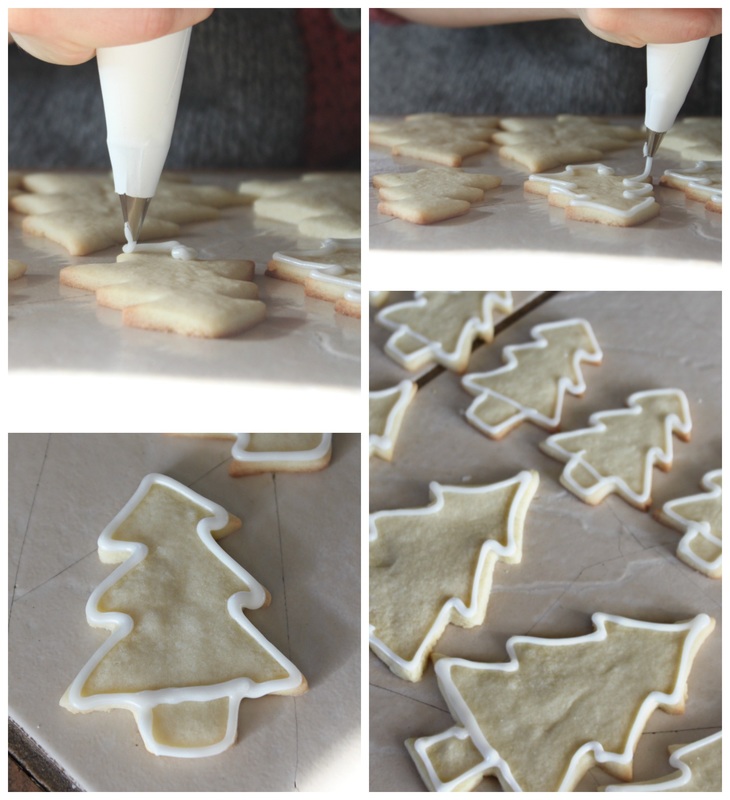
     Now you'll need to create the borders on your cookies so that your inner icing stays where you want it and doesn't go dripping off your cookies! You can see that my piping skills are poor! Oh well, the cookies still look pretty good when all is said and done! 
Picture
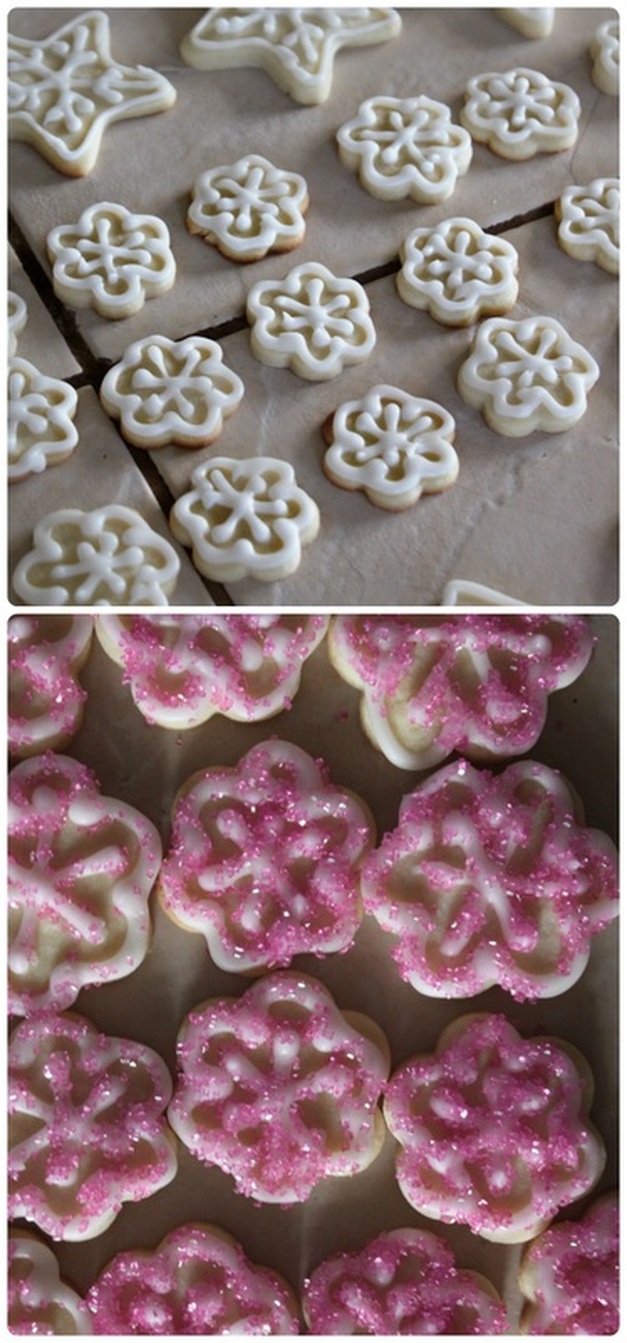
  Ok, so here's a little tip! If you plan on making pretty snowflakes, save the pretty snowflake for after you've flooded the cookie! When I went to flood the blue snowflakes, the border and the snowflake design were so close to each other that I had to use a toothpick to gently and carefully flood around the design. And that was a huge time hog! 

   So, for the smaller snowflakes I didn't even bother flooding them! Once I realized my blunder with the bigger snowflakes, I quickly grabbed some sprinkles and made my smaller snowflakes into sparkly pink snowflakes before the border icing dried fully! You can see those cookies above. 

     To pipe a design over the flooded icing, you'll want to keep the flooding to a minimum so that you're not waiting around for it to dry before piping your design. Just flood a thinner layer than you might normally have used, allow it to dry to the touch, and use the border icing to pipe your design.

       For the wreath cookies, flood the cookie with white, then immediately add dots of green around the edge of the cookie. Use a toothpick to gently drag the green icing from one dot to the next. Then I piped red "berries" on after the green had set slightly.

​       For the (super helpful!!!) photo tutorial I used to make my wreath cookies, look here at The Monday Box!
Picture
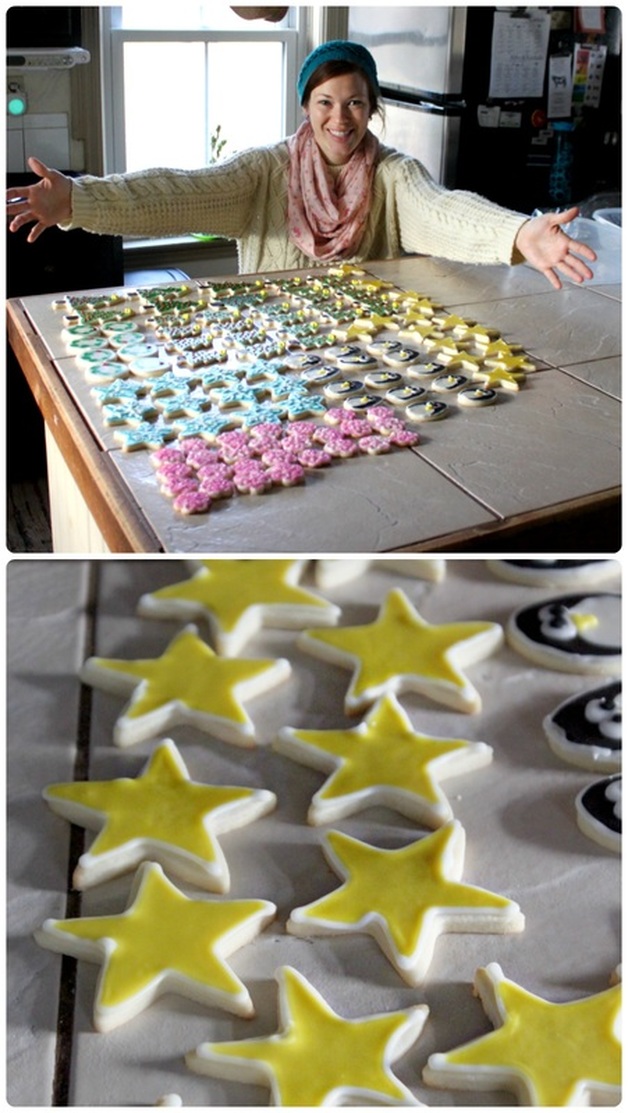
It doesn't look like a lot in front of me, but that's about 7 dozen cookies!
   The little penguins were time consuming! Geepers! I liked how they turned out, but I was also like, "Yeah, not doing that again!" Although I probably will because I'm a sucker for punishment when it comes to creat beautiful Christmas cookies!!! 

    Something that would make it not so awful would be to have little candy eyeballs, which I've seen at Michael's & WalMart, but never purchased of course because I'd rather take forever and ever piping my own eye balls onto cookies (sarcasm, people). 

     I also could have made them more simple, like the ones pictured here, but, ya know. Too little too late. Also, the ones in the link bother me slightly because the eyes are technically on the pengiuns belly (look at the link to see)....but, they are cute, and more simple, and most people aren't painfully critical like I am and wouldn't mind or even notice that the eyes and beak are on the pengiuns belly!  

​    Anywho! I hope everyone has a good weekend, and got through this week in one piece! 

    Let me know if you make these cookies, or if you have a special Christmas cookie you like to make for the holidays! Sharing is caring! 

​xoxo

4 Comments
Kathy
12/15/2016 06:33:06 am

I just wanted to tell you that I made a double batch of these cookies, and they were just perfect! I did as you mentioned, making the dough a day ahead, then after baking them I stored them in the freezer for a week before I had the chance to decorate them. They tasted just as good out of the freezer as they did fresh out of the oven.
This is a recipe I will use every time I need a cut-out cookie!
Thanks for sharing!

Reply
Amy-Lyn
12/15/2016 07:55:54 am

So glad to hear it Kathy! Thanks for taking the time to leave a comment!

Reply
Denise
1/22/2017 09:41:48 am

Wow sugR cookies made way to decorated

Reply
Jennifer
2/15/2017 07:41:30 am

I made these for a birthday party (I bought cute animal cookie cutters), and they were great!
I did have to adjust the amounts for the icing to come out right, but that's not a big deal!
Thanks for the great recipe!

Reply


Leave a Reply.


    Welcome To
     Bushel &
    A Peck!

    Hi, I'm Amy-Lyn!

    Picture
    I am the lady behind this here blog! I live in the sticks with my animals, my super handsome husband, and my
    ​ 3 amazing kids! 
    Here you'll find things from recipes (gluten-free, paleo, and strait up junk food!), DIY ideas, thoughts on raising a son with autism, and whatever else pops into my brain! : )  

    Read more about me by clicking here!

    Want to Stay Connected?

    RSS Feed


    Subscribe to my mailing list!

    * indicates required

    Find What
    ​You're Looking For on the Site!


    Vitacost.com

     Most Popular Posts

    Meat & Potato Casserole
    Gluten-Free Meat & Potato Casserole
    Picture
    D.I.Y Tea Cup Bird Feeder
    Picture
    Mini Caprese Kabobs

    Featured in The Huffington Post

    Picture
    Paleo Double Chocolate Avocado Cookies

    Featured in Woman's Day

    Picture
    Chicken Bundles


    Categories

    All
    Antiques
    Autism
    Birthday
    Breakfast
    Chocolate
    Dessert
    Diy
    Family
    Five Minute Friday
    Giveaway!
    Gluten Free
    Health-fitness
    Lunch/Dinner
    Miscarriage
    Motivational Monday!
    Muffins
    My Thoughts...
    Nifty Ideas
    Paleo
    Primal
    Recipes
    Sandwiches
    Soup
    Tea Party


    Some of my favourite products! 


    Archives

    September 2017
    August 2017
    June 2017
    May 2017
    April 2017
    March 2017
    February 2017
    January 2017
    December 2016
    November 2016
    August 2016
    July 2016
    June 2016
    May 2016
    April 2016
    March 2016
    February 2016
    January 2016
    December 2015
    November 2015
    October 2015
    September 2015
    August 2015
    July 2015
    June 2015
    May 2015
    April 2015
    March 2015
    February 2015
    January 2015
    December 2014
    November 2014
    October 2014
    September 2014
    August 2014
    July 2014
    June 2014
    May 2014
    April 2014
    March 2014
    February 2014
    January 2014
    December 2013
    November 2013
    October 2013

    my foodgawker gallery
  • Blog
  • Health & Fitness
  • Artist Biography
  • Paintings
  • Photography
  • Drawings, etc.
  • About Me
  • Contact Me