|
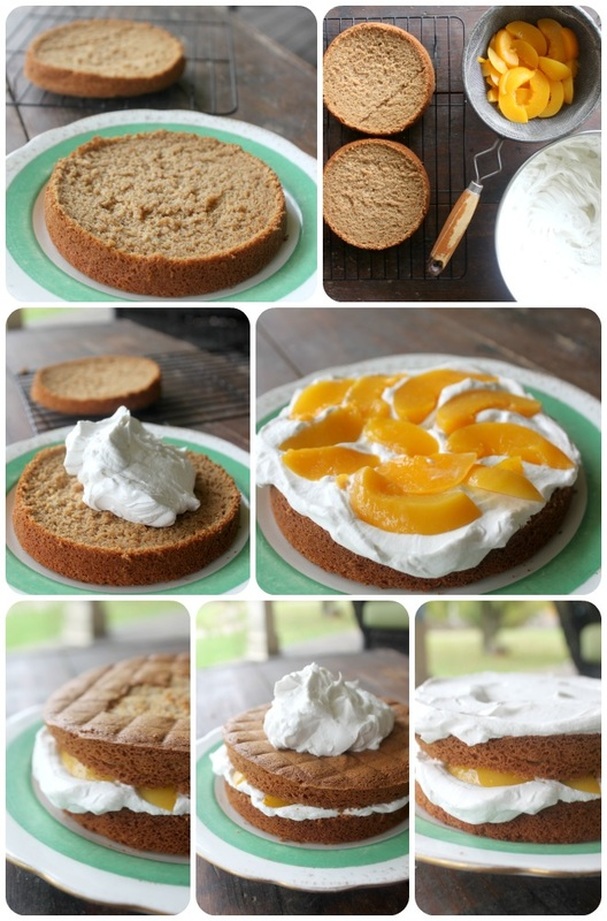
Hello there! How are we today? I've been struggling the last few weeks with the blog....I feel "niche-less", or too "niched". I write here for myself, it's true, but I want to reach people and become part of something in peoples' lives. But, when you've got a blog like mine, unless you are me, you won't come back because I post about super healthy recipes, super-unhealthy recipes, simple recipes, difficult recipes, writing about family & autism, DIY projects, health & fitness, not to mention the rest of my site which is dedicated to my art!!!! Good golly!!! To top it off, one particular recipe on here has been going viral, which is very exciting, but it leaves me feeling like nothing else I've done matters here...? Seriously, this month, only 20 pages were viewed on the site, which isn't bad, except I have hundreds and hundreds of pages! Let's take a look at the seedy underbelly of Bushel & A Peck, shall we? The top 3 numbers look like this: ~24, 609 views on the Meat & Potato Casserole ~2, 414 just opening to my blog ~1, 270 on my Double Chocolate Avocado Cookies There's a difference of more than 23,000 views between one recipe and the next! Geepers! Anyway, I'm not complaining exactly.....I'm thinking out loud....thinking out type? I dunno what we should call this. A few days ago I came to a realization though....I cannot fit myself or my thoughts into one niche on this blog! It's me, this is who I am! Bushel & A Peck, to me, is like a flea market! You can never be quite sure what you'll get, but it's always worth coming to check, just in case! Dig around, see what you can find, see what you love, share about it, talk about it, make it, create it, fill your own bushel!!! I want to always share what I love, what I'm passionate about, and not get bogged down in the "but I need a niche" talk that circulates around the blogosphere! My "niche" is me! I think I've talked myself into a better mood!....I also turned on the sound track for The Music Man, so, I mean, that cheers me up too! : ) Also singing karaoke to show tunes (on YouTube) makes me feel better, so I'll be doing that once I'm done here! Thanks for listening to me rant.....shall we move on then? Great! 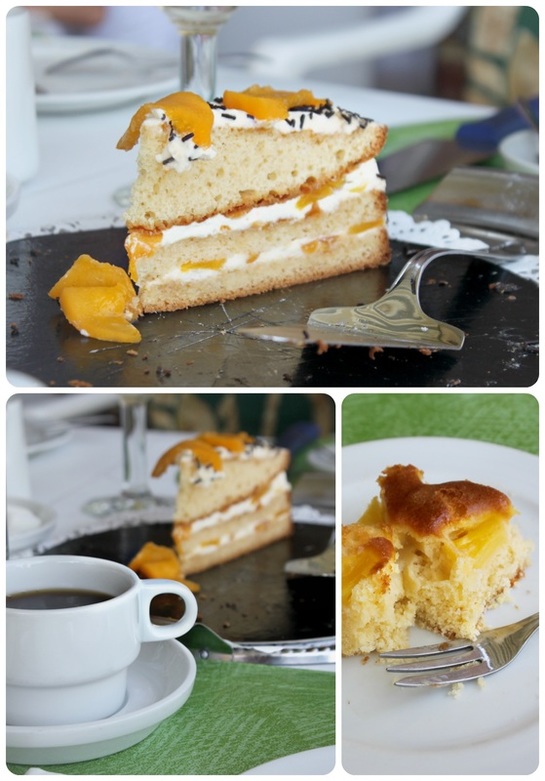 The beautiful treats we were served visiting family in Belgium In the summer when my husband, father-in-law, mother-in-law & Grandpa went to Europe, our first stop was at Grandpas cousins house in Haaltert, Belgium. I already shared part of what they served for dinner (shrimp stuffed tomatoes! Super simple, and really tasty!), but before dinner (yes before!), they served us coffee, beer, wine and cakes. I did say cakes on purpose, they served us 2 different kinds! One was a beautiful pineapple topped vanilla cake, and the other was a fabulous layered peaches & cream cake. Oh, with chocolate sprinkles added! : ) I decided I wanted to make my own peaches & cream cake when I got home, but wanted to make it paleo. I also thought it would be so tasty to incorporate a fantastic Dutch dessert, honey cake, or honingkoek, into this dessert. I like peach cobblers and crisps with nice spices, so I was sure having a spiced honey cake with the peaches and cream would be a winner! T'was, t'was indeed! 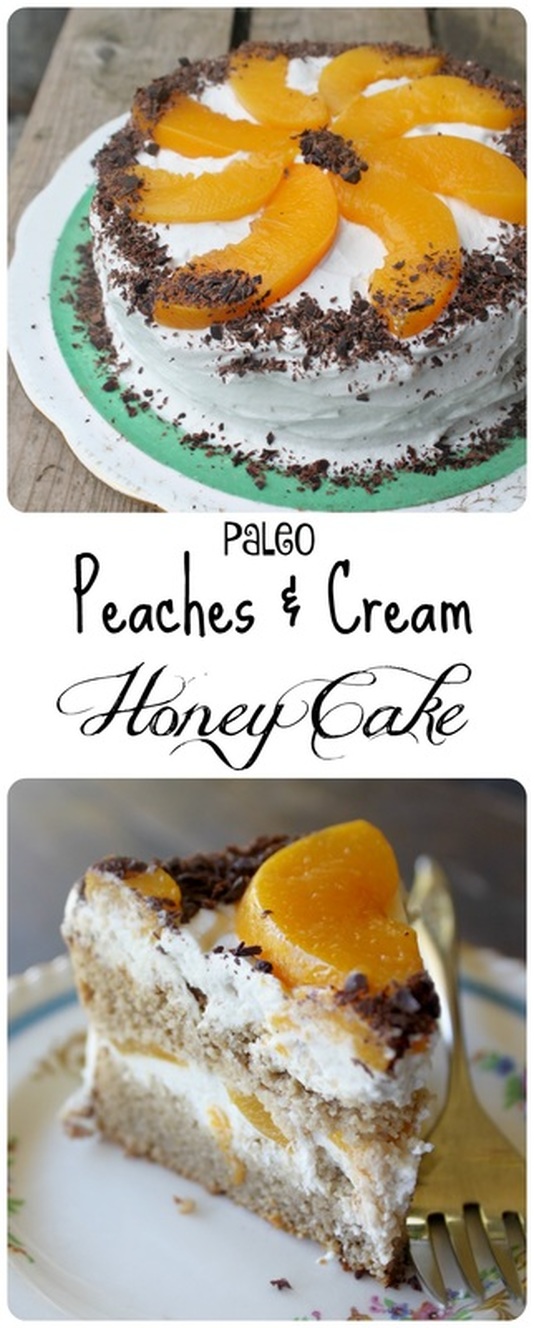 Peaches & Cream Honey Cake Adapted from The Dutch Table & Plated With Style Ingredients:
Method:
 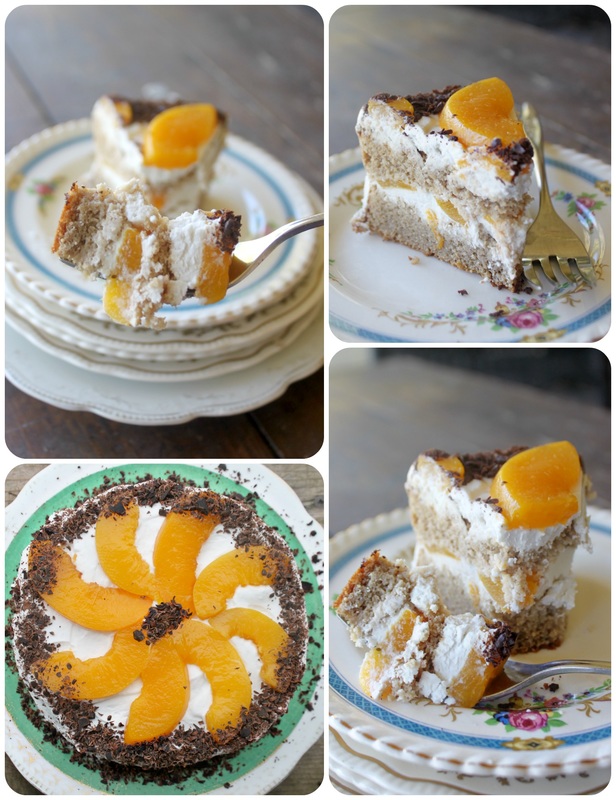 If you've ever had a regular dutch honey cake, you'll know that it is heavy & dense, but still soft all at once, and this paleo version was too! You could distinctly taste the honey and spice, and the peaches and cream really brought a cool sweetness to the whole dessert. If store at room temperature the cake stays nicer, but if your whipped cream isn't super stable you'll need to refrigerate it. It still tastes great, but the cake seems more dense once it's bee in the fridge. Best plan? Just make it to share and have it eaten sooner than later! : ) And that, my friends, is all I've got for you today! We'll be out tomorrow night dressed up and collecting tummy aches (candy!!!) for Halloween, and our sweet middle child has her 7th birthday party on Sunday which will be fun (as long as it's not raining and the kids can play outside!!!) : ) Fingers crossed! Please leave a comment if you want to say "hi" or anything! Don't be afraid, I love comments! xoxo
4 Comments
Good Monday morning to ya! Yes, musical theatre is one of my favourite things (and where my title reference comes from), but today, on my Health & Fitness page, I share about some of the things that I have found helpful in my journey of being healthy & getting back into shape! To read that post, click here! Seriously, just check it out. Do it. : ) So, so another favourite thing of mine (besides the health related things) is being a complete idiot with my beautiful, wonderful sister. My sister and I (who are brilliant, and not the least bit geeky) have a knack, if you will, for creating amazing ideas! For instance, we created "Realface", where when you're texting someone, if you can't find the right emoji to express yourself, you simply take a "Realface" (your actual face doing what you'd want an emoji to do) and send it. "Isn't that just a selfie?" you're asking yourself. Gosh, no! Selfies are meant to be taken at just the right angle to make you look your very best, but "Realface" is meant to make you look like a big dummie! Try it sometime, you'll be the coolest person ever. 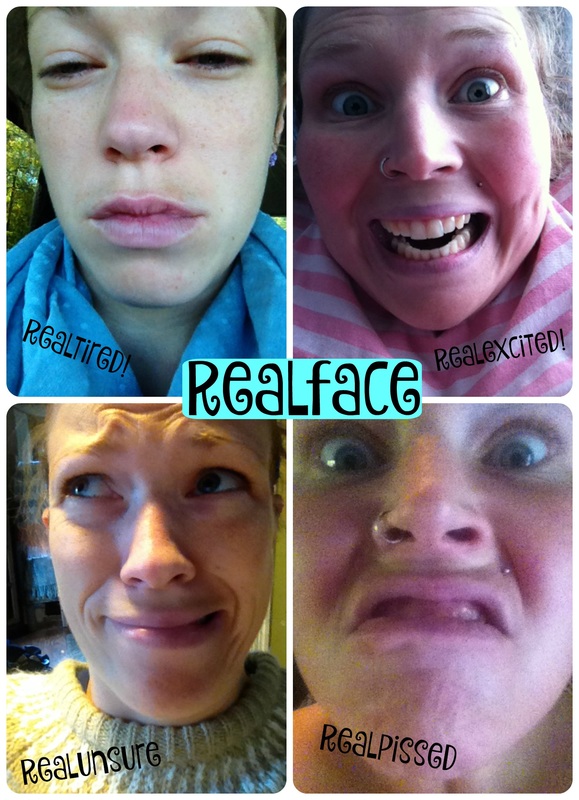 More recently we've started sending "Footsies". Now this, this is the most brilliant thing ever! It's like a selfie....but of your foot in different places. I know, I know....it's just brilliant. We haven't trademarked these ideas yet, so don't steal them! You can use them, of course, but don't claim they are yours because my sister and I know better! Also....please know how much I am joking about all of this!!! Do we do "Realface" and "Footsie"? Yes, of course!!! Hahaha! But, I am being a goon about the seriousness of our brilliance and coolness! 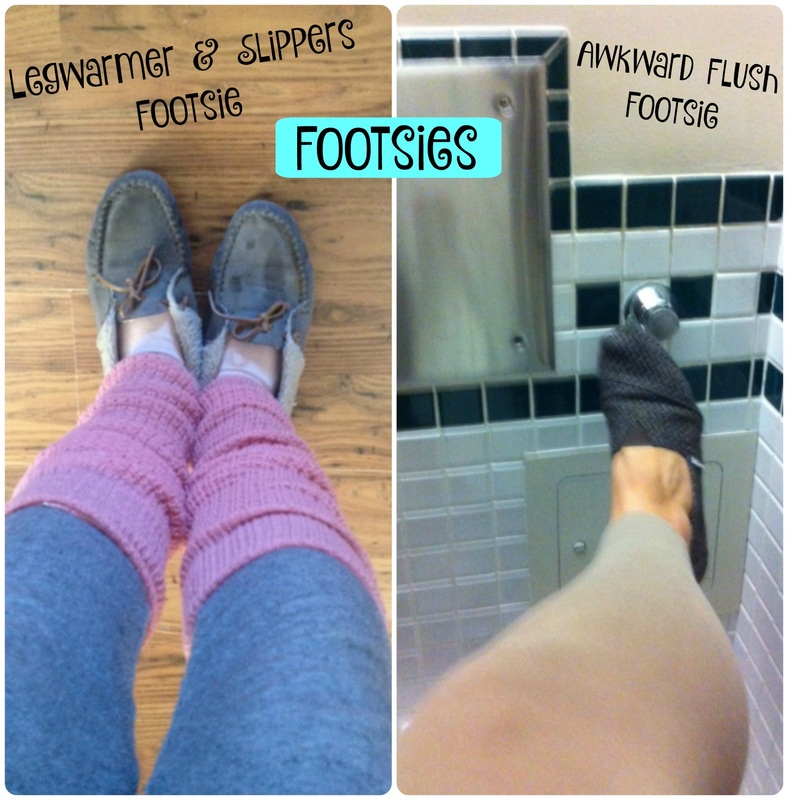 I know what you're thinking, "why didn't I think of these amazing things?!?". It's because you're not as weird as my sister and I, that's why. : )
Anyway, I hope everyone had a good weekend (we were busy with guests all weekend, but it was great fun), and that this week has some moments that you are looking forward to! Part of feeling your best involves having things to look forward to, even if it's something small like telling yourself that on (whatever day) you'll get yourself a fancy coffee from some place, or plan to call or e-mail someone you haven't talked to in a while that you miss. Take a Realface, a Footsie, make a plan, look forward to something, and make the most of this new week! xo Ya know what makes a great party? No, it's not the friends, or the conversation. It's the dip. Ok, I am kidding, but for realz, a great dip makes an awesome party awesomer! : ) Awesomer may not be a real word, but it is in my house with a 5 & 6 year old, and it describes this dip! First up....I took crappy photos of said dip. Thumbs down. I was (happily) busy getting ready for my birthday party, and only stopped briefly to take a few pictures. The starting point for this recipe can be found here, at mom4real and her photo of the dip gives it a little more justice. "Buffalo Chicken" refers to hot wings, btw. When I was young, I really and truly believed that these "buffalo wings" that I heard grown-ups talking about were some sort of genetic mutation specialty food....buffalo with wings? Yikes! Well, let me put your mind at rest, according to the internet (where all pieces of information are true-haha), Buffalo wings got their name from their originated location, Buffalo, New York. I read this enlightening piece of information here, on todayifoundout.com. I know I went, "ohhhh, Buffalo, New York!" when I found out. I knew as an adult the wings weren't part of a buffalo, but my brain blanked beyond that and never thought of the New York city! Duh. Typically, Buffalo wings are served with blue cheese dressing, and other Buffalo chicken dip recipes use blue cheese, but I can't. I loooves me some cheese, but blue cheese? Nope. Can't do it. Anyway, ranch is equally as popular now for chicken wing eaters, and well, there's no rules when it comes to wing eating or dip making! Anywho, the real surprise twist here is what we did with the leftovers....oh good golly, it was gooooooood. But first, the dip! 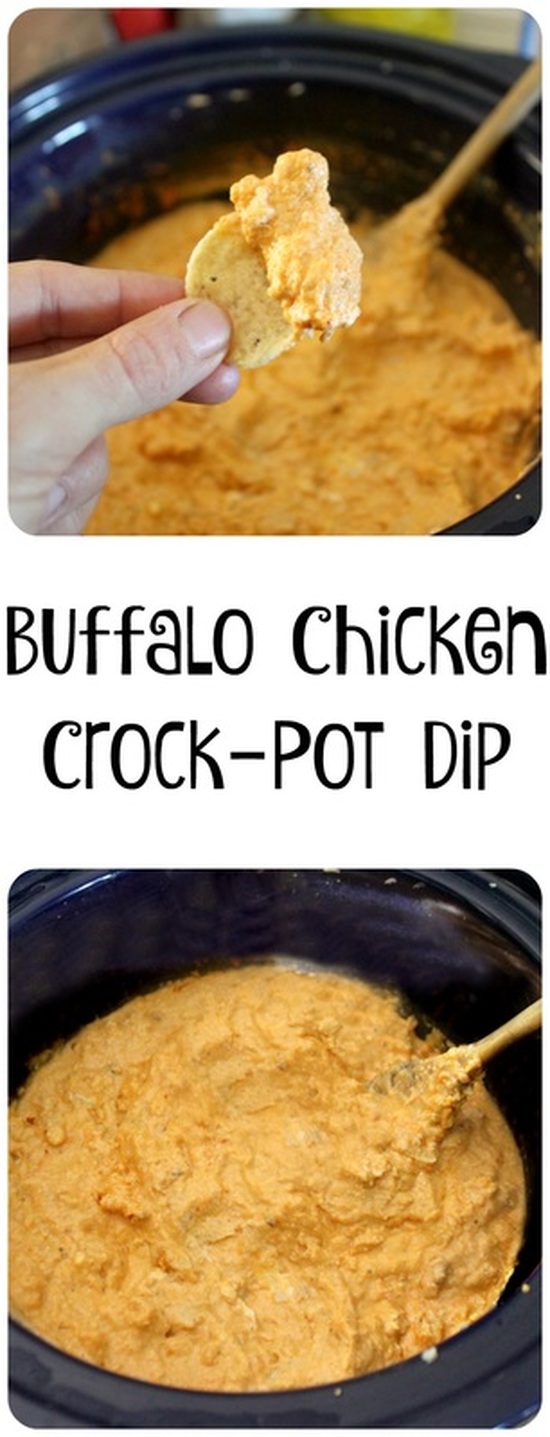 Buffalo Chicken Crock Pot Dip Adapted from mom4real Ingredients:
Method:
Well now, you can see the pic below ruining the surprise of what we did with the leftovers! We made it into the most fantastic grilled cheese sandwich ever!!! I guess if you're not a grilled cheese lover this won't be that appealing to you, but let me tell you, this treat day dinner was right up my alley! We buttered some fresh bread, then prepared the sandwich by loading it with leftover dip, an extra splash of Frank's Hot Sauce, a drizzle of ranch dressing, and a little extra grated cheese. This sandwich could be replicated without making the dip too. Simple empty the contents of a can of chunk chicken into a bowl. Mix in some Frank's, ranch dressing, and a little cream cheese (if you have any). Mix up well! Then, butter 2 pieces of bread and put some shredded cheese on the non-buttered side of one piece, top with some of the filling, add a little more cheese, then finish with the second piece of bread (butter side up. Then grill to melty perfection! 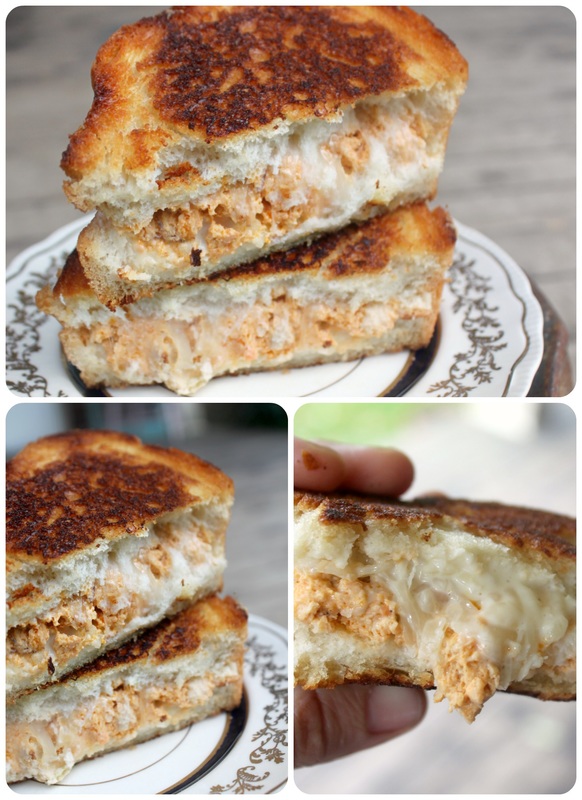 Let's talk about my Jekyll & Hyde thing I've got going here, shall we? On Monday I started my new Health & Fitness page. So....where does cheese laden dip and buttered smothered grilled cheese fit into this? I eat Paleo....80%-90% of the time. Paleo is a whole foods lifestyle with lots of fresh veggies and fruits, meat, nuts and seeds, and avoiding things like grains, (refined) sugar, and dairy. But I am (at heart) a food lover. A lover of ALL food! So, 5-6 days a week I eat strictly Paleo, but the 1-2 days a week I don't eat Paleo, my "treat day(s)", I don't worry about what I eat! Sounds crazy? Maybe. But it works for me, it keeps me on track, really. If I looked into the endless future, knowing I would never again enjoy a grilled cheese, a or a bowlful of Maynard's gummy candies.....I would be so sad. So very, very sad. I love healthy food, and I love how I feel when I create something delicious with it, and how I feel knowing my body is being well fuelled. But, taking a break mentally from good eating re-charges me to keep eating healthy! So, to ya'll going, "whaaaaat?" to the seemingly random recipes I post, this is the "why" to your "what". : ) Happy Friday everyone! Please leave a comment if you stop by here, or share this recipe with someone you know would love it, or make it for your next party so that you'll be the most awesome person ever! Awesomer. xoxo I'm finally doing it! I'm starting my 'health & fitness' page and posts that I've been talking about forever!!! It seemed fitting to start this today because today is my 2 year blogiversary (ok, well, technically, it was yesterday....)! Woot woot! I can't believe I've been writing here (mostly to myself....) for this long! My first post ever was about my son's Larry The Cucumber Cake, and last year for my first Blogiversary I posted about My Favourite Things from that first year of blogging. Today I'm excited about starting this new phase in my life (and the blog's life!) and sharing about another part of me-my love of health & fitness! I am using a lot of exclamation marks!!!! Haha So, for my first ever health & fitness post, I wanted to share (a short version of) my story of how I went from my heaviest (not including my pregnant weights! Those were dooozies! I got to 200 lbs for my third pregnancy!), to my leanest and fittest. The plan for this here Health & Fitness thingy is that I'll post the full article over on my "Health & Fitness" page (look, it's now in the tabs up top!), and will just give a sample here for those who aren't interested! I'll be posting for Health & Fitness every (motivational!) Monday! So, to read the full story, click right here! 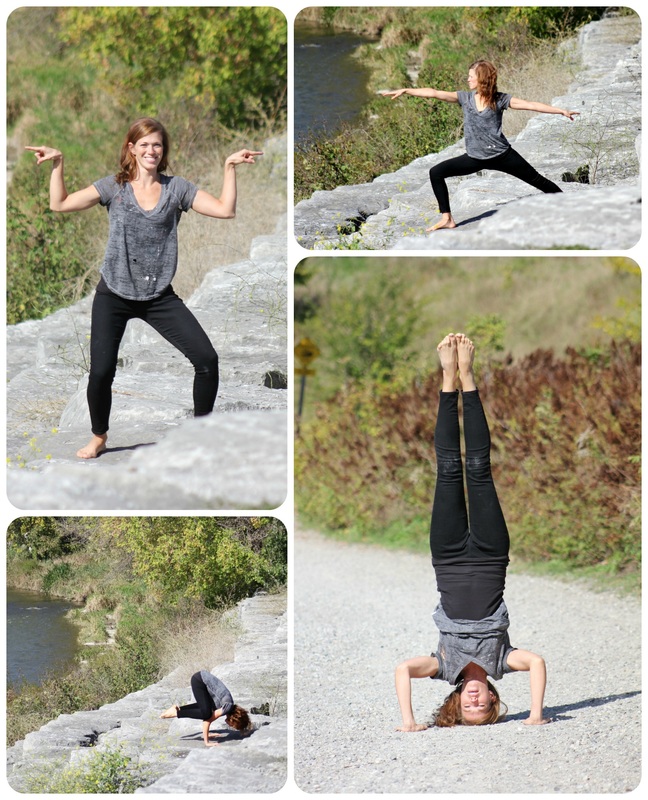 Happy Monday! A few weeks back 'twas my birthday and we had a little shin-dig for it! I had a friends daughter making me a cake (she's 10 years old and asked if she could make my cake for me! Such a sweet girl!) So, even though I had a cake coming, I still love baking and trying new things, so I knew I would be making some extra treats for the par-tah (like these s'more clusters!) and I suddenly had the urge to make lemon squares! I literally had no clue how they were made, so I Googled "easiest lemon bar recipe", and got a result from Rock Recipes for Super Easy Lemon Bars, and they weren't joking around! These amazingly delightful squares are so gosh-darned simple to make, and only require 5 ingredients! Ok, 6 including the icing sugar to dust on top, but still, 6 ingredients is pretty good! I hope you'll make these squares, and check out Rock Recipes (the author is a fellow Canadian!). It is a blog is full of amazing recipes!  Lemon Squares From Rock Recipes Ingredients: For the shortbread base:
For the layer of lemony goodness:
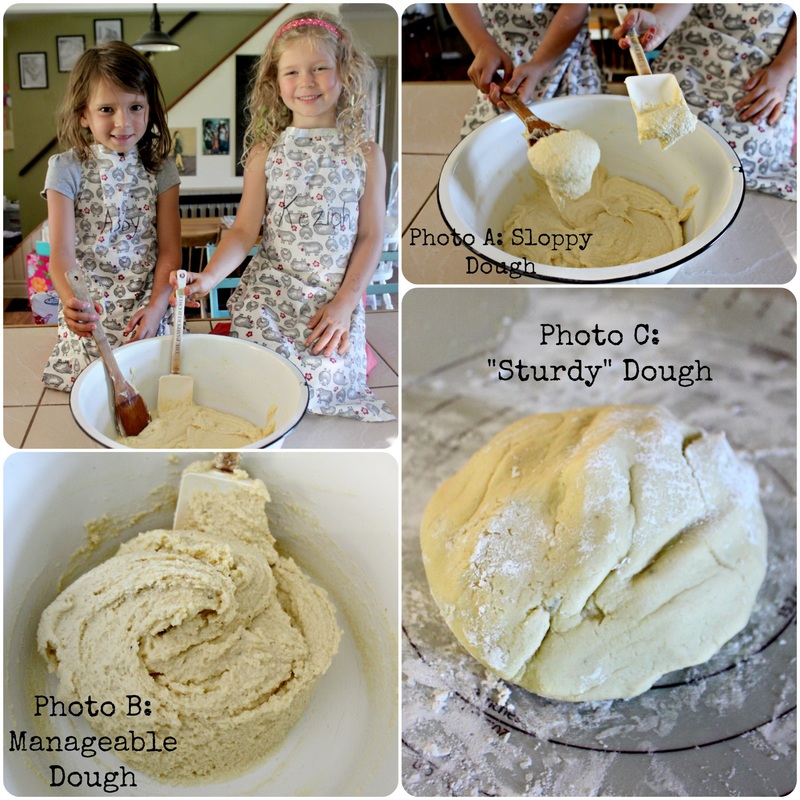
Method: Shortbread base
....while that is baking..... Lemon layer:
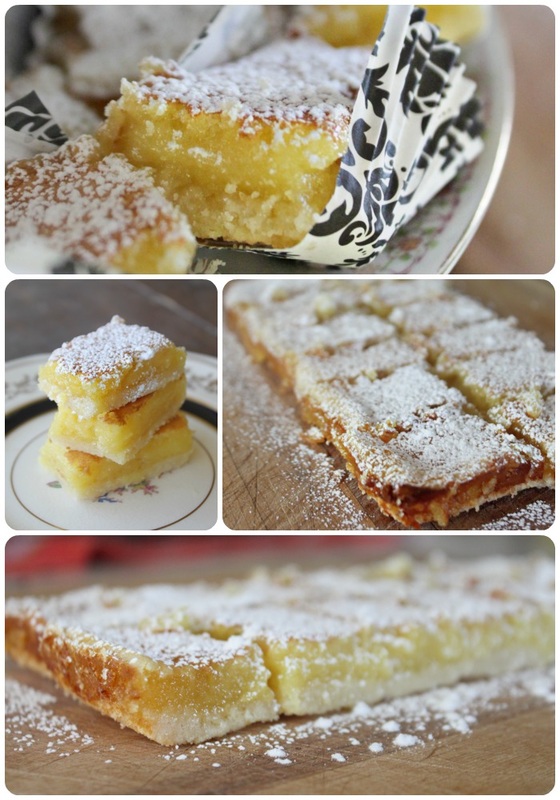 So easy, right? And seriously, unreal delicious! I brought the few remaining squares I had to an art show I was doing the day after my party, and one lady said that the squares were better then the (slightly expensive) ones she bought from a lovely bakery downtown. I told her, "I just Googled 'easiest lemon bar recipe', and this recipe came up!" She could hardly believe it! Ok, randomly, my fingers crack A LOT! All the time, no matter the season! I think it's because I wash my dishes in crazy hot water (kills more germs, and they dry really fast!).....but, all that to say....it makes typing really freakin' hard! :( Boo hoo for me! Seriously, I'm having to type with only the middle finger of my right hand, and the pointer and middle finger on my left hand. My number of words per minute typing is at an all time low!!! Woe is me! Ok, I'm done whining..... I hope everyone had a great week, and has some plans for the weekend! My husbands plans are to be on his weekend of night shifts, and for us to tiptoe around the house so as to not wake him! Whomp whomp! Our usual Saturday thing is to go to the dump (we gotta bring our own, no pick up for us in the sticks!), and go to the library. It's supposed to be ok weather tomorrow too, so we'll probably go for a little nature walk. Going for walks around our place in the fall is so nice. So very nice. Alright, I'm signing off! xo
Hello there!
We're back from our weekend away for Thanksgiving (in Canada), and are all feeling a little exhausted, but happy from our trip. We saw a lot of family, ate a lot of great food, went to The Rockton World's Fair, and stayed up waaaaaaaaaaaay too late!!! But it's all good, and it's all part of getting the most of the time we have while visiting family! Anyway, I wanted to share a healthy, pretty simple to make granola bar recipe with you! I shared a gluten-free granola bar recipe a while back, and although it is super-tasty, it's not that healthy. Thumbs down. I've been feeling more convicted about feeding my kids better foods, and so I knew I needed to try to make a cleaner version of their take-to-school granola bar. It also needed to be nut free, as the school had to go nut free this year with some new students coming in with allergies (we've been spoiled the last few years with no allergies and being able to send whatever we wanted!). So, I got to work, knowing I wanted to eliminate refined sugar from the bars, still have them be soft (not hard and crunchy), and most importantly to have good food ingredients in them. I choose sunflower butter because I feel strongly about not using soy butter (read a great article here from The Wellness Mama about why NOT to use soy butter) or any soy products at all. But, if you do the soy-butter thing, you can use that in these bars too. If your school isn't a nut-free zone, you could also just use any nut-butter you wanted to! 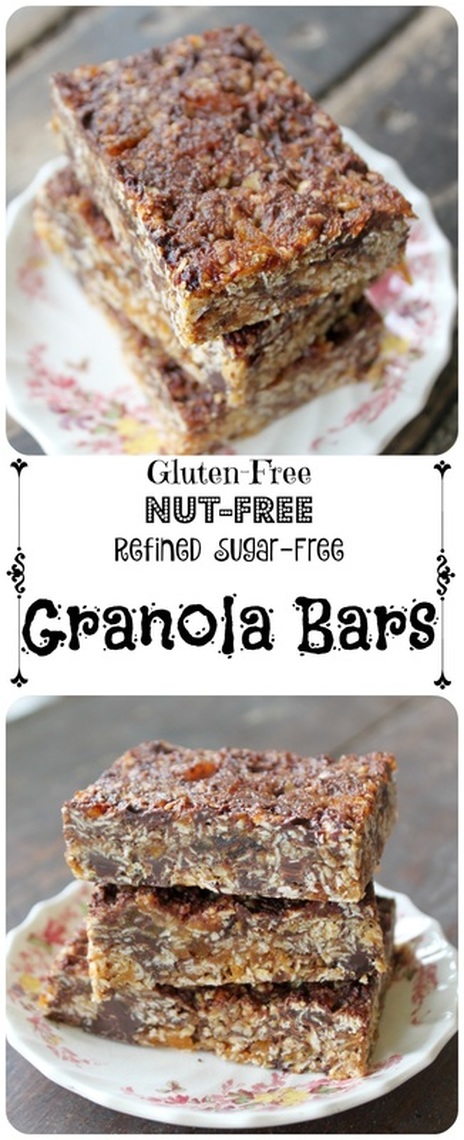
Gluten-Free, Nut-Free, Refined Sugar-Free Granola Bars
Ingredients:
* ** You can also just use all dates or all dried apricots instead of a mix. And also be sure to check the ingredients label for the dried fruit you use as some companies add oils, salt and sometimes sugar Method:
I generally make a double batch of these, and will freeze the whole lot, pulling out the bars as I need them to pack into snacks or road trips. If I leave the dates & apricots too big, Caleb (who hates raisins) won't eat them because he's sure the bits he's seeing are raisins! So, if you've got a raisin hater, be sure to blend the dates & apricots up very well! When I've done a more thorough job of blending, Caleb eats these bars happily. Score one point for the sneaky Mom! : )
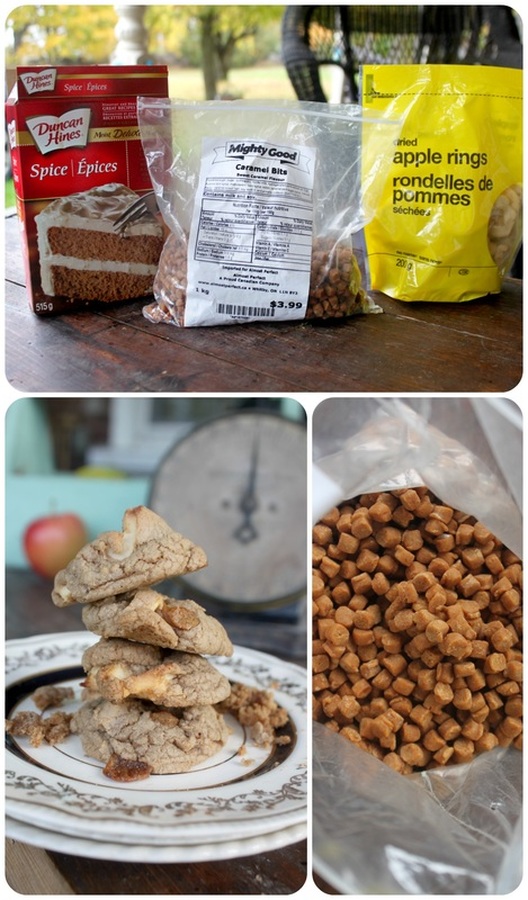
I hope everyone is having a good week so far! It feels like it should be Monday for me because we only got back last night, the kids have gone back to school, Adam is off to work, so it's got a Monday vibe. But, vibes aside, it's fully Wednesday, so I wish a grand Wednesday to all! Peace out. Yup. It's Thanksgiving weekend here in Canada! I love Thanksgiving! It welcomes in the wonderful fall weather our country offers us (I seriously love the fall weather here in this part of Ontario!), we get to enjoy The Rockton World's Fair, it gathers together family & friends, and we get to eat lots of amazing and delicious foods! Way back in the summertime, my sister and I stopped at a store called "Almost Perfect" (or Almost Frozen as my Mom once called it!). It is a store that sells frozen, refrigerated and grocery foods, some name brands some brands of their own, & super low prices. I"m not getting paid for this rant, I just love the place! Anywho, when we were there in the summer they had bags of caramel bits for sale for a crazy good price! So, my sister and I both snatched some up with ideas in mind. Somehow though, I never got around to using mine! Oh, I've gone through (at least!) 5 KG of chocolate chips, but I just kept forgetting/not knowing when to use these caramel bits. Until it was the fall....then all I was thinking about was apples and caramel...then fate...cake mixes were on sale for 0.97, and I saw for the first time ever, a Spiced Cake Mix! Seriously, I haven't see them until now! But my brain went "yes!", and I knew what was happening.... 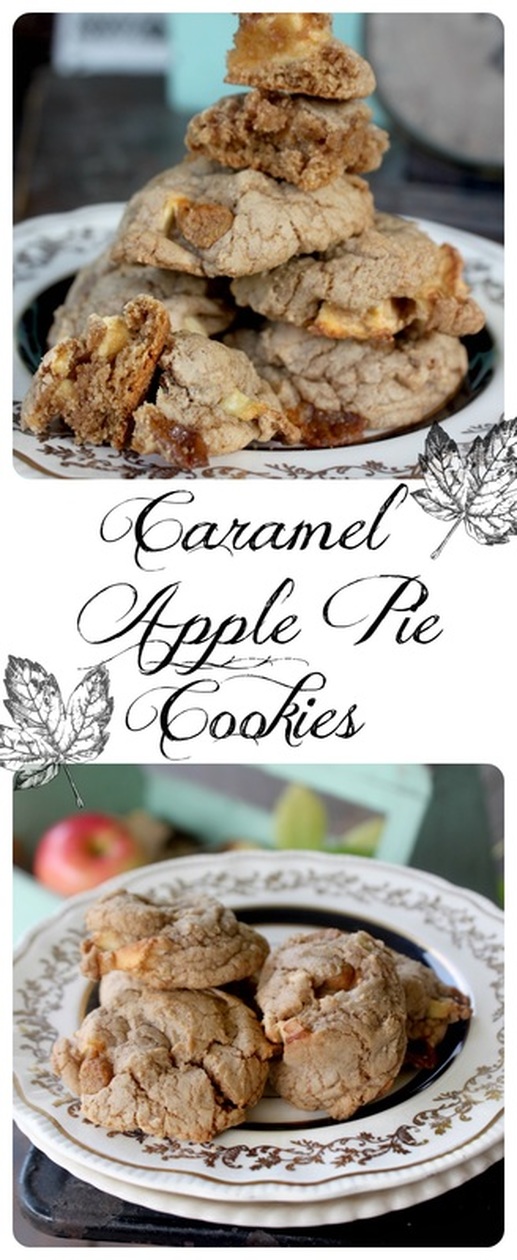 Caramel Apple Pie Cookies Ingredients:
Method:
 Let's talk dollars and cents here for a moment.....I love to bake, I love to bake the "real" way (without a cake mix!), but let's break this down:
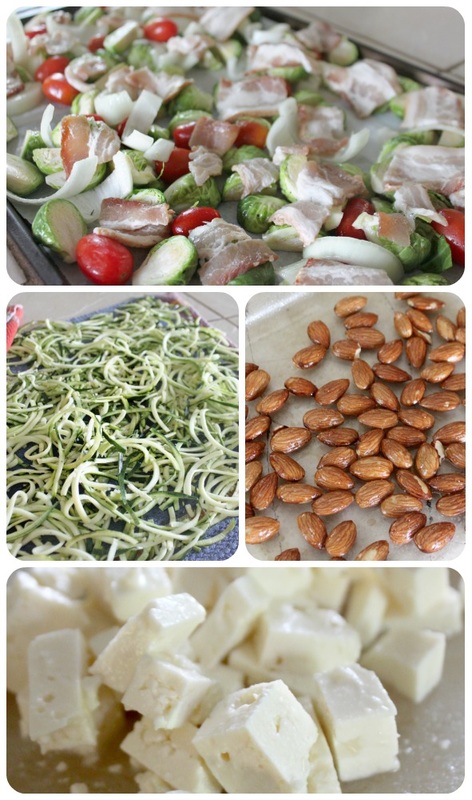
Total for (approx.) 24 cookies $ 3.53 (give or take, plus electricity for running the oven) All that and you're completely finished in 20-30 minutes (depending on how many cookie sheets you use at once, etc.) But for realz......this is unbeatable. Well, if they were actually magically good for you, that would be unbeatable....but let's not talk about that right now.... : ) 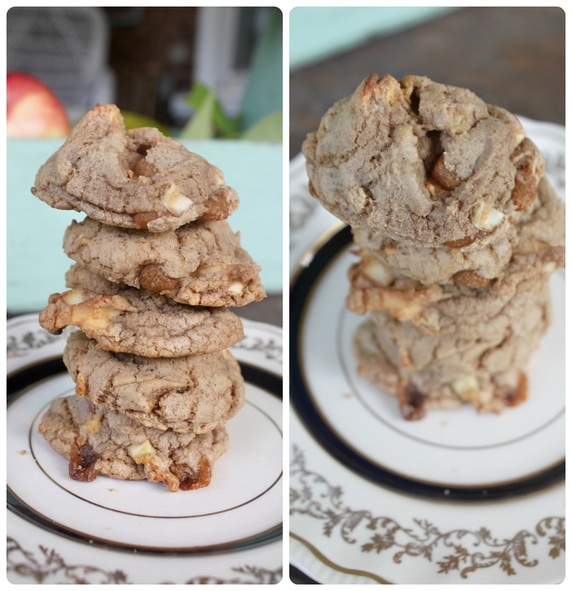 See why I love fall here?!? It's beautiful! 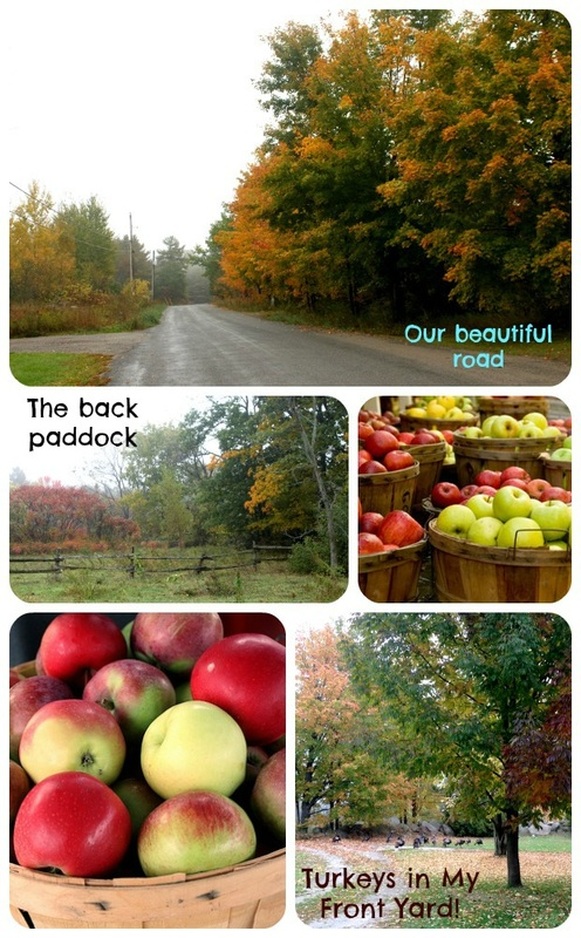 Alrighty, well, I hope all my fellow Canadians have a wonderful Thanksgiving, I hope you get to make some cookies, see some friends or family, or both, eat some wonderful food, and get to a fall fair if there is one near you! And remember to be thankful! xo I haven't written a post about my Caleb and autism in a very long time. Oh, it's not that things are all hunky-dory around here, but the truth is, autism is our life, and sometimes finding something to write about can feel like finding a needle in a haystack! It's like trying to write a post about my brown hair....I live with it everyday, it's normal to me, what's there to talk about? I would rather focus on quality, not quantity when it comes to what I write about autism. But I was struck by something this past weekend about our lives and our journey through Autism-Land: I'm getting a thicker skin. Where once I was all momma-bear on anyone who even looked at us slightly irritated because of the noise from Caleb, or his wild arm flapping and crotch grabbing, I now go, "meh". My role as his advocate is changing all the time, and my need to disclose his diagnosis is getting smaller as he gets older, and I'm also taking it less personally when people seem bothered by him. Caleb is beautifully and wonderfully made, and if his "isms" bother people, well, they can go suck a lemon (excuse my French). :) 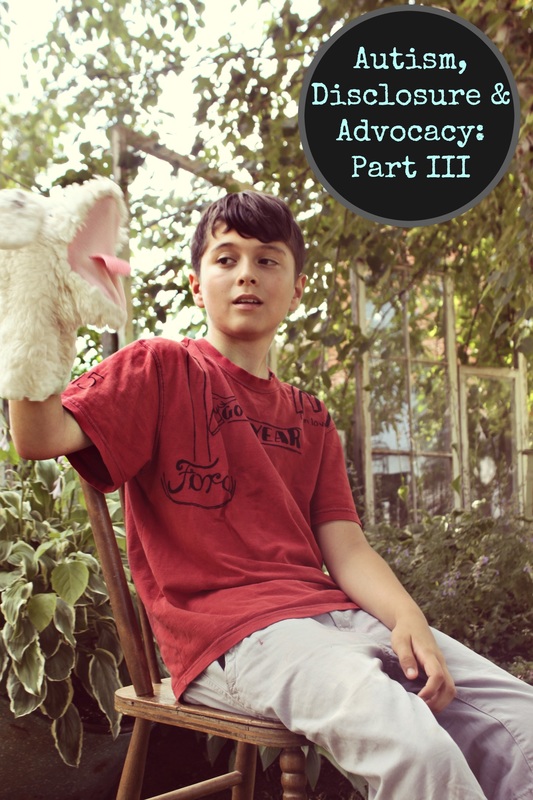 Caleb playing with a sheep puppet I was at Tim Horton's (a coffee shop) with Caleb, and was meeting a woman who had knit me some mittens. She is a sweet and patient woman who was kind and polite to Caleb, despite him being pretty loud and interrupting us a lot (I don't think that's an o.k. thing, btw, and we're working on that with him), but at one point I happened to look to the table next to us, and they were just dead-faced staring at what they apparently thought was the one child circus show! Caleb was sitting on my lap due to a lack of seats, and he is a pretty big kid, and he was being loud and shouting about his new favourite thing, public bathrooms (yuk!), but he was really being sweet. He was clearly happy and enjoying himself, and in a good mood, and I was too! So, I blocked our coffee shop table neighbours out, and enjoyed my time out with Caleb! When we were getting up to leave Caleb walked between 2 tables to stand at the large window that looked at the business next store to the coffee shop, Reid's Dairy, another place Caleb loves! So, he's standing at this window, looking out and says (very loudly, and while bouncing up and down a little and grabbing his crotch), "Look, here is Reid's Dairy!!! Reid's Dairy will have a public bathroom and it has a toilet that will flush very funny!!!" and the people at the tables he had to walk through looked as though they felt their entire day was ruined by this terrible child! Those people had really perfected their rude stare! To me it's apparent that Caleb has something different about him. Maybe people don't know about autism at all, and I realize Caleb looks pretty "normal", but I'm really over feeling crushed about people giving Caleb the stink-eye. This world is full of amazingly different people! Are we to stop and stare rudely at each person we deem "strange"? We'd likely all be standing for all of time staring at someone....  Caleb is Peter Parker (aka, Spiderman) :) Does this mean I don't care anymore? That couldn't be farther from the truth! If someone said something hurtful out loud to Caleb I would speak up and defend him, but the hurtful gawkers I leave alone. Caleb is always so happy and focused on whatever it is he's being so loud about that I don't think he even notices the looks he gets. The trick is to have a thick skin, but a soft heart when raising a child with autism. If I let myself feel hurt every time someone seemed to not approve of Caleb I would be a mess! I could waste my time by constantly being upset by other people, people who, in the grander scheme of Caleb's life, don't matter. The people who matter and who know him treat him with kindness (well....except his sisters sometimes....), and he is very loved. I still need to be an advocate for autism and for Caleb, but I am seeing where it matters more clearly as I get a thicker skin and as he gets older and more independent. I am trying to remember that people can be rude and hurtful, and stare at someone they think is annoying, strange, or different. But Caleb will always seem annoying or strange or different to someone, and that's ok! I won't always be with him to stand up to every person who never got told "it's rude to stare", and that's ok. He will be ok! I like to think of my thicker skin (and softer heart) as a chance to model proper behaviour towards people with special needs. I don't lash out (which is really just ignorance met with ignorance), or say something rude to the rude person (because that makes no sense either!), I just carry on, and that's what I want people around us to do too. In a situation when people are staring though, I find that for every 5 people with the rude stare, there is 1 person who is smiling warmly at me, in a knowing way. In a way that says, "I get it", and that helps me have an even softer heart. Be one of those people!!! Having a thick skin is vital in raising a child with special needs, but remembering to keep your heart soft is essential too. You need to remember that love for your child and even for those people who don't understand your child, is what will change the way people see special needs. I do still feel hurt and get angry on occasion because of how other people (openly) view my son, and that's ok, I am human! But my aim is to show the world that autism (....although often very, very loud!) is very different, and that different is very beautiful. You can find Autism, Disclosure & Advocacy: Part I here, and Part II here  It's that time of year! That time when we're not really ready to commit to turning on our outdoor wood boiler to heat the house because it requires filling it with wood, and we're just a bit too lazy yet for such things. Plus the days do warm up (sort of), and if you wear warm clothing it's all good! However, today I am sitting in the freezing "office" (a nook, really) wearing many, many layers of clothes, warm wooly socks, a scarf, and pausing from typing every so often to hold my cup of coffee to warm my hands! The craziest part is that when doing the kids laundry last night, I was folding up shorts & a few tank-tops from last week because it was that warm! Oh, Canada! I really love you! Well, moving on to the recipe for today! I purchased from Bed, Bath & Beyond a spiral vegetable cutter (to make vegetable "noodles" ) and wanted some awesome recipes! I saw a recipe for Butternut Squash Noodles With Shredded Brussel Sprouts, Walnuts & Caramelized Onions on inspiralized.com and thought, "whaaat? Yumm!". So now I have been spending a lot of time looking through (and drooling!) at the beautiful recipes that Ali creates! So, believe it or not, this recipe was my wild take-off version of Ali's recipe mentioned above! I used brussels sprouts and onions, and roasted some nuts, but those are the only similarity left, really! I make a roasted Brussel sprouts with bacon recipe, so I knew I would start with that, but wanted to add more flavour and colour, so I decided to roast onions and tomato with it too. And roasted nuts are a delicious idea anytime, so I did that too! So, the end result was a really simple dish that was bursting with flavour, and full of good-for-you foods. Oh, and cheese on top is optional, but adding the feta (you could also go for some parmesan) is a nice little salty addition!  Zucchini "Noodles": Fully Loaded Makes 3 huge servings, or 5-6 smaller servings Ingredients:
Method:
 Some beautiful, fresh ingredients! 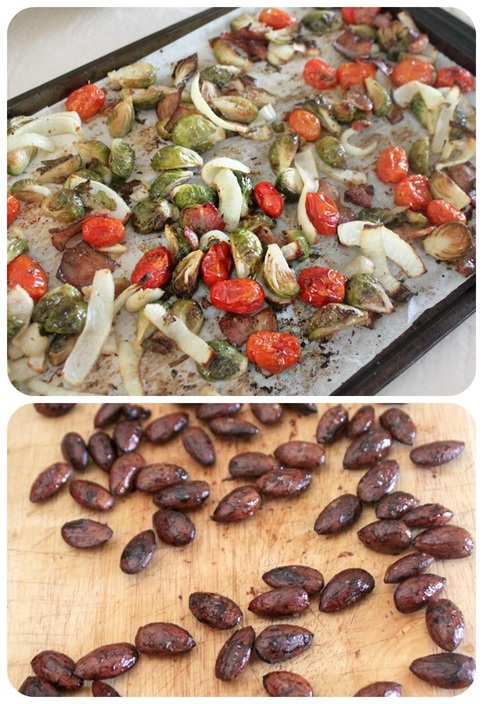 So, looks good, right? Yeah, I know. Haha, for real though, it does look good! My husband thought it was funny though that you can't even see the "noodles" in the photos because of all the toppings I added! That's how I roll.... FYI, if you plan on making this with the idea of having leftovers for a lunch, a word of warning! The roasted nuts will get soft and (in my opinion) yucky after cooling and being refrigerated. So, just store the cooled toasted almonds in an airtight container on the counter, then add them once you're ready to eat your leftovers! After owning my vegetable spiral cutter from BB&B for a while now, and knowing how much I love making noodles out of veggies, I thought I would bite the bullet and buy a more fancy version that was easier to use, but would do more. However, I hit a snag....Bed, Bath & Beyond didn't offer any other kinds besides the one I'd already bought, and I literally couldn't find any other options in my near-by Belleville. Well, unless I owned a $250-$500 stand mixer I could add an attachment to, but I sure don't own one of those!! On Amazon I found only one kind of spiralizer I had in mind, it was around $40, plus shipping, etc., but I wasn't super impressed with it. Then I thought, well, I guess I'll see how much Ali (from Inspiralized) has hers for....? Well, not only was I super pleasantly surprised by the very reasonable price, I was amazed by all the thought that was clearly put into The Inspiralizer. So....I ordered one! Gosh darn-it I'm excited for it to arrive, and I will be sure to tell you all about it when it arrives! Woot woot! Ok, I need to get moving! I always have a dread/excitement for my Monday workouts because Sunday is generally my "treat day", so I'm feeling motivated (from eating junk!) to get a good sweat going.....but then the sluggish feelings I have (from the same junk food!) makes getting going a little tricky! And I know if I get distracted at the computer starting new blog drafts or going on Pinterest I'll never get going! So, I'm going! Wish me luck! ;)
Hello!
First, if you clicked here thinking, "this says Paleo, but it's covered in cheese!!!". I know, cheese isn't paleo (it's considered Primal, "technically"), but the real star of this show is the crust, and it is Paleo. Hund-o-pee (that means 100%, cool new word compliments of my cousin). He's a weirdo. Ok, now let me move on and say that "pizza" & "paleo" don't really go together. Someone asked me the other day what Paleo was. In the words of Michelle from Nom Nom Paleo: "In a nutshell, the Paleo diet (or, as I like to think of it, the Paleo template—the word “diet” tends to mislead folks into thinking this is nothing more than a temporary weight-loss program) is based on the notion that for optimal health, modern humans should go back to eating real, whole unprocessed foods that are more healthful than harmful to our bodies". So, what does that mean? It means focusing on whole, unprocessed foods like meat and eggs, seafood and vegetables, as well as fruits, nuts & seeds. Things that should be avoided on the "Paleo Template" are foods that can cause our bodies harm such as grains, legumes, sugar, and dairy. Based on those facts, pizza sounds like an out-there idea! And really, pizza isn't an everyday paleo meal for me & the fam, but it sure is nice to have on a Friday night once in a while! Seriously, somehow having pizza for dinner on a Friday night makes me feel young again! Not that I'm "old", but it does something to my brain that says "you're so hip eating pizza on a Friday night!", then my brain focuses back into the fact that I'm also married with three kids and a mortgage and a pile of responsibilities, and I'm eating a Paleo pizza. And that I said "hip"...... Moving on! Dairy and I have a love-hate relationship. It doesn't make me bloated, or make me feel ill, but it does make my saliva thicker, causing mucus (eeewwwwww). So, I just avoid it if I will be singing somewhere (in front of people, that is. I'm always singing in the house, and that can sound as good or as bad as I want it to!). Also, I don't have some sort of Paleo accountability partner who looks at me disapprovingly if I eat dairy. I eat Paleo based on how I feel, and because dairy doesn't seem to assault me with ill-feelings, I consume it periodically. Now, all that being said, this pizza crust is dairy free, and what you put on it is up to you! I found the recipe at Paleo Spirit for this crust. Lea Valle (at Paleo Spirit) deserves all the glory here people! I did make some adaptations, but it was her basic paleo pizza crust that made me believe in paleo pizza! I've made many other kinds of crusts before, and they basically all sucked. Thumbs down. So, get ready, this stuff is awesome! :) 
Basic Paleo Pizza Crust
Makes 1- 12 Inch pizza crust (approximately). I have doubled and tripled the batch with great results Ingredients:
Method:
Other Options: A: Bake the crusts a day or two before you need them, let them cool completely (on their baking sheet or pizza pan), then wrap in plastic wrap until you need them. Once you're ready to use them, just heat the oven to 400, add your toppings to the pizza, then heat for 15 minutes or until hot and the toppings are ready B: Bake the crust, let it cool completely, then wrap lightly in plastic wrap (on it's baking sheet/pizza pan) and let and freeze completely. Then you can take the crust off the pan and wrap tightly in plastic wrap and place into a freezer safe bag (or a few layers of plastic wrap for a bigger pizza). Once ready to use, preheat oven to 375, remove plastic, add toppings to the frozen crust and bake until hot through and toppings are ready, about 20 minutes C: Bake the crust for 10 minutes, then and add the toppings and bake, but only for 5 more minutes until the toppings are nearly ready. Remove from the oven and let cool completely. Then wrap lightly in plastic wrap (on it's baking sheet/pizza pan) and let and freeze completely. Once frozen, you can wrap tightly in plastic wrap, and place into a freezer safe plastic bag (if it's a small pizza) and freeze. If it's a large pizza, just wrap in a few layers of plastic wrap). Once ready to use, preheat the oven to 350, remove the plastic and heat pizza for 15-20 minutes or until the pizza is hot. You could also make the dough, and wrap tightly in plastic wrap and place into the fridge for a few days until ready to make the pizza. I've never done this, but I think if you did, you would need to pull the dough out of the fridge for at least 30 minutes to let it warm back up slightly. If you try this method let me know how it goes! 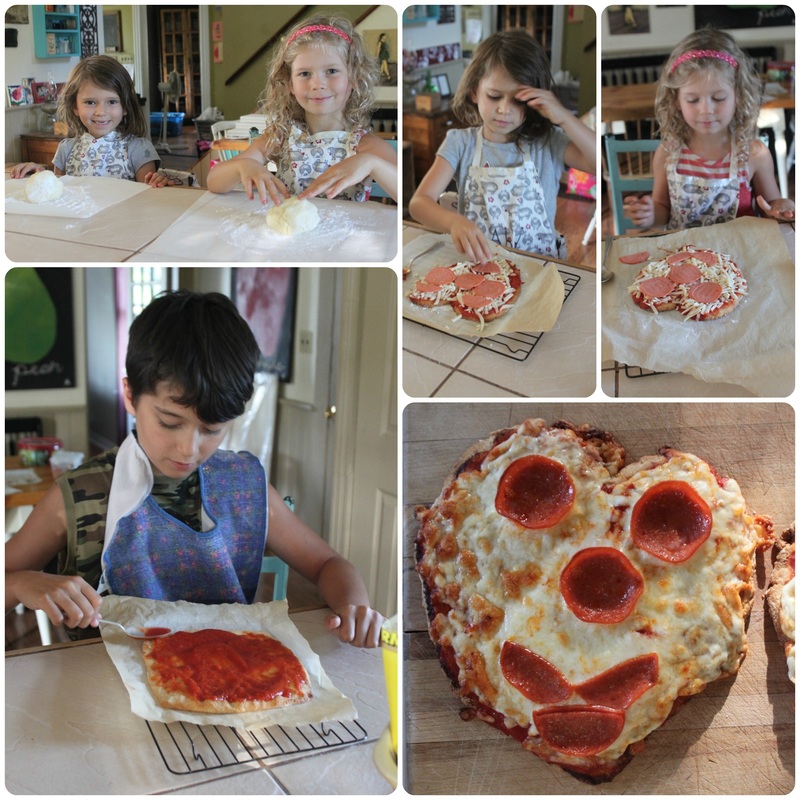
My kids who have made and eaten (and complained about) other pizza crusts really (really!!!) like this one! My lovely 6 year old took her first bite and said (very concerned), "can Caleb eat this?". Caleb is our for real, all the time gluten-free family member, and Abby has tried some pretty crappy gluten-free foods and actually thought I had maybe made a mistake and the crust wasn't gluten-free!
Pat yourself on the back, Amy-Lyn, you've fooled the toughest critic out there. :) As for Paleo pepperoni, the pickings are really slim, but Maestro makes a pepperoni that I can get at a great price at my usual grocery store and is Paleo (therefore gluten-free) and tasty! 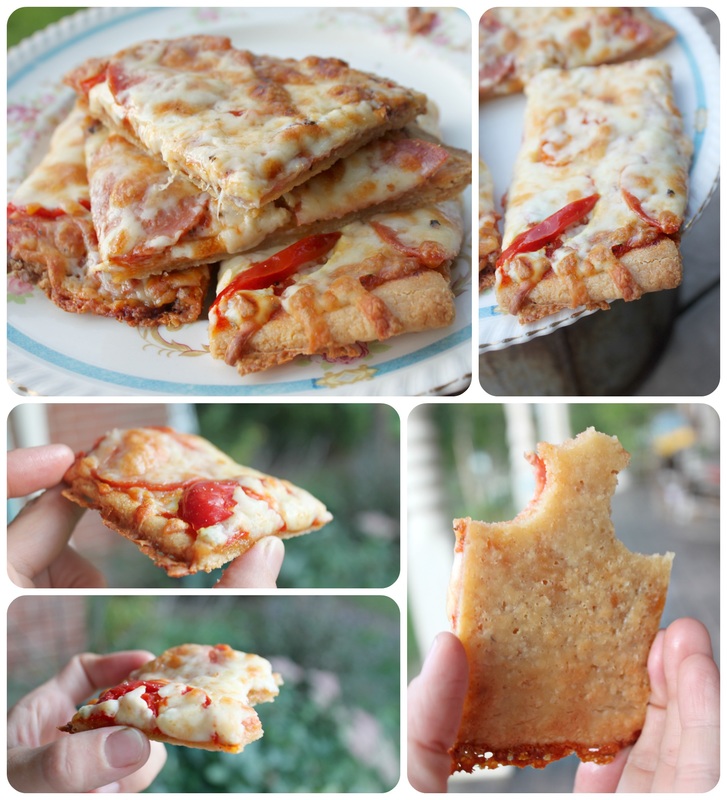
I went a little picture crazy with this pizza....it is just too good to be true...except it IS true! I didn't get any pictures of just the crust, well I actually did get some, but they were just kind of "bleh" and I don't really like "bleh" photos, I like, "Wow!!! That looks yummy!" kind of photos. But you get a nice bottom shot of the crust in that collage above, so that's something. When I made this the first time I was still mentally prepared for failure. For a weird taste, or a floppy crust you couldn't hold, but this pizza crust is the real deal! It's so easy to make, tastes great, and has a super hold! Oh, and it even tasted great and held up after being micro-waved the next day in my husbands lunch! What? I know! I know..... If you want to feel cool and young this weekend, make some pizza. Hahaha, just kidding. For real though, have a great weekend, and make some pizza! |
Hi, I'm Amy-Lyn! 
I am the lady behind this here blog! I live in the sticks with my animals, my super handsome husband, and my
3 amazing kids! Here you'll find things from recipes (gluten-free, paleo, and strait up junk food!), DIY ideas, thoughts on raising a son with autism, and whatever else pops into my brain! : ) Read more about me by clicking here! Want to Stay Connected?
Find What
|

 RSS Feed


