|
Oh yes, dear friends, there is definitely still more s'mores ideas out there! ....Hello. How are we today? I am EXHAUSTED!!!!!! : ) No, but seriously, I've been more stressed lately than I ever thought I could possibly be - I've had a constant headache for a week, my body is aching, I have hardly slept, and I even developed a canker sore on my lip!!! K, I'm done now. I'm just whining to all of you, to whoever will be a listening ear! I think it's time we got back to s'mores though, because s'mores always make me feel better! : ) In August of 2014 I wrote a s'more compilation post called "Please Sir....I Want S'more...", and last July I compiled another list of s'more-ific ideas in "It's Time For S'more!". I love-LOVE-LOVE s'mores! They have been a passion of mine for years and years! So, when I recently received an e-mail from Julia Arangure of Shari's Berries with a request to share their 9 unique s'more ideas on Bushel & A Peck, I thought, "well, it's worth looking at". Let me say that when I opened the link she sent, I went "whaaaaaaaaaaaaaa?!?!?!". For. Realz. When Julia said "unique" she meant it, and I have honestly never seen s'mores like the ones she shared with me, and that I am going to share with you! These amazing s'more ideas where created and photographed so beautifully, and I want to try every single one of them! So, here they are -9 unique ways to make s'mores from Sharis Berries!
........I mean, c'mon, right?!?!
I am so excited about these s'mores, and I think I want to try the birthday one first! TO find out how to make all of theses, hop on over to Sharis Berries and the original post about these 9 amazing and unique s'more ideas! Today is Canada Day here in (obviously!) Canada! We've got the usual fun things to do in our wonderful little town of Tweed: a parade, face painting, boat tours, kids crafts, fireman water activities, live entertainers, hot dogs and cupcakes! Then, this evening we're heading to a Canada Day BBQ, where we'll be saying goodbye to some military friends who are moving to Seattle. Thumbs down to people leaving. Anyway, I hope if you live in Canada you have a wonderful Canada Day! If you live outside of Canada, have a wonderful Friday! Either way, any day is a good day to try out a new s'more (in my opinion, at least!). On Tuesday I'm going to share with you how we do s'mores around here so that it isn't a complete and utter disaster! Have a great weekend!
0 Comments
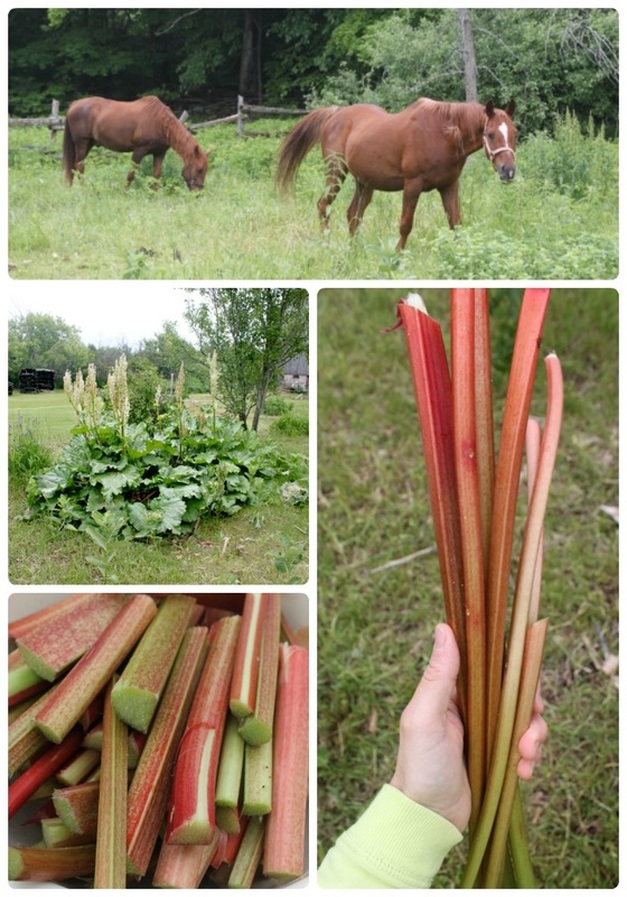
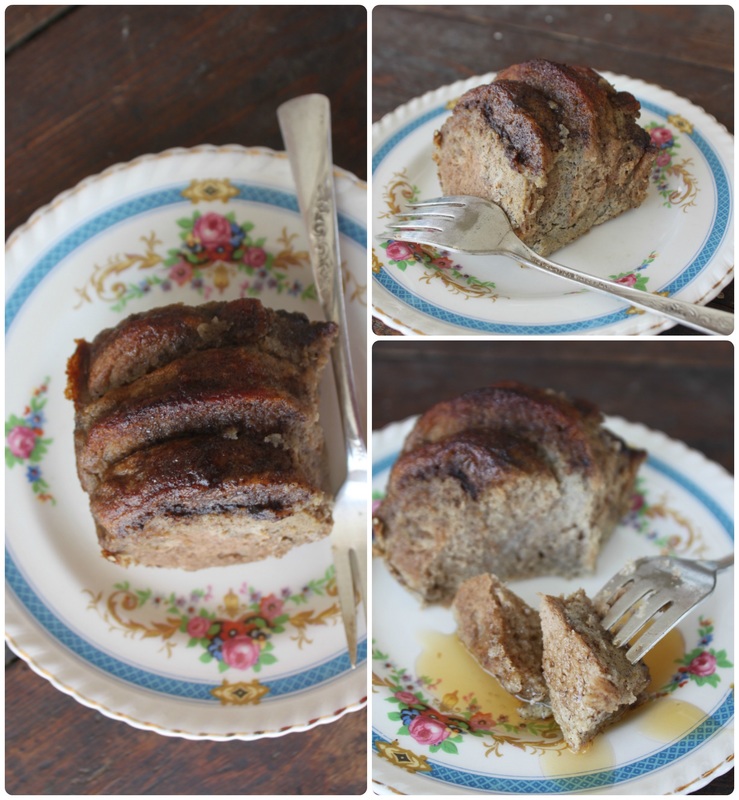
Truthfully, the first time I heard the words "ruhbarb cake" I thought, "bleh!"I couldn't imagine how a cake made with rhubarb could taste good at all. In one of our horse paddocks we have a large rhubarb patch though, and a neighbour asked if she could take some to make this "rhubarb cake". I only really use it to eat the crazy sour stuff raw (it's alarming and refreshing!), and I've made a paleo strawberry rhubarb bare bottom pie last year for national strawberry rhubarb day, but that's it. I never even went out to cut it down and freeze it because I just never really loved much that was made from rhubarb. Anywho...back to my neighbour....she got some rhubarb from our field, made some cake, and brought some over for me to try...and, let me tell you people, this freakin' cake was so good! So, so, soooo good!!! I'm a little excited about this cake. I plan on making 2 more today! I feel some sadness over the rhubarb I've let go to waste because I didn't know about this delightful cake. This cake is a very simple white cake with rhubarb mixed in, and a crumbly, buttery, cinnamon-sugary topping. It is very moist, and not too sweet, not too sour. After I had made 3 pans of my own rhubarb cake, I brought some over to another neighbour who said that he quite hates rhubarb, and has never had any cake, pie or jam of it that he enjoyed. So I told him I wouldn't be offended if he didn't try it, but he said he would anyway. He said he was always willing to try something, just in case. Well, didn't I go back to see him the next day and he couldn't believe how good the cake was! He said (in a thick Italian accent) that his face didn't pucker, and that the sweetness wasn't too much and he loved the cinnamon in it. Enough said. 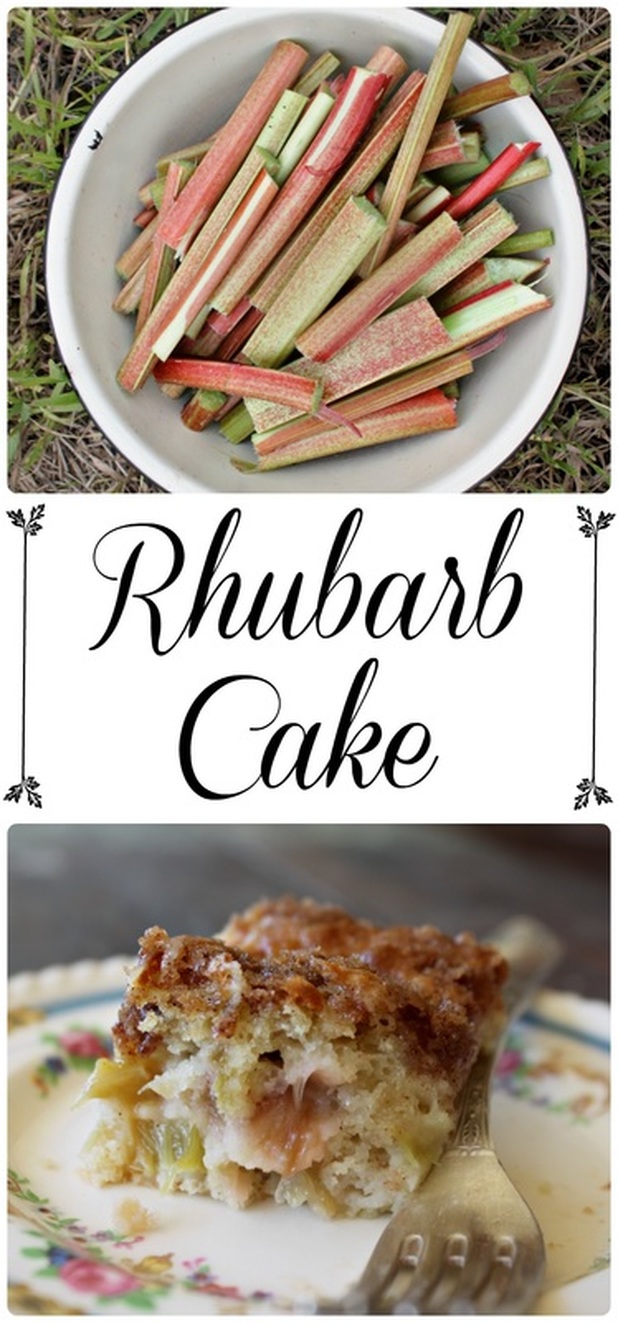 Rhubarb Cake Adapted from Oma's Rhubarb Cake Ingredients: For the Cake:
For the Topping:
Method:
 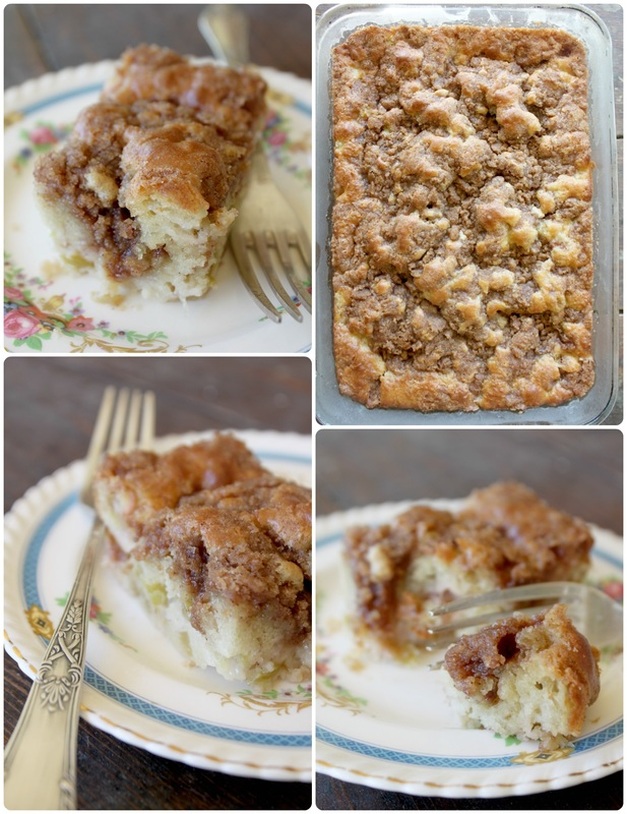 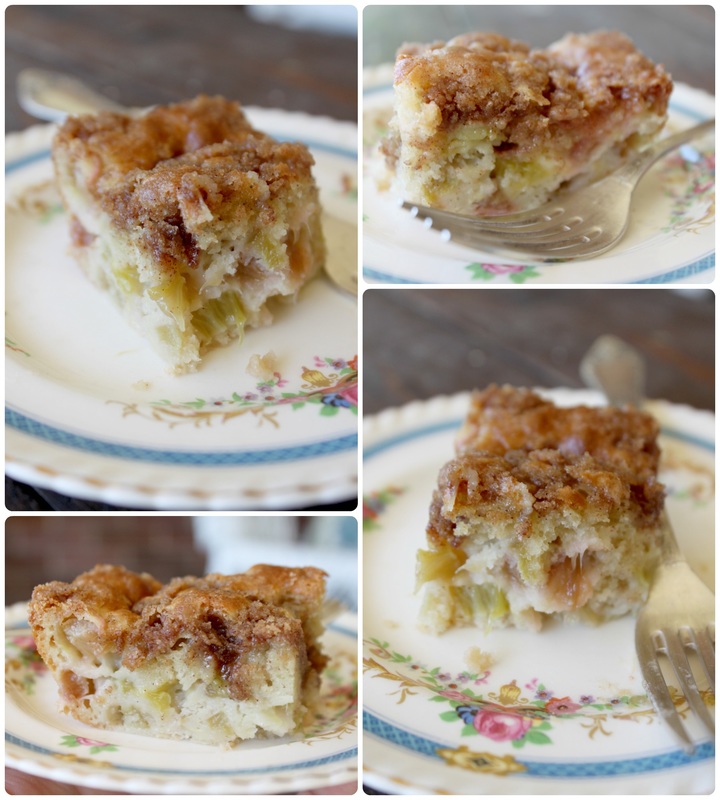 The first time I tried making this it was a gloomy Saturday. The weather was gloomy, and I felt gloomy. By the time the cake was finished and cooled, the sun had come out and the weather was no longer gloomy - and neither was I! The cake smelled so good, and looked so beautiful, and tasted so wonderful! So, that's all there is to this lovely little cake! Tonight the girls have a soccer game, then I think we'll let them have some time playing at the splash pad, and maybe we'll have a campfire tonight too. We plan to go and visit some friends tomorrow who we don't get to see too often, so I am looking forward to that also. I hope you all have a lovely weekend. xo So, yesterday I went with my middle child on a field trip to a place called "Sky Zone Trampoline Park". I wasn't sure (at all!) what to expect, but it turned out be a really fun day (except for the long bus ride there and back!). I don't know how to describe the "park" exactly, except to say that everything is trampoline based! It was fun, and (total) I probably jumped on a trampoline for at least an hour - which is a lot for an old gal like me! : ) Ok, the jumping itself wasn't too bad, but I did need to take a lot bathroom breaks to make sure I didn't pee myself! Hahaha, seriously though, having kids (and vaginal births!) really makes things like jumping on a trampoline more like playing a game of Russian roulette! Whomp whomp. Anywhooooo, this recipe today is really tasty, and not difficult to put together. There's a new Thai/Japanese restaurant in Belleville that we've been to a few times, and it has opened my eyes to the many wonderful Thai (and Japanese) dishes I've never known about. I also tried sushi (well, I tried it once before, about 10 years ago and hated it!) and really loved it. So, all that to say I've been experimenting at home with different Thai flavours, and I was pleased as punch with this dish. The sauce is adapted from Stupid Easy Paleo's Sweet Chilli Dipping Sauce, and the meatballs are just a few ingredients with nothing fancy. Well, unless you consider sesame seeds fancy? If you want to make your own Asian cuisine at home, just get yourself some sesame seeds! Just commit to it; they aren't terribly expensive and they are delightful and (in my opinion) essential in making Asian foods! All that said....you can omit the sesame seeds if you don't have any. But just get some. : ) 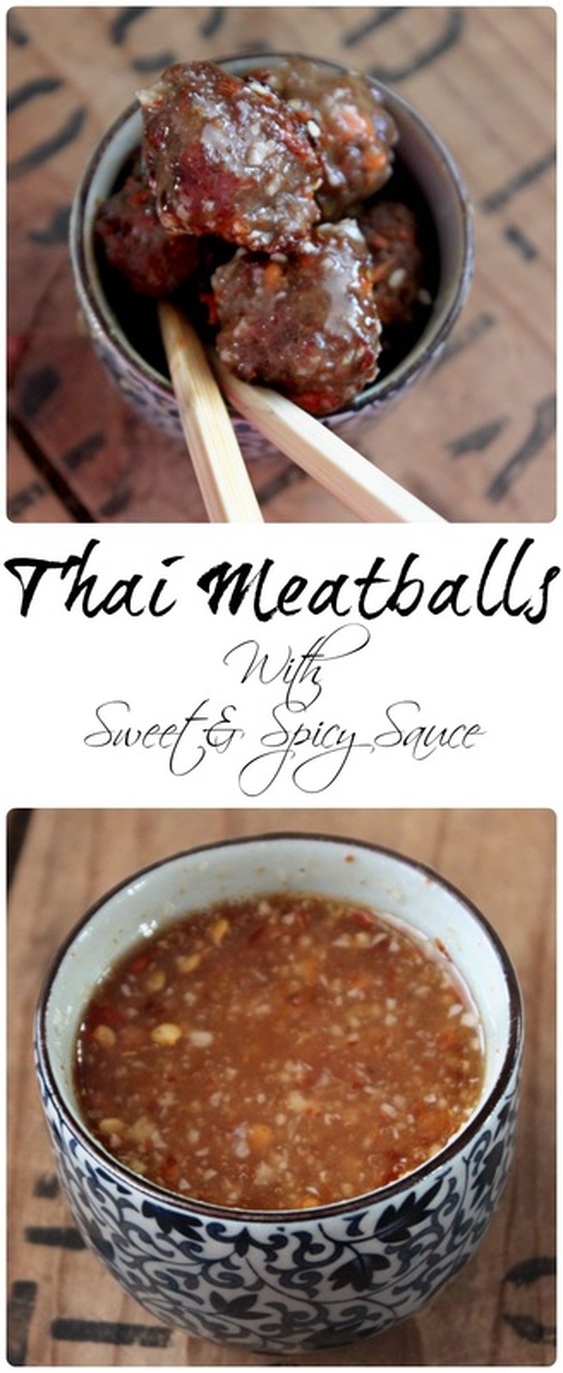 Thai Meatballs with Sweet & Spicy Sauce Ingredients: For Meatballs:
For the Sweet & Spicy Sauce:
Method: For the meatballs:
For the sauce:
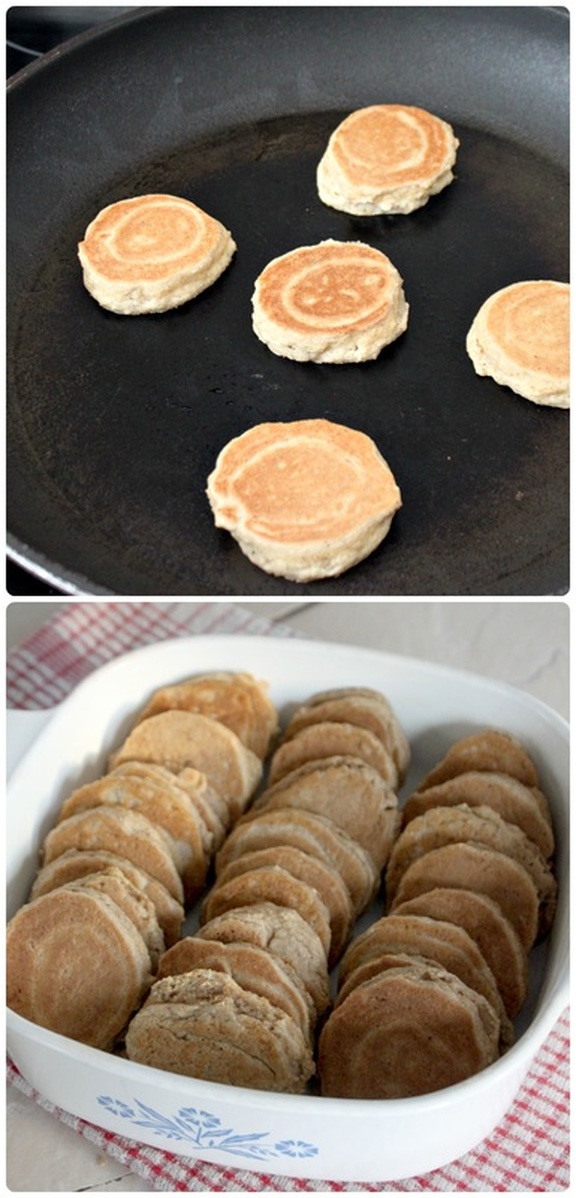
***If kids are eating this, and they don't like spicy food, just leave some of the meatballs out of the sauce. They still taste great on their own!*** 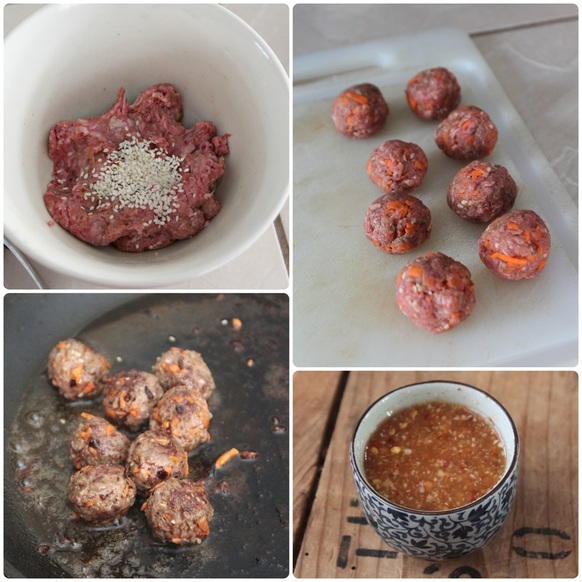  So, really, a pretty strait forward recipe, but with really fantastic results! I like to eat this with a quick fry of shredded cabbage, bean sprouts, thinly sliced peppers and onions, and spiralized zucchini. I'll just top it with the meatballs, and spoon a little extra sauce on it. Anyway, on Monday on my health & fitness post I talked about dealing with stress. One of the things that had been causing me anxiety was a decision to cook at a camp this summer. Once I decided I would do it, I got started on menus. I like creating menus, but I've only had to do it for my family, and special menus for if guests are coming over. So, I'm putting it out there - what kind of food would you consider quintessentially "summer camp", and what foods would you think could work on a summer camp menu? I always lean towards healthy options, but I realize (and my husband keeps reminding me!) that the whole world, and most children, don't eat or believe in eating the way I do. So I need to balance healthy foods with camp foods, oh, and all on a budget too! This might be a challenge, but I am totally up for it! Input would be welcomed though!!! So please, if you've read all this way, give me some suggestions! Have a great weekend! Hello there! I'm sharing a recipe today that was from Paleo Parents, who shared if from Julie Bauer's cookbook "Paleo Cookbook" So much sharing! I like to do a syrup based breakfast for the kids on Saturday mornings - wait, what? You don't know what a "syrup based breakfast", is? Well, it's a food item that gives you an excuse to eat maple syrup!!! :) I am truly Canadian. Anyway, making great paleo pancakes can be difficult, but I've made a few that I liked a lot (like these Chocolate Monkey Pancakes), but I was wanting to try something new, and also something I could make ahead. Well, I found this little dream of a recipe, and we loved it! I made the mini pancakes on Friday night (and wanted to eat them right then!), then I simply stuck 'em into an airtight container overnight, and got the rest whipped up in no time in the morning! This is so good! If you make the mini pancakes and think "why can't I just eat these like this?". Well, you can if you want to! But, making them into a delightful little pancake bake just makes it seem more like a cozy bread pudding. It seems more filling and satisfying somehow. I also changed the recipe slightly, and swapped out the coconut milk for applesauce in the mixture you make that gets poured over the mini pancakes before being baked. It made these a wonderful, apple cinnamon pancake bake! Anywho, it's the bees knees, and I think you should give it a whirl! 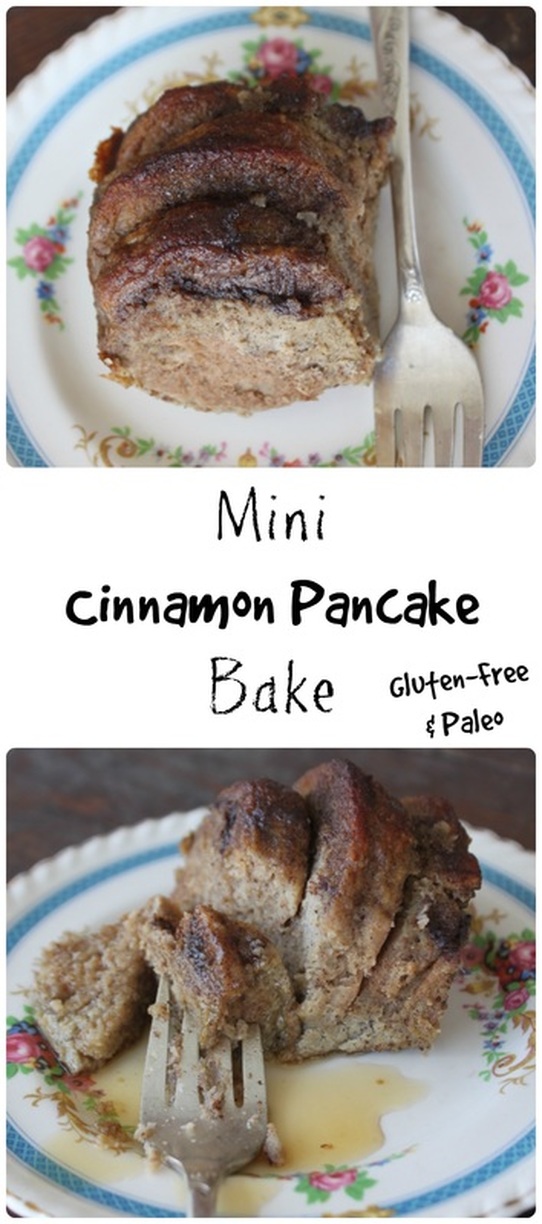 Mini Cinnamon Pancake Bake From Paleo Parents, with some adjustments of my own The Mini Pancakes Ingredients:
Method:
The Mini Cinnamon Pancake Bake Ingredients
For the topping:
Instructions
  I have a very (VERY!) wiggly 6 year old on my lap while I'm writing this and when she saw the pictures she said, "Oooooohhhh! I looooove these french toasts!!!" : ) So, I think that sums this up nicely! Have a wonderful weekend! Hello there! Until a few years ago I would not - nay - COULD not eat shrimp. Originally, this started from a place of growing up not eating a lot of shrimp, but also knowing that shrimp were bottom dwellers (garbage eaters!), made my stomach turn. This does not seem like a great intro to this post....hold on, it get's worse! Hahaha! So, after I got over that and tried shrimp again randomly as an adult (I just tried the cold shrimp with the classic seafood sauce), I came to realize that shrimp was pretty tasty and I actually liked it. And then, a set back. We showed up for an Easter meal at my in-laws, and my brother-in-law had something smelling so good on the BBQ. I asked what it was and he said he had been marinating jumbo shrimp for a few hours and was now grilling them. Well, yum-diddly! I had only really eaten "party shrimp", as mentioned, but this smelled so good, and I was willing to try! Well, didn't he just bring me one when they were ready.....and it was a large, frightening, unpeeled shrimp! I literally went, "OH NO! No, no, no, no, I can't eat that....". Like a baby. Like a giant baby. My father-in-law came to the rescue and offered to peel it for me (where I couldn't see him doing it!), and then I ate that shrimp. It was tasty. But I knew my shrimp limits then and there. If the shrimp is naked, I'm good. If it's got eyes, and creepy little legs. Good golly, keep it away from me!!! For this post I wanted to find some useful links to help with the peeling and deveining process, and literally, out loud at my computer sat going, "Bleeeeh! Eeeewwwwwww!!" while making faces of disgust. I still can't handle shrimp that look like little sea creatures. Here's a link for those of you who can handle it though! If all of this made you question eating shrimp at all....I'm sorry. Seriously, so sorry. This coconut shrimp is so good though....you may want to reconsider your feelings. I shan't ever change my feelings about shrimp I'd need to peel and devein, but shrimp that's ready for fried coconutty goodness? That's a no brainer! These tasty morsels come together easily and relatively quickly. They are great on a salad, served with sauce, eaten alone, and even eaten cold the next day! I usually eat mine next to a mountain of Moo-shu (I just make a meat free version). 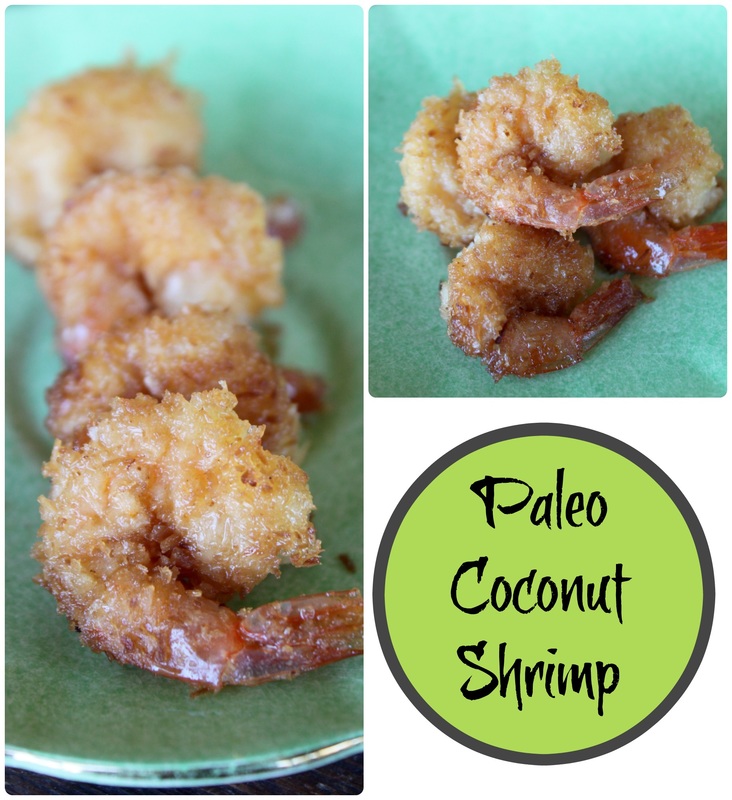 Paleo Coconut Shrimp From Wiked Spatula Ingredients:
Method:
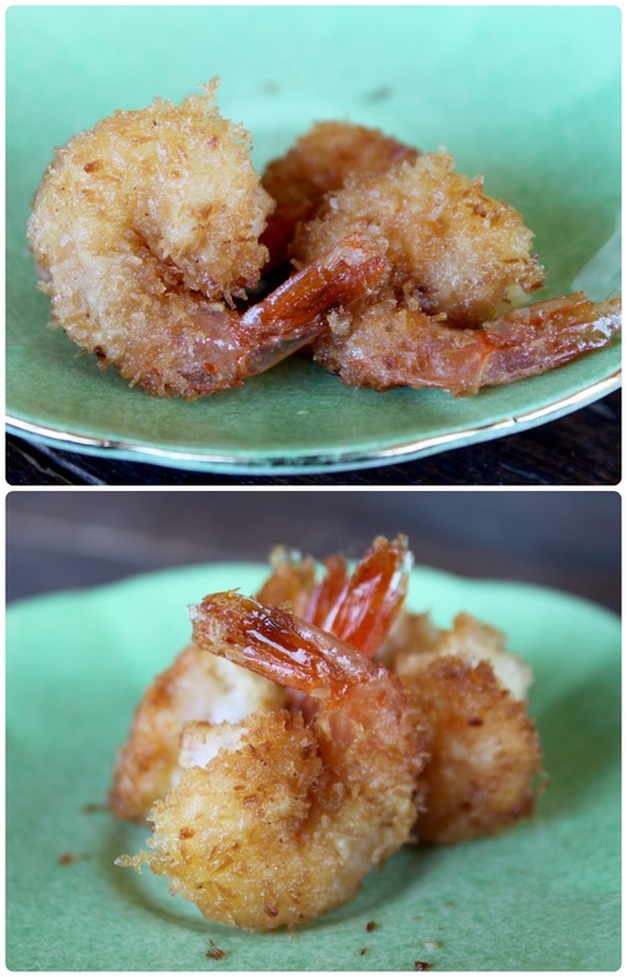 Looks good, eh? It is. It so is. Well, that's all for today! I didn't get a chance to post anything last Friday because it just turned into a day of busyness (not business), and then last minute my husband and I decided to go out for a late anniversary dinner, and well, the day just vanished. Poof! Anywho, how do you feel about shrimp? I want to know! So, feel free to share with me your truest feelings about the little sea creature. : ) Is it true?! Is it really real?!? Is spring finally, finally here?!?!?! : ) Our spring here has been warm...and then snowing! And then warm....and then snowing!!!! And then all the kids got sun-burnt one Saturday.....then we had an ice storm! I mean, good golly. Anywho, I'm washing the snow pants and winter coats for the third time to put away for the warmer months, and am hoping it'll stick this time! Well, when the winter won't end, more and more cookies get made! These super simple gems are made using a cake mix, and we added some super fun mini candy covered chocolate chip thingies.....I honestly can't remember what they are really called...? Anyway, enjoy! 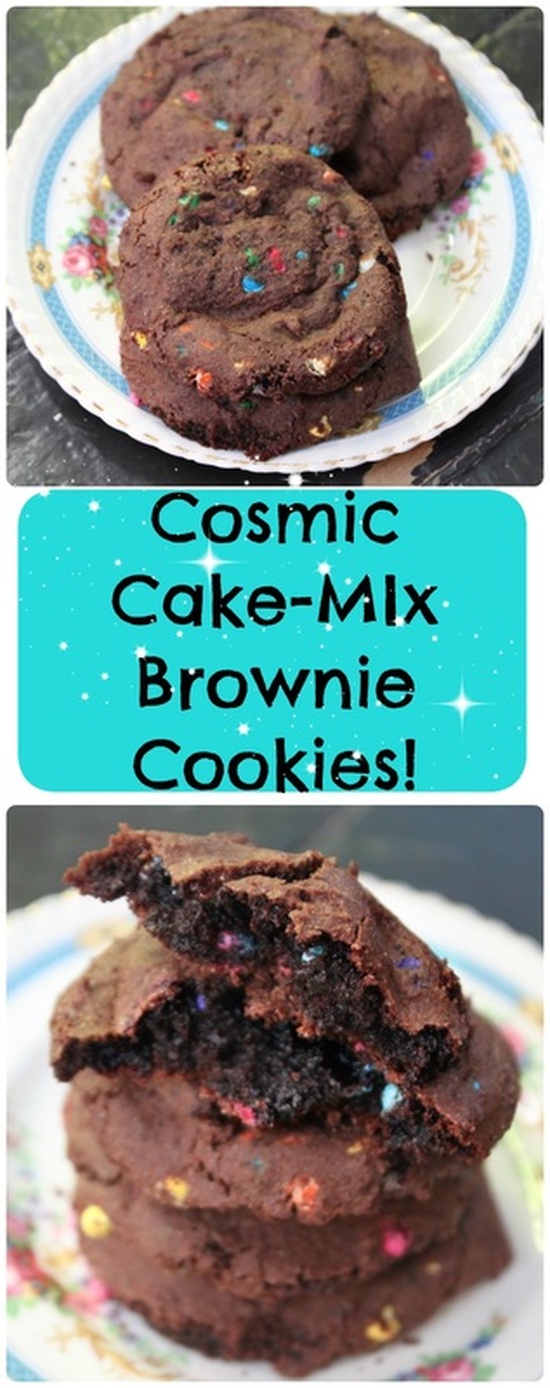 Cosmic Cake Mix Brownie Cookies I get approx. 22 cookies using a 2 Tbsp sized scoop from one batch Ingredients:
Method:
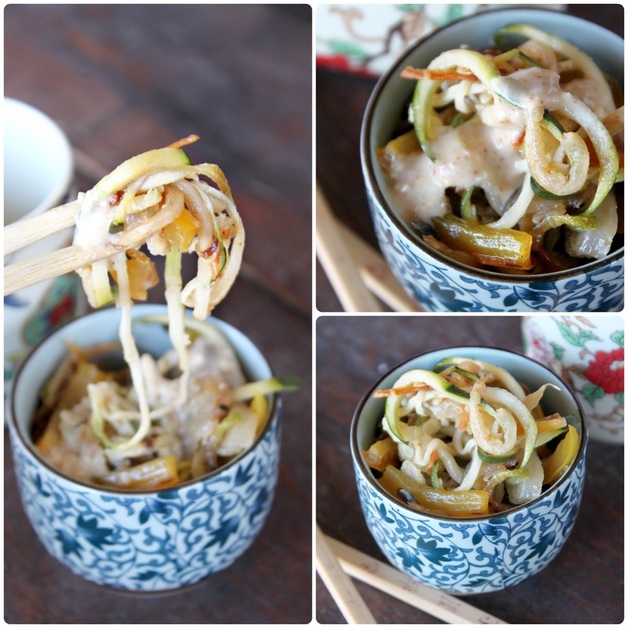
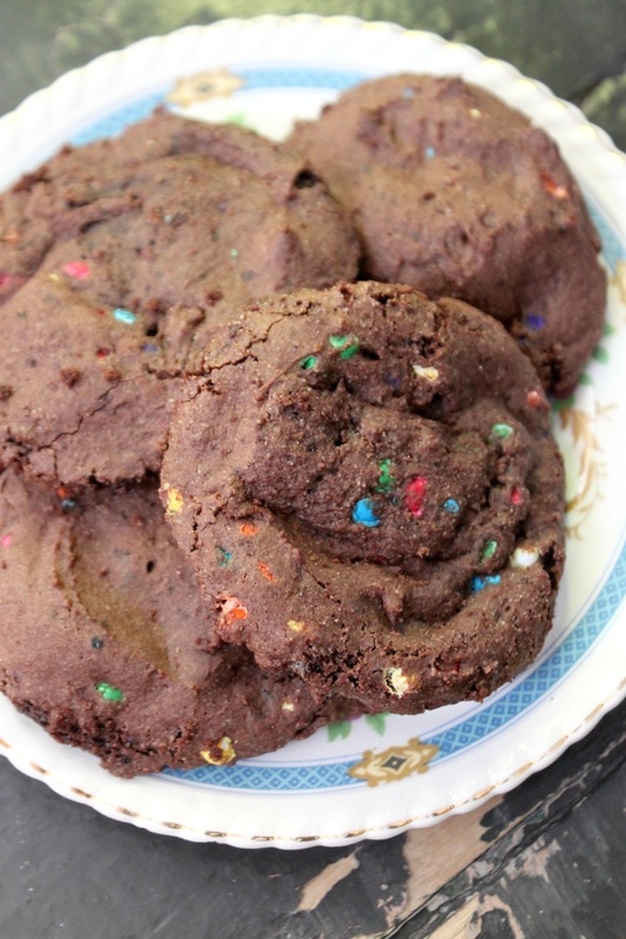 I made this particular batch o' cookies with a President's Choice Gluten-Free Chocolate Cake Mix. Someone at church gave it to me because their son who used to eat gluten free wasn't anymore, so she kindly gave us a bag of random gluten-free goodies! I basically never need a gluten-free cake though except for Caleb's birthday, and my homemade recipe is so darn good, so using the mix for cookies was definitely more up my alley. I was able to pack away a bunch of the cookies in the freezer and have them ready to take-along for my gluten-free Caleb if we went somewhere I knew there would be some treats he couldn't partake in. Well, that's it, I guess. My mind feels like bleh....yesterday I was filling out a form for a police check, and I wrote my birthday year as 1893. Then I put a 5 instead of an S at one spot, and I also wrote my address one line above each line I was actually supposed to write it on. Golly gee willikers. Hopefully my brain is taking some sort of rest to get ready for some sort of awesomeness....? Yes? Fingers crossed? Have a great weekend - and a great Mother's Day! Be sure to show some love to some motherly figure in your life! I can't seem to get a good nights sleep lately!!! Blah!!! Ok, sorry, I'm just feeling pooped and cranky. The End. So, eating healthy food can start to feel boring because often times we get stuck in a rut of making the same things over and over. When this happens, I've found the best way to kick the food boredom in the butt is to inject some culturally diverse and intense flavours into my life! Seriously, it makes me look forward to dinner, it feels so satisfying, and it's rarely boring adding some Chinese, Thai, Curry dishes, or Mexican cuisine into a weekly meal plan. And this recipe is really simple, and you can add other things you love or take-away things that may not quite appeal to you. You could add more heat with the additions of dried hot chilies, or swap out the almond butter for peanut butter. You could throw shrimp into it if you're not vegan, or spiralize some carrots or a handful of bean sprouts into it if you want some more veggies! I had mine with a big heap of kimchi (I use this recipe, but I omit the fish sauce), and a soft boiled egg. Perfection. 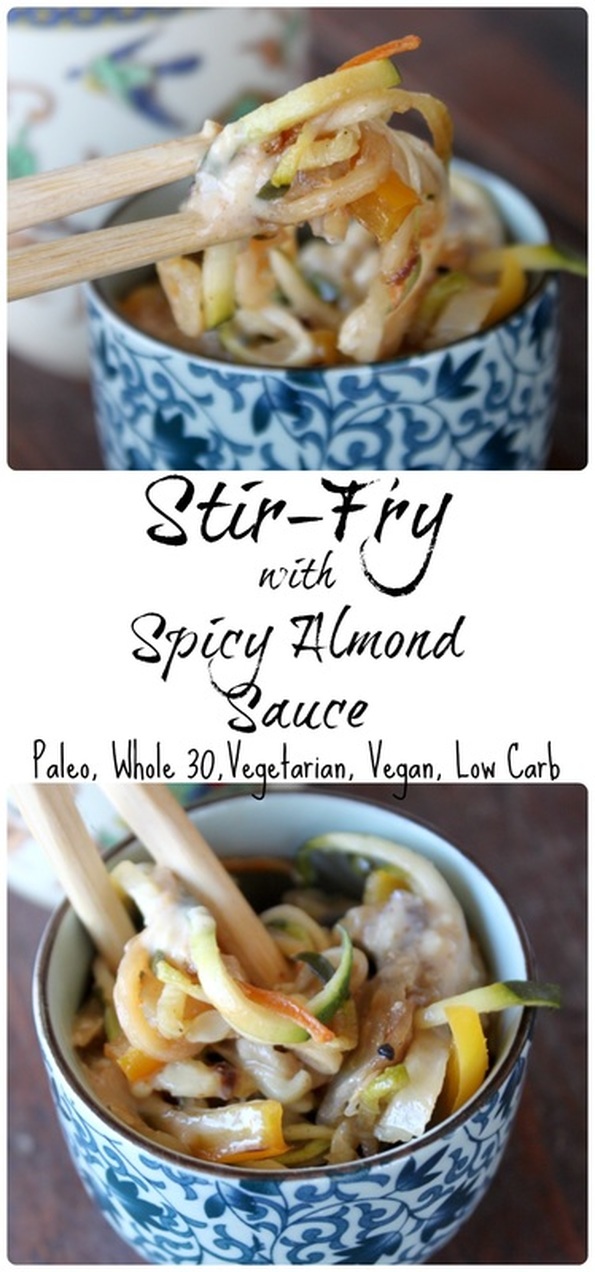 Stir-Fry with Spicy Almond Sauce Ingredients for stir fry:
Ingredients for sauce:
Method:
 Sometimes when it comes to a "closing" on a post, I have all sorts of things to say. Other times my brain is an empty shell, and I can't get any thoughts or quips together. Today is more of the latter.
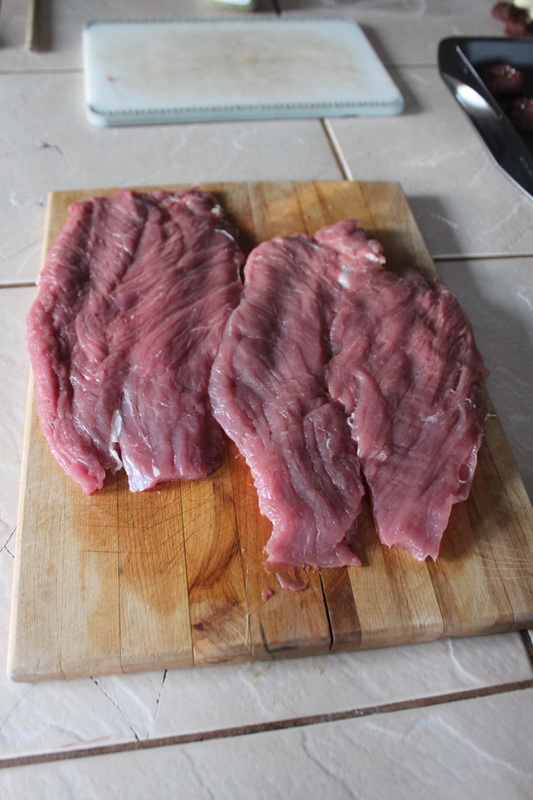
Having shared this, I shall simply say goodbye, and I hope you have a lovely weekend! I've been married and cooking for myself for nearly 12 years, and until recently, I had never bought pork tenderloin. Except for bacon, I don't buy pork. It's never been my favourite. Whenever I think of pork, I think of dried out pork chops. Bleh. No thanks! My brother once brought a tenderloin to my house (among many other groceries) because he used to stop by to visit and fancied himself to be Jamie Oliver and would whip up some of the most delicious meals I've ever had!!! But, in that instance he decided to prepare another meat he had brought, and the tenderloin got tossed into the freezer, only to be pulled out later and turned into pulled pork. Oh yeah, I'll eat pulled pork, but, c'mon, it's shredded meat covered in a yummy sauce and eaten with coleslaw! Tasty! Anywhooooo, when scrimping and saving on groceries, beggars can't be choosers! Pork tenderloin was on sale, a sale so good I actually did a double take and went back to the cooler to investigate. Per kg, pork tenderloin was cheaper that week than any of the other regular meats we would get. So, I thought, "well, I might as well see what I can do!", and grabbed a few. My husband thought I was having a stroke because I was buying pork. Ok, he didn't think that, but he was like, "huh....?" Once home I Googled and pondered the potential of this meat. It seemed stuffing it was a must for a more guaranteed finished product. I had spinach which I knew would be nice, and having bacon inside seemed like a great way to keep the tenderloin moist from the inside out while roasting. Lemon and rosemary are a favourite flavour combo of mine, and knew that they'd taste great with bacon and spinach. Lemme say that this roast was goo-ooo-ooo-ooo-ood (read that with a slight Southern drawl and it'll make sense) : ) 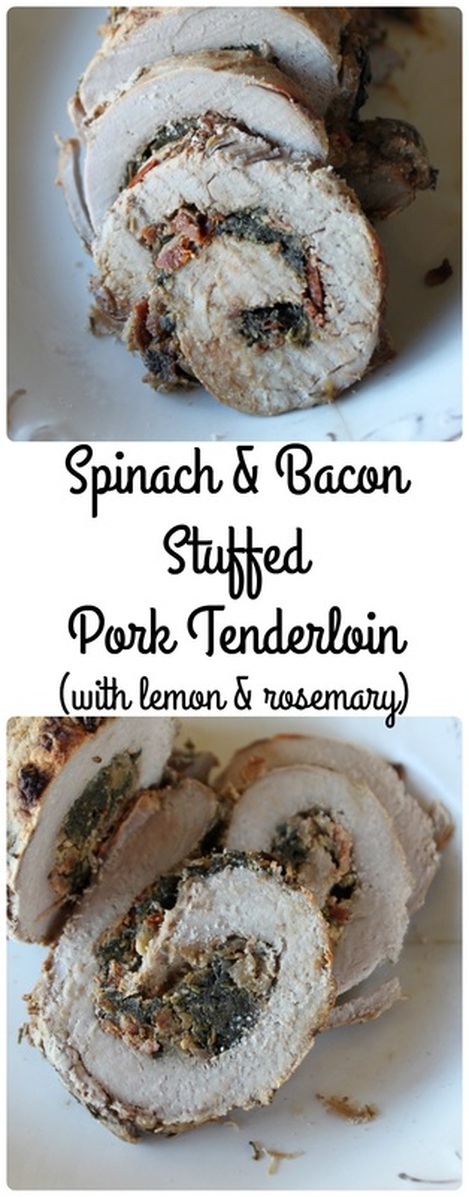 Spinach & Bacon Stuffed Pork Tenderloin (with lemon & rosemary) Ingredients:
Method:
 What we had for dinner that night I sliced into approximately 1 inch pieces, and we ate it with a side of mashed cauliflower, and the rest I tried to cut thinner so my husband could use it in a sandwich to take to work. Best sandwich ever! 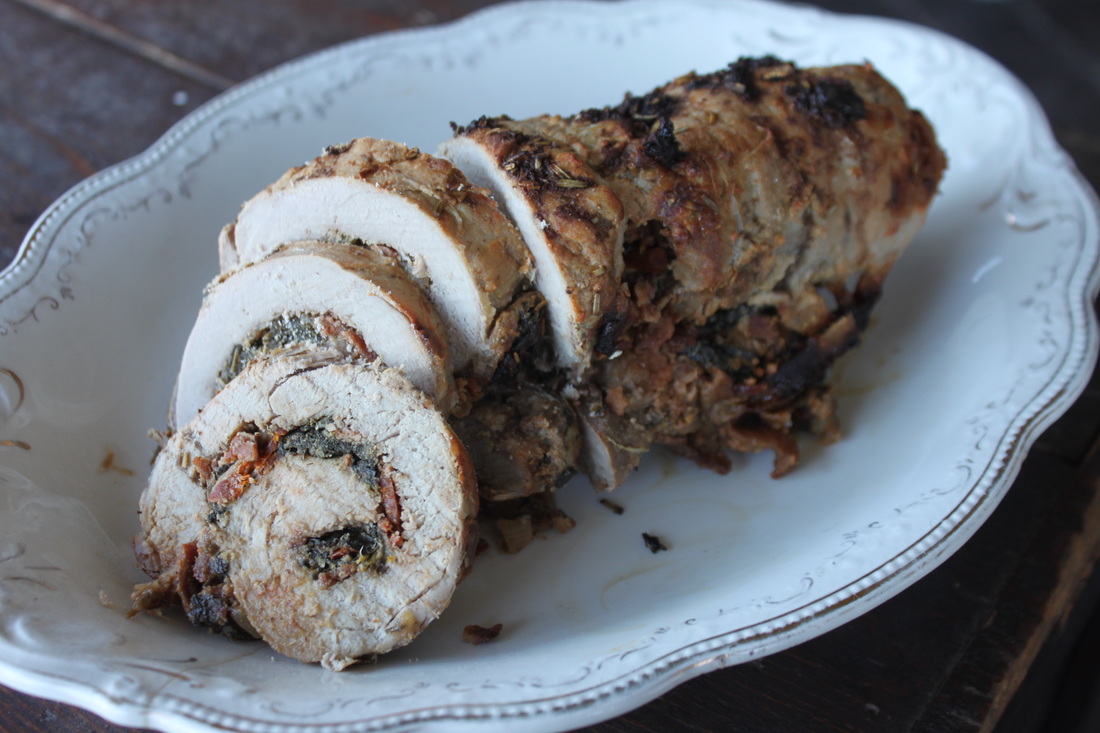 Happy Friday one and all. I'll meet you here again next week! This recipe is a wonderful concoction of brownie, caramel, and cookie! The first time I made this it was because I had some leftover oatmeal chocolate chip cookies from a sale I had been a vendor at. The cookies had gotten too hard to be able to eat (well, unless you dipped them into tea or coffee, which was yummy!), so I needed to just get them used up in another way. I thought if they were a crumb or crumble type thing for something else, it would be deee-lish! I found this recipe from Chelsea's Messy Apron, and adapted it to suit me and what I had one hand. I've made this with from-scratch brownies, boxed brownie mix, even a modified-to-brownies chocolate cake mix. I've used wrapped caramels, as well as caramel bits, and I used my leftover cookies, but also store-bought oatmeal chocolate chip cookies! So, I mean, you can make this treat in many ways! And you should! Perfect, fudgy brownies topped with caramel and more chocolate, then topped with a crumble made from cookies? Yes, it is every bit as delicious as it sounds! 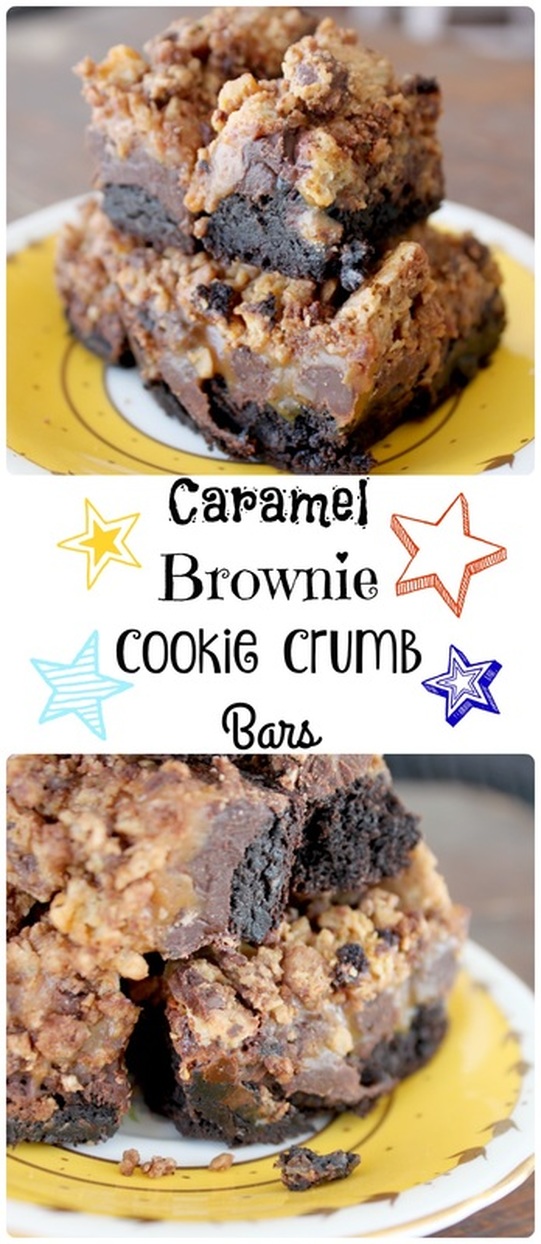 Caramel Brownie Cookie Crumb Bars Adapted from Chelsea's Messy Apron Ingredients: For the Brownie Base:
For the Caramel Layer:
For The Cookie Top:
Method:
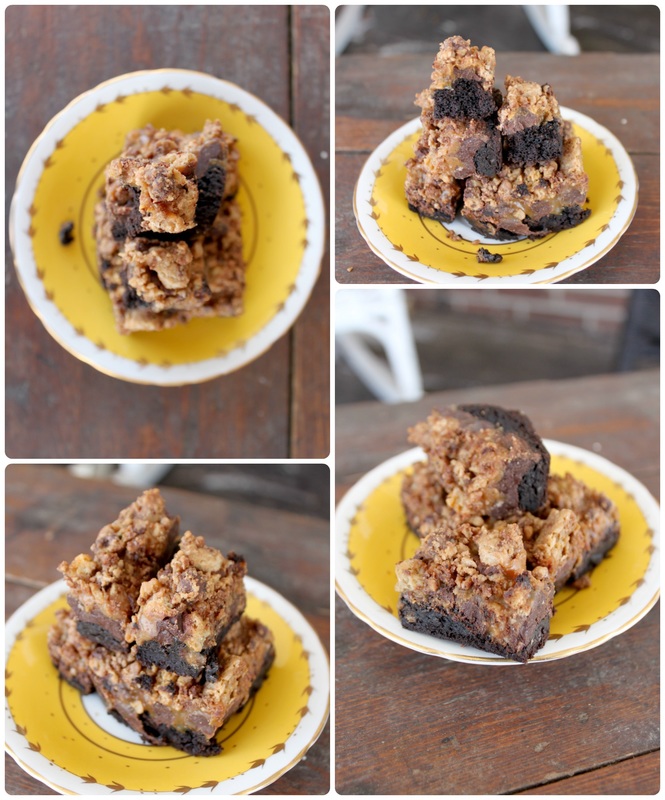 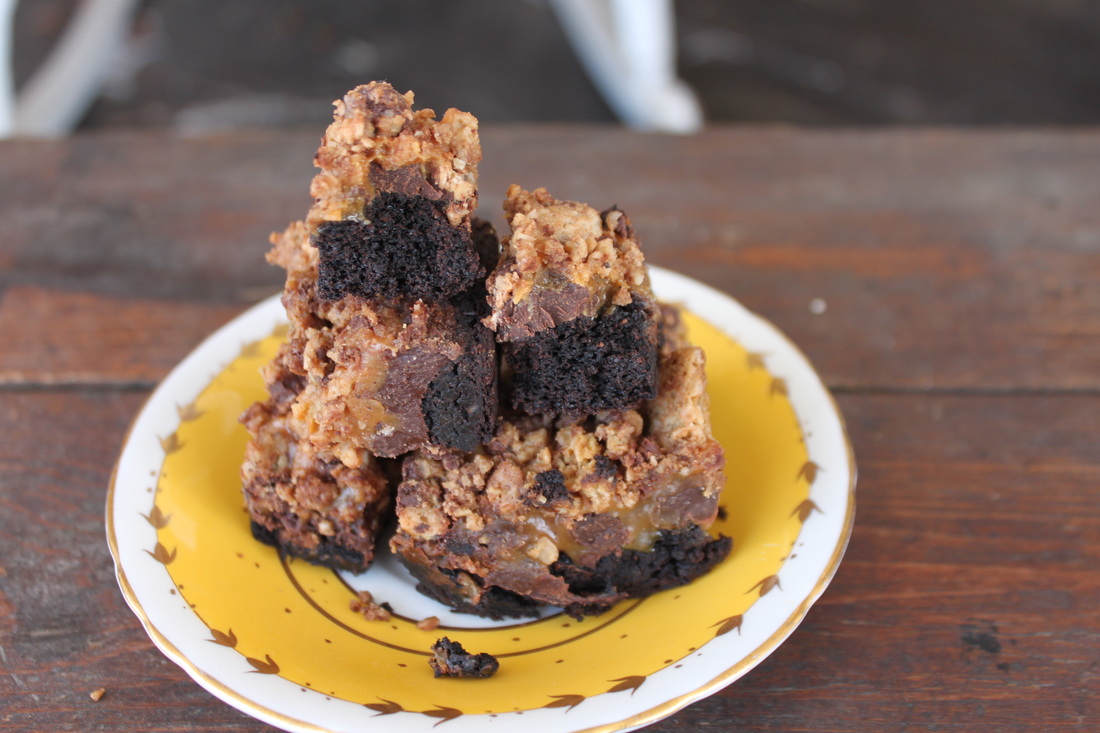 Oh, yum. These bars are just the tops! For real, they are just too tasty to fully describe! So, this weekend-any plans? Saturday we go over to the neighbours for an annual pancake breakfast! My wonderful neighbour has a huge maple syrup shack (it's an enormous shop, really!) where he's been really, really, really busy, working away at turning the sap from our beloved maple trees into wonderful maple syrup! He doesn't even personally like maple syrup, but his father made it, and he wants to carry on in his tradition. So he hosts a wonderful pancake breakfast to share/get rid of some of the syrup he's made! : ) It's really so great, we always enjoy it a lot! Have a good weekend! Hello! I don't know about you or where you live, but here in Tweed, it's been feeling more like spring this week. It's actually raining right now....which is just yucky and miserable, but the spring makes me want something bright, light, and palate cleansing as a treat. Am I the only one? We spend the cold winter months eating comfort foods, then when it feels like the warmer weather is approaching we feel the need to switch it up? Maybe it's just me? I know I would, and have, eaten these cookies any time of the year, but they feel particularly "springy" to me because of the refreshing lemony-ness of them. This recipe is one I've been using for a while now, but I made some changes, basically because I needed it to reflect what I usually have on hand! The original recipe is from a blog I frequent, Lauren's Latest. She's shares about home, travel, family, and she's got some wonderful, delicious and simple recipes (one of my favourites is her copy-cat Cinnabon cinnamon rolls! They are sooooooooo good!!!). Anyway, I'm keeping this post short and sweet....and sour? Get it? Lemons? Sour? Hardy har-har, I know, I'm funny. : ) 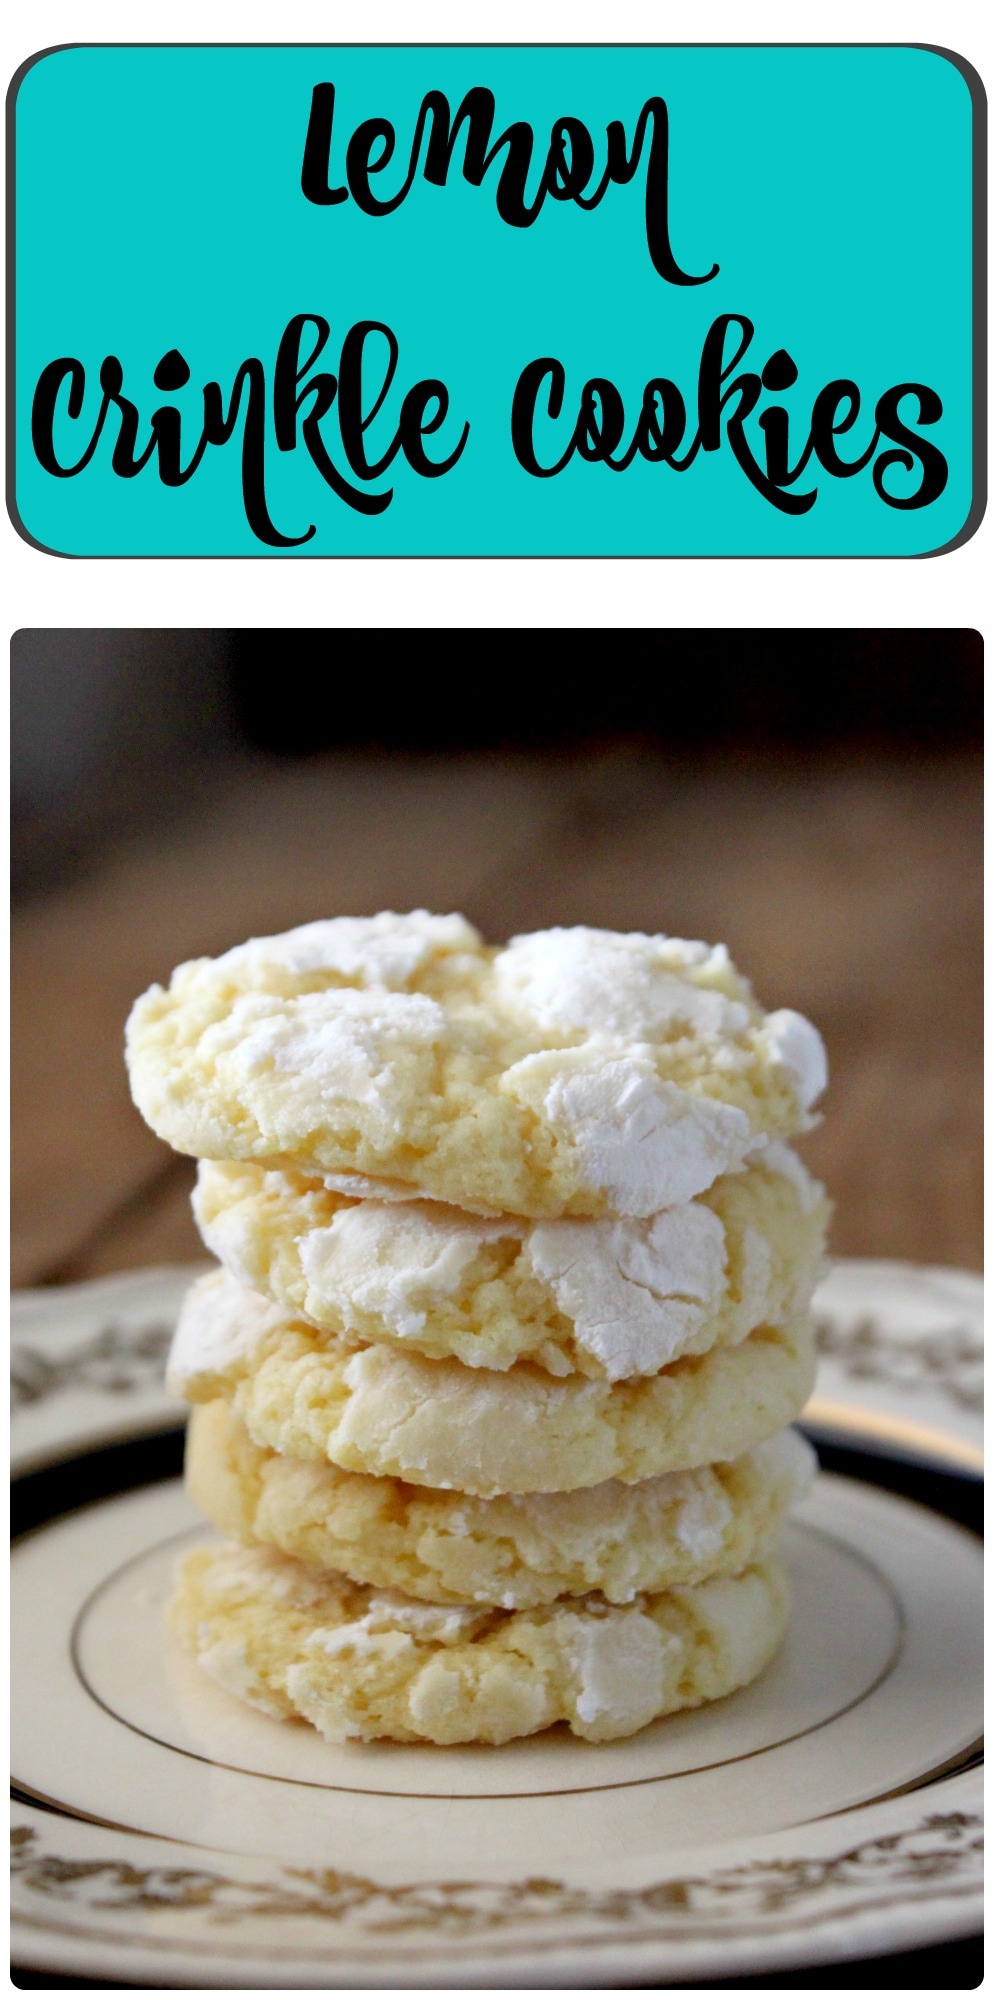
Lemon Crinkle Cookies Adapted oh-so-slightly from Lauren's Latest Lemon Crinkle Cookies Ingredients:
Method:
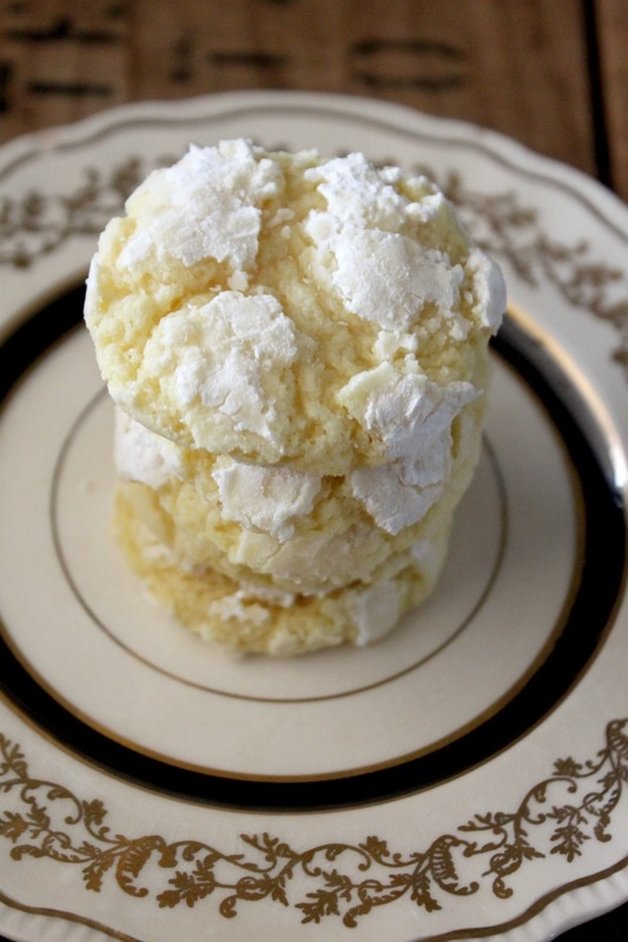 So lovely looking, right? They are just delightful, soft on the inside, lightly crisp on the outside, and so refreshing! Well, as "refreshing" as a cookie can be, I guess! Haha! Have a great weekend friends! |
Hi, I'm Amy-Lyn! 
I am the lady behind this here blog! I live in the sticks with my animals, my super handsome husband, and my
3 amazing kids! Here you'll find things from recipes (gluten-free, paleo, and strait up junk food!), DIY ideas, thoughts on raising a son with autism, and whatever else pops into my brain! : ) Read more about me by clicking here! Want to Stay Connected?
Find What
|
||

 RSS Feed


