|
Friday, Friday Friday!!! It's Friday. Today my parentals are coming over for a night to visit, and we are very excited about that. Then tomorrow is Caleb's 11th birthday (well, his party is tomorrow-his real birthday isn't for another 9 days!). So, I've been busy getting things ready, trying to find that balance between making everything perfect...and remembering that it's just a birthday party, and if something is a disaster, it's ok! Anyway....still talking myself through it! Last August I posted about different s'more recipes and ideas. Find that at "Please Sir...I want S'More...". I know, I'm so clever using that line from Oliver Twist. Whomp whomp. This summer, I am giving you my collection of s'more inspired ideas, as well as some others I found on the World Wide Web that looked so good! 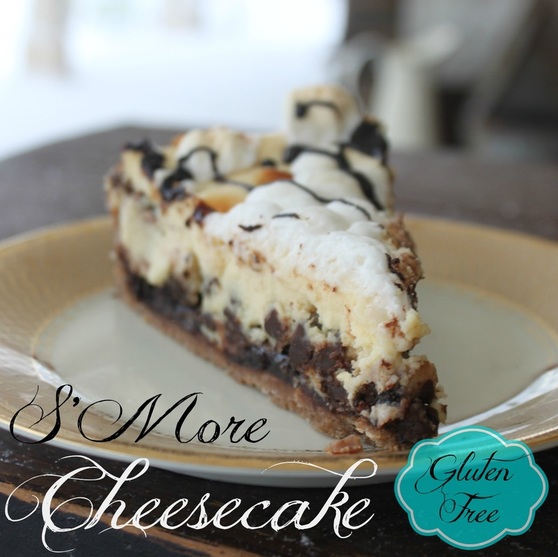 This gluten-free s'more cheesecake is sooooo good! I think I should make one again soon! Click here to find the recipe 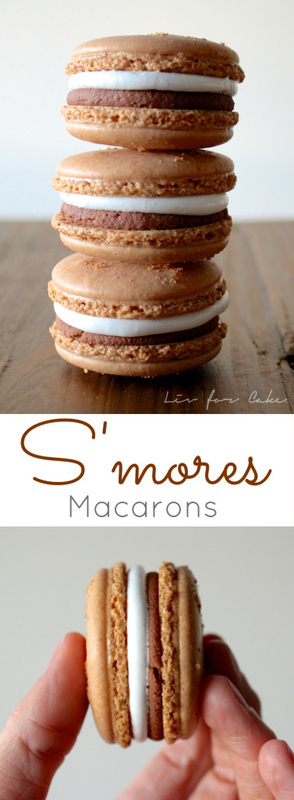 At Liv For Cake, Olivia has created these beautiful, and perfect little s'more macaroons. A real (french) macaroon isn't as hard to make as you might think, so hop on over to Olivia's site for the recipe! 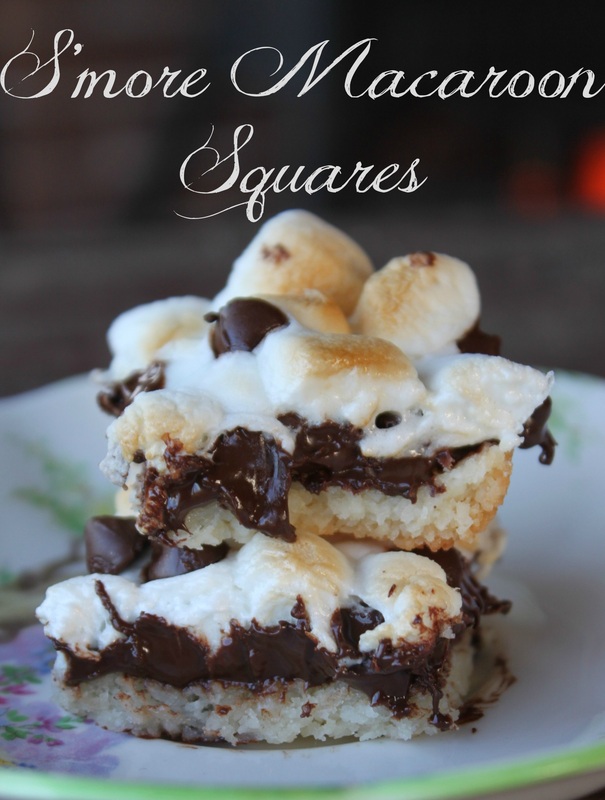 I have been making these for years, and they are always a hit. Well, except with my one friend who hates coconut, but no matter, most everyone else likes these! And they are so easy to make, for realz. Click here for the method to the madness! 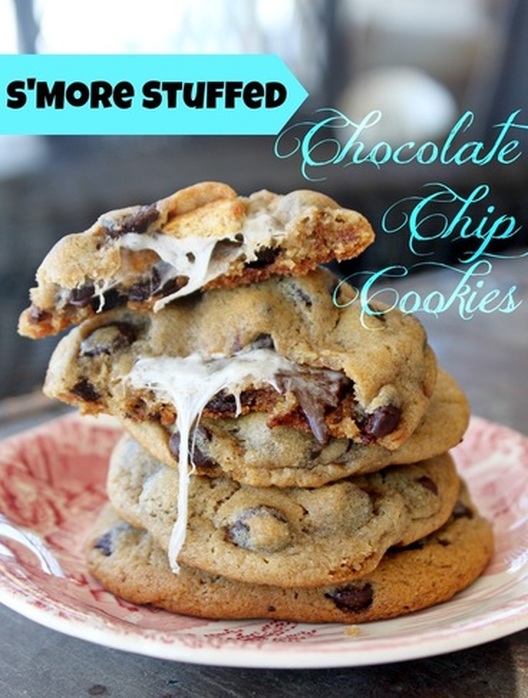 Whaaaaa? A deeee-lish chocolate chip cookie stuffed with the perfection of a s'more?!? Yes, that did happen. Right here, in my kitchen! Here you go. :) 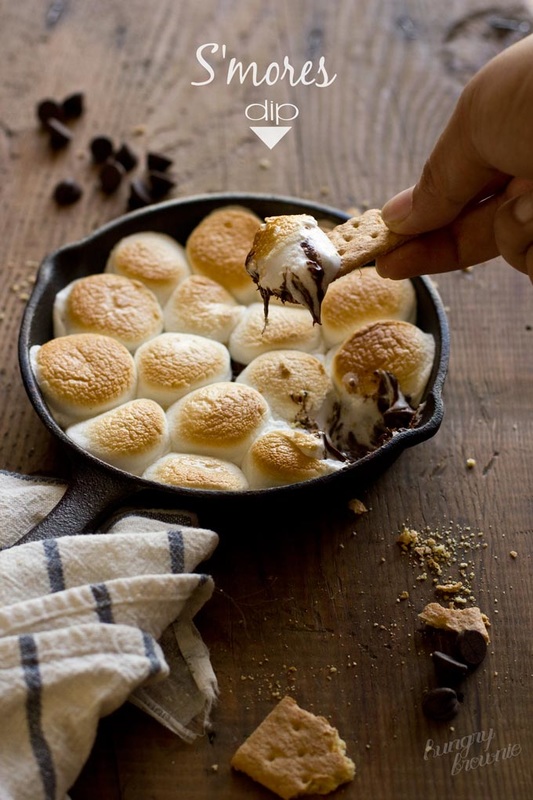 Elaine at the Hungry Brownie made this amazing dip with chocolate chips, marshmallows, and using the graham crackers to scoop the goodness up! I may have made this for quite a few of my treat days! Visit The Hungry Brownie here to find out how she makes this magic happen! 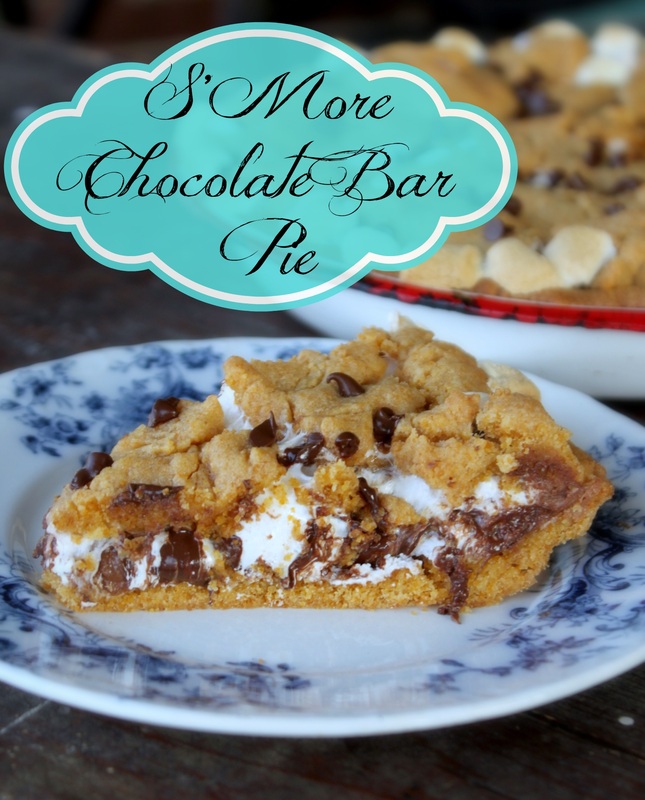 This pie....oh, this pie!!! It made the list last summer as a must-try s'more idea, and I stand by that! The chocolate and marshmallows being so darned tasty is one thing, but then you get chunks of chopped up chocolate bar in there too, and BAM, you're swooning. And the crust and top are no mere plain-jane graham cracker with butter contraption, no! It's a delight that does involve graham crumbs, but is like a soft, homemade version. It's so good. It's soooo good. If I didn't eat Paleo (no wheat, sugar, dairy, or grains) 5-6 out of 7 days a week....I would be eating this all the time! Make it for a pot-luck, or when you're having guests over! I warn you! Don't make it unless you can share it, because if there isn't anyone to share with...you will eat it all....you've been warned! Head over here to find that recipe, btw. :)
A good ol' s'more made over a fire is still one of my favourite things ever though; I've got it down to a real art. One of my sisters is a (sweet) evil genius too, and when we get a campfire lit, there's a-gonna be some fine s'more making going on! We recently used the new Oreo s'more cookie as the cookie in a campfire s'more. It werz goo-ood! And that's that. If you're looking for more s'more ideas (what the heck for?!?), Amy from amyshealthybaking.com has this Pinterest board and it is chock-full of them! I also like that her name is Amy, she has a healthy blog, but also an entire Pinterest board dedicated to s'mores! We are kindred spirits! Have a great weekend everyone! xoxo
0 Comments
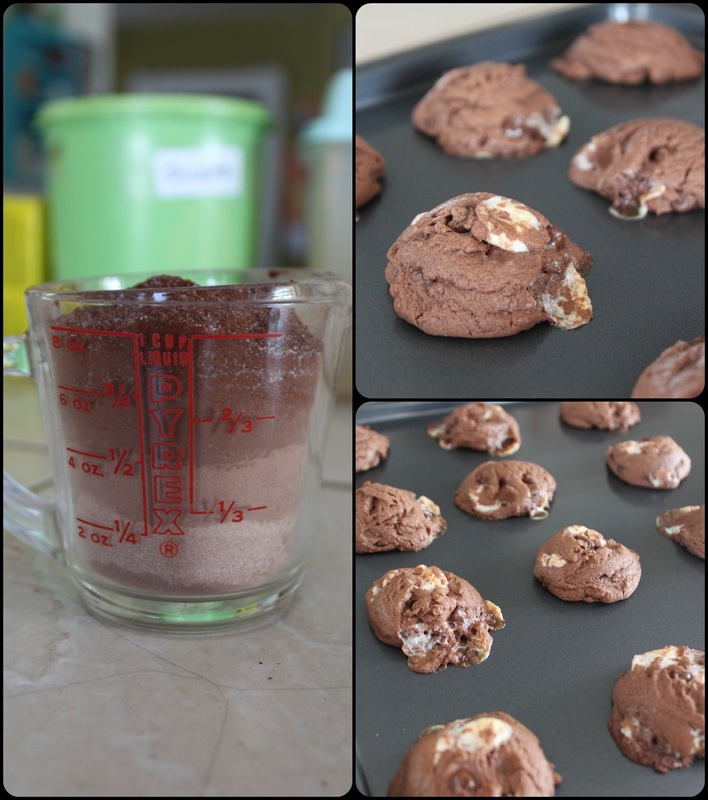
So....about a month ago our chickens all got snatched up by a fox...or an owl, or something else. We're not 100% sure what got them, but all our girls were gone within a few days. Just big heaps of golden feathers here and there around the farm. :( I'm not a chicken lover like some people are (doting on their birds, naming them, giving them "special treats" like herbs in an ice water bath in the summer...seriously, that's a thing), but I did enjoy taking care of them. I enjoyed that my kids could help collect the eggs, and bring them our scrap bowl, full of leftovers that the chickens loved to eat. And for that matter, I also miss not having them as our compost. So, where once we had at least 2 dozen eggs ready for anything, we suddenly had none...I needed to buy eggs. I haven't bought eggs in forever. We bought a few dozen from a lady Adam knows from work, and a few dozen from a lovely older lady who sells them from her scrap feed, free range chickens. But, more often than not...we had no eggs in the house. I just wasn't used to having to buy them, so we keep going, "ohh....there aren't any eggs in the house....I guess we should go buy some?" Or, I have the urge to bake chocolate chip cookies...and there were no eggs! Yikes! Luckily, making chocolate chip cookie dough without eggs was something I had experimented with a while ago when I made this gluten free chocolate chip cookie dough. I had worked out a lot of the kinks of edible cookie dough because I wanted to eat it raw, and eating raw eggs are not such a great idea. Unless you're a dog. Which I'm not. Anyway, I went back to that recipe, but tweaked it to make sure it would be stable enough to bake. So, here they are, egg-free chocolate chip cookies! They are actually a really simple cookie to make, and, although my preference is a super thick, super soft cookies, these little darlings were super deee-lish. They were a little crispy on the outside, but still nice on the inside. Thumbs up. 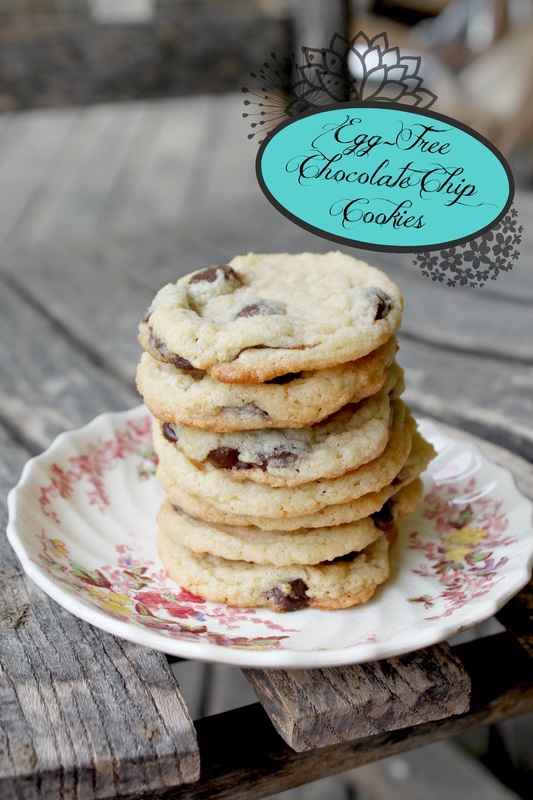 Egg-Free Chocolate Chip Cookies Ingredients:
Method:
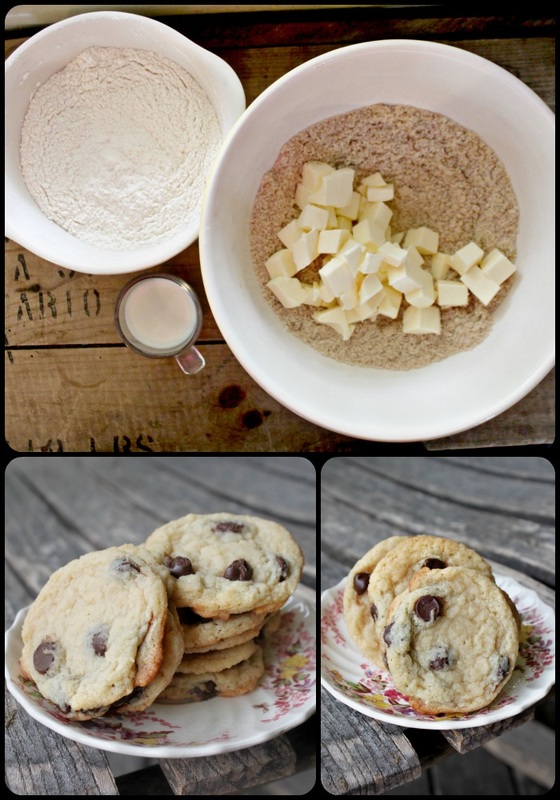 I know I don't have the butter whipped up before adding the sugars in the photo above...but I wanted a picture of all the ingredients, and well, this is what you get :) Also, the butter is cubed because I needed it to get to room temperature quickly, and that's the way to do it. FYI.
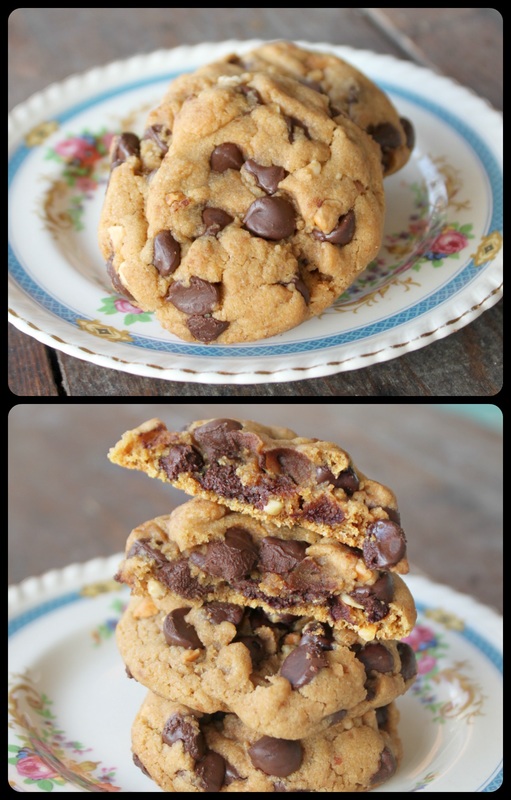
So, you can see these cookies have a fantastic golden bottom, are slightly thin, but still have some puffy spots. They really are so good. Sooooo good. And that's that! It's Friday, it's a "nothing" day for us here (nothing planned), so I'll be working on a wee project outside...actually, it's not "wee" at all, but if I tell myself that I won't be overwhelmed and quit!! I hope everyone has a good weekend! The kids and I are heading to the Tweed Fair tomorrow, then to a Belleville Theatre Guild picnic on Sunday. I am looking forward to both! xo Hello all you people! 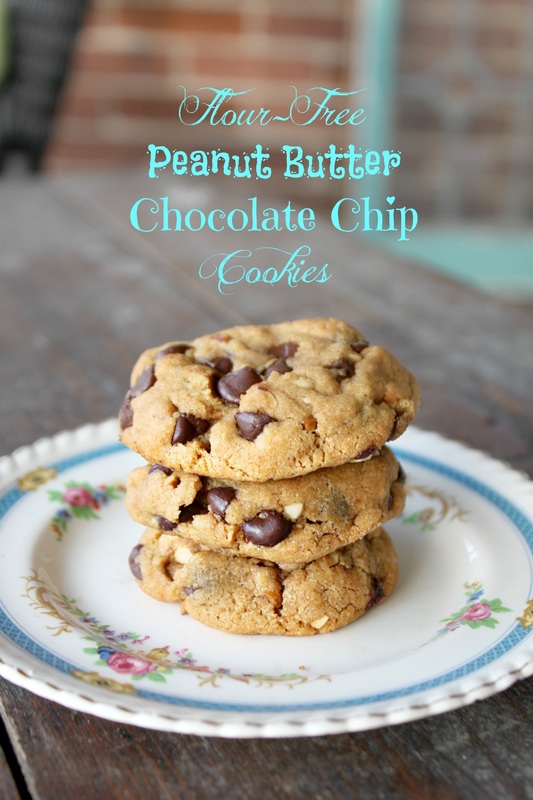 Flour-Free Peanut Butter Chocolate Chip Cookies Ingredients:
Method:
 Simple. Tasty. The End. :)
It's the first official week of summer holiday for us here, and Wednesday is Canada Day which we're looking forward to! Tweed does a big how-do with a parade and celebrations in the park. It's always fun, and we're having some friends come to be involved then come back to our place after to hang out and have dinner and a campfire (hopefully, if it's not raining!). Well, I'm excited about all of this! Let me know what you think of the new look! I hope everyone has a great day! So, I'm baaaack! After the musical was finished on June 13th (sigh....a happy and a sad one), we packed the family up and headed to a cottage for a week. That was a fantastic time of hanging out with my beautiful sister and her fam, relaxing, and eating my weight in s'mores......mmmmm..... Last year I posted a recipe from Martha Stewart for Early Grey Tea Cookies. I love those cookies, I make them often, but what I love more than a regular shortbread style cookie is a whipped shortbread cookie. Whipped shortbread is so soft, buttery, and melt in your mouth tasty. So, I decided to try my whipped shortbread recipe with the addition of earl grey tea, and the results were (not surprisingly) fantastic! 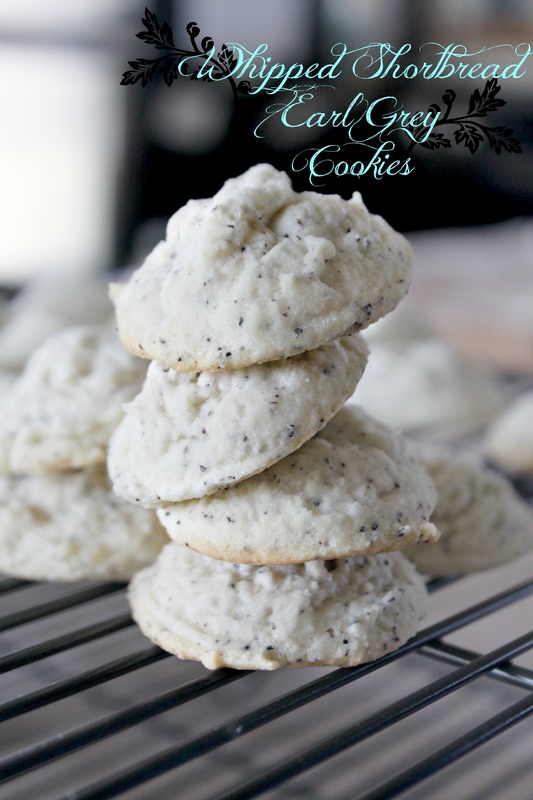 Whipped Shortbread Earl Grey Cookies Ingredients:
Method:
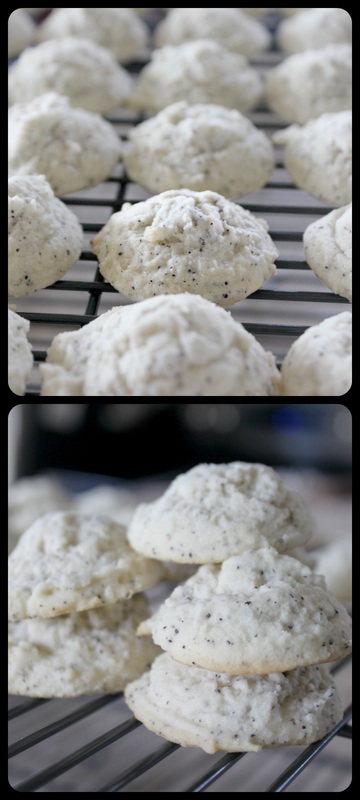 These cookies are a true cookie delight! They are light, but buttery, aromatic and delicious! For realz. For some other ideas for these whipped shortbread, look here at my whipped shortbread: three ways!
My blogging has been waining lately...whomp whomp. I'm hoping now that the show is finished I can try to put a little more time in here. We'll see though because this is the last week of school, then I'll be in summer-mode (read: lazy) and may be too busy with summer stuff! We shall see though, we shall see. Let's say it again: we shall see. I've already made cake mix cookies. Last April I posted the recipe, and that was that! I like to make cookies to bring to Friday night rehearsals when I'm in/helping with a show at the theatre, but one week my time got away from me, and I was seriously short on ambition! When I posted that cake mix cookie recipe last year, I confessed that the idea of making cookies out of a cake mix seemed dumb; why wouldn't one just buy a cookie mix if they wanted easy cookies? The answer is two fold, really. One: cookies made using cake mix are a cookie breed all their own! Part cake, part cookie? What the heck?!? It's crazy delicious! Two: Um....cake mix is always waaaaay cheaper than a cookie mix. It's true. Also, I guess this would be a third point, but I never buy cookie mix because I like making cookies and buying a mix seems silly. However, buying a cake mix when they are on sale is something I do because cake mixes make some lovely cakes. It's true. So, it happened this particular day that I wanted to make cookies, didn't want to put in much effort, and decided to try the cake mix cookies again....only make them crazy simple! My recipe from last year was basically a cookie recipe with flour, sugars, butter, etc., but some of the regular flour was swapped out for cake mix. This recipe today? All cake mix. Seriously....just cake mix, eggs and oil are all you'll need for these! Super lazy? Yup! Super tasty? Yup! 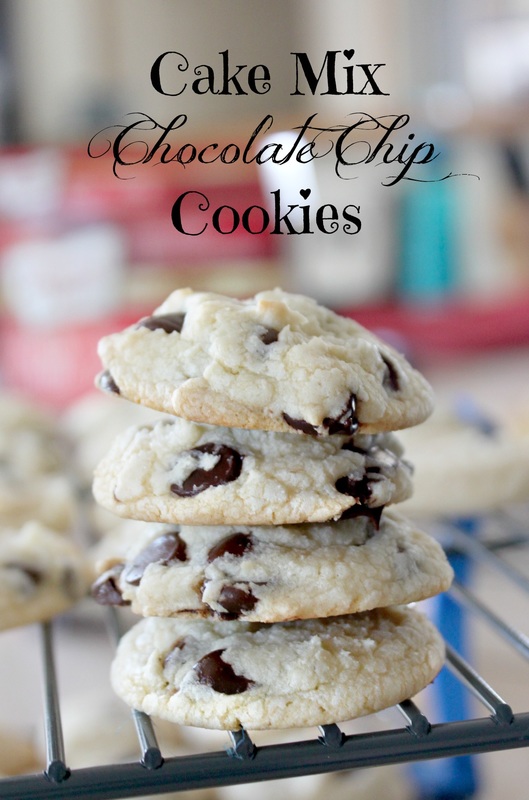 Cake Mix Chocolate Chip Cookies Ingredients:
Method:
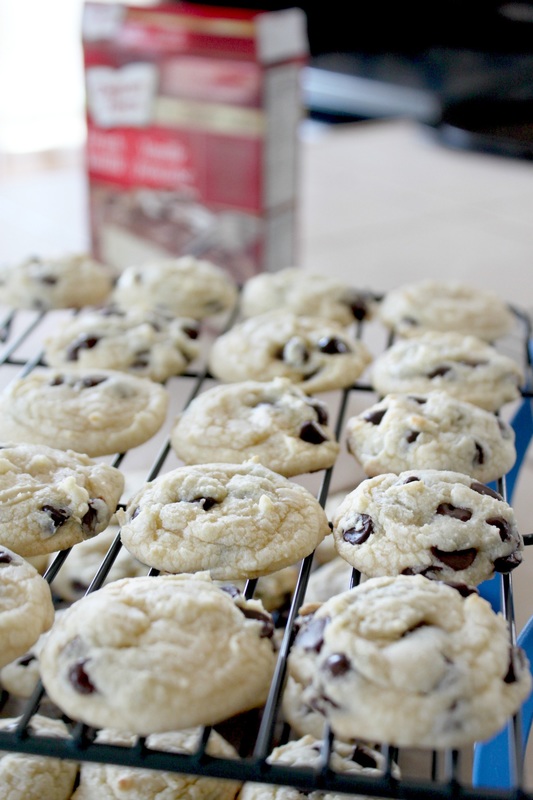 Let's just talk about variety here for a moment....how about strawberry cake mix with white chocolate chips, or chocolate cake mix with score bits, or peanut butter chips? How about chocolate cake mix with nuts added in? Seriously, you can make these what you want them to be! And amazing will always be the result! So, although I believe in baking from scratch (I find it therapeutic!), sometimes baking like this can also be therapeutic too! I mean, getting such a fantastic bunch of cookies from some crazy simple ingredients is amazing! Maybe I'm overly excited about these, but I think it's legit. :) Anywho, tonight marks the start of week 2 for The Drowsy Chaperone, and I'm feeling excited! Last week with the preview, opening night and running for the weekend went well. My Mom and Dad came up to see the show, and help me out by watching the kids while I was away, and it was a pleasure to have them! Below are a few photos from one of our last rehearsals from 2 weeks ago. These beautiful photos are from Sean Scally, a talented photographer who is involved with the Theatre Guild. 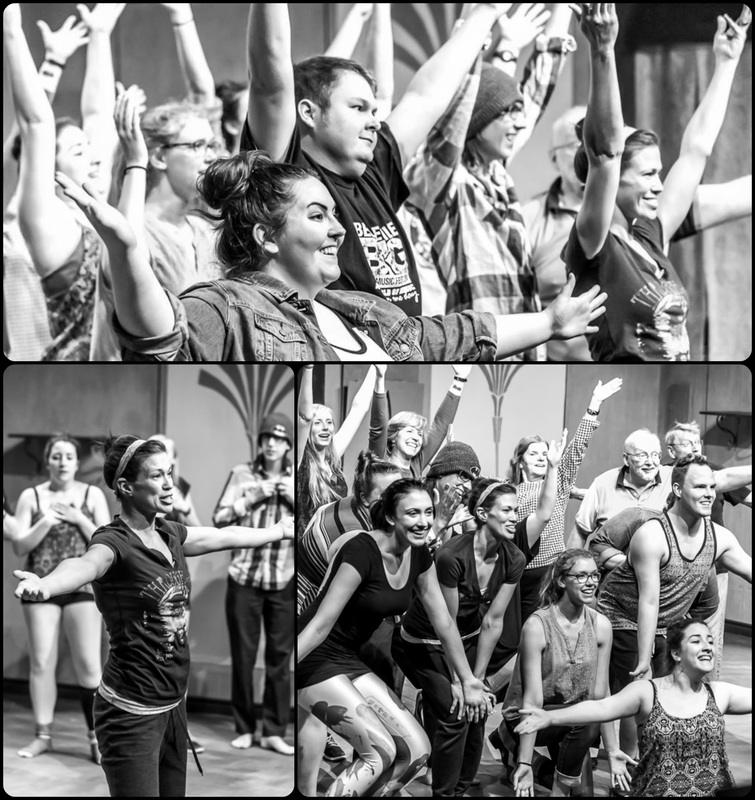 So, that's it! Have a great Wednesday!
Hello there. How are we today? I'm feeling cold. I know it's spring, but seriously, a lot of days you need to be sitting right in the sun to be warm. If you're in the shade, or in the house, you're freezing! So, although hot-chocolate cookies seem like a lovely winter treat, they really hit the spot on any cool day! Made with hot-chocolate mix, chocolate chips, and mini marshmallows, these cookie honest-to-goodness taste like hot chocolate....only cold. They are super-yum. 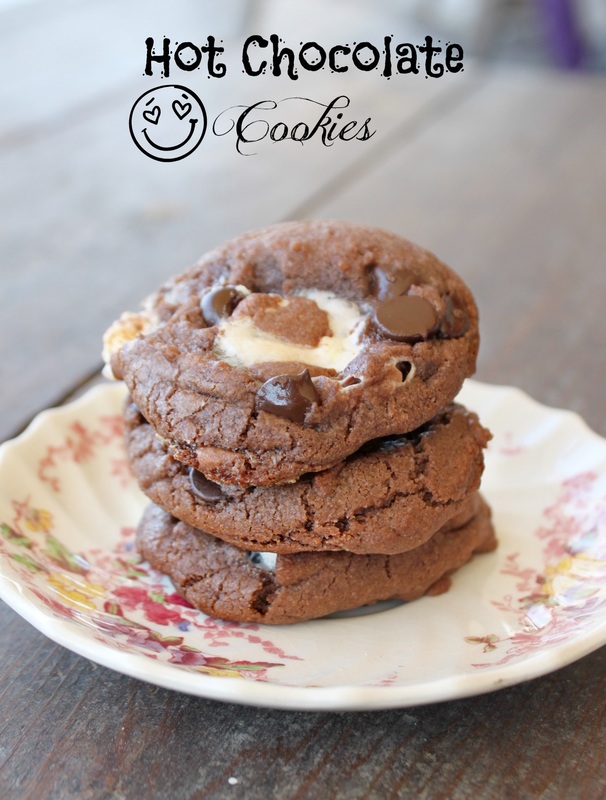 Hot Chocolate Cookies Ingredients:
Method:
 I bought new cookie sheets and they are the BEST! So, I didn't have to use parchment paper. You can see that the cookies are still poofy and soft-looking out of the oven. This is how they should look! They will flatten and cook a little more as they cool. You can also see the many hot chocolate mixes I used for this batch! 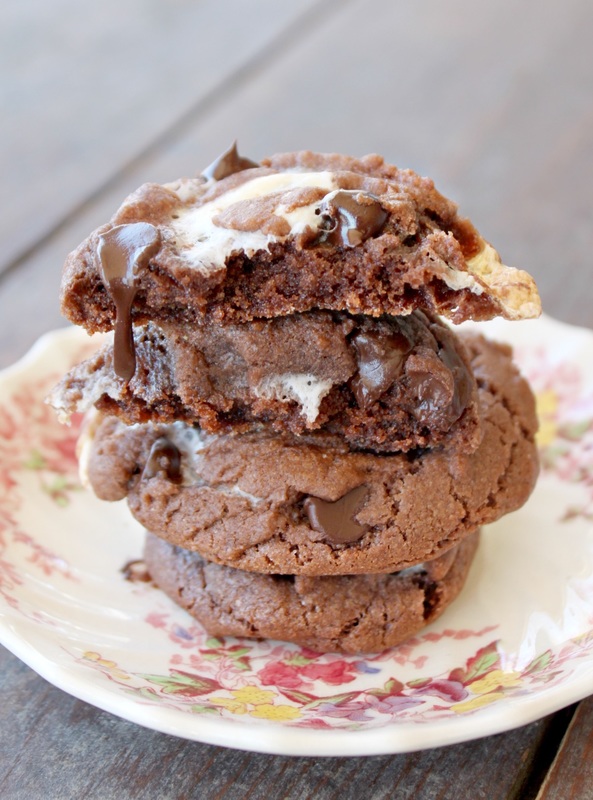 Well, alrighty.
I hope everyone has a good weekend, doing what you're doing! Today is a p.a. day for the kids, I have rehearsal tonight, then a full dress rehearsal on Sunday evening. We have a paid preview on Tuesday, then we open on Thursday! Ahhhhhh!!!!! I'm a little nervous/excited. I can't believe the show is opening next week; it feels like we just did auditions a month ago, not 5 months ago! Anywho, happy weekend to all, and to all a goodnight! :) Truffles are one of the easiest things to make, for realz. A 'regular' truffle consists (basically) of cream, chopped/shaved chocolate, and vanilla extract. This paleo version is just as simple, but I opted out of cream and used coconut oil instead. I have also made truffles with coconut cream (from this site), and they were good, but I wanted to make some on a different occasion and had no coconut milk. So, I just threw some things together and made these....which, after I had made, photographed and eaten them...it came to me...I've made these before, sort of...in October 2013 I wrote a "healthy chocolate treats" post and the chocolate I made then was the same. I tried to re-invent the wheel, and came out at the other end with, have you guest? A wheel. I'm loosing my edge here people, this is serious. Sheesh. Anyway, these are tasty, easy, and apparently my "go to" for a chocolate fix....whether or not I even realize it..... 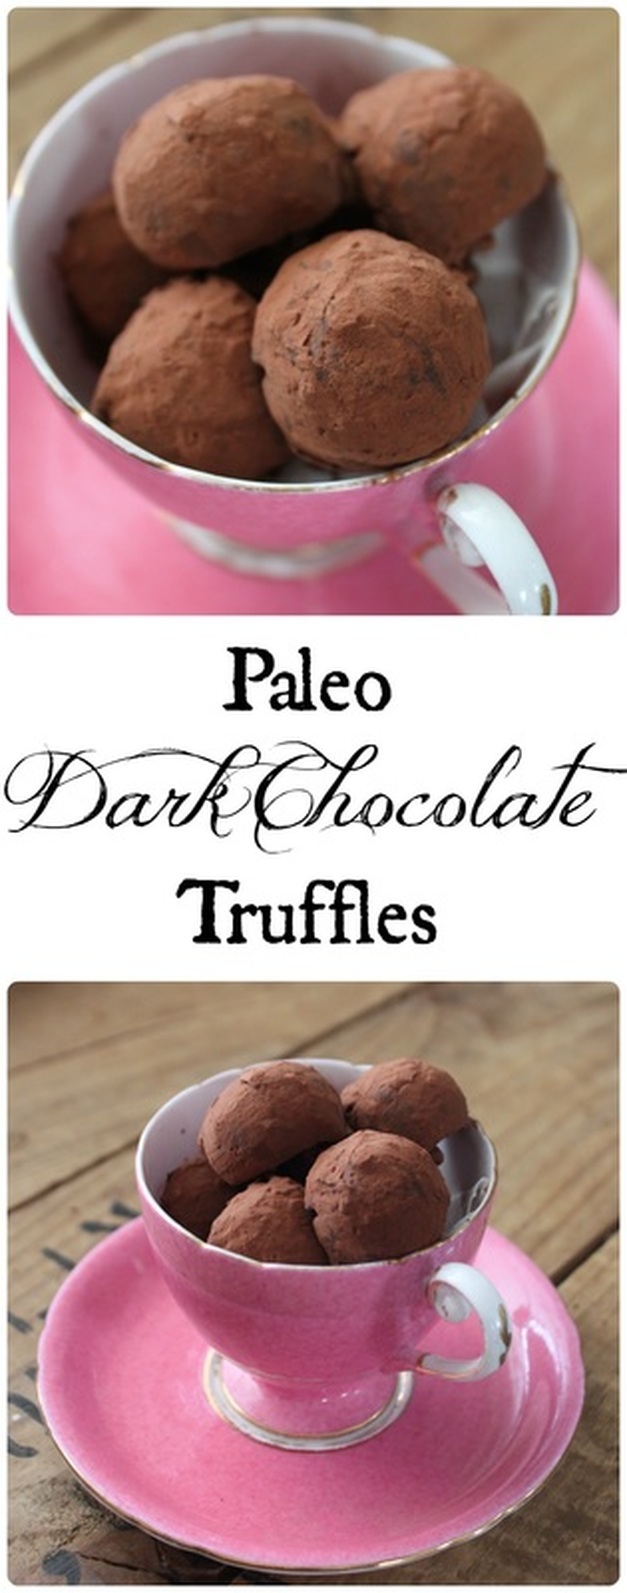 Paleo Dark Chocolate Truffles Ingredients:
Method:
So easy, right? They are a real treat! I have always had a serious sweet tooth, but I have especially always loved chocolate, and so I like to have little chocolate treats available that are a healthier than the sugar and hydrogenated oil filled store bought versions. You can buy some good store bought versions, but the prices are usually whacko! I have more time than I do money, so I'll stick to making my own. Anyway, I didn't plan on posting this today, but here I am, doing it anyway. I'm a rebel without a cause!!! Ok, I'm not, I just want to share a chocolate treat because, well, why the heck not? :) Have a great Tuesday! 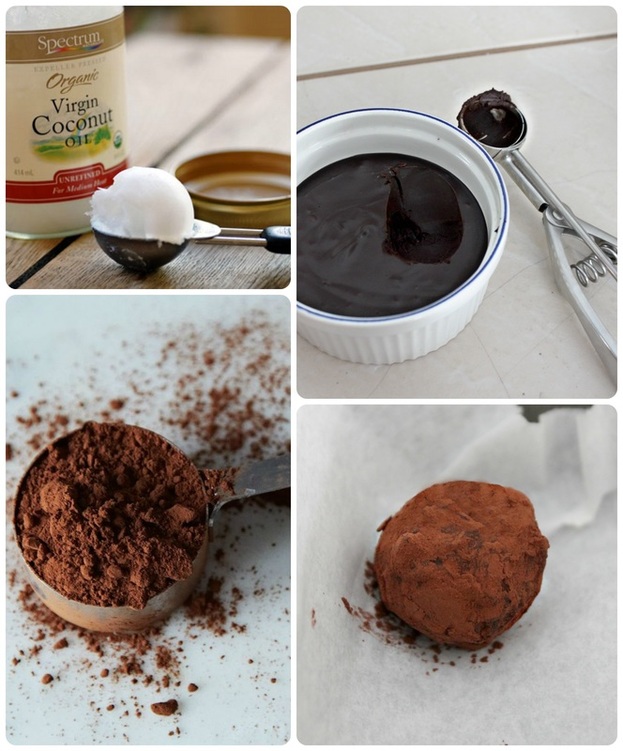 Last week I shared a seriously delicious gluten free chocolate chip cookie dough dip recipe....and I warned you that my treat day brain worked some magic to add to how de-lish the recipe was...oh yes, I sandwiched it between two gluten free (and flour free) brownie cookies. Yum-o X 1000! :) I decided to bake the brownie cookies a pinch longer than I normally would to make sure they would be sturdy enough to be involved in a cookie dough sandwich. They were perfect! The original post for those beauties is here. In a way, these seem like they would take a lot of work, but the cookie recipe is simple, and the cookie dough dip recipe is simple too. I made both the cookies and the dough dip the day before I needed them, then assembled the next day. I actually made a double batch of both the cookies and the cookie dough dip, and made about 35 sandwich cookies. 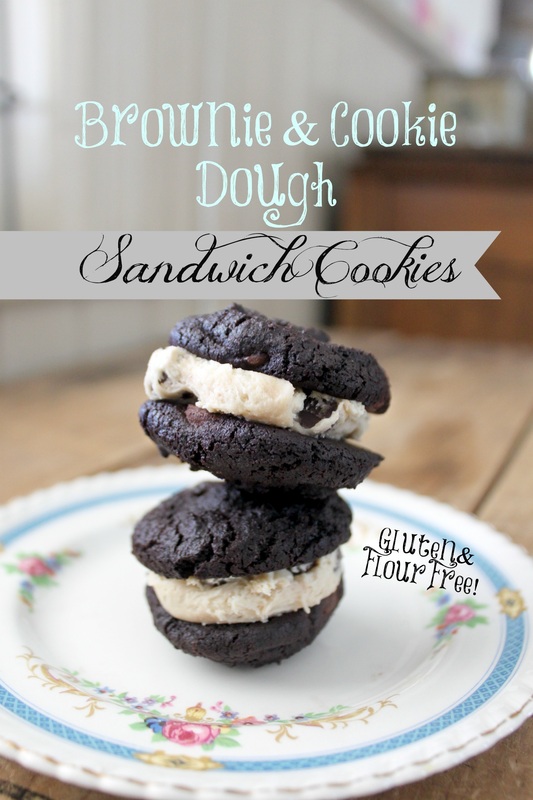
Flour-Free Brownie Cookies Makes approx. 35 cookies Ingredients:
Method:
Chocolate Chip Cookie Dough Dip
Method:
Time Saving What I did to make these and make the most of my time was to start the cookie dough dip because the melted butter mixture needed to cool. While it was cooling I made the brownie cookies, and by the time I was done baking, the dough dip butter mixture was cooled, and I could finish making that. Taa-daa! 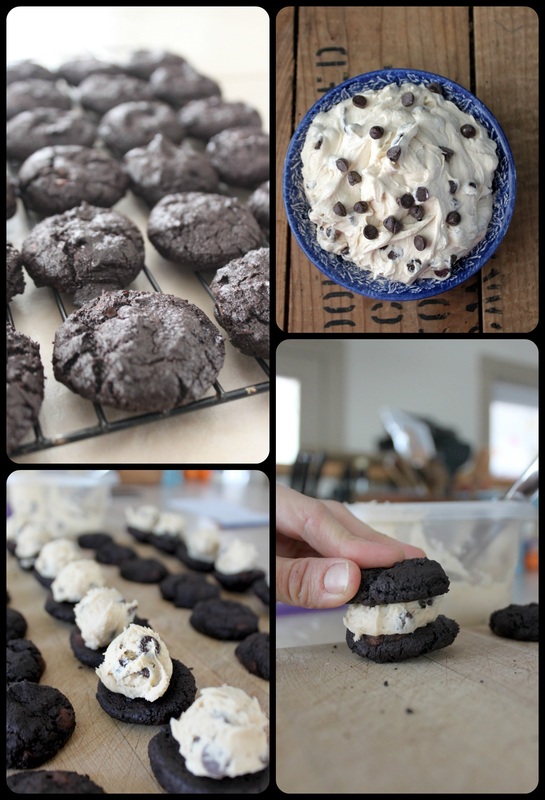
Time to Assemble! I don't think you need instructions for this part, but just in case you do... I created a little assembly line of sorts to make the sandwiches. I lined some cookie up with the tops facing up, and some with the bottoms facing up. Then I used my small (1 Tbsp) scoop to dish out the dough dip onto each cookie with it's bottom facing up, and then took it's cookie partner (the cookie with the top facing up), and squished them together. That's it! 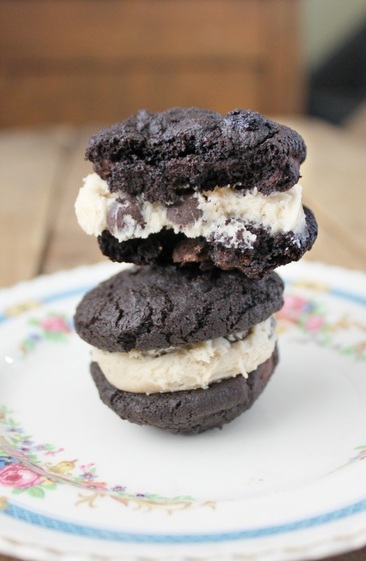
Yummy, right? You have no idea!!!
They disappeared at the rehearsal I brought them to, and one person said, "I thought gluten free food was supposed to taste gross?" She thought wrong, real wrong. I can prove that gluten free doesn't have to be gross, but also that it doesn't have to be even a little bit healthy! Haha...I'm just poking fun at those whose brains say: gluten free=healthy! For real, these are a treat, and eat them in moderation, blah, blah, blah... I have rehearsal again tonight, and I'm going to whip up a batch of something to bring. I'm not sure what I'm going to bring yet, actually? Anywhooo... On Wednesday night the hubby and I and some friends went to see ZZTop in Peterborough, and that was actually fun (I wasn't too sure it would be). They still have their little choreographed moments, they brought out their fizzy guitars, there was a really drunk guy in the audience wearing a cowboy hat trying to dance with anything that walked by him...yikes....he finally got escorted out! It was really loud, so I felt kinda old, but we were right near the front and it was a good show! Those are the coolest 65 year old guys ever...well, except for my Dad, he's pretty cool. Although he's older than 65...never mind, I digress. Have a good weekend internet dwellers, and don't forget it's daylight savings this weekend, so you need to spring your clocks ahead one hour! Most people hate this loss of an hour, but for my husband who is working a 12 hour night shift, it turns it into an 11 hour night shift, which might not seem like a lot, but it is to him! :) Bonne journée! In January I shared a Dutch macaroon that was simple, light, airy, and tasty. I went ahead and paleo-fied it into this version for a valentines day treat! It's still simple to make, but if you're not paleo, look over here for the regular recipe, but instead of just scooping the cookies onto a baking sheet, pipe them out into hearts like these cookies! 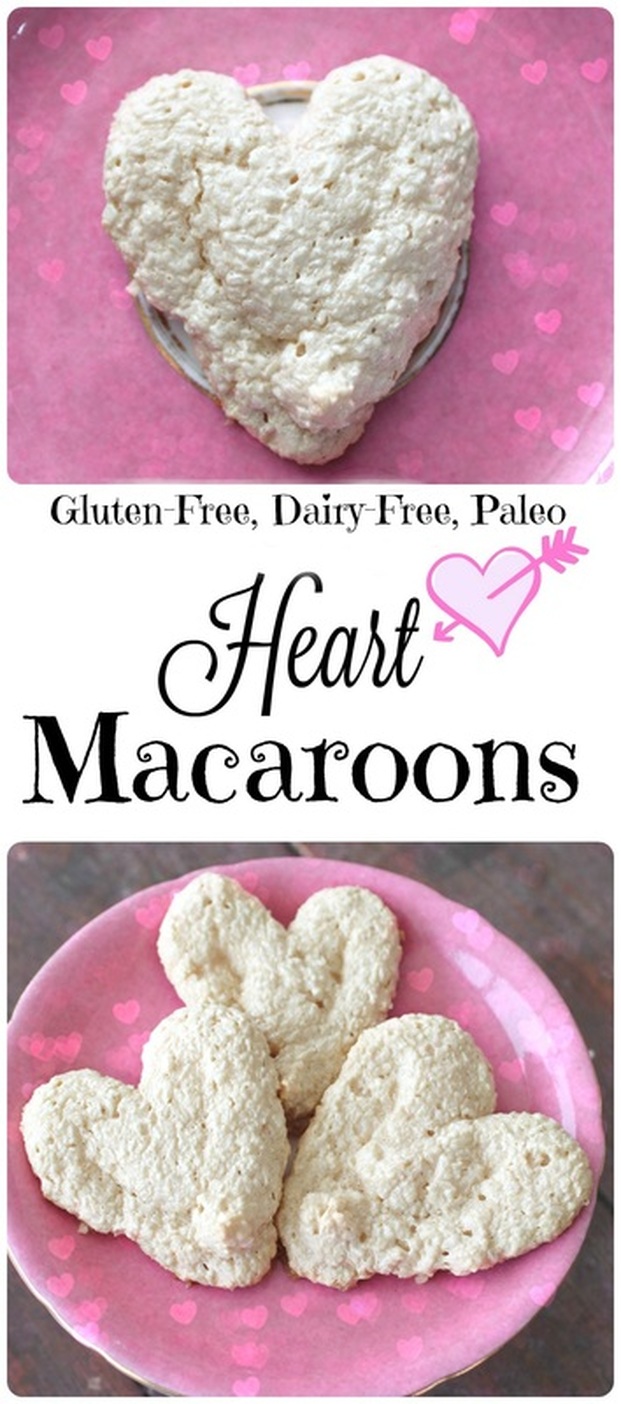 Paleo Heart Macaroons Ingredients:
Method:
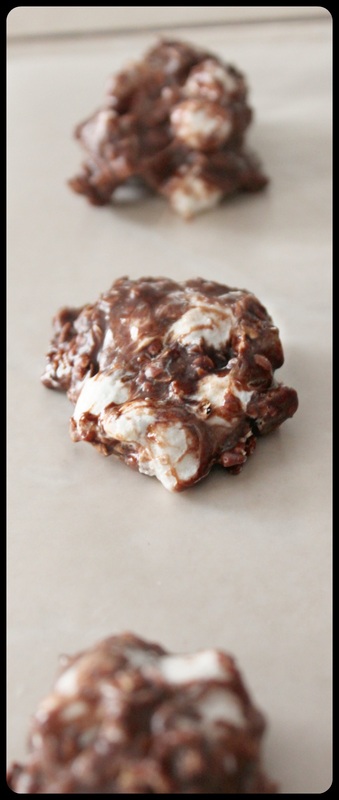
So, the recipe itself is pretty darned simple, then you just do the tiniest bit of extra work and, voila! Valentine ready! :) I'm not a big valentine hype kind of person. Ya know, demanding dinner out, a bouquet of flowers, a box of chocolates, etc. Although, I love a box of chocolates anytime, so I would always gladly accept one of those! I do like to try to make valentines day fun for my kids though, so I make things into hearts to thrill their little hearts. :) Along with these I also dyed some Rice Krispie treats pink, and spread into a large cookie sheet and then cut out into heart shapes. They loved those. Adam and I ate out for lunch today, which is my kind of valentine date. The kids were in school so we didn't need to hire a sitter, it was 2 in the afternoon so the restaurant wasn't busy, and neither of us had breakfast or lunch, and so our late-afternoon "lunch" was filling and took care of our tummies for dinner! All three meals made up in one! Score! I just said score about a meal.... Now I'm running out the door to a rehearsal! I didn't post all week for some reason....I lost track of the week in a serious way!!! Oh well, can't fix it now! I hope everyone has a great weekend, whatever you do, however you valentine! xo 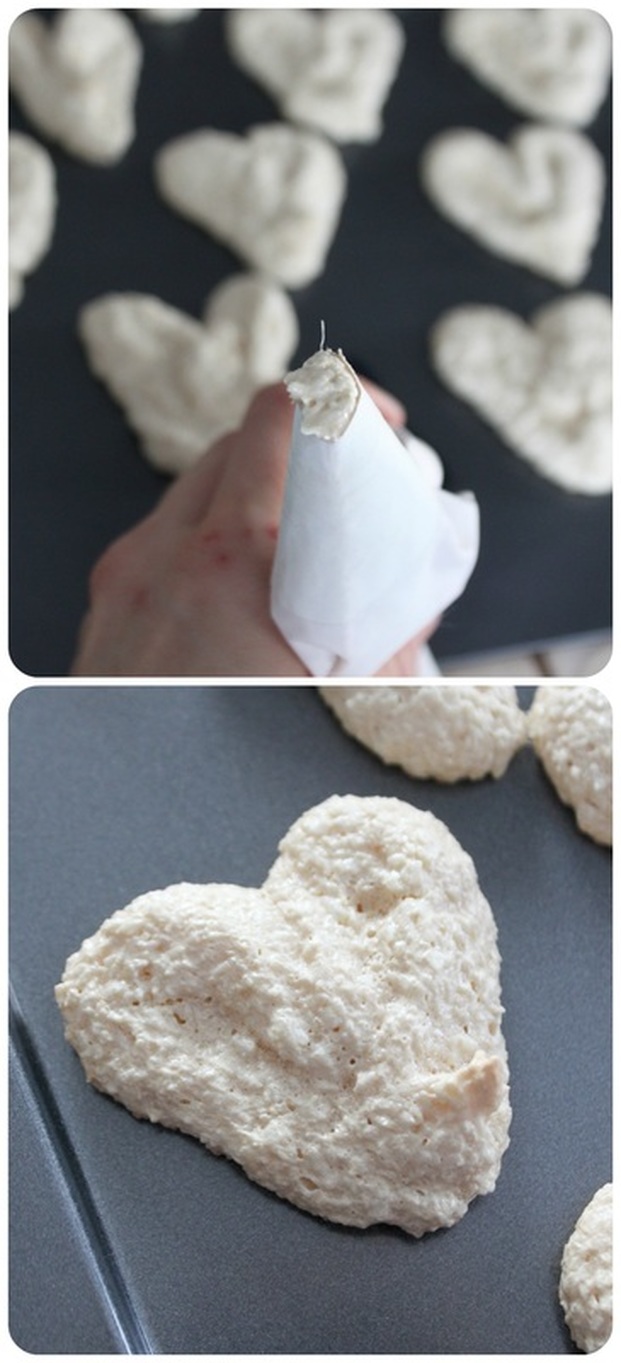 When you love marshmallows the way I love marshmallows, you find ways to add them to any/everything! 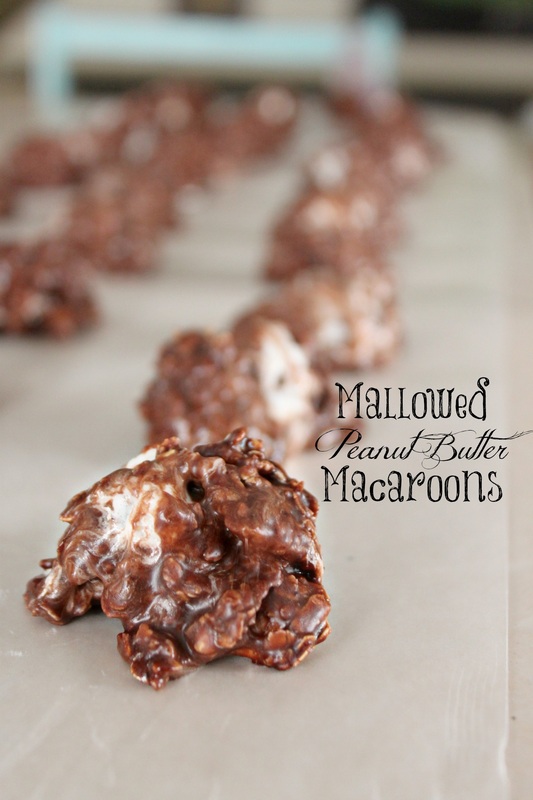
Mallowed Peanut Butter Macaroons Ingredients:
Method:
Yuummmm!
These are a seriously gooey, chocolatey and delicious variation on my regular old macaroons (or whatever you call these!). Not that my regular cookies are not good, they are great (in my humble opinion) :) But really, adding marshmallows just kicks 'er up 10 notches!
They keep well too. I can make a batch and keep them in an airtight container for a week so my kids can enjoy them after school...and if there are any left I have a few too on my treat day! It's hard looking at these all week and not gobbling them all up! Anyway, I hope everyone had a good week! Mine was good; even with some hiccups. Mainly having Keziah home sick for a few days made things different, but by no means difficult! Each of my kids on their own are really so sweet....now, put them together and it can be a different story! This week I also taught a dance number for the Belleville Theatre Guild's spring show, The Drowsy Chaperone....it was a tap dance! Do I dance? Yes. Do I choreograph? Yes. Can I tap dance......well, not exactly. I own tap shoes from some other life I was in, but I am not a "tap dancer"! In fact, when my husband saw the tap shoes sitting out he said, "what are those ugly shoes for?". We've been married nearly 11 years and he has NEVER seen them, so that should give you a hint at the last time I was tappa tappa tappin'! Also, pregnancy has been known to make foot size increase...and mine sure did! I sent a picture of my battered feet with many bandages to a friend, but I'll spare you all those ugly details! The shoes that fit just right many moons (and pre-babies) ago, now just, just fit. Ouch. All that to say though, I feel really accomplished for choreographing an entire dance in a style that I have only ever been moderately trained in! I felt stressed day and night about it; I would honestly wake up in the middle of the night and hear the song in my head, and I would be mentally tapping out rhythms! Every sounds I heard (including typing on a keyboard!) sounded like tap variations to me! Right now my fingers are tap dancing!!! Hahaha!! "They" say you can do anything you set your mind to. And usually that statement makes me irritated! If I set my mind to becoming a dinosaur, no matter how much I want it, I shall never be a dinosaur! Whomp whomp. However, within reason, I say "hear hear!" to that vague statement. I was asked to choreograph this piece, and I set my mind (and feet and body) to do it! I worked at it every day, slowly and painstakingly, adding a new sound or step as I went, and suddenly ("suddenly" as in 3 weeks later!), I had it done and I was teaching it! :) This amusing anecdote is meant as an encouragement to you today! If you see a task ahead looking ominously large and un-manageable, just start at it....pick away at it. Do what you can with what you have (knowledge, resources, etc.), and see what you can do when you set your mind to something! And if you want to learn to tap dance, but not pay for it or have others witness the event, just go to YouTube! Seriously, there are a tonne of tap teachers on YouTube and you can take it at your own pace! Just in case you wanted to know. :) Happy weekend! xoxo |
Hi, I'm Amy-Lyn! 
I am the lady behind this here blog! I live in the sticks with my animals, my super handsome husband, and my
3 amazing kids! Here you'll find things from recipes (gluten-free, paleo, and strait up junk food!), DIY ideas, thoughts on raising a son with autism, and whatever else pops into my brain! : ) Read more about me by clicking here! Want to Stay Connected?
Find What
|
 RSS Feed


