|
Hello! How are we today? Monday can either intimidate me with thoughts of what needs to get done in the coming week, and I feel it's too daunting and get unmotivated. Or it can give me a fire to start checking things off the list and see what I can do! This morning I'm feeling the latter; motivated, excited, ready. The start of a new week also finds me eating better (because usually I have a treat night during the weekend and I need some recovery!), and that's why I want to share these delightful little bites of goodness with you today! If you're not familiar, a caprese salad is an Italian salad (meaning "Salad of Capri") and is traditionally made of sliced, fresh, sliced mozzarella, tomatoes and basil, and seasoned with salt and olive oil. I've made a version of this salad before; I just tossed everything into a bowl and mixed it up! It was a good salad, but you didn't always get enough of each flavour in every bite. Thumbs down. Anyway, while in Belgium this summer, we visited some family who served us bbq Bugles with a herbed cheese balls (surprisingly good!), aged cheese (obviously good!), prosciutto wrapped melon (super-surprisingly amazing!!!), and mini caprese kabobs. :) It was another food idea I knew I wanted to try when I got home. I had a little basil plant that was doing well, so I decided that instead of sprinkling dried basil on the kabobs (as we had on the ones we ate in Belgium), I would put an entire basil leaf onto each toothpick, ensuring a fantastic, unmistakable basil flavour. It was scrumptious! 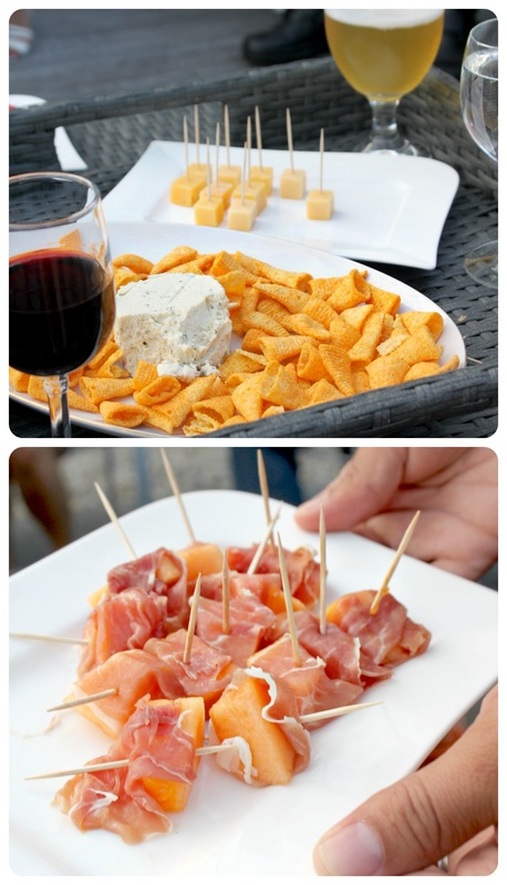 Some of the tasty and beautiful apps we enjoyed while visiting family in Belgium  Mini Caprese Kabobs For 15 Kabobs Ingredients:
Method:
You can basically eat these right away, but I prefer to make them ahead and let them sit in the oil and vinegar and get all the nice flavours together! 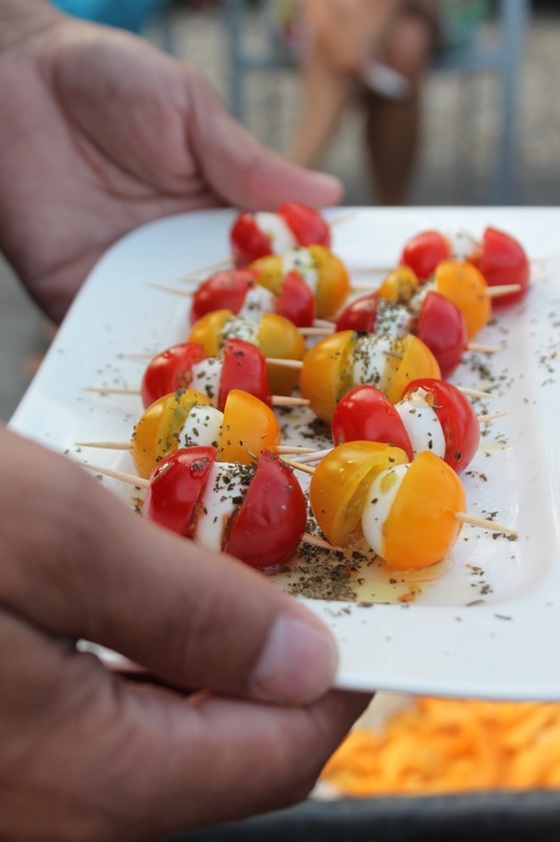 These are the beautiful caprese kabobs we had in Belgium 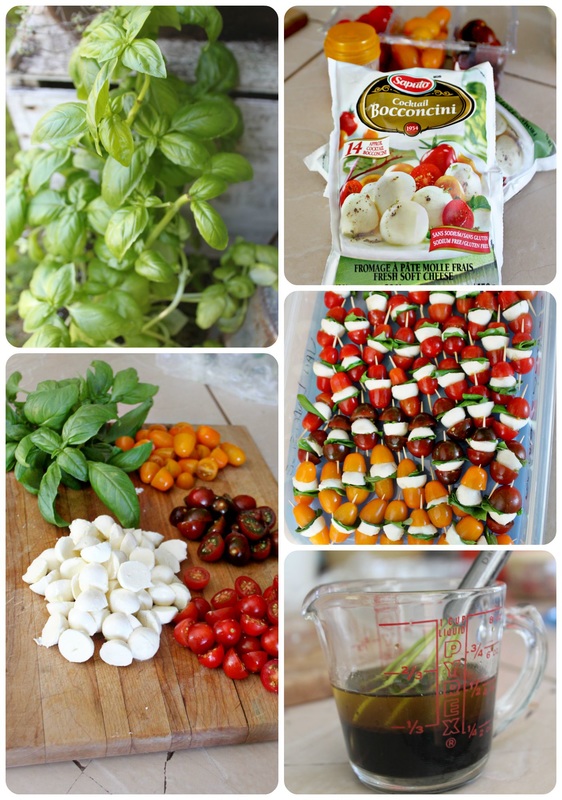 Such beautiful ingredients for these little gems! And that's that! Pretty simple "recipe". It's really hardly a recipe at all, just a basic outline to get you going! Use more or less oil & vinegar if you want. Skip the vinegar all together and make it more traditional and Italian by using only olive oil, or slice larger bocconcini and tomatoes, and serve with fresh basil, as pictured below. You can use multi-coloured cherry tomatoes as I did here (so pretty). 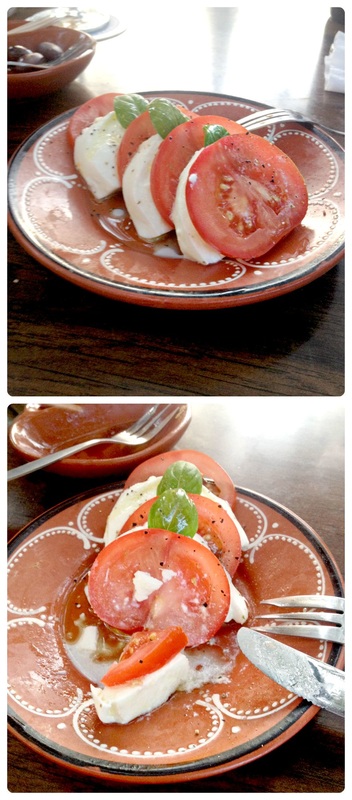 This is another caprese salad I had in Breda, The Netherlands One last note about these lovely kabobs: they keep well! They can get a little uglier as times goes by because of the balsamic vinegar, but, kept in an airtight container in the fridge, and they'll be good for up to 5 days. My husband really enjoys taking these to work, and they are great to add as a side to a dinner that needs more colour. For dinner one night I had a big plate with coleslaw, a broccoli salad, and about 6 of these. It was perfect. Well, have a great Monday! Oh, it's the first official day of fall too, so after you're done making this hilariously summer salad, make something more fall-ish with apples or pumpkins too! :)
2 Comments
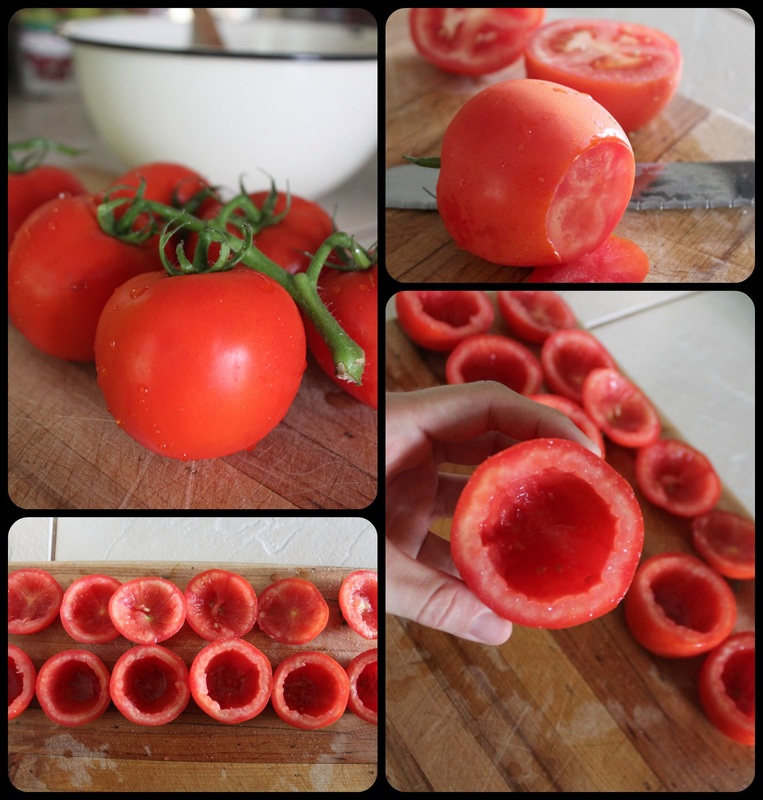
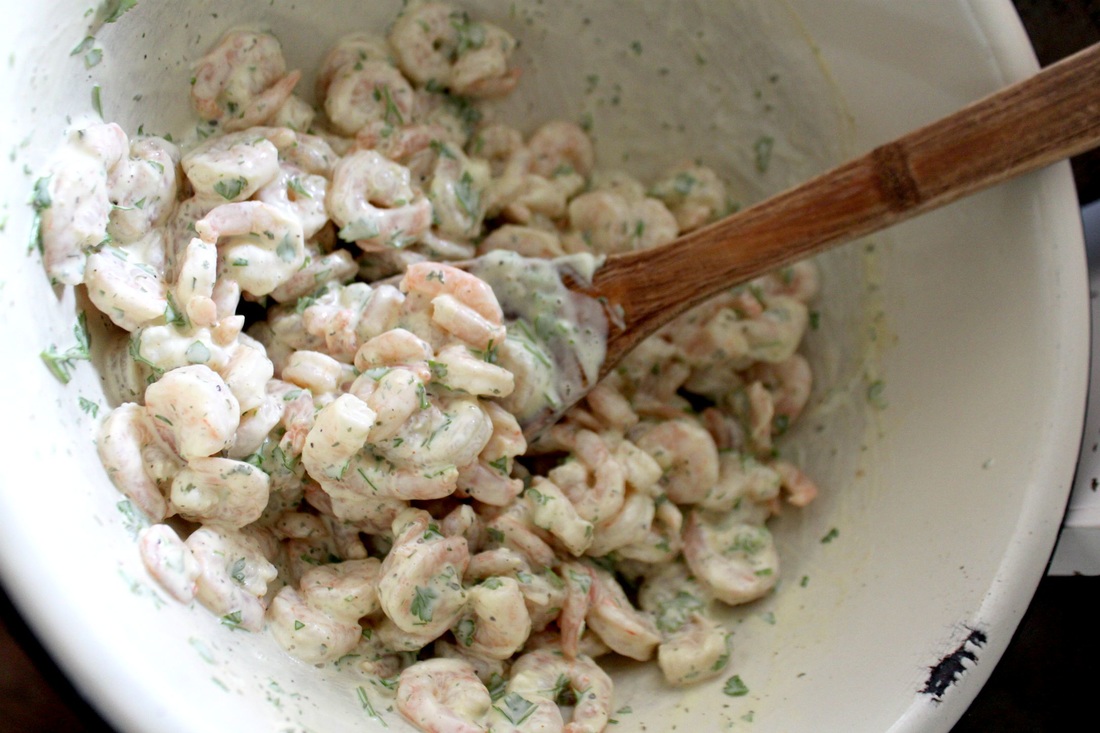
Yes....National. Guacamole. Day. There is honestly a national day for everything! In September alone there is over 100 "national days" including national blueberry popsicle day, talk like a pirate day, and the one I'm most sad to have missed....national lazy Mom's day (p.s, it's the first Friday in September. Mark it in your calendar for next year) :) Anywho, to celebrate this ridiculous national day, I wanted to share some wonderful recipe for guacamole! All listed are paleo, but that doesn't mean they aren't suited for any/everyone! They are all made with simple ingredients, and don't contain any sour cream, mayo, or anything else that has no place in guacamole!!! 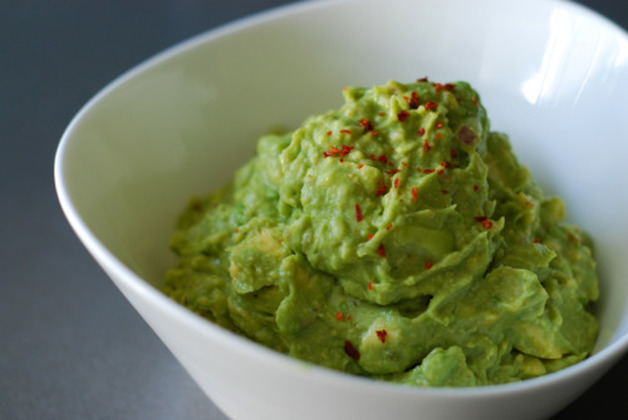 Let's start with a classic, basic guacamole. Michelle over at Nom Nom Paleo has this super simple, but not lacking in yumminess version. Simple. Yummy. The End. Find the recipe right here. 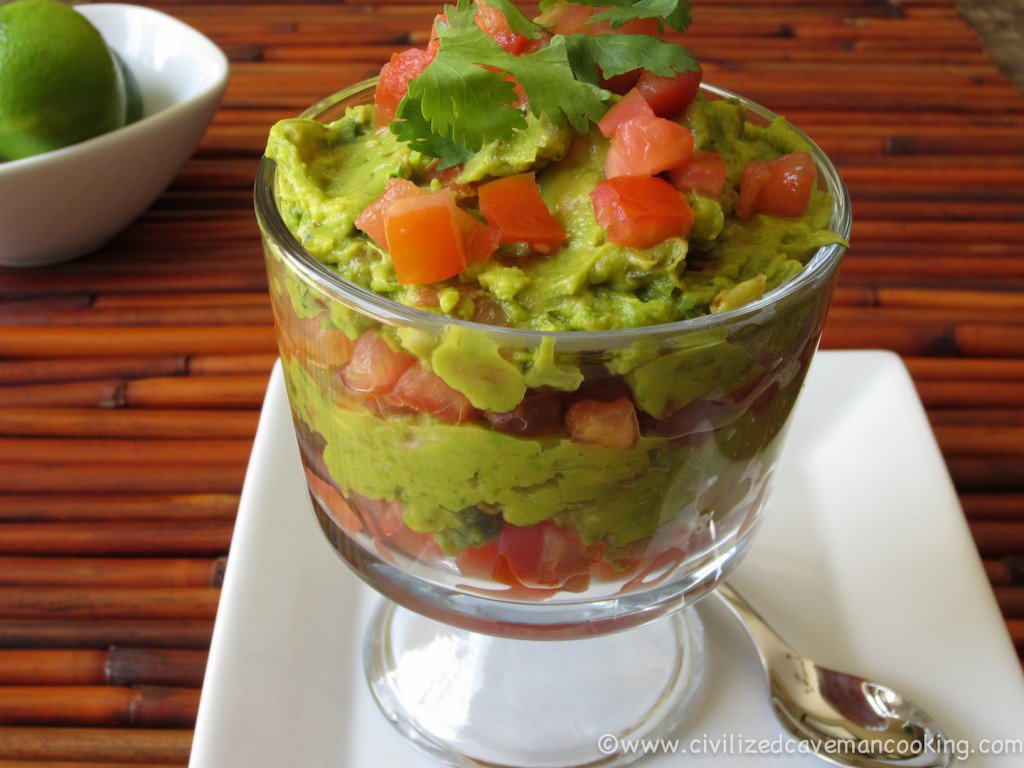 Mango Guacamole? Yup! George at The Civilized Caveman has created such an amazing guacamole, it'll make your taste buds sing a hallelujah chorus! :) Visit George and find the recipe here. 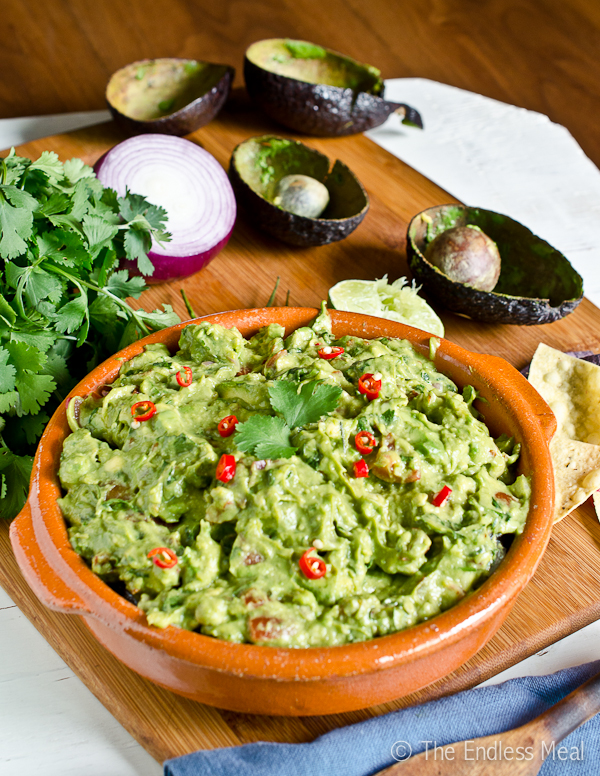 If you're into the fantastic, smoky flavour of chipotle peppers, then you'll love this guacamole recipe from Kristen over at The Endless Meal! Find her recipe here. 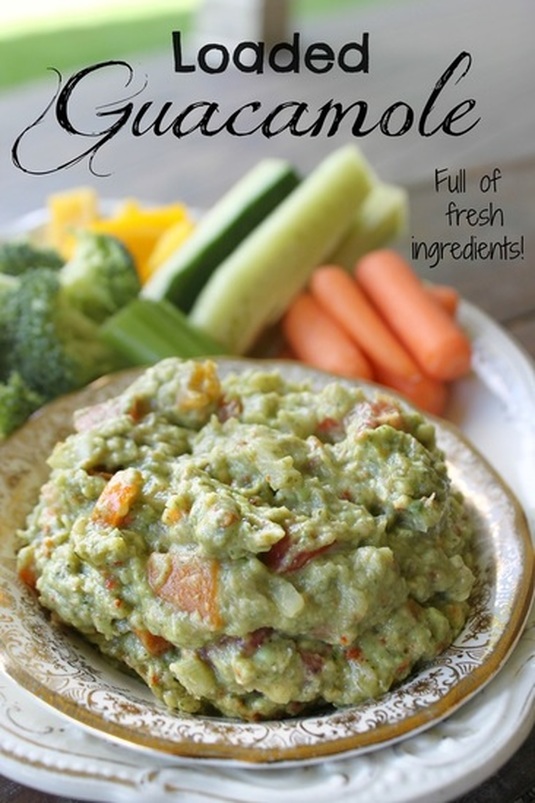 Well now, what kind of whacko would I be if I didn't include my own version of this amazing food! I like mine loaded with veggies to have lots of texture. You can find my loaded guacamole recipe here. 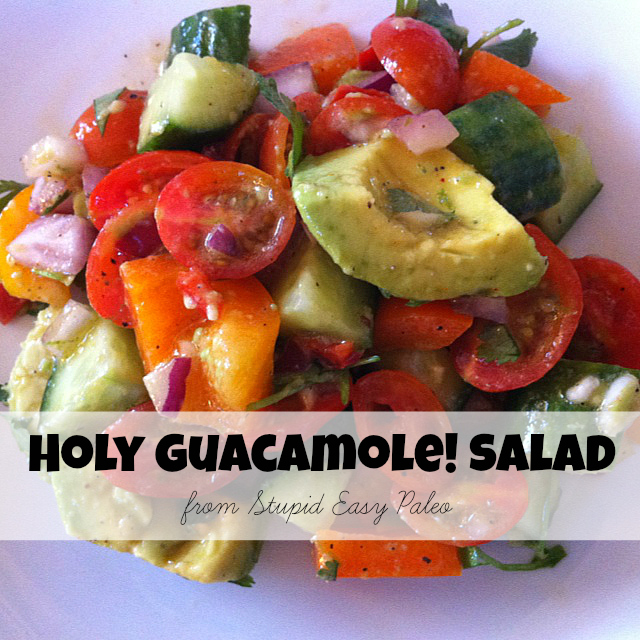 Now, this guacamole is even more loaded than mine! This really is more of a salad (um...as the name of it clearly points out), and I think if you're determined to eat your guacamole with chips (instead of with veggies or on meats or a salad), you should make this kind! You'll feel a smidge better about the chips you devoured knowing they were paired with this veggie loaded guacamole salad! :) Steph at Stupid Easy Paleo tweaked the recipe from an episode of The Barefoot Contessa, and I think you'll love it. Find it here. 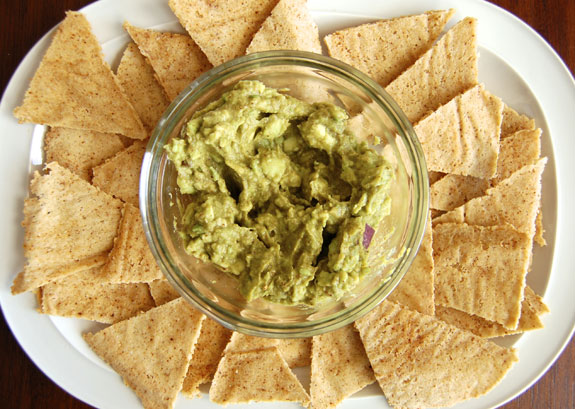 Speaking of chips.......what if I told you that you could make some paleo chips for your dipping pleasure? Well, I'm telling you, you can! :) Rebecca at Paleo Grubs has created a delightful chip to accompany any guacamole you fancy. Find the recipe for the chips here. And that, my friends, is some of the many ways to make guacamole! Now, how you decide to eat it is up to you! With chips, veggies, as a topping for meats, as a mayo of sorts for building a (egg, potato, chicken, tuna, etc.) salad. Avocados are a true example of how one should not judge a book by it's cover....or a fruit by it's skin. My kids remind me all the time how ugly avocados are, and I remind them how gosh-darned tasty and healthy they are! So, enjoy National Guacamole Day and embrace this wonderful health food! In August we visited Belgium, France, and The Netherlands (it was awesome!!!). When we first got to Belgium we visited with family who were so kind and gracious, and welcoming and wonderful! We were fed a beautiful meal, had coffee and cakes...yes, cakeS, 2 cakes to be exact! Kindred spirits! :) Anywho, one thing we were fed for dinner was shrimp stuffed tomatoes. We were all "oooh", and "awwwww!", but apparently it's a common dish in Belgium, "tomate aux crevettes" ! It is a very simple dish of hollowed out tomatoes, stuffed with shrimp that has been mixed with mayonnaise and parsley, salt & pepper. So, it's a simple, and great (perfect, really) make-ahead meal! Honestly, they were so darned tasty, I couldn't believe how simple they were to make! I knew when I got home, I was going to make this! And this is coming from someone who didn't really like shrimp until a few years ago, and still rarely eats them! I am also someone who never eats tomato unless it's with a million other yummy veggies in a salad, or on a sandwich.....as a BLT! A few things though......they use "grey shrimp", or "grijze garnalen" in Flemish (otherwise known as Dutch....it's the same language, we found out!), and finding grey shrimp here in Canada (well, at the grocery stores I shop at!) is impossible! So, I settled for the smallest shrimp I could get. If you can find grey shrimp, use them, if not, just find a nice, small, cooked shrimp. The other problem was that I wanted these to be paleo friendly....so I needed to tackle the mayo! If you Google "paleo mayonnaise" you'll get a pile of results. I decided on a mayo from Paleoleap.com. You can find it by clicking here. You can also just use regular mayonnaise if you're not paleo/primal! 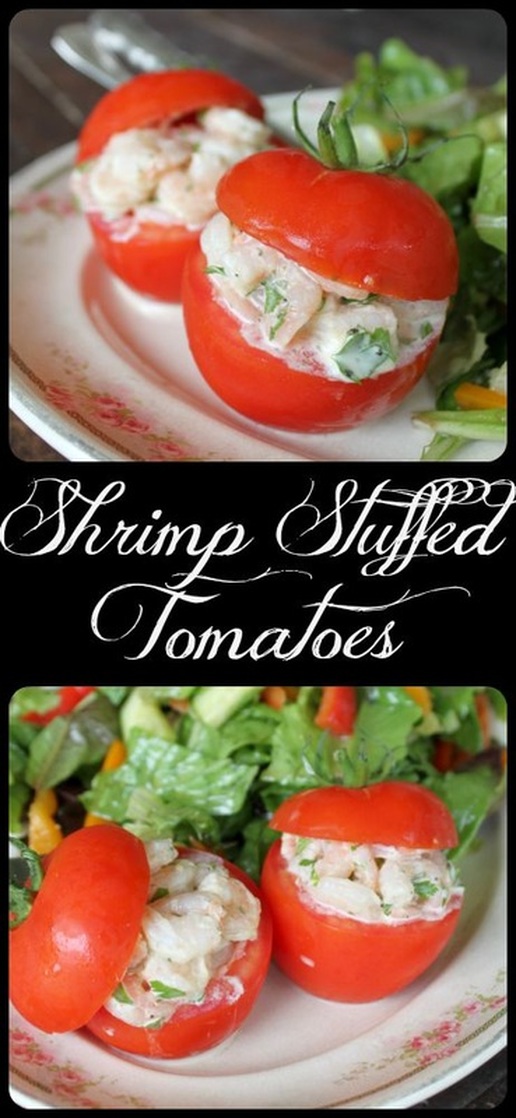 Tomate Aux Crevettes (Shrimp Stuffed Tomatoes) Ingredients:
Method:
  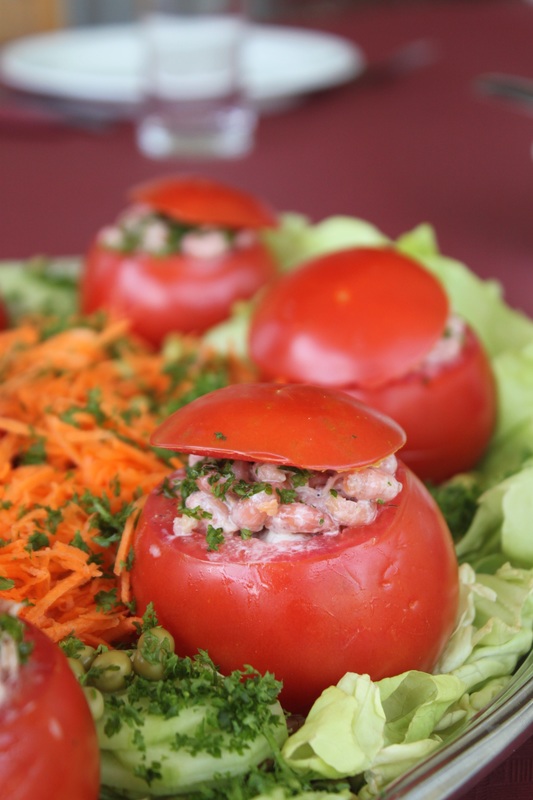 These are the "original" shrimp stuffed tomatoes that we had our first day in Belgium! My European family soon realized how much I love food, but more than that, they realized how much I love to photograph food!! Seriously, I was so exhausted, but as soon as our hostess started bringing out food, I had to grab my camera! Her presentation of the tomate aux crevettes, was on a big platter that was covered in washed, cut & ready to eat romaine, sliced cucumber, shredded carrots, peas, and more chopped parsley. Beautiful. 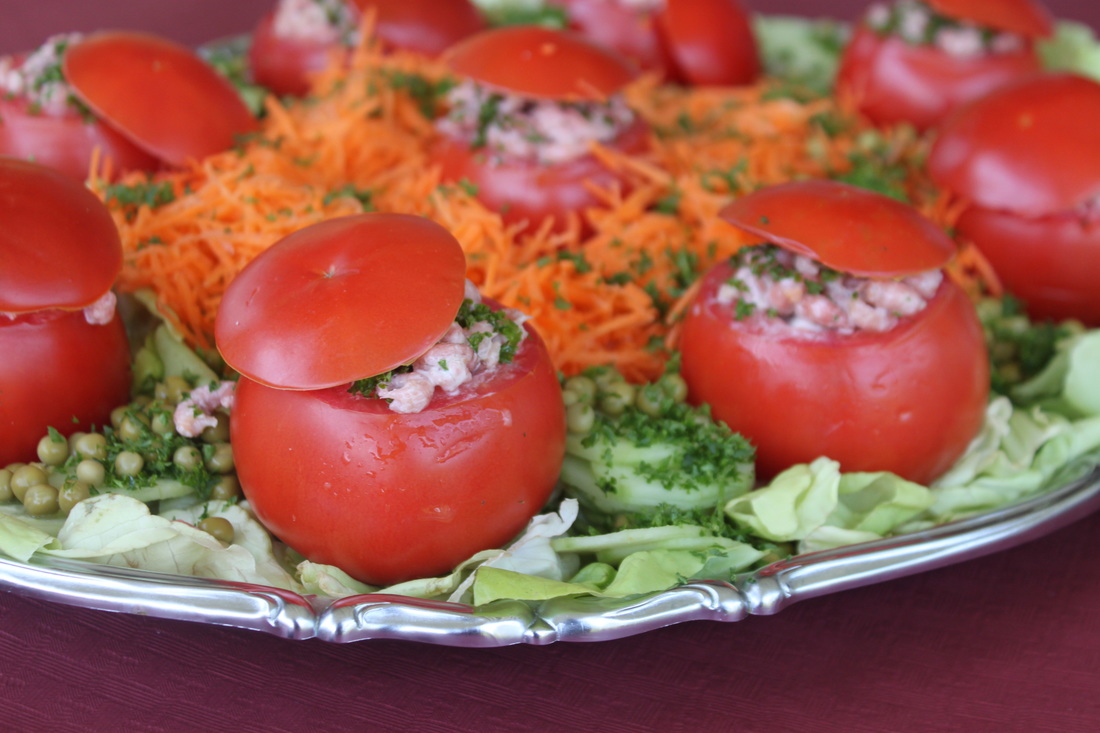 I forgot to mention about these European kindred spirits and their 2 cakes they served us...they also served them before dinner! My kind of meal! :) I will hopefully be sharing the cake recipes soon....or at least one of the recipes...we'll see.
So, Monday folk, have a great Monday! I hope (if you didn't have to work during the weekend!) that you are rested and ready for this week! Any special plans? I'll still be chugging away at projects for the upcoming Culture Days event. I'll be part of the Theatre Artists event and (if you live close) you could come downtown Belleville and find me (and other artists from the Theatre Guild) set up next to the library on Saturday, September 26th from 10-3. There will be paintings, pottery, knitting, felting, rug-hooking, jewelry, crafts and baking and you can take a tour of the theatre too! I'm pretty excited about it! Farewell! First day of school, first day of school!!!!! I am excited for the kids because they are so excited, but truthfully, I will miss having them around. I really saw them grow up this summer, and so it feels sad watching them drive away on their bus and knowing that the things they are going to learn now will be mostly without me. My kids are gone for 7 hours total, and are only home (and awake) for 4 1/2 hours. That's a small window to feel like I can be a strong influence in their lives. Anyway, I'm just lamenting and sharing my heart a little. Anyway, what I'm sharing today is nothing new, but I still wanted to put it out there. The "salad in a jar" phenomenon is pretty awesome (I think). Basically, it's a way to pre-make great, healthy salads that you can just grab and take with you to your job or school. I've made these for camping trips, for day trips we've taken, and smaller versions for Caleb when we're going somewhere and I need to pack him some gluten-free & Caleb approved meals. I'll often only eat a big salad for dinner, so I've made these when I'm prepping veggies for a meal, and can think to the next day or so and know that I would rather have my salad ready ahead of time in order to save time the day-of. 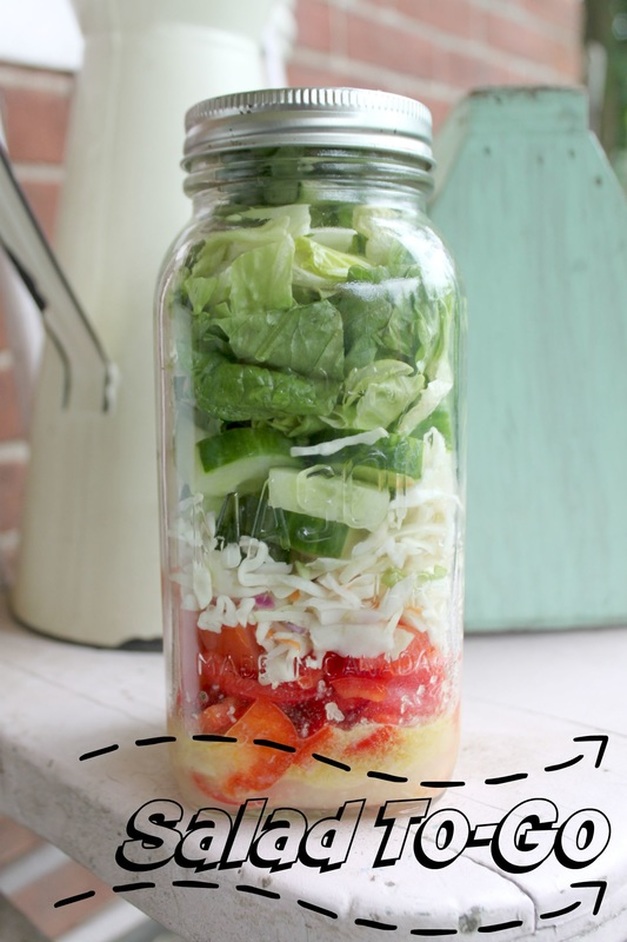 So, there is no "recipe" per-se for this! But the secret to this actually working is all in the layering. So, here are the basic rules when assembling a salad in a jar.
 So, a few points to remember:
Sometimes I make my salad in a jar, but have the meat or hardboiled eggs in a separate container because I want as many veggies as possible in the jar. Then when I'm going to eat the salad, I dump it out of the jar, then put the meat or eggs on top (as you see in the photo above) Really, it's up to you! My salads are often just anything I have in the fridge, and other times I make specific recipes, like the ones at Lexi's Clean Kitchen. Some of her ideas include pesto chicken anti-pasto jar, and a cajun shrimp jar. Yumm-o! Go check those and her other ideas out! Well, I hope everyone had a great long weekend. We did here! Saturday we had a friend over for dinner and a bon-fire, Sunday we went to a pig roast at the home of an amazing family here in Tweed, and yesterday we went to a carnival Adam's work (Goodyear in Napanee) put on. Honestly, I'm not just saying this because my husband works there, but they put on a great family event. There was a ton of stuff to do! There were rides, a climbing wall, face painting, sparkly tattoos, balloon animals, bouncy castles, tie-dye a t-shirt, pony rides, and wonderful food! Lots of it! And they had porta-potties in different locations so that you were never too far from a toilet. They also had big troughs filled with ice and water bottles and juice boxes. It was a crazy hot day, but we all stayed well hydrated! Seriously, it is really well done, and a lot of fun. It was literally the perfect end to the summer!  Well, I know it's still summer and the fall hasn't officially begun, but the start of the school year really begins a new season. The new season for Bushel & A Peck will hopefully include a health & fitness element (as I said it would....way back in June!). I want to include weekly meal ideas, workouts, and my views on different health and fitness trends. So cheers to seasons past and to seasons to come! Well, it's felt like a long week, and a long week calls for a sweet treat! I should really post something fresh, seasonal, Ontarian (something with peaces, of course!)....but I won't. There are no rules here, I have no blog boss! :) In April 2014 I posted a recipe for Mini Meringue Nests; they are tasty, have simple ingredients, and make an impressive and light dessert 'bowl' for fruit, pudding, whipped cream, yadda yadda. Fast forward to now, and I'm eating mostly paleo (about 80-90% of the time), and I only give myself 1 (or 2) treat days a week. So, when we had friends coming over on a non-treat day, I wasn't about to not make a super-fantastic, summer dessert! Gosh no! Luckily the friends we had over love sweets, so they are good guinea pigs (thanks Val!) :) I made my crazy delicious Honey Mustard & Rosemary Chicken (in a pan on the bbq), roasted potatoes, obviously also on the bbq, and a green, leafy salad...maybe a coleslaw too...? Can't remember, doesn't matter! What does matter is dessert (really, the most important part of any meal!). I took my regular, non-paleo mini meringue nests, and gave them a simple switch over to create such a treat; such a lovely, delicate, slightly sticky, oh-so-good treat. Yummy! :) 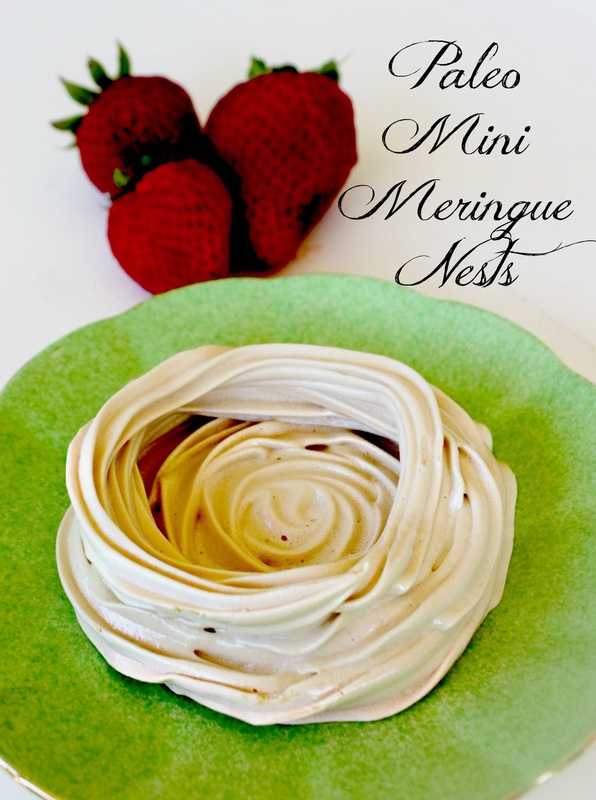 Paleo Mini Meringue Nests Ingredients:
Method:
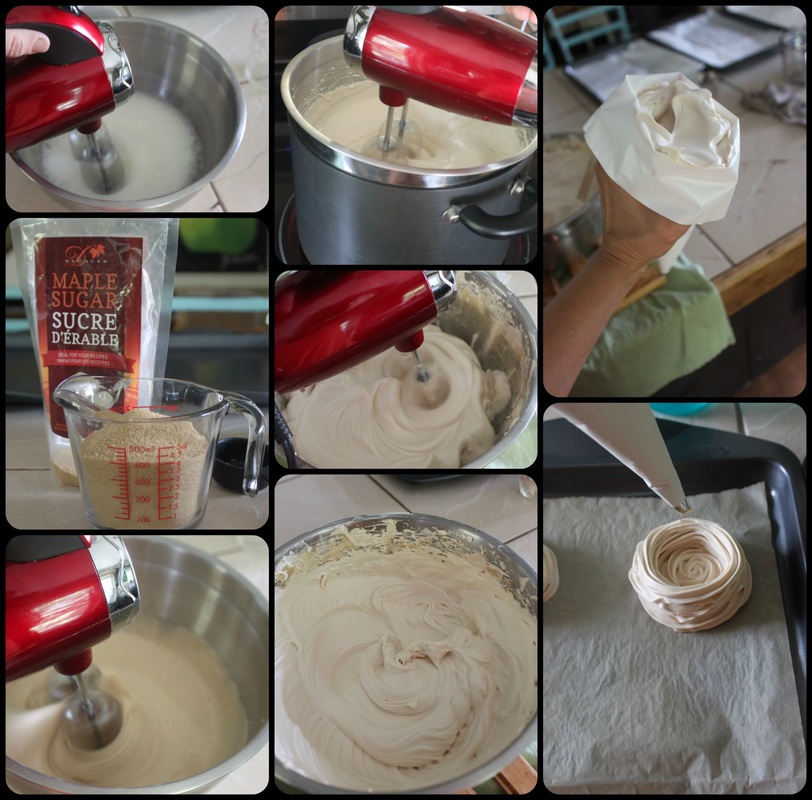 Here is the process! Whip the egg whites, add the sugar, whip it up more, put over simmering water until sugar is dissolved, remove from heat and whip until stiff! Fill a piping bag, and make your nests!  The paleo pudding I served with the nests So, full disclaimer....if you use maple sugar, your tastes buds will be singing a hallelujah chorus!!! :) It is such a maple-y marvel! The coconut sugar lends a darker, more molasses-y taste; just as yummy, just a different kind of yummy. I also found that (no matter how many batches I tried), these didn't stay as dry as regular meringue. I think it's the sugar difference. I tried switching between the two sugars and the starches, but after about 5 minutes out of the oven the meringues nests got a little sticky. lets be honest, that is not a big deal at all, but I wanted to put that out there so if anyone else had this problem you would know I had it too! My solution was to keep the meringue nests in the oven until it was nearly serving time, then I turned the oven back on to it's lowest temperature, and let the nests re-dry slightly. I turned the oven back-off after it had reached temperature, and left them in the oven for dessert, and we just grabbed the nests out of the oven as we wanted them. We filled the nests with this paleo chocolate pudding, fruit, and whipped cream. It. Was. Good. x 1000. 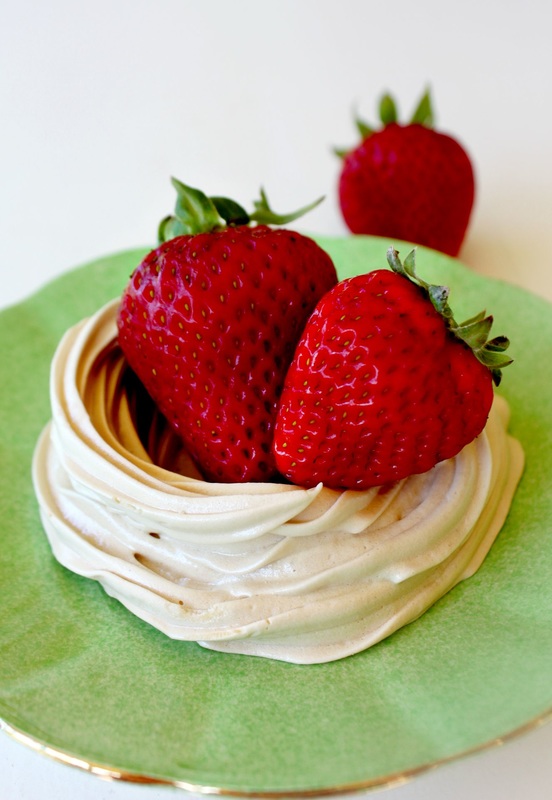 I cannot believe that school starts next Tuesday.....I feel (honestly) sad about it; the kids and I have had a great summer (.....maybe because 15 days of the summer I was away from them in Europe, giving me ample time to miss all the sweet things they do, and forget all the irritating things they do! Therefore resetting my child-patience gauge!) :) Haha, whomp, whomp!
The kids are really excited about school starting, and I am looking forward to some time alone in the house getting paintings and different projects ready for an Art Show I am doing at the end of September for Belleville's Culture Days (I'll be downtown on Saturday, September the 26th next to the Library!). I'm signing off now. I meant to post this in the morning, and it's now 7:54 p.m....so, I missed the mark by a smidge.....still, it's summer yet, and I am enjoying the lazy version of life! I was literally sitting on the couch with the kids, watching a pre-bedtime movie, and one of them said, "is today the weekend?", and I said, "nope, not yet, it's only Friday", and that reminded me that it was Friday, and that I had this post (mostly) ready to go! Golly. Well, hopefully next week I'll share some recipes with peaches in them! Have a good Labour Day weekend fellow Canadians! xoxo We're back! It's been 16 days of being away, but we've made it back safe and sound! We landed in Amsterdam on August 2nd, then travelled to Haaltert, Belgium where we spent a week visiting Adam's family, and also visiting Brussels, and many of the cities around the western side of the country. After that, we headed south where we spent 2 days in paris, France. Oh boy, that's a story! I'll get to it eventually, but not right now! After those 2 days, we travelled north, stopping again in Belgium, in a place called "Londerzele". Look familiar? It's where my husband and his family (the Van Londersele's) are named after. "Van" in a lot of European names means "of", or "from", so our last name is "from Londerzele". Anywho, we continued on our journey, going to the place where my Dad was born and spent the first 7 years of his life. A lovely place called Breda, in The Netherlands. We spent the day there visiting my family, then headed more north/west toward Rotterdam (for 1 night and day), then Haarlem (for one night and day), and finally ending in Amsterdam for 3 nights and 3 days! I took a lot of photos....a LOT! I plan to share many of the photos in the next few weeks (or months), as I share recipes from the places I visited. I also ate a lot of different foods! I had chocolate everywhere I went (big surprise there, right?). I had kaas (cheese), croquettes (a small breadcrumbed fried food roll containing, usually as a main ingredient, mashed potatoes), saucijzenbroodje (sausage rolls) & stroopwaffle (thin waffles with a syrup filling) in The Netherlands. Crepes, baguettes and croissants in France, and frieten (fries-NOT french fries), waterzooi (a fish or chicken stew), crevette grise (little, tiny shrimps), and, of course, waffles in Belgium! Belgium is famous for mussels too, but I couldn't go there, I'm not into mussels. I did try some nice Belgian beers though (they sure do like their beer!), which I don't generally enjoy, but I did find a few that I quite liked. Anyway, back to waffles!!! The recipe today is for a simple gluten-free waffle, which, incidentally, more closely resembles a real Belgian waffle in taste and texture than our very Canadian or American version. Over on this side of the pond, our waffles are very light, fluffy, and barely coloured (not browned too much). Oh, and we drown our waffles in syrup! In Europe, waffles aren't even really a breakfast food at all. They are served in restaurants, but mostly by street vendors and small shops. Also, in Belgium.....get ready for this....there are no "Belgian Waffles". That made me laugh! There are two main types of waffles, the Brussels waffle, and the Liege waffle. The really, really, really simplified way to distinguish the 2 waffles is that Liege waffles are made with a thicker batter that is similar to bread dough, and they have uneven edges. Pearl sugar is mixed in with the dough, which caramelizes when the waffle is cooked. Ya, I know....drool! The Brussels waffles are made with a yeast-leavened batter, which makes them lighter and crispier. They are rectangular with defined edges, and they also have deeper pockets or holes. So, my waffles are North American is shape and size today, but they are more Belgian in texture. It's the love child of the two countries. Whomp whomp. I plan on getting my apron on and experimenting with my waffles to share with you both types of Belgian waffles very soon! But, for today, I share these. Alstublieft! ("here you go", or "if you please" in Dutch and Flemish....which, incidentally, is the same language) :) 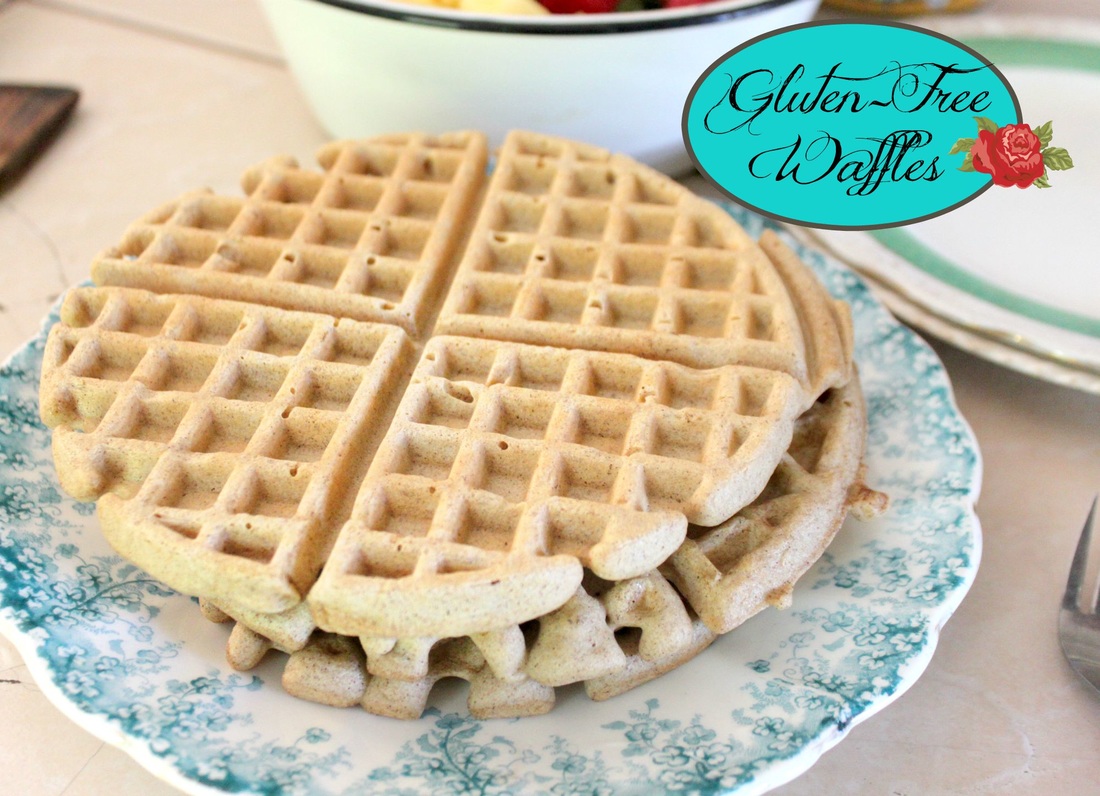 Gluten-Free Waffles Ingredients:
Method:
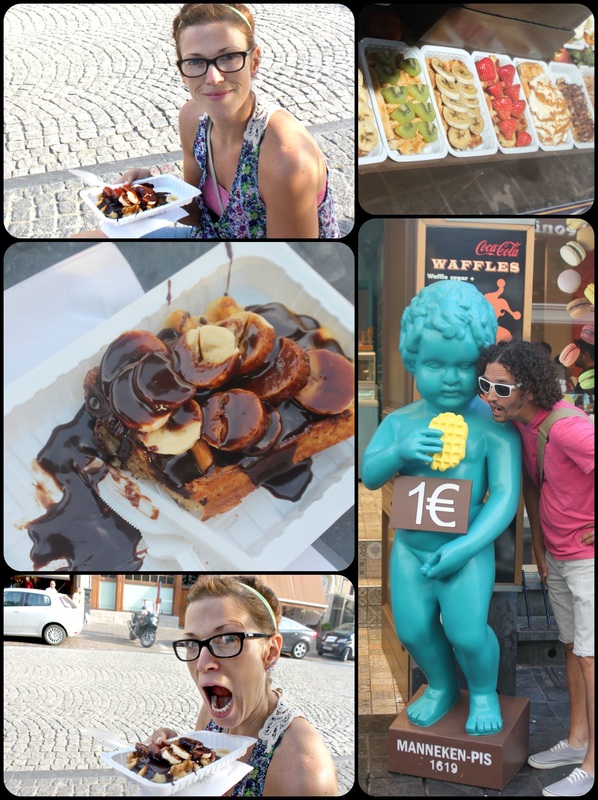 Eating a waffle in Ypres, Belgium. I chose a Liege waffle with banana and chocolate. Yummm-o! :) And you can see a window display of some of the waffle toppings available. Oh, and that's Adam with "Manneken Pis" (translation: "little man pee"), a famous statue in Brussels. The real statue is actually only about 2ft tall. And it isn't teal.  Caleb and Keziah eating their waffles. We generally eat ours as dinner with syrup, bacon and fruit.
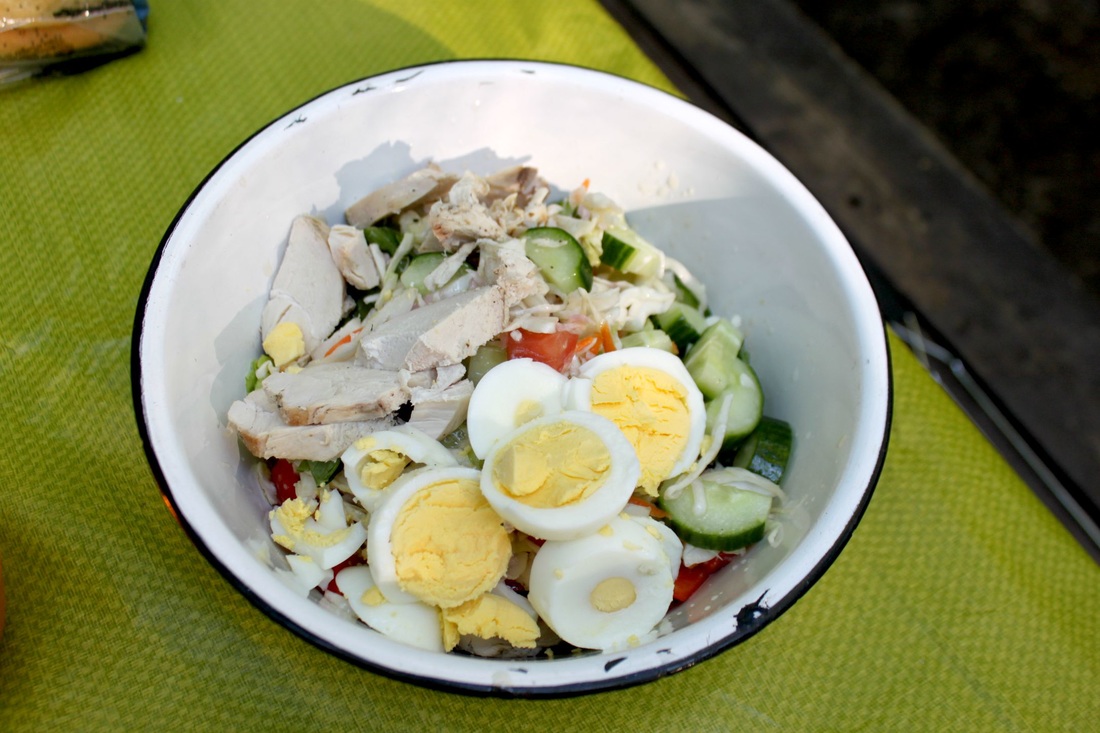
I'm glad to be back! Travelling was really fun, meeting family in Europe was wonderful, walking between 10-20 kilometers a day was something I actually enjoyed! But being back to real life is my favourite. I love our house, and the farm. I like every day, there is beauty in it, though it's easier to see the beauty when you've been away for a time. Until next time, tot ziens ("so long")! Good Monday to ya! That's what my Mom says when she does her weekly Monday phone call. Well, actually, it's been a little patchy lately with summer being upon us, and schedules being off, but still, none the less, good Monday to ya! :) I have a fantastic, simple, and versatile recipe for today! And it's loaded with veggies, good fats, & some chicken! What more could you want to recover from a summer weekend! Whomp whomp... :)  Chicken & Veggie Salad Ingredients: For the dressing:
For the Salad:
Method:
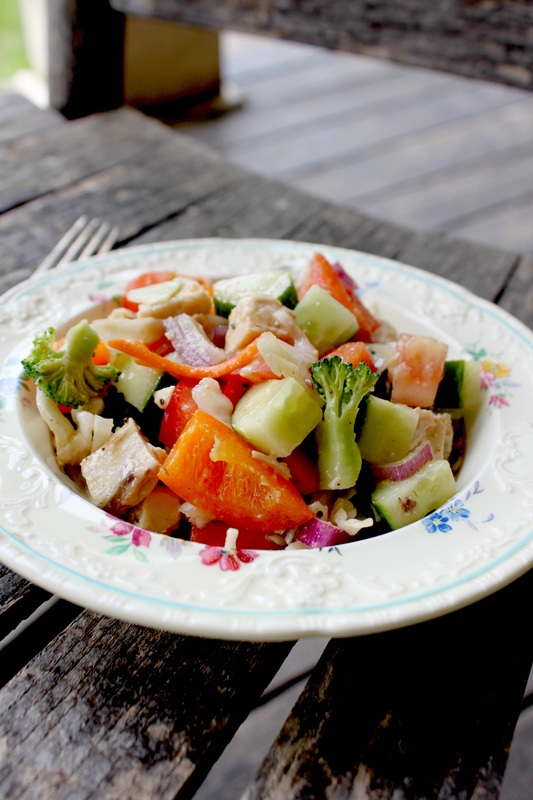 So simple, right? I told you so! I will sometimes just eat this beast of a salad as my dinner! Other times I'll divide it into 2, or 3 or 4 and use it to top a leafy salad for a few days. The choice is up to you! You could also make it to bring to a summer pot-luck! I always appreciate seeing a healthy option at a get-together! Well, I hope this inspires you to make yourself a happy, healthy salad this week! Why I describe it as happy is slightly mysterious, but I love salad, and it makes me happy to prepare it, and devour it, so, it's happy to me! Hope you had a great Monday; I had a lazy (x 10!) day-I did workout in the afternoon, but the rest of the day, well, I never got out of my p.j's except for that workout, so let that be your guide to my inspired day! :) I found this recipe on Pinterest from The Pinning Mama...well, actually, I found the picture, and never even looked at how to make it! It was honestly so strait forward from their lovely photos that I never bothered to look at the recipe until today, when I wanted to be sure to pass the credit onto who deserves it! So, my method and ingredients vary slightly from the original, but the results are still divine. If you're a strict paleo eater and don't consume any dairy, I would wrap a piece of tin foil over the top of this to bake, then uncover for the last 5-10 minutes to give the peppers a chance to brown up a little. 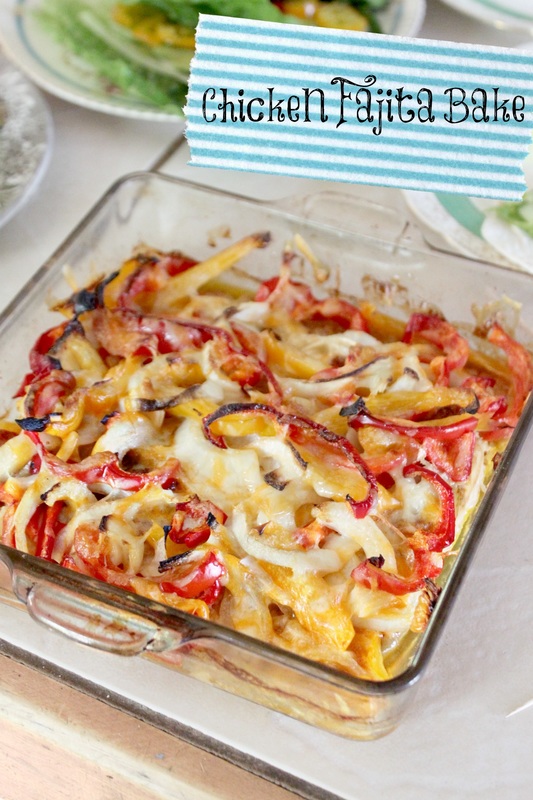 Chicken Fajita Bake Ingredients
Method:
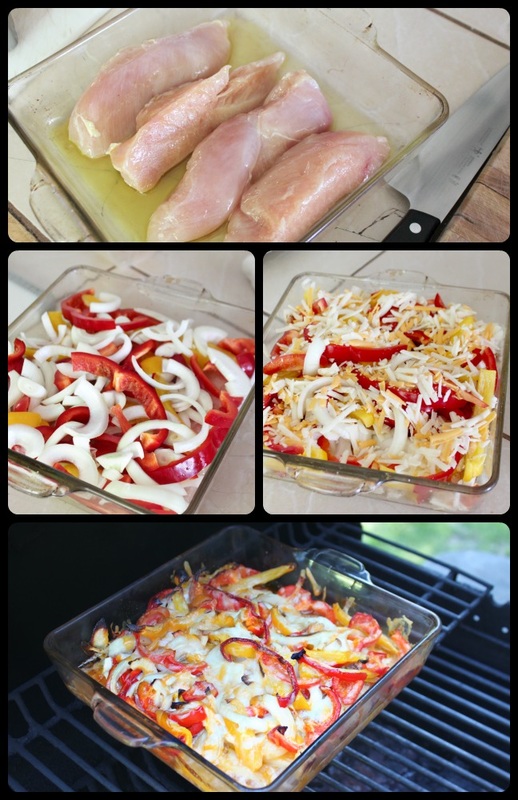 This recipe can easily be doubled, and is so simple to make. My kids, who can sometimes be fussy about when meals change ("this is very different from a taco!" my 6 year old announced) all enjoyed this. Hazaa! So, I've made it a bunch of times since then. I've used jalapeño peppers when I had them, diced a tomato onto it when I only had one pepper, more cheese, less cheese, etc. etc. Basically, this recipe is simple, easy to sub ingredients in and out, and also makes great leftovers. I once turned the leftovers into soup! Now that was deee-lish! :) 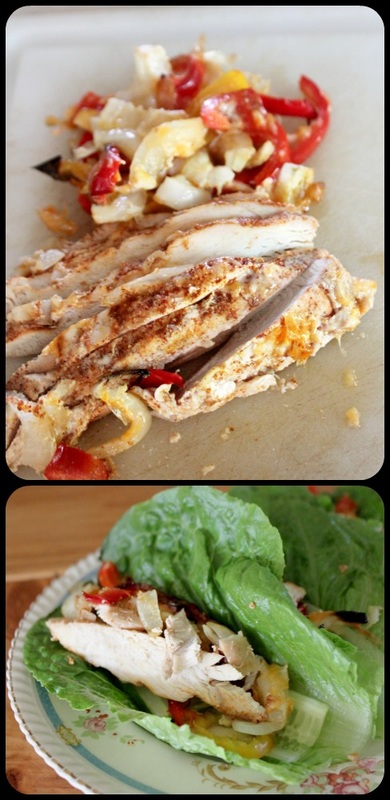 Well, tonight we have a paid preview for The Drowsy Chaperone, then opening night is Thursday! Yikerdoodles! If you live in the area, come to see it! It's funny, full of big song and dance numbers, and it is a Canadian show to boot (that can sometimes mean it might be terrible, but this gem went to Broadway and won a bunch of Tony awards!).
I've got no witty closing remarks....so, goodbye for now! :) I thought today was Monday..... Turns out its Tuesday and I'm loosing touch with reality! :) Adam was working all weekend, then yesterday (which was Monday, incidentally) we just got things done around the ol' homestead. So, anywho, today I bring to you a simple recipe for a paleo tortilla. We do a "Taco Tuesday" night every few weeks here, and I am always happy to just pile all my taco toppings onto a mountain of salad. We were low on the leafy stuff though one day, and I thought it might be nice to have an alternative to my usual taco salad and actually have a vessel to carry my taco goodness in. I started searching the web for some good recipes, and they all had either cauliflower which I didn't feel like cooking, mashing and draining, or coconut milk, which I was out of, or one million eggs to make up for the crazy amount of coconut flour used (coconut flour is very absorbent!). Simple is my main objective in the majority of my recipes, so I just thought, "well, these will only be for me (we had regular, gluten free taco shells for the rest of the family), so I don't need to make a million of them, I'll just aim for 2-3!". And I set off on the task! The result was a simple, 3 ingredient tortilla that was bendy, but strong, and was totally satisfying! 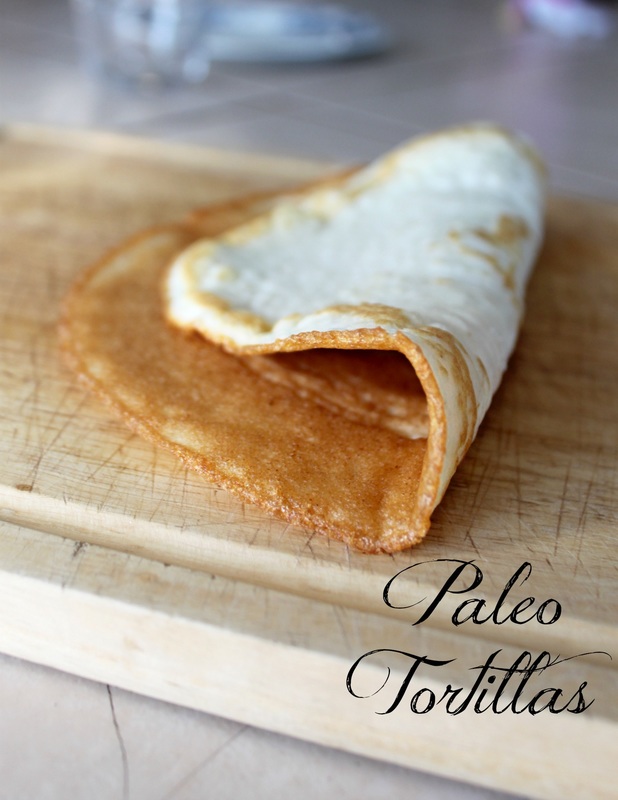 Paleo Tortilla Ingredients:
Method:
 That's it! I've made these a few times for a few different purposes. Once I added cinnamon to the batter, then once they were cooked I spread some almond butter in one of them, and rolled it around a banana! It was a great snack!
I've also added cayenne pepper to the batter, then I wrapped up diced leftover chicken, avocado, tomato, & onion. Yum! So, these are a blank canvas, really! Use them as you please! Have a great Tuesday! We've got a lot of ground beef....seriously, too much ground beef! we ordered food last year (in April) from a food company, and you "shop" and pick what you want, and then they deliver it in one fell-swoop! We had to emergency buy another deep freezer to accommodate the volume of meat that showed up at our house! The sales man (although super nice) had clearly not estimated properly when he told us the deep freeze we already had would be sufficient for all the meat we had coming. Anywho.....all that to say we still (over a year later!) have about 30-lbs of ground beef left! And that's with us eating at least 1-lb of it every week! Needless to say, coming up with ground beef recipes that are different and worth eating was getting difficult! Then Caleb (who loves cheeseburgers!) mentioned something about this beloved food, but we had no gluten free hamburger buns, so I told him I wasn't going to make burgers. Then it hit me! I have the beef, eggs, bacon, pickles and onions I would normally add to a cheeseburger-I didn't see why making it into one huge casserole wouldn't work! Well, unless, of course, the kids wouldn't eat it because it looked like garbage....so, I included the best part of a burger-the cheese! If you're strict paleo, omit the cheese, and this is still a fantastic recipe! If you eat primal (and can tolerate cheese)-then get your cheese on! Eww, that sounded way more gross than it was meant to....... The casserole is gluten free, full of bacon cheeseburger flavours, and the leftovers are the best! My husband loves it packed in his lunch. Thumbs up! 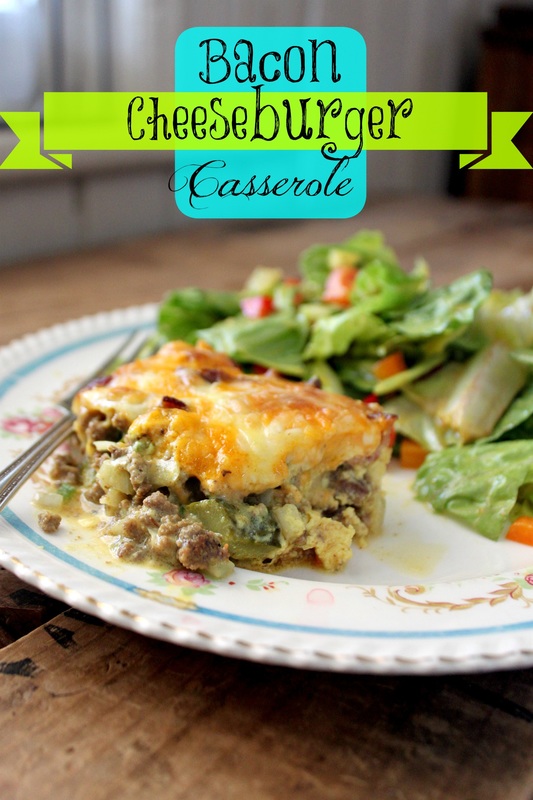 Bacon Cheeseburger Casserole Ingredients:
Method:
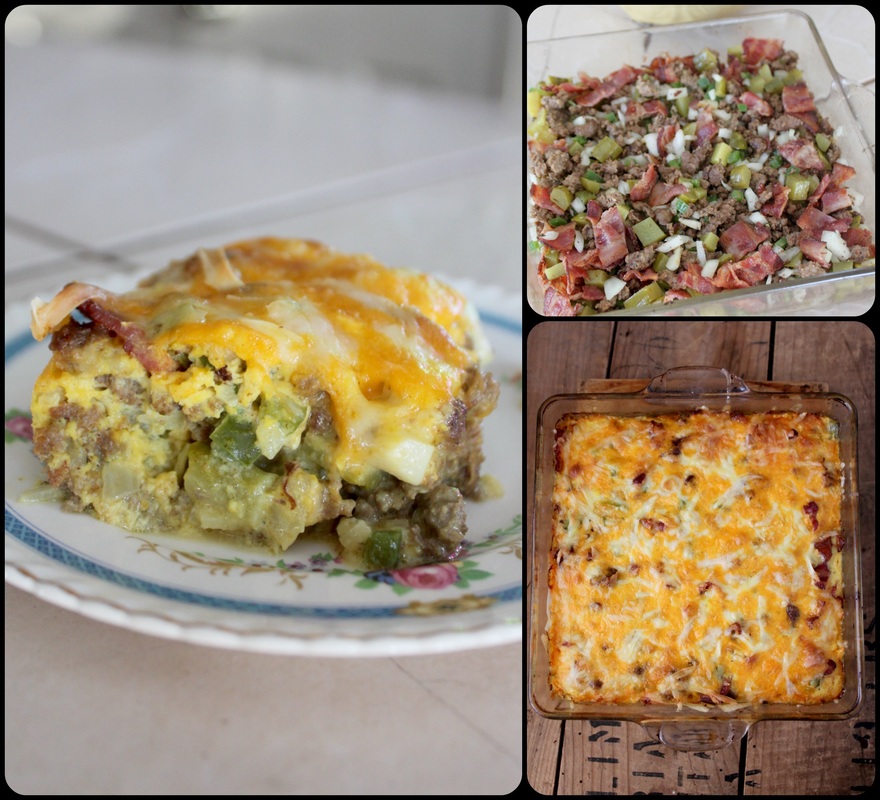 My kids honest to goodness love this casserole! They think I'm brilliant for making such a fantastic mess of a cheeseburger!
Every part of it is so bacon cheeseburgery and delicious! I had wanted to add tomato too, but decided against it as I didn't want this to turn out too wet, so I added slices of it on top before I ate mine. The next time we had it I put it right on top of my salad, added tomato, avocado, and hot banana pepper rings and ate it with the salad (I like lettuce on my burgers, so I figured it would be ok)! It was really good, two thumbs up! Well folks, I'm signing off! I've got to get baking my usual Friday night rehearsal treats, and I want to get out and clean one of my gardens that I've been neglecting! I hope everyone has a grand weekend (it's Victoria Day weekend {the early Queen's birthday celebration| here in Canada!), and I also hope that you come back here soon to see what else I've got cooked up! :) xo |
Hi, I'm Amy-Lyn! 
I am the lady behind this here blog! I live in the sticks with my animals, my super handsome husband, and my
3 amazing kids! Here you'll find things from recipes (gluten-free, paleo, and strait up junk food!), DIY ideas, thoughts on raising a son with autism, and whatever else pops into my brain! : ) Read more about me by clicking here! Want to Stay Connected?
Find What
|
 RSS Feed


