|
Background info: I saw a beautiful recipe on Pinterest from Iowa Girl Eats. It's a pretty simple recipe for Spicy Shrimp & Sausage Skewers. I loved how it sounded, so I was going to make it! I had the shrimp ready, the sausage thawed, skewers soaked and ready....then I was like, "huh....I don't feel like bbq-ing because it's cold and rainy.....", so then I was like, "I guess I could make the skewers and just fry them up in a pan...", then I was like, "If I'm just going to fry these in a pan, why the heck would I take the time to put them onto skewers....?" Oh, the other problem was how small my shrimp were (they were shrimpy, haha, get it?). I couldn't find (or afford!) the really big shrimp that would have made these pretty (which is an important element to me in my meals!), so I was just going to alternate between shrimp & sausage instead of making them look amazing by having the sausage piece tucked into the shrimp (go check out the recipe at Iowa Girl Eats to understand what I'm saying!). Anywhooooooo..... I really added a dash of lazy to this recipe, but I loved how the salad turned out anyway! It still tasted great, and was a real filler! Because I was originally going to eat a salad and have the skewers to the side but on the same plate, (not on top), I wasn't concerned about the dressing for my salad. But once I decided I was going to cook everything and throw it onto my salad, I suddenly needed a perfect dressing for it! I sometimes get a little obsessed about the dressings of my salads being exactly right! When I eat sausage I enjoy it with plain old mustard, so I wanted to create a very mustard-y dressing to go with it. My husband was extreeeeeeemely leery of a "mustard dressing", but he really enjoyed it because it was wonderful! It was sweet and tangy, you could taste the mustard which went really well with the sausage and the spicy shrimp! I also added some sour kraut to the salad....oh man, that was a perfect addition! Winner! 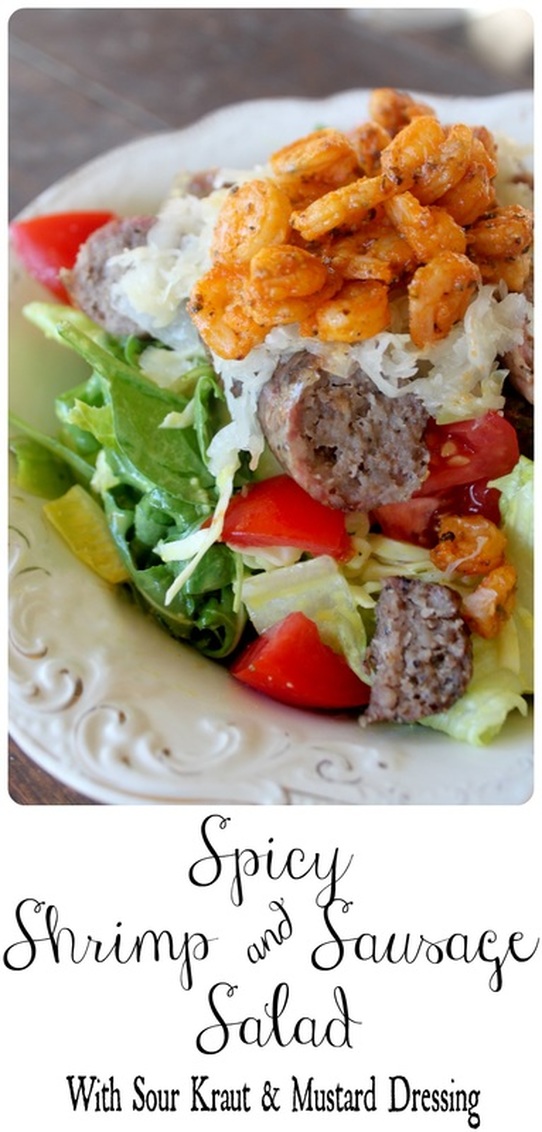 Spicy Shrimp & Sausage Salad and Mustard Dressing Makes 2 Huge Servings Ingredients:
For the Salad Dressing:
For the Salad:
Method:
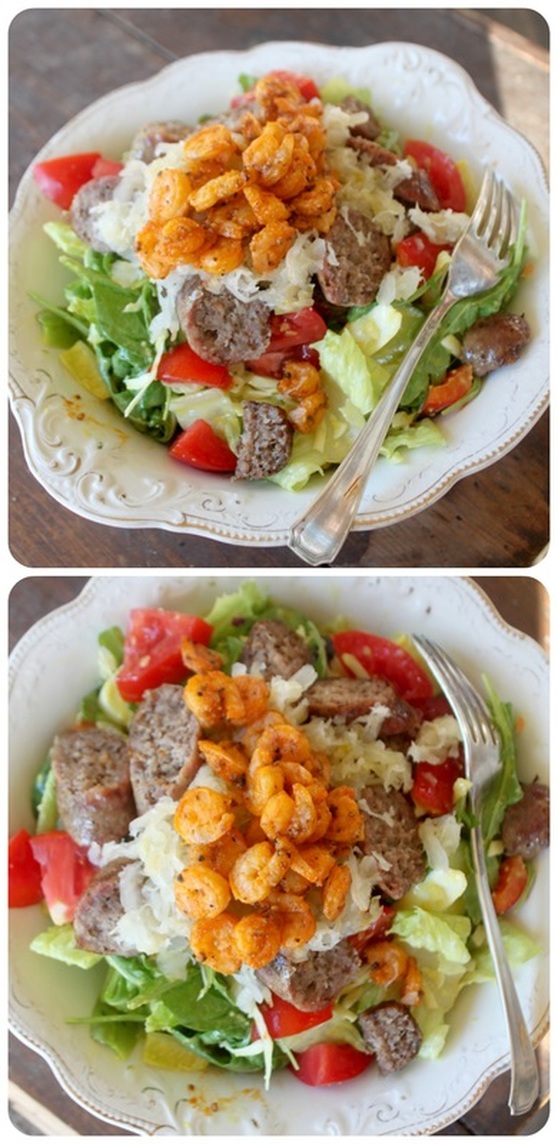 Honestly, this salad is soo good. I want to eat it every day, but alas, we don't have sausage and shrimp on hand in an endless supply! Booo hoo! I know the sour kraut might seem a little weird too, but it added this whole different taste and texture element that created such a fantastic salad! So, if you like sour kraut normally, and perhaps usually eat it with your sausage, then you'll want to add it on this. Just trust me. So, this weekend marks the beginning of our families Christmas holiday! We head South-West today to stay with & visit family. We shan't return home until the 28th, so it's a long haul! Some years the 10 days have gone by terribly, some years it's been amazing, but most years are a mix of the two! Between the kids and not knowing how they'll behave/react/cope, Adam and I trying to (and failing to) properly communicate, and pleasing family & friends it can be a roller coaster ride! But we are always happy to visit for Christmas, and the kids love seeing cousins and it somehow seems to work out. We know the outcome of the time away depends largely on our attitudes, so we've been working on keeping them in check and enjoying the season, regardless of the external factors! Well, so, leave a comment just to say "hey", or to tell me what you think about this salad, and especially to tell me if you tried it! Have a wonderful weekend!
0 Comments
Nothing says "welcome to the Christmas season" like lasagna! Am I right? It's just so gosh-darned warm & comforting, full of amazing flavours, and it's a great make-ahead meal to have ready for when guests come over! Whenever I made lasagna in the past, I just followed the super simple and basic recipe from Delallo, an Italian food producer's website. It's just the sort of as plain as you get recipe that gives you room to add things, take away things, ya know. We haven't had lasagna lately though. There are gluten-free noodles in the market that I could use, but with me eating limited grains, it would still leave me without something to eat....and the torture of seeing smelling it baking & watching my family eat lasagna without me! Thumbs down! Recently I came across something on Pinterest that made me go, "oh yeah!". Lasagna noodles made from sliced zucchini! I had eat such a thing before, I eat zucchini often, but I had just sort of forgotten about it! So, thanks to Monique over at Ambitious Kitchen, lasagna has been revived in this house! I took the tips and tricks from her zucchini lasagna, and just shmooshed them into my basic lasagna recipe. Enjoy! 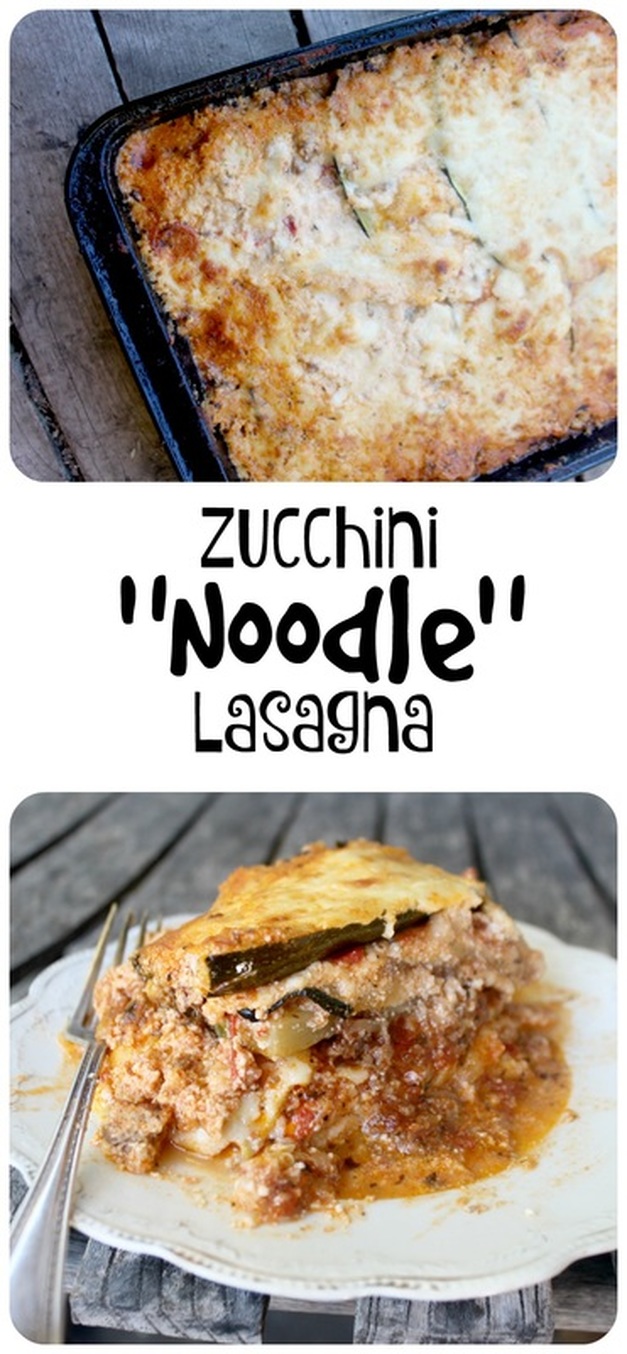 Zucchini "Noodle" Lasagna Adapted from Ambitious Kitchen & Delallo Ingredients:
Method:
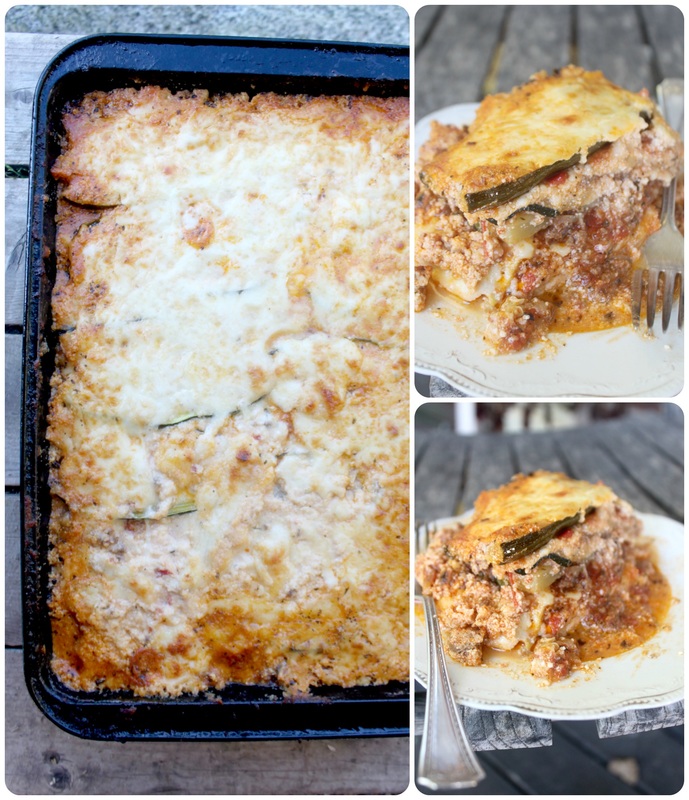 Cheeeeeeese!!!!!!! Sorry about that. : ) Well, that's all she wrote! Is there anything "special" you add to your lasagna that you would love to share with me!?! Please do! Leave a comment, say hello, join me in my "cheeeeeeese" attack, whatever. I am really looking forward to this weekend, friends. We have Adam's work party, which I always enjoy so much! Then Saturday is the Tweed Santa Clause Parade, which Abigail & Keziah get to be a part of on their school float (they are over the moon excited!). Then we'll head over to O'Hara Mill Homestead (a pioneer village of sorts) to take part in their old fashioned Christmas, then Sunday is the Christmas party for the kids (through Adam's work). A lot to do, but it'll be so much fun! I spent this past week being (un-necessarily) upset about a Christmas planning glitch we hit. Truthfully, I'm still feeling upset about the whole thing, but the reason why is because I don't want to let people down, and I love to visit friends and family during the holidays, so I get a little autistic (hate plans changing!!!) when things start to unravel. However, selfish moments like these remind me to reflect on my life, and on what's really important. It reminds me that I am blessed beyond measure to have too many people to squeeze into one trip while we're home for the holidays! It reminds me that, beyond family, I am blessed to live in a country where I am free, my life is not in danger, I live in a beautiful town filled with strange and beautiful people. I have an amazing & handsome husband, and three freakin' adorable (and loud!!!), healthy, bright children. I have friends who love me, and help and support me. We have our smart dog, our beautiful horses, and my new cat who insists on jumping up onto the keyboard while I'm typing!!! My very insignificant problem I'm facing isn't resolved, it likely won't be. We will miss out on seeing family, or we'll be stressed and rushed getting from one place to the other. But I will choose happiness. I will choose to look at a little baby in a manger who came here for me & to rejoice with the angels who welcomed his birth! Thank-you for letting me rant.....I needed that. : ) I feel better about my situation, no resolution in the actual situation, but a resolution in my heart. That's what matters most. Now go make some lasagna. xoxo Potato salad is a classic make-to-bring-somewhere-dish. Am I right? It uses inexpensive ingredients, it's relatively quick & simple to put together, can be made ahead of time, and almost everyone likes it. My problem usually with potato salad is the disgusting amount of mayonnaise added to most recipes. Bleh. So, this is a thing that has been around for a while, but I only recently stumbled upon German Potato Salad ("Kartoffelsalat") a potato salad recipe that uses vinegar & the fat from the bacon to create the dressing. Most traditionally this potato salad is served warm, but if you let it cool, the salad does get a little "creamier" as the bacon fat cools. A potato salad that boasts a sweet & tangy dressing, and it's mayo free? Yes please! It's crazy delicious, it is a crowd pleaser, it is awesomesauce, as some people might say! And I like that saying for this because, well, it really is the "sauce" that makes this the best! 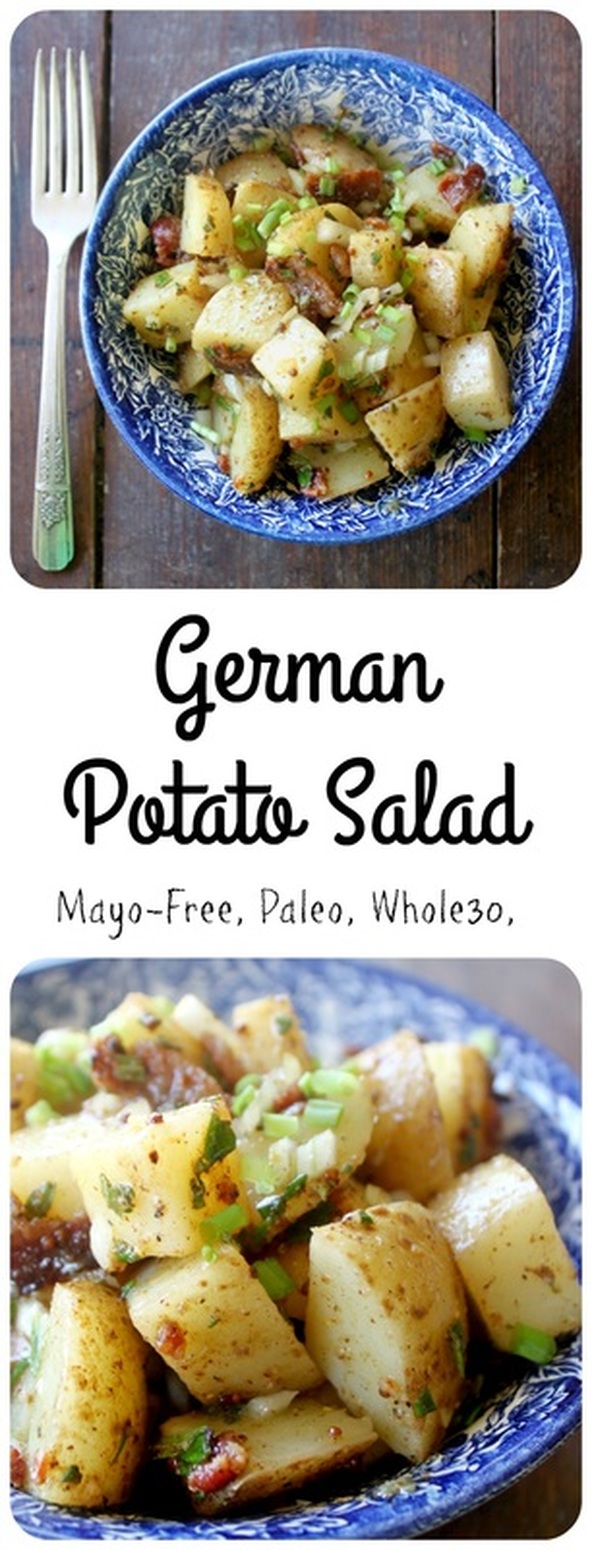 German Potato Salad Adapted from Bravo For Paleo Ingredients:
Method:
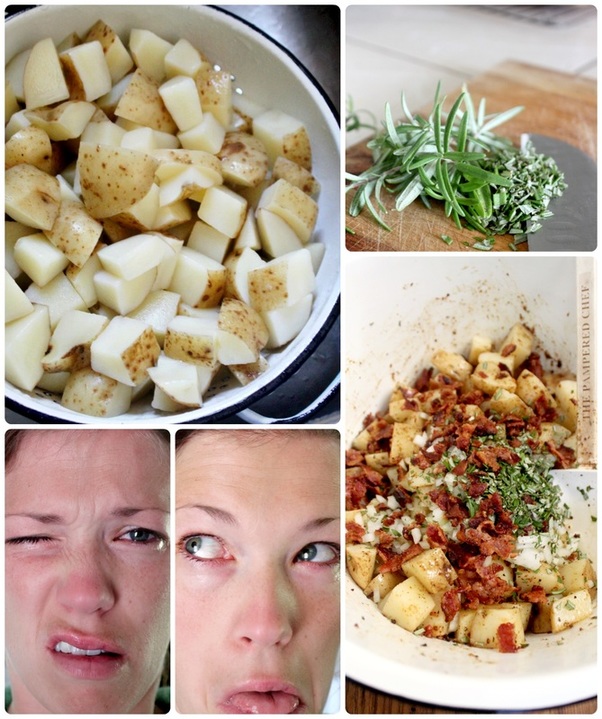 I cannot cut any type of onion without my eyes burning!!! I'm not sure how many eye-burning selfies I've shared, but I'm gonna keep sharing them because I'm weird, and because I want to! ; ) 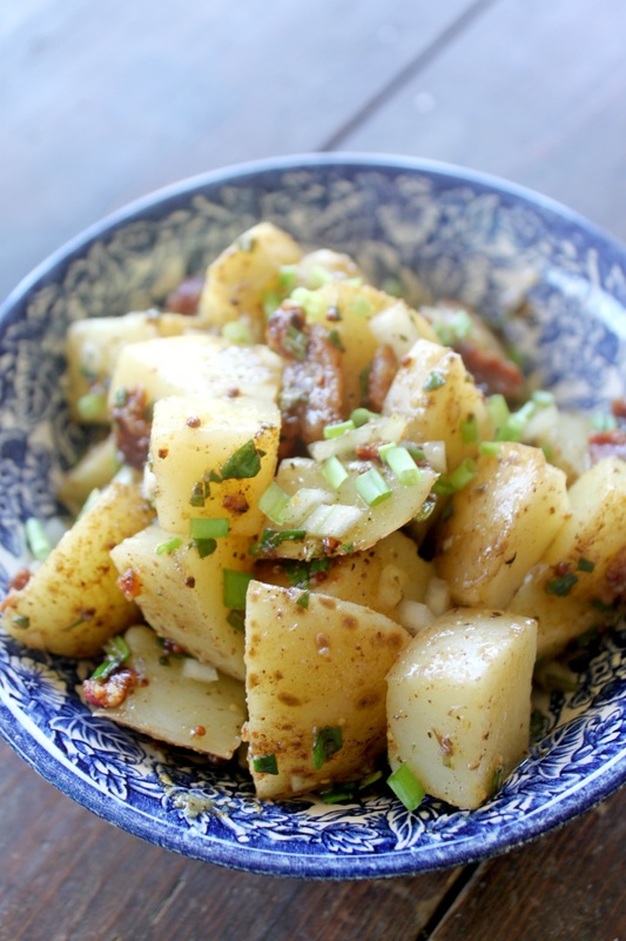 If you've got some (American) Thanksgiving festivities you're going to this weekend, bring this along! On that note, to my American friends, Happy Thanksgiving (yesterday), and I hope you have a great weekend visiting family & friends! To the rest of us, happy regular weekend in November! Take time, wherever you live, to stop and be thankful for something. To see whatever you have as a blessing, whether big or small, xoxo This Friday my husband is travelling to China for 10 days with his work!!! Yikes! We're a mix of nervous & excited about this. China hasn't ever been a destination spot on our list of places we wanted to see, but getting this chance to go is really amazing! It's funny though......ever since we found out he was going, I've wanted everything we ate to be Asian inspired! Apparently I am very easily influenced by ideas! For some reason though, Chinese style food isn't always on my radar as far as food flavours go, not because I don't like it (I really love it!), but usually because I've not been confident enough. In the 2 years of Bushel & A Peck, I've only once posted an Asian-type dish, and it was a simple and forgiving M00-Shu! So, that'll tell you how experimental I get with flavours from that part of the world! But now, here I am, dreaming about Asian dishes.....so, I turn to Pinterest! People always be hatin' on Pinterest, but I really love it! I found this amazingly delicious looking Thai Cashew Chop Salad from The Recipe Critic, but had to change a few things up to make it Paleo, but it is just a great, fresh & tasty recipe! Simple, healthy, full of flavour, blah blah blah, just go and make it already! ; )  Asian Chop Salad Adapted from The Recipe Critic For the Ginger Almond Dressing:
For the Salad:
Method:
**If you are making this ahead of time, just prep the dressing and the salad, but don't toss together. Toss before serving** It's a really simple salad, isn't it?! And it just has such nice flavours, and the fresh crunchy veggies and cashews, mmmmm....so good. I'm sure my husband will come home from his trip and say all Asian inspired food I make is inferior....and he will be correct! Haha, but for me here, in my little corner of the world, it's perfect. It's fresh and simple, and tasty and healthy! I've got my sister and her family visiting here for a few days and for dinner tonight we made a deeee-lish zucchini "noodle" dish with garlic, tomatoes, fresh baby spinach, fresh basil, and topped it off with a mediterranean goat cheese.....gosh, that was tasty! So, I shall say farewell for now, please feel free to leave a comment, and I hope you join me here again soon! : ) Hello! Ever seen the baked ham & cheese sandwiches before? I have been seeing them on the world-wide-web for a long, long time, but just never got around to making them! Well, now I've gone and made them, and there's no going back! So, hey, if you're going to a potluck and know the hosts, and know that you could use their oven once at the event....these make the best bring to a potluck food! All the recipes I found called for Worcestershire sauce, which I've never owned and wasn't about to purchase, as well as poppy seeds. I suppose I could have gotten those, but it didn't seem essential. Oh, and you're supposed to use "King's Hawaiian Rolls", which if you live outside of Canada, you should apparently be able to find. Here in Canada? No such thing as this King and his rolls from Hawaii! : ) Let's be real though, this crazy delicious hot baked sandwich recipe isn't exactly rocket science, and there is lots of leeway! For instance, you can use whatever thin sliced meat you'd like & whatever kind of cheese, though a strong, sharp, or spicy cheese is the best (in my opinion)! 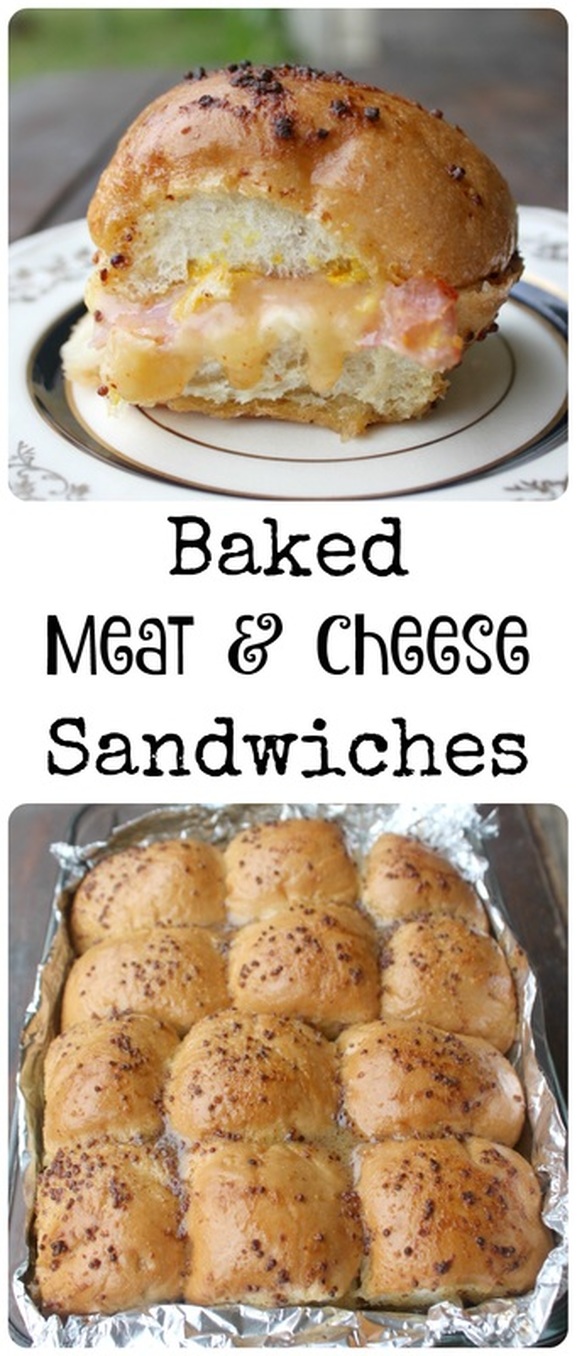 Baked Meat & Cheese Sandwiches Ingredients:
Method:
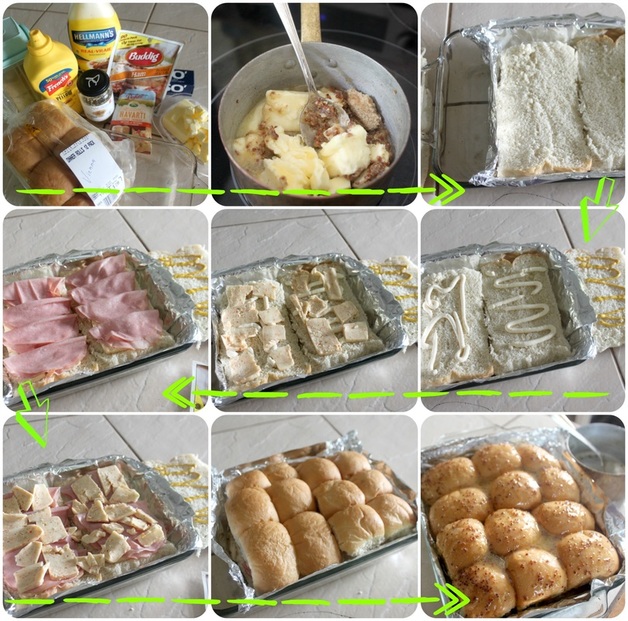 These sandwiches are really simple to put together, but the results are faaab-u-lous! Seriously, you end up with a warm & soft sandwich, but with perfect crunchy tops and edges, as well as the crazy delicious taste from the butter/mustard/sugar mixture......mmmmmmmm...... 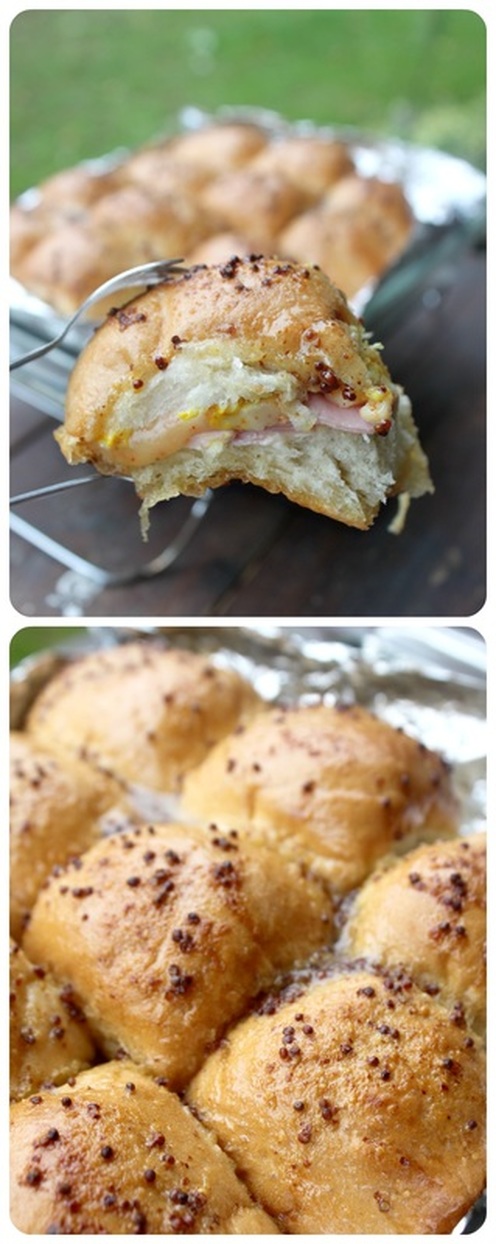 These fantastic sandwiches with a nice soup would be a perfectly delightful lunch with guests! Wouldn't you want to be invited to someones house with these?!? So, send this recipe to someone, and then super casual invite yourself over for a meal, then randomly mention how you soooo enjoy warm, baked sandwiches....and offer to bring the soup yourself : ) I'm signing off now, it's family movie night and we're watching the 1930's production of "Peter Pan" and putting a dent into the Halloween candy we got last weekend! Hazaa! Have a great weekend! xo Ya know what makes a great party? No, it's not the friends, or the conversation. It's the dip. Ok, I am kidding, but for realz, a great dip makes an awesome party awesomer! : ) Awesomer may not be a real word, but it is in my house with a 5 & 6 year old, and it describes this dip! First up....I took crappy photos of said dip. Thumbs down. I was (happily) busy getting ready for my birthday party, and only stopped briefly to take a few pictures. The starting point for this recipe can be found here, at mom4real and her photo of the dip gives it a little more justice. "Buffalo Chicken" refers to hot wings, btw. When I was young, I really and truly believed that these "buffalo wings" that I heard grown-ups talking about were some sort of genetic mutation specialty food....buffalo with wings? Yikes! Well, let me put your mind at rest, according to the internet (where all pieces of information are true-haha), Buffalo wings got their name from their originated location, Buffalo, New York. I read this enlightening piece of information here, on todayifoundout.com. I know I went, "ohhhh, Buffalo, New York!" when I found out. I knew as an adult the wings weren't part of a buffalo, but my brain blanked beyond that and never thought of the New York city! Duh. Typically, Buffalo wings are served with blue cheese dressing, and other Buffalo chicken dip recipes use blue cheese, but I can't. I loooves me some cheese, but blue cheese? Nope. Can't do it. Anyway, ranch is equally as popular now for chicken wing eaters, and well, there's no rules when it comes to wing eating or dip making! Anywho, the real surprise twist here is what we did with the leftovers....oh good golly, it was gooooooood. But first, the dip! 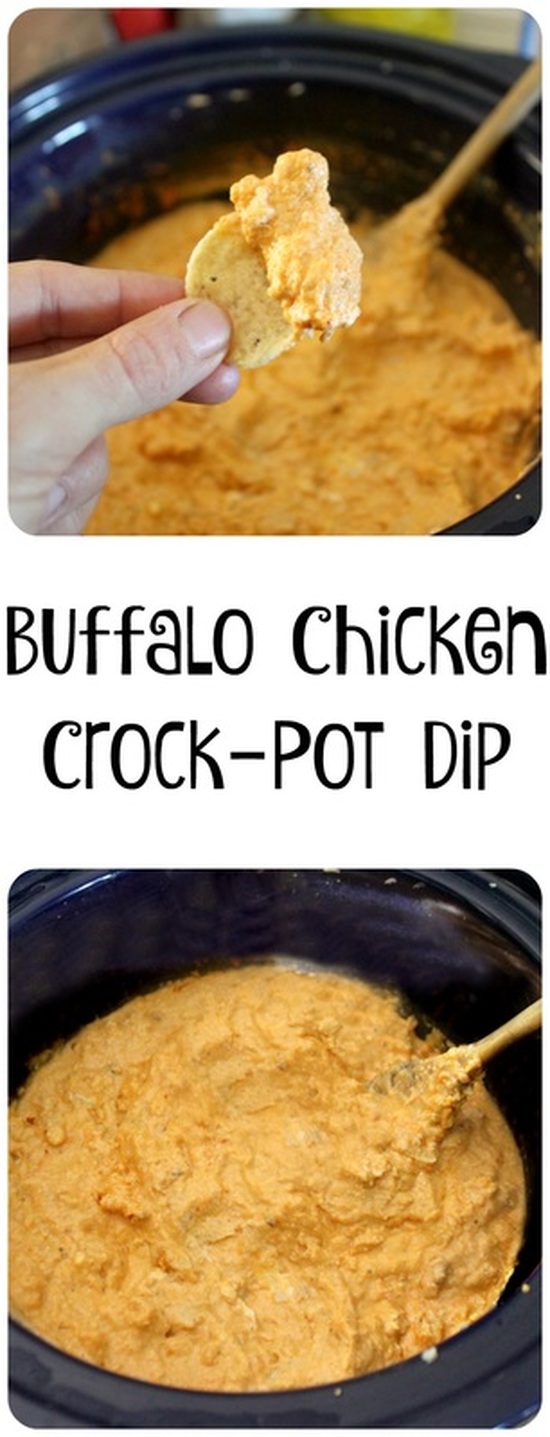 Buffalo Chicken Crock Pot Dip Adapted from mom4real Ingredients:
Method:
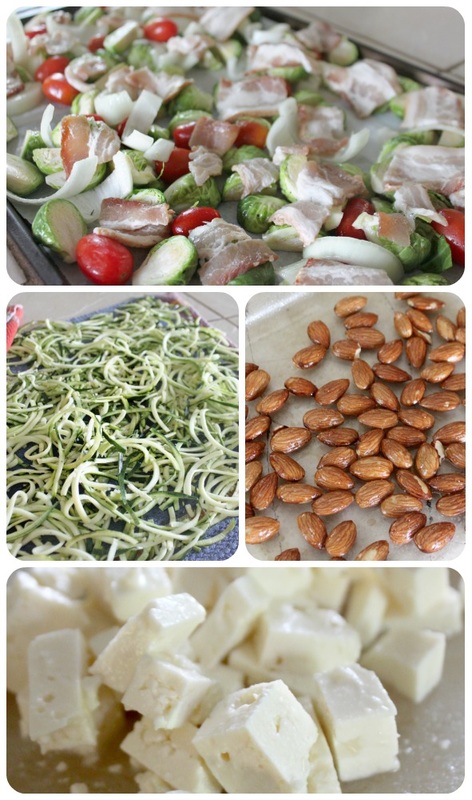
Well now, you can see the pic below ruining the surprise of what we did with the leftovers! We made it into the most fantastic grilled cheese sandwich ever!!! I guess if you're not a grilled cheese lover this won't be that appealing to you, but let me tell you, this treat day dinner was right up my alley! We buttered some fresh bread, then prepared the sandwich by loading it with leftover dip, an extra splash of Frank's Hot Sauce, a drizzle of ranch dressing, and a little extra grated cheese. This sandwich could be replicated without making the dip too. Simple empty the contents of a can of chunk chicken into a bowl. Mix in some Frank's, ranch dressing, and a little cream cheese (if you have any). Mix up well! Then, butter 2 pieces of bread and put some shredded cheese on the non-buttered side of one piece, top with some of the filling, add a little more cheese, then finish with the second piece of bread (butter side up. Then grill to melty perfection! 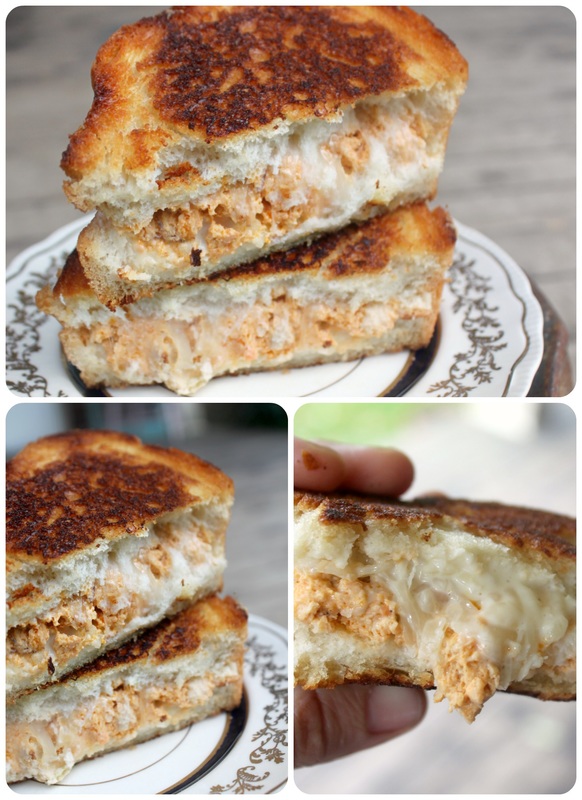 Let's talk about my Jekyll & Hyde thing I've got going here, shall we? On Monday I started my new Health & Fitness page. So....where does cheese laden dip and buttered smothered grilled cheese fit into this? I eat Paleo....80%-90% of the time. Paleo is a whole foods lifestyle with lots of fresh veggies and fruits, meat, nuts and seeds, and avoiding things like grains, (refined) sugar, and dairy. But I am (at heart) a food lover. A lover of ALL food! So, 5-6 days a week I eat strictly Paleo, but the 1-2 days a week I don't eat Paleo, my "treat day(s)", I don't worry about what I eat! Sounds crazy? Maybe. But it works for me, it keeps me on track, really. If I looked into the endless future, knowing I would never again enjoy a grilled cheese, a or a bowlful of Maynard's gummy candies.....I would be so sad. So very, very sad. I love healthy food, and I love how I feel when I create something delicious with it, and how I feel knowing my body is being well fuelled. But, taking a break mentally from good eating re-charges me to keep eating healthy! So, to ya'll going, "whaaaaat?" to the seemingly random recipes I post, this is the "why" to your "what". : ) Happy Friday everyone! Please leave a comment if you stop by here, or share this recipe with someone you know would love it, or make it for your next party so that you'll be the most awesome person ever! Awesomer. xoxo  It's that time of year! That time when we're not really ready to commit to turning on our outdoor wood boiler to heat the house because it requires filling it with wood, and we're just a bit too lazy yet for such things. Plus the days do warm up (sort of), and if you wear warm clothing it's all good! However, today I am sitting in the freezing "office" (a nook, really) wearing many, many layers of clothes, warm wooly socks, a scarf, and pausing from typing every so often to hold my cup of coffee to warm my hands! The craziest part is that when doing the kids laundry last night, I was folding up shorts & a few tank-tops from last week because it was that warm! Oh, Canada! I really love you! Well, moving on to the recipe for today! I purchased from Bed, Bath & Beyond a spiral vegetable cutter (to make vegetable "noodles" ) and wanted some awesome recipes! I saw a recipe for Butternut Squash Noodles With Shredded Brussel Sprouts, Walnuts & Caramelized Onions on inspiralized.com and thought, "whaaat? Yumm!". So now I have been spending a lot of time looking through (and drooling!) at the beautiful recipes that Ali creates! So, believe it or not, this recipe was my wild take-off version of Ali's recipe mentioned above! I used brussels sprouts and onions, and roasted some nuts, but those are the only similarity left, really! I make a roasted Brussel sprouts with bacon recipe, so I knew I would start with that, but wanted to add more flavour and colour, so I decided to roast onions and tomato with it too. And roasted nuts are a delicious idea anytime, so I did that too! So, the end result was a really simple dish that was bursting with flavour, and full of good-for-you foods. Oh, and cheese on top is optional, but adding the feta (you could also go for some parmesan) is a nice little salty addition!  Zucchini "Noodles": Fully Loaded Makes 3 huge servings, or 5-6 smaller servings Ingredients:
Method:
 Some beautiful, fresh ingredients! 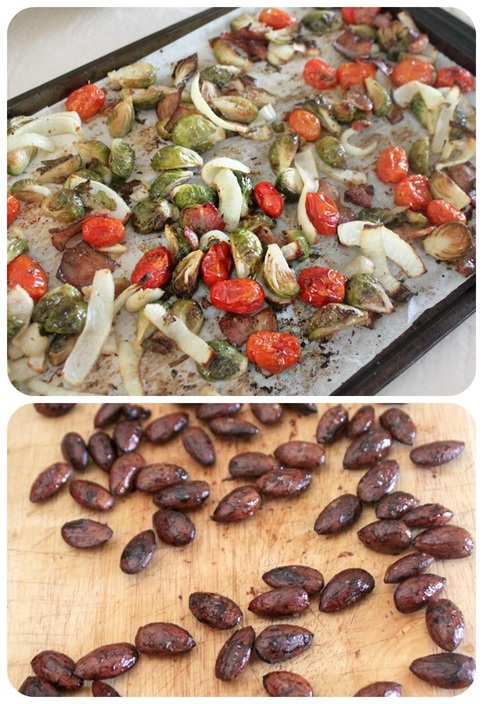 So, looks good, right? Yeah, I know. Haha, for real though, it does look good! My husband thought it was funny though that you can't even see the "noodles" in the photos because of all the toppings I added! That's how I roll.... FYI, if you plan on making this with the idea of having leftovers for a lunch, a word of warning! The roasted nuts will get soft and (in my opinion) yucky after cooling and being refrigerated. So, just store the cooled toasted almonds in an airtight container on the counter, then add them once you're ready to eat your leftovers! After owning my vegetable spiral cutter from BB&B for a while now, and knowing how much I love making noodles out of veggies, I thought I would bite the bullet and buy a more fancy version that was easier to use, but would do more. However, I hit a snag....Bed, Bath & Beyond didn't offer any other kinds besides the one I'd already bought, and I literally couldn't find any other options in my near-by Belleville. Well, unless I owned a $250-$500 stand mixer I could add an attachment to, but I sure don't own one of those!! On Amazon I found only one kind of spiralizer I had in mind, it was around $40, plus shipping, etc., but I wasn't super impressed with it. Then I thought, well, I guess I'll see how much Ali (from Inspiralized) has hers for....? Well, not only was I super pleasantly surprised by the very reasonable price, I was amazed by all the thought that was clearly put into The Inspiralizer. So....I ordered one! Gosh darn-it I'm excited for it to arrive, and I will be sure to tell you all about it when it arrives! Woot woot! Ok, I need to get moving! I always have a dread/excitement for my Monday workouts because Sunday is generally my "treat day", so I'm feeling motivated (from eating junk!) to get a good sweat going.....but then the sluggish feelings I have (from the same junk food!) makes getting going a little tricky! And I know if I get distracted at the computer starting new blog drafts or going on Pinterest I'll never get going! So, I'm going! Wish me luck! ;)
Hello!
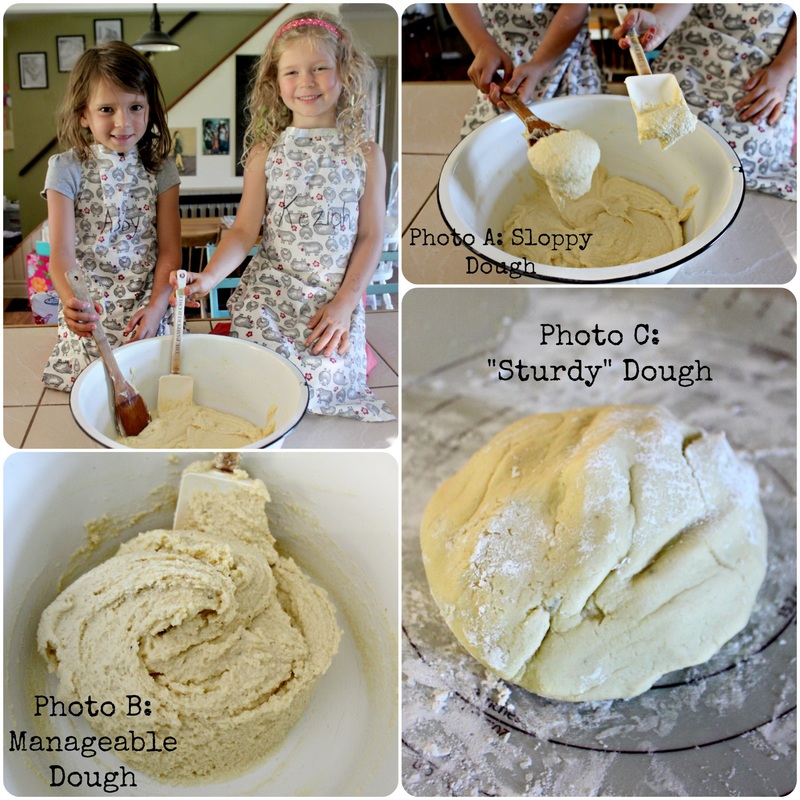
First, if you clicked here thinking, "this says Paleo, but it's covered in cheese!!!". I know, cheese isn't paleo (it's considered Primal, "technically"), but the real star of this show is the crust, and it is Paleo. Hund-o-pee (that means 100%, cool new word compliments of my cousin). He's a weirdo. Ok, now let me move on and say that "pizza" & "paleo" don't really go together. Someone asked me the other day what Paleo was. In the words of Michelle from Nom Nom Paleo: "In a nutshell, the Paleo diet (or, as I like to think of it, the Paleo template—the word “diet” tends to mislead folks into thinking this is nothing more than a temporary weight-loss program) is based on the notion that for optimal health, modern humans should go back to eating real, whole unprocessed foods that are more healthful than harmful to our bodies". So, what does that mean? It means focusing on whole, unprocessed foods like meat and eggs, seafood and vegetables, as well as fruits, nuts & seeds. Things that should be avoided on the "Paleo Template" are foods that can cause our bodies harm such as grains, legumes, sugar, and dairy. Based on those facts, pizza sounds like an out-there idea! And really, pizza isn't an everyday paleo meal for me & the fam, but it sure is nice to have on a Friday night once in a while! Seriously, somehow having pizza for dinner on a Friday night makes me feel young again! Not that I'm "old", but it does something to my brain that says "you're so hip eating pizza on a Friday night!", then my brain focuses back into the fact that I'm also married with three kids and a mortgage and a pile of responsibilities, and I'm eating a Paleo pizza. And that I said "hip"...... Moving on! Dairy and I have a love-hate relationship. It doesn't make me bloated, or make me feel ill, but it does make my saliva thicker, causing mucus (eeewwwwww). So, I just avoid it if I will be singing somewhere (in front of people, that is. I'm always singing in the house, and that can sound as good or as bad as I want it to!). Also, I don't have some sort of Paleo accountability partner who looks at me disapprovingly if I eat dairy. I eat Paleo based on how I feel, and because dairy doesn't seem to assault me with ill-feelings, I consume it periodically. Now, all that being said, this pizza crust is dairy free, and what you put on it is up to you! I found the recipe at Paleo Spirit for this crust. Lea Valle (at Paleo Spirit) deserves all the glory here people! I did make some adaptations, but it was her basic paleo pizza crust that made me believe in paleo pizza! I've made many other kinds of crusts before, and they basically all sucked. Thumbs down. So, get ready, this stuff is awesome! :) 
Basic Paleo Pizza Crust
Makes 1- 12 Inch pizza crust (approximately). I have doubled and tripled the batch with great results Ingredients:
Method:
Other Options: A: Bake the crusts a day or two before you need them, let them cool completely (on their baking sheet or pizza pan), then wrap in plastic wrap until you need them. Once you're ready to use them, just heat the oven to 400, add your toppings to the pizza, then heat for 15 minutes or until hot and the toppings are ready B: Bake the crust, let it cool completely, then wrap lightly in plastic wrap (on it's baking sheet/pizza pan) and let and freeze completely. Then you can take the crust off the pan and wrap tightly in plastic wrap and place into a freezer safe bag (or a few layers of plastic wrap for a bigger pizza). Once ready to use, preheat oven to 375, remove plastic, add toppings to the frozen crust and bake until hot through and toppings are ready, about 20 minutes C: Bake the crust for 10 minutes, then and add the toppings and bake, but only for 5 more minutes until the toppings are nearly ready. Remove from the oven and let cool completely. Then wrap lightly in plastic wrap (on it's baking sheet/pizza pan) and let and freeze completely. Once frozen, you can wrap tightly in plastic wrap, and place into a freezer safe plastic bag (if it's a small pizza) and freeze. If it's a large pizza, just wrap in a few layers of plastic wrap). Once ready to use, preheat the oven to 350, remove the plastic and heat pizza for 15-20 minutes or until the pizza is hot. You could also make the dough, and wrap tightly in plastic wrap and place into the fridge for a few days until ready to make the pizza. I've never done this, but I think if you did, you would need to pull the dough out of the fridge for at least 30 minutes to let it warm back up slightly. If you try this method let me know how it goes! 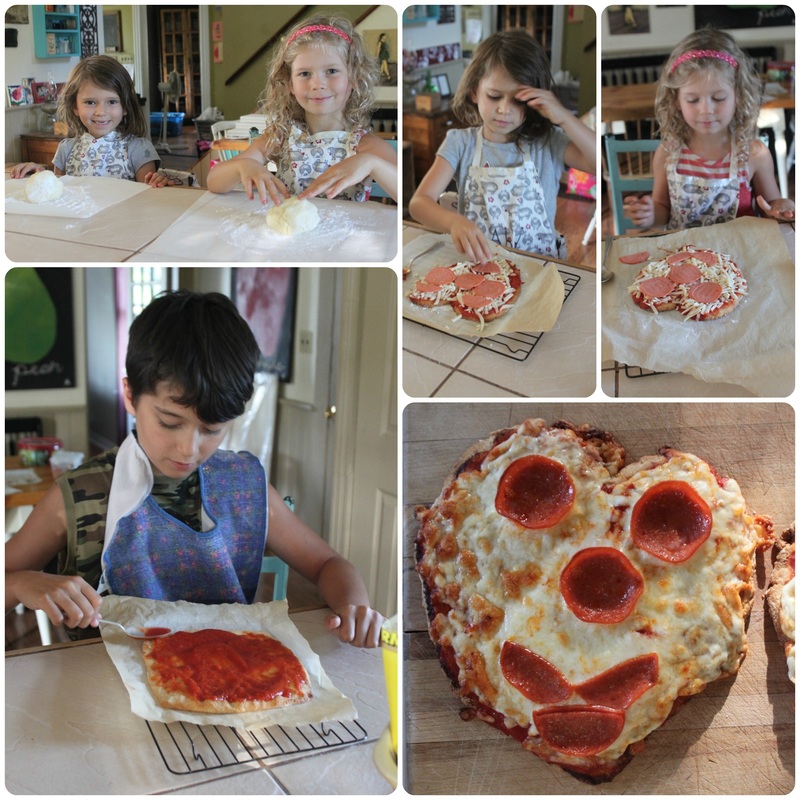
My kids who have made and eaten (and complained about) other pizza crusts really (really!!!) like this one! My lovely 6 year old took her first bite and said (very concerned), "can Caleb eat this?". Caleb is our for real, all the time gluten-free family member, and Abby has tried some pretty crappy gluten-free foods and actually thought I had maybe made a mistake and the crust wasn't gluten-free!
Pat yourself on the back, Amy-Lyn, you've fooled the toughest critic out there. :) As for Paleo pepperoni, the pickings are really slim, but Maestro makes a pepperoni that I can get at a great price at my usual grocery store and is Paleo (therefore gluten-free) and tasty! 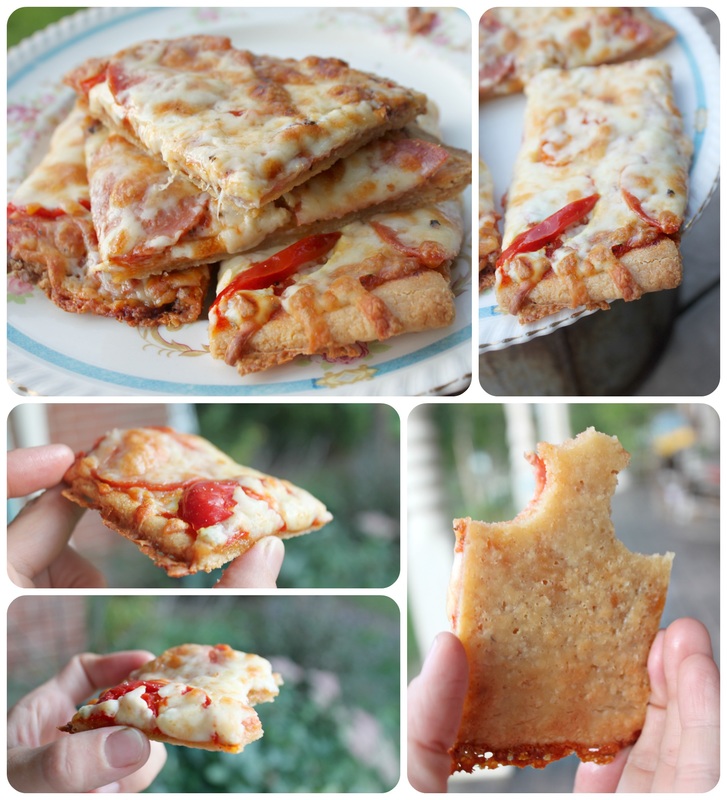
I went a little picture crazy with this pizza....it is just too good to be true...except it IS true! I didn't get any pictures of just the crust, well I actually did get some, but they were just kind of "bleh" and I don't really like "bleh" photos, I like, "Wow!!! That looks yummy!" kind of photos. But you get a nice bottom shot of the crust in that collage above, so that's something. When I made this the first time I was still mentally prepared for failure. For a weird taste, or a floppy crust you couldn't hold, but this pizza crust is the real deal! It's so easy to make, tastes great, and has a super hold! Oh, and it even tasted great and held up after being micro-waved the next day in my husbands lunch! What? I know! I know..... If you want to feel cool and young this weekend, make some pizza. Hahaha, just kidding. For real though, have a great weekend, and make some pizza! Hello! Happy Monday! The kids and I spent some time "in town" last week getting a few things for school, and I couldn't believe how fast this summer went! Well, first it felt slow, but then it flew by! Does that make any sense? Anyway, I'm gonna miss the kids when they head back to school. I know the "usual" joke heading back into school is the (tongue-in-cheek, soaked in sarcasm) "sooooo sad, the kids are heading back to school!", but I actually enjoyed the kids this summer! Hahaha, well, that sounded bad! Seriously though, the kids do the usual fighting, complaining, whining and asking "what are we going to do today" instead of just doing and being kids, but overall, I've really enjoyed watching my kids grow and change this summer. We had some pretty serious road bumps like the surfacing of some pretty little liars, and Caleb developing a stutter, but it was good. It was really good. And, besides that, it's the only summer I'll ever have with them being 12 (turned 13), 7 & 8. So, that's worth cherishing! Anywhooooooooo...... I wanted to share today some school lunch ideas! A few years ago it dawned on me that sending "the typical" lunch with my kids was weird....because I never (ever!) give my kids a "normal" lunch all summer or on the weekends, so why would I send a "traditional" lunch to school?!? During the summer (besides when they're at camp) and every weekend, lunch is something like a 1 hour grazing period that includes fruits, veggies, leftovers, and, well, whatever! If I make the kids sit for a lunch during the summer and weekends, it's usually a "Dutch Lunch" as we call it, which consists of fruits, veggies, usually meats and cheese, crackers, pickles, raisins, ya know, basically a large snack. I know a lot of Moms feed their kids like this is real life, so adding stress to the school year by thinking we're suddenly required to make a proper (sandwich, etc.) lunch is silly! ***SIDE NOTE**** If you do make sandwiches for your kids because they like them and actually eat them - then make sandwiches! This is not an "anti-sandwich" post, it's a "do what you've been doing!" post! :) Does that make sense??? No Mommy guilt here is what I'm trying to say! It takes all kinds of Moms to make the world go 'round, so do what you do, and do it the best you can! If you journey with me to Fall 2014, you'll find a post a wrote about Back To School, where I share some of my tips & tricks for making the school year *relatively* stress-free (if your school year seems completely stress free...you're missing something....you may need your meds adjusted). I joke. Ok, I only joke a little. Anywho, read that post, then come back here. I'll wait. Ok, so, today I just want to share some easy, healthy, snack-meals for kids lunches! Enjoy! Oh, and don't forget to take a minute to comment and share some good kids lunch ideas with me! 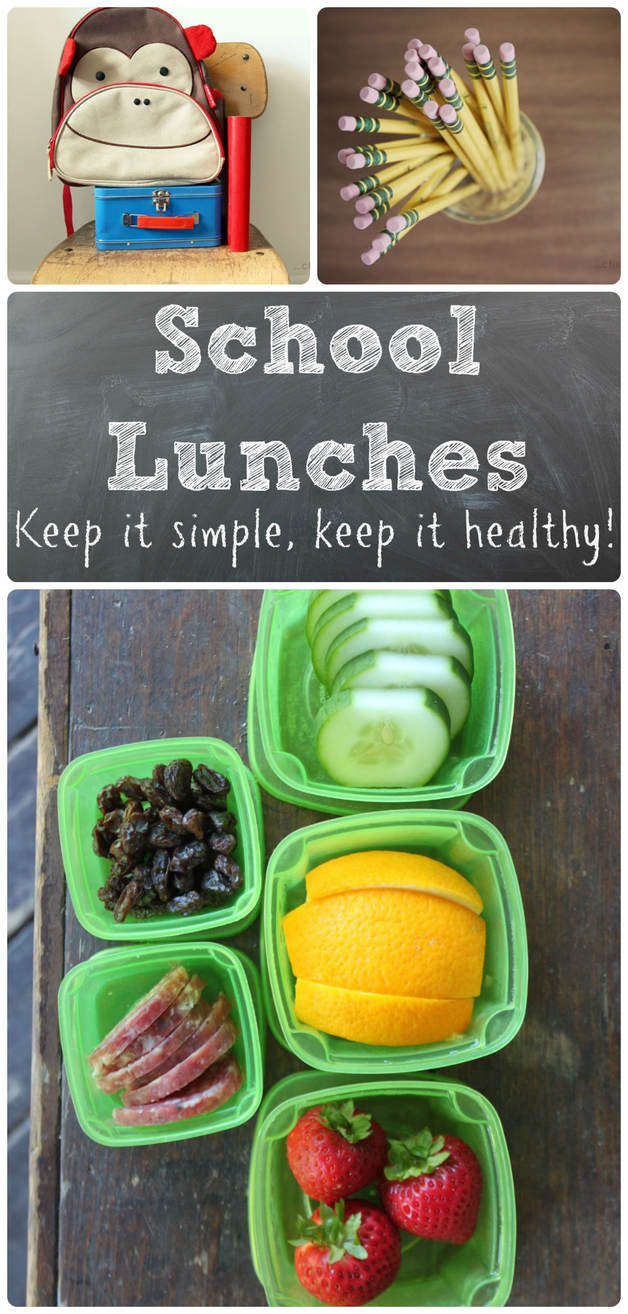 This is the lunch menu I use for my kids. It's from a site called "Hello, Cuteness", which is currently on hiatus for some reason. Anyway, it's really cute, and I've been using it for about 4 years. 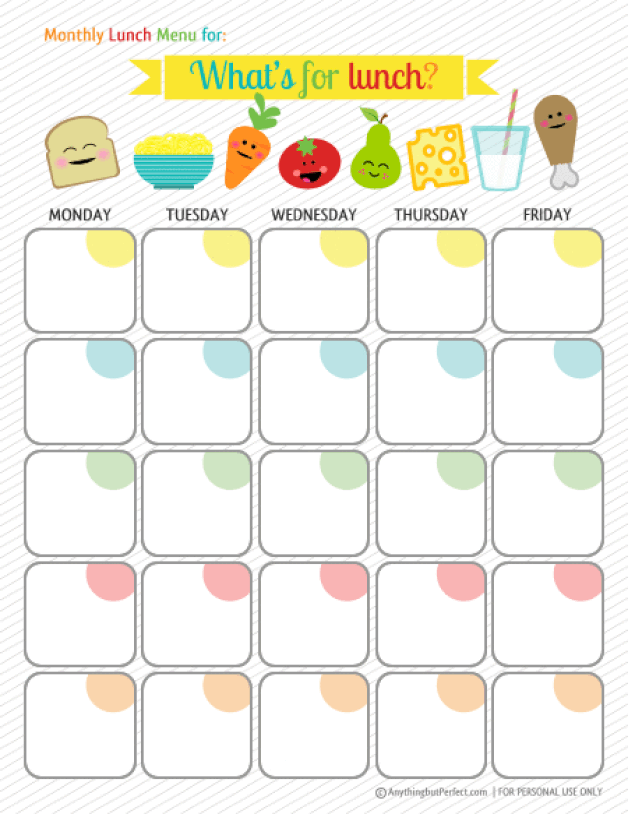 I mention this in the Back To School post from 2014, but for me, making a lunch menu saves me grief. I don't want to stand and stare into the fridge wondering what to pack my kids for lunches. And because we do our grocery shopping only once a week, and at a grocery store 40 minutes away, I can't just helter skelter pack my kids lunches because I can't just run to the store to replace what I've used if I realize I needed it for a planned dinner. Yes, we have a little grocer here where I live, but things are more expensive, and therefore not cost effective for this one-income house. If you don't want a lunch menu, then don't do one! Again, no Mommy-guilt here! I've said it before, and I'll say it again (and again!) it's about finding what works for you, and making it work! In the lunch menu shown below, the girls are separate from Caleb because there are a few differences in their preferences, and so it was easier for me to have 2 menus. Also, "special fruit" in the girls' menu refers to a different fruit they get to choose during our Sunday shopping trip that I'll pack into their lunches. It's just a chance for them to have a fruit we wouldn't ordinarily buy, but that they really enjoy! Caleb's menu says "fruits" on opposite days of "Apple" because I didn't want to have to put exactly what that "fruit" would be, but I wanted to try to not send the same fruit every day because of a faulty memory! :) So, "fruit" usually means a banana, orange, clementine, pineapple, peach, berries, basically whatever might be seasonal or on sale that Caleb enjoys! I've found that my kids eat the most when they have a variety, and not too much of anything. If your child does like sandwiches, maybe just make them a half sandwich so that they aren't overwhelmed by an entire sandwich that they may not want or have time to eat.  Here's a site you might not look at for kids lunches, but Beach Body on Demand has a post called "6 Simple No-Cook Snacks To make This Week" (it's a long title....and it's not no cook because hard-boiled eggs don't come out of a chicken that way!), but anyway, I still like the snack (lunches, really) ideas. 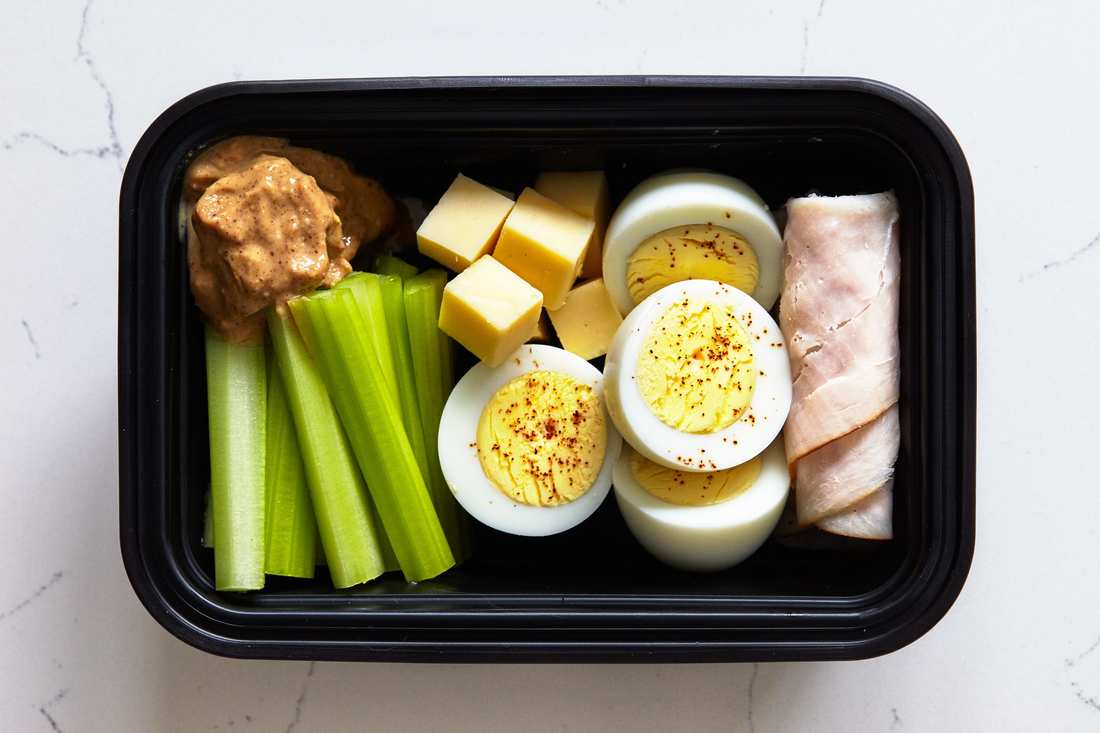 Rachel over at Following in my Shoes shares a post called "Paleo & Primal Lunch Box Ideas", and I love the cute food list she's created for it! Even if you're not feeding your kids Paleo or Primal, it's a super healthy food list, which any kid could benefit from. You'll want to check the post out because she shares the downloadable file for the list! Print it out, and stick it inside a cupboard door for easy reference! 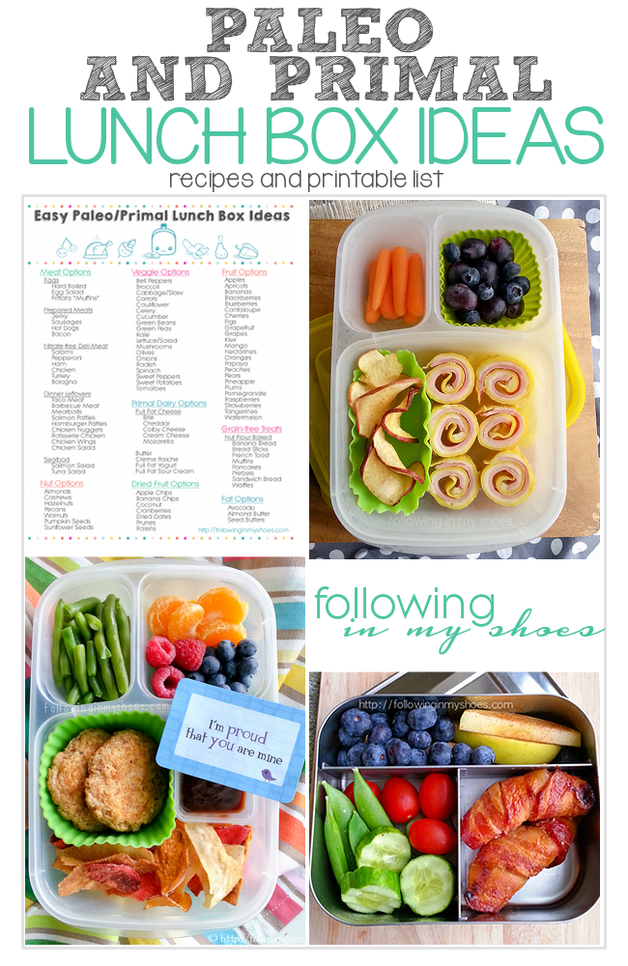 Check out my Pinterest board for "School Lunch Ideas" to see all I've been pinning, or check out my board "For Adam To Take To Work" for your older children or kids with a more adult palette!
I hope you enjoyed this post! Let me know in the comments below if you did, or share with me your favourite lunch as a kid, and be sure to share any of your lunch packing tips! Hello! How was the weekend? I had such a fabulous birthday party on Friday evening! I felt so blessed by my friends, and it was good to have them all (mostly) here. Our house looked like some wild high-school rager had swept through it though! When I finally went to bed at 3am (eek!), I saw there were plates and cups strewn about the yard, fruit flies on every bit of sticky dessert stuck here and there, and a mountain of plastic cutlery to wash! I blame the first 2 on all the (wonderful) little children who were here, and the utensils on my extreme need to recycle (I can use plastic utensils over and over people!). The best part though? I had an art sale & show on Saturday that I needed to leave the house early for, so I didn't have to do any of the next day cleaning!!! Woo hoo!!! My amazing husband and kids had this house shining like the top of the Chrysler building by the time I got home!!! That's pretty much the best birthday gift ever! Anyway, let's move on to food! I saw a great recipe for Jerk Chicken with Mango Pineapple Salsa over at Paleo Newbie and it looked so good! I rarely (rarely rarely!) buy chicken breasts, and was going to try this with bone-in chicken, but had another thought. Shrimp. Yes, spicy shrimp, a cool refreshing mango & pineapple salad over a big bed of salad and veggies. It sounded so good and wanted to give it a try! 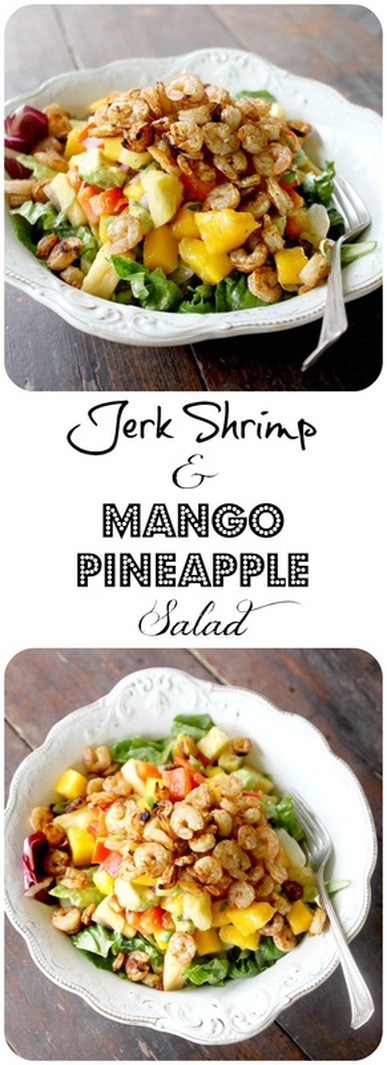 Jerk Shrimp & Mango Pineapple Salad Makes 2 huge servings. Also, it seems like there a a million steps, but really, it's not so bad! Adapted from Paleo Newbie Ingredients for everything!: For the shrimp:
Mango Pineapple Salsa & Salad:
For the salad dressing & salad:
Methods: First prep the shrimp:
Now the mango pineapple salsa:
Now prep your salad
Meanwhile...back to the shrimp (p.s. you can always skip this step if you'd rather have the shrimp cold!):
Put it all together!:
Dinner time!!! :) 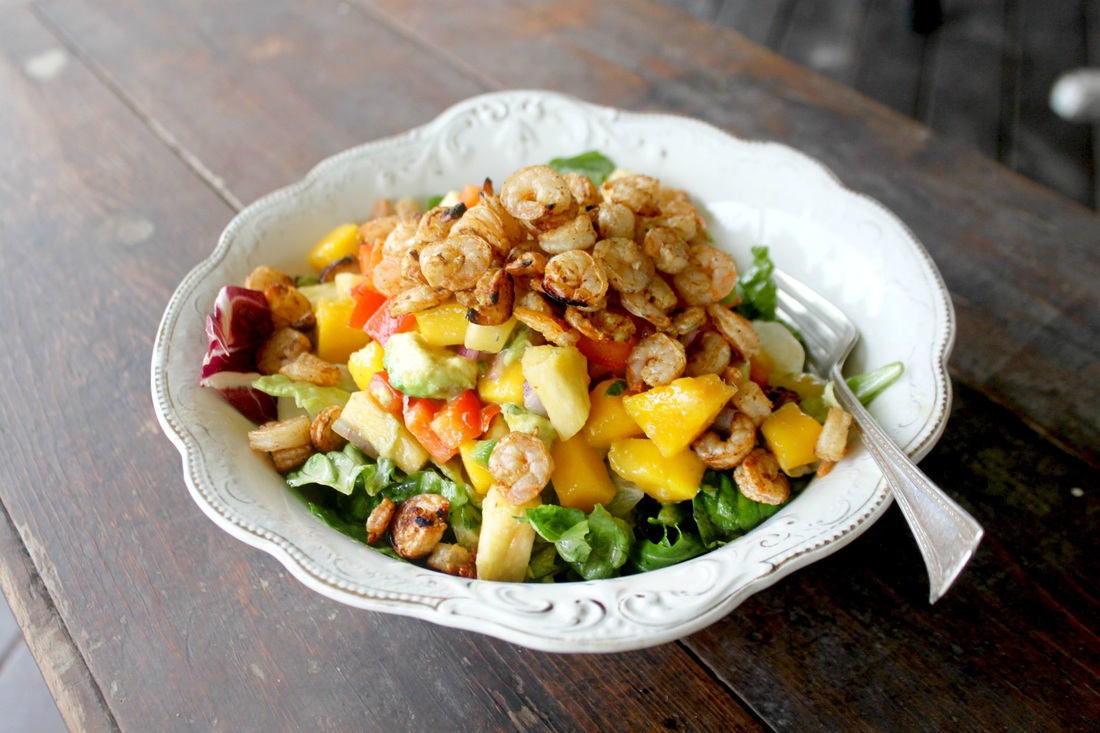 So, yes, it may seem like the longest list of ingredients and steps ever, but it is honestly a pretty simple recipe. It's really forgiving too; if you don't have all of the ingredients for each part, as long as you have most of them, it'll still be super tasty. Don't want to cook the shrimp? Then don't (remember it's the pre-cooked kind)! Want to use your own salad dressing? Then go for it! Just look at this all as a starting point, and you can get creative. As long as you have a nice, spicy shrimp, and the cool (with a bite) mango pineapple salsa, you'll be good to go. You could even just mix those 2 together as a salad on their own if you wanted! Alright, well, I need to get moving! It was a long weekend of late nights, and the kids were up each a few times last night for some ridiculous reason or another ("I lost my bracelet!", "where's my water bottle?", "where's Diana?"(a doll), "I need you to tuck me back in!"). Good grief Charlie Brown.....So, I'm feeling tired, got a bit of a headache, and I know if I don't stand up soon and move, I'll just melt into a tired puddle! Oh, and it's raining, so even the weather is trying to trick me into doing nothing today! Have a wonderful day! See you next time! Oh, and super randomly, last night while on Pinterest I noticed I mis-spelled the word "chocolate" on one of my images with a title....but I was too tired to deal with it...now I can't remember which recipe it was! Help me find it! I'm so embarrassed that it's out there in the WWW (and on this blog) with "chocolate" spelled incorrectly! Aaahhhhhh! Home-schoolers nightmare!!! Hahaha....I am a little dramatic, but I am seriously embarrassed! |
Hi, I'm Amy-Lyn! 
I am the lady behind this here blog! I live in the sticks with my animals, my super handsome husband, and my
3 amazing kids! Here you'll find things from recipes (gluten-free, paleo, and strait up junk food!), DIY ideas, thoughts on raising a son with autism, and whatever else pops into my brain! : ) Read more about me by clicking here! Want to Stay Connected?
Find What
|
 RSS Feed


