Bushel & A Peck
  • Blog
  • Health & Fitness
  • Artist Biography
  • Paintings
  • Photography
  • Drawings, etc.
  • About Me
  • Contact Me


Tea Bag Sugar Cookies

5/28/2014

2 Comments

 
   Today's cookies are seriously just the cutest things. I made them a while ago for my daughter's Tea Party Birthday, but hadn't posted about them, so here they are now! 
Picture
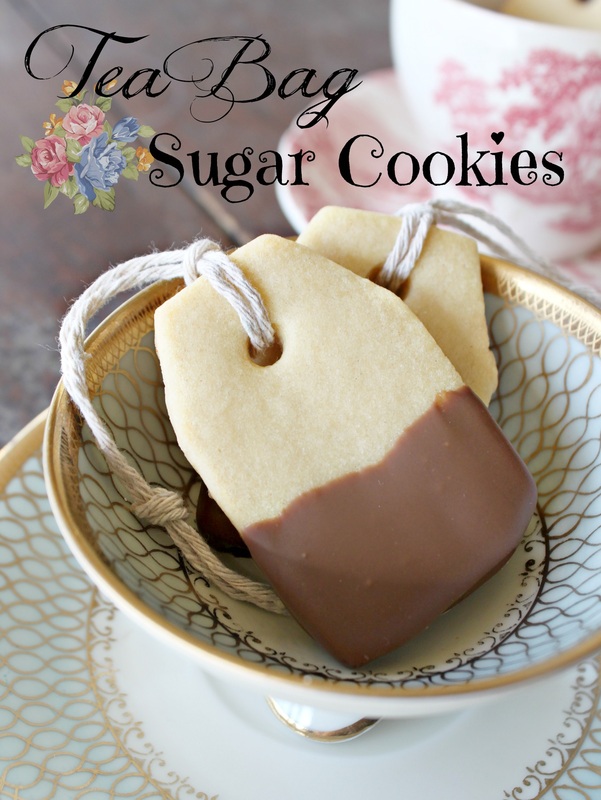
Tea Bag Sugar Cookies
The dough requires a little refrigeration time)

Ingredients:
  • 1 cup butter, room temperature
  • 3/4 cups sugar
  • 1/2 teaspoon vanilla extract
  • 1 egg
  • 2 1/2 cups all-purpose flour
  • 1 teaspoons baking powder
  • 1/4 teaspoons salt
  • Chocolate chips (for the "tea")
  • Butter (also for the "tea". Approximately 1 tablespoon per 1/2 cup chocolate chips)
  • **See note between the two final photos about the chocolate**

Method:

  1. Using a stand mixer, or hand mixer, cream butter and sugar until it's light and fluffy. 
  2. Beat in egg and vanilla, scraping down bowl as needed. 
  3. In a large bowl, combine dry ingredients and gradually add to creamed ingredients. Beat well.
  4. Divide dough into fourths, flatten and wrap quarters with plastic wrap (diving it help with 2 things: 1. It cools faster so you can get working with it sooner, and 2. It keeps you from over-working the dough to help the cookies stay nice and buttery)
  5. Refrigerate for at least 1 hour before cutting into shapes (trust me, if you don't, the dough will be too soft, and you'll just squish your shapes trying to lift them onto your baking sheet, and then you'll be grumpy.)  

....after the dough has chilled....

  1. Heat oven to 375 Degrees
  2. Let dough soften a little for easier handling (line a cookie sheet while you wait). Roll out dough into a rectangle on a floured surface to approximately  1/4” thickness. 
  3. Use a real tea bag (if you have one) to measure the size of the cookies (just lightly mark the dough along the top of the short end of your rectangle. This is the width of your cookie), then use a ruler to cut long strips of dough down from there. Then, using the tea bag again, mark how long each cookie is, and, using the ruler, work your way across cutting the dough. You should now have dough with all little rectangles on them.
  4. It's easier to move the rectangles onto the cookie sheet now (I forgot this time around), then using the tea bag as a guide again, cut off the top corners of the triangles.
  5. To make the holes, I used a McDonalds straw. They are the perfect size so that when you bake the cookies the holes don't close up. If you have a smaller straw (or some other fancy tool that would cut out a good hole), that would work too, but you may want to place the cookies on their tray into the freezer for 10-15 minutes before baking so they don't loose their shape.
  6. Bake for 7-9 minutes or until lightly browned (just on the bottom, not brown on top or these will dry out!) Time may need to be adjusted depending on how thick your cookies are. Smaller cookie=less time. Bigger cookie=more time.    
  7. Cool on baking sheet for 5 minutes, then move to wire racks to cool completely. 
  8. To make the "tea", first lay out a sheet of wax or parchment paper.
  9. Melt the chocolate with the butter (either slowly on the stove, or slowly in the micro-wave) in a bowl that is deep bough to get a good "dip" on your cookie. A mug works well (Obviously  if you melt the chocolate on the stove, you would pour it into a mug after melting it).
  10. Dip the cookies into the chocolate and lay out onto the wax or parchment paper until completely set. Melt more chocolate/butter as you need to finish dipping all the cookies.
  11. Loop a string through the hole, and you've got yourself a tea bag cookie! 
Picture
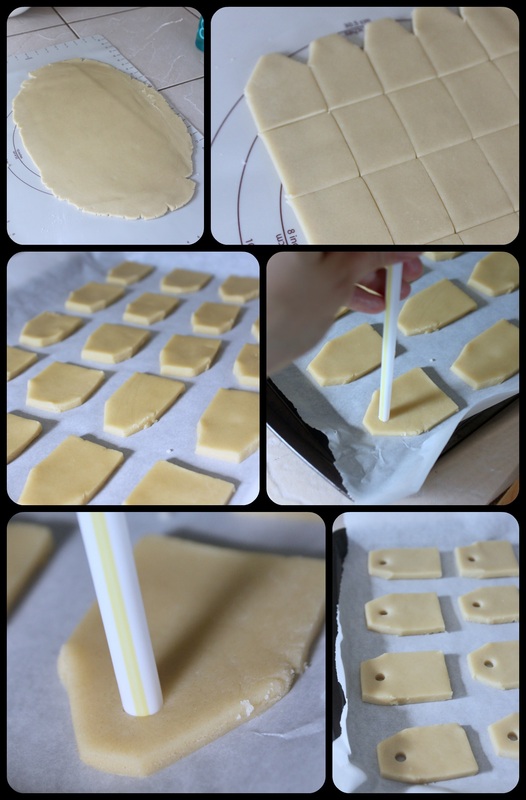
   These cookies do take a bit of 'work', but it's repetitive, and not difficult. Plus, they are just so darn cute when you're done it's completely worth it! 
Picture
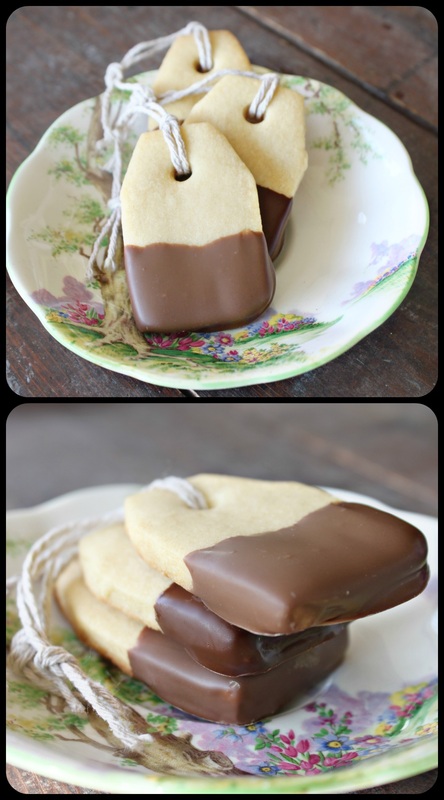
   These cookies freeze really well (layered between wax paper).
  **If you plan on serving them in a very hot room/event/climate, you may want to consider adding a few (not too many because they taste a little yucky!) chocolate "melts" (the brand I get are Merkens "light chocolate flavoured moulding wafers" from the Bulk Barn). This product is made for melting and setting up properly. But, like I said, they taste kinda gross (it says "chocolate flavoured, so that should be a hint!), so don't substitute all of the chocolate chips for these**
Picture
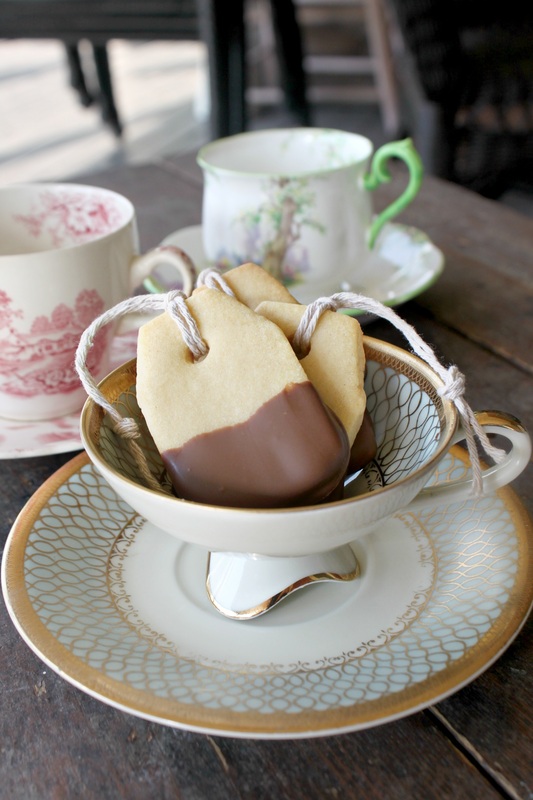
   Well, I hope these darling cookies perked you up on this "hump day" (don't be rude, it's the hump between the beginning and the end of the week!). Sheesh.  :)   
2 Comments
Patent Attorney link
11/3/2014 08:10:43 pm

These would be amazing for a tea lover!

Reply
Amy-Lyn
11/3/2014 11:46:45 pm

They would make a great Christmas (or anything!) gift for a tea lover, that's a great idea!

Reply


Leave a Reply.


    Welcome To
     Bushel &
    A Peck!

    Hi, I'm Amy-Lyn!

    Picture
    I am the lady behind this here blog! I live in the sticks with my animals, my super handsome husband, and my
    ​ 3 amazing kids! 
    Here you'll find things from recipes (gluten-free, paleo, and strait up junk food!), DIY ideas, thoughts on raising a son with autism, and whatever else pops into my brain! : )  

    Read more about me by clicking here!

    Want to Stay Connected?

    RSS Feed


    Subscribe to my mailing list!

    * indicates required

    Find What
    ​You're Looking For on the Site!


    Vitacost.com

     Most Popular Posts

    Meat & Potato Casserole
    Gluten-Free Meat & Potato Casserole
    Picture
    D.I.Y Tea Cup Bird Feeder
    Picture
    Mini Caprese Kabobs

    Featured in The Huffington Post

    Picture
    Paleo Double Chocolate Avocado Cookies

    Featured in Woman's Day

    Picture
    Chicken Bundles


    Categories

    All
    Antiques
    Autism
    Birthday
    Breakfast
    Chocolate
    Dessert
    Diy
    Family
    Five Minute Friday
    Giveaway!
    Gluten Free
    Health-fitness
    Lunch/Dinner
    Miscarriage
    Motivational Monday!
    Muffins
    My Thoughts...
    Nifty Ideas
    Paleo
    Primal
    Recipes
    Sandwiches
    Soup
    Tea Party


    Some of my favourite products! 


    Archives

    September 2017
    August 2017
    June 2017
    May 2017
    April 2017
    March 2017
    February 2017
    January 2017
    December 2016
    November 2016
    August 2016
    July 2016
    June 2016
    May 2016
    April 2016
    March 2016
    February 2016
    January 2016
    December 2015
    November 2015
    October 2015
    September 2015
    August 2015
    July 2015
    June 2015
    May 2015
    April 2015
    March 2015
    February 2015
    January 2015
    December 2014
    November 2014
    October 2014
    September 2014
    August 2014
    July 2014
    June 2014
    May 2014
    April 2014
    March 2014
    February 2014
    January 2014
    December 2013
    November 2013
    October 2013

    my foodgawker gallery
  • Blog
  • Health & Fitness
  • Artist Biography
  • Paintings
  • Photography
  • Drawings, etc.
  • About Me
  • Contact Me