|
Something strange has been happening in my kitchen lately.....it all began a few months ago when a hinge on our oven door broke. It should be fixed, but I just sort of shrugged, and figured out a way to keep it from falling off completely (though it did a few times, and let me tell you, that sure messes with baking times!). Anywho, then my beautiful vintage stand mixer was in the middle of mixing when suddenly shhrrruncchhhweeellcchhh.....the engine seized (that strange word is the official sound of a vintage stand mixers engine seizing, btw). So, I was down to only using my hand mixer to recipes, which in some cases proved to be a great arm workout as my hand mixer is also vintage, and weighs at least 8 pounds! Then, in the middle of whipping up some avocado cookies, SNAP, one of the attachments snapped off. Oh well, I thought, I can use a hand mixer with only one mixing attachment... A few weeks back I was going to make some treats for a fundraiser I had volunteered to bring some desserts to, and I turned my oven on, only to watch as the bottom element of the stove caught fire, and burnt its way down the entire element, until only a crunchy, burnt, useless element remained. "No worries!" said I, "Our BBQ has a thermostat, I can bake in there!" It's true, I can bake in my bbq....though it can take twice as long because I only really have 1 rack to use. But, I wasn't worried, I would press on! Then, yesterday during a macaroon experiment in which I was attempting to really mix the ingredients together well in a blender, the bottom ring (the threaded part that holds the blender glass to the base of the blender), broke in half, and everything in the blender came flying out as the glass top came crashing to the floor! ....I think the Lord may be trying to tell me something. It's either A: to make more microwave cakes & leave the oven alone, to B: win the lottery and buy a new oven, C: Stop buying vintage appliances, D: Be a little more gentle when screwing the bottom on a blender on, E: to send a truly heartfelt thank-you card to my father-in-law who bought us our bbq a few years ago, or F:....to stop trying to bake altogether. I really can't imagine the lesson would be that last one, but I can't be sure. All that to say, I made my own birthday cake a few weeks ago on our bbq! My husband shook his head in disbelief....though I'm still not sure if it's because I made a cake on the bbq, or because I made myself a birthday cake? No matter, it worked out really well, and I got a paleo(fied) birthday cake! It wasn't a treat day, after all, and I didn't see why I should have a treat day just because it was my birthday! I thought it more fitting that I would celebrate my birthday eating what had gotten me to the new, healthier place I was in! So, here it is, many stages, a little step-intensive, but overall a simple and tasty cake! 
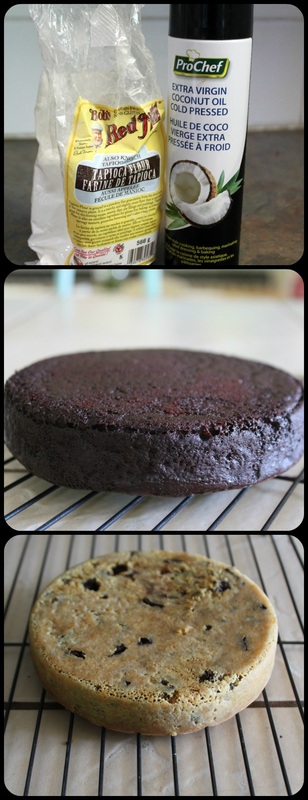
Paleo Chocolate & Chocolate Chunk Layer Cake *I only have one small round cake pan, so I made the chocolate cake first, then while it was baking I prepared the chocolate chip cake layer. When the chocolate layer was done baking, I washed and dried the cake pan and used it again. If you have 2 cake pans-all the power to ya!* Chocolate Cake Layer: Ingredients:
Method:
Chocolate Chip Cake: Ingredients:
Buttercream Frosting: Ingredients:
Method:
Cake Assembly:
Look at those lovely cakes!
Pictured above is the spray I use for cake pans. And dusting the pan (with cocoa for a chocolate cake, or flour/starch for white cakes) really helps to ensure the came will come out of the pan when you're finished baking it. 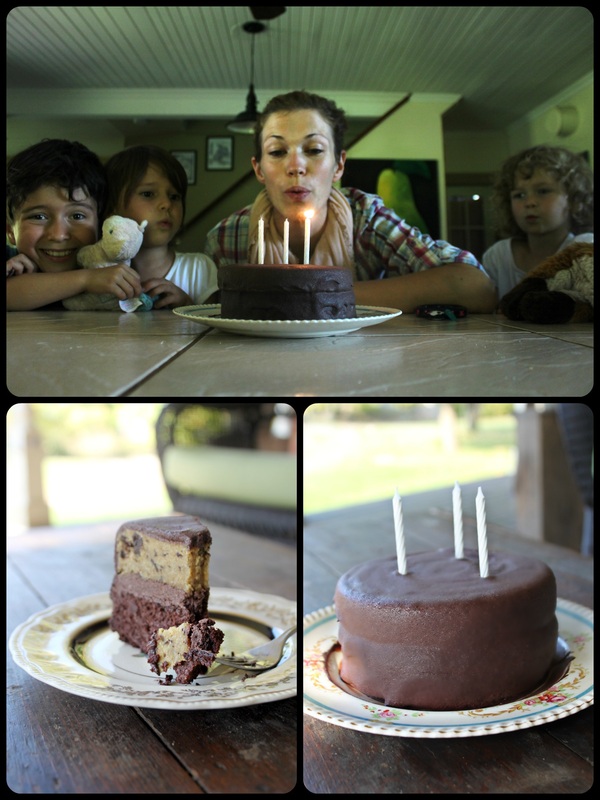
The kids and I having cake for dinner on my birthday! :) Seriously, we had it for dinner. We did have some veggies later on, if that makes you less concerned.
And so, there you have it! My tale of kitchen woes, and how I refuse to be woe-d by such things! :) Seriously, stubbing my toe makes me angry, but my kitchen falling apart around me? Naw, I'll just figure something else out!
I've made this cake, some cookies, muffins, mini muffins, and even a pie on my bbq! It's like having an old fashioned summer kitchen! That's how I will look at it, at least! Once the snow flies I may feel differently though...whomp whomp. And I'm doing fine without a stand mixer, and a hand mixer with only one mixy-thing on it is still easier than trying to whisk everything by hand! I can't make smoothies until I get a new blender, but my Mom gave me a Yonanas for my birthday, so I will just use my frozen fruit for that instead! The glass if half-full for me folks, looking on the bright side is something I want to spread around! Later peoples, and happy Wednesday! Pass on some positive attitudes! :)
2 Comments
val
10/8/2014 09:43:32 am
You are superwoman when it comes to baking! 3/25/2015 07:03:01 pm
Waw..this is amazing recipe i have seen, and i will try it at home. because i think my kids like it. Leave a Reply. |
Hi, I'm Amy-Lyn! 
I am the lady behind this here blog! I live in the sticks with my animals, my super handsome husband, and my
3 amazing kids! Here you'll find things from recipes (gluten-free, paleo, and strait up junk food!), DIY ideas, thoughts on raising a son with autism, and whatever else pops into my brain! : ) Read more about me by clicking here! Want to Stay Connected?
Find What
|
 RSS Feed


