|
Have you ever set out on a task and thought, "I sure hope I can see this through...", only to realize that at some point, you've done it? And not only have you done it, you find that there were many moments that were beautiful? You've climbed the mountain, you've changed your health, you've worked at a summer camp as the cook (true story!), you worked your butt off and saved an important relationship, you did a total room make-over, saved for a down payment on a house? Whatever it was, didn't it take you by surprise? Yes, you set out to do it, but still, to turn around and find that the view from this new place in your life is beautiful and unexpected? Doesn't the view take your breath away? I was recently watching videos of my son Caleb, who has autism. The videos were from when we had our second child, Abigail. Caleb was 4 years old at the time. That was 8 years ago. Watching videos of Caleb when he was young, and seeing how sweet & happy he was left me feeling completely overwhelmed. Those were hard times, and felt like dark days filled with uncertainty. But now, with my view from here, I see his ability, his character, his goofiness has always been there! Over the years, he's developed skills that have made him into an amazing pre-teen! My view now shows me & reminds me that even if today seems dark & endless and if hopelessness wants to take over, it will be ok!  Doubts about the future and how uncertain it all is feels like a boulder strapped to my back. But I turn and look. And I see it all. My pregnancy with Caleb, his birth, his first birthday, the red flags of autism and the drowning feeling it brought on. The suggested day care, speech therapy, occupational therapy, Sunday School, years of potty training, bowel and food issues, starting a gluten free diet, refusing to put on footwear, running away, being brought home by the police, jumping into lakes and being saved numerous times. Starting school, riding the bus, bringing his baby sisters home......it goes on and on, the drama of raising a child with autism, playing like a film in my mind. You know when you're watching a movie, and everything seems hopeless, but you're sure it will work out. You're not at all sure how, but you are sure it will. I didn't feel like that back when Caleb was young, but now, from here, I do feel that! I feel it so deep down in my heart and soul. I know it will be alright. I still feel worried about him as an adult, him getting a job, or living on his own, but I also know it will be ok. I know this because I can see for miles behind me, and I can see that all along he's been getting stronger, smarter, more brave, more clever, more vocal, more friendly. He's learning, pushing, working hard, and becoming an amazing young man. The road has been marked with pot holes and storms, but that isn't the whole picture. Not by a long shot. 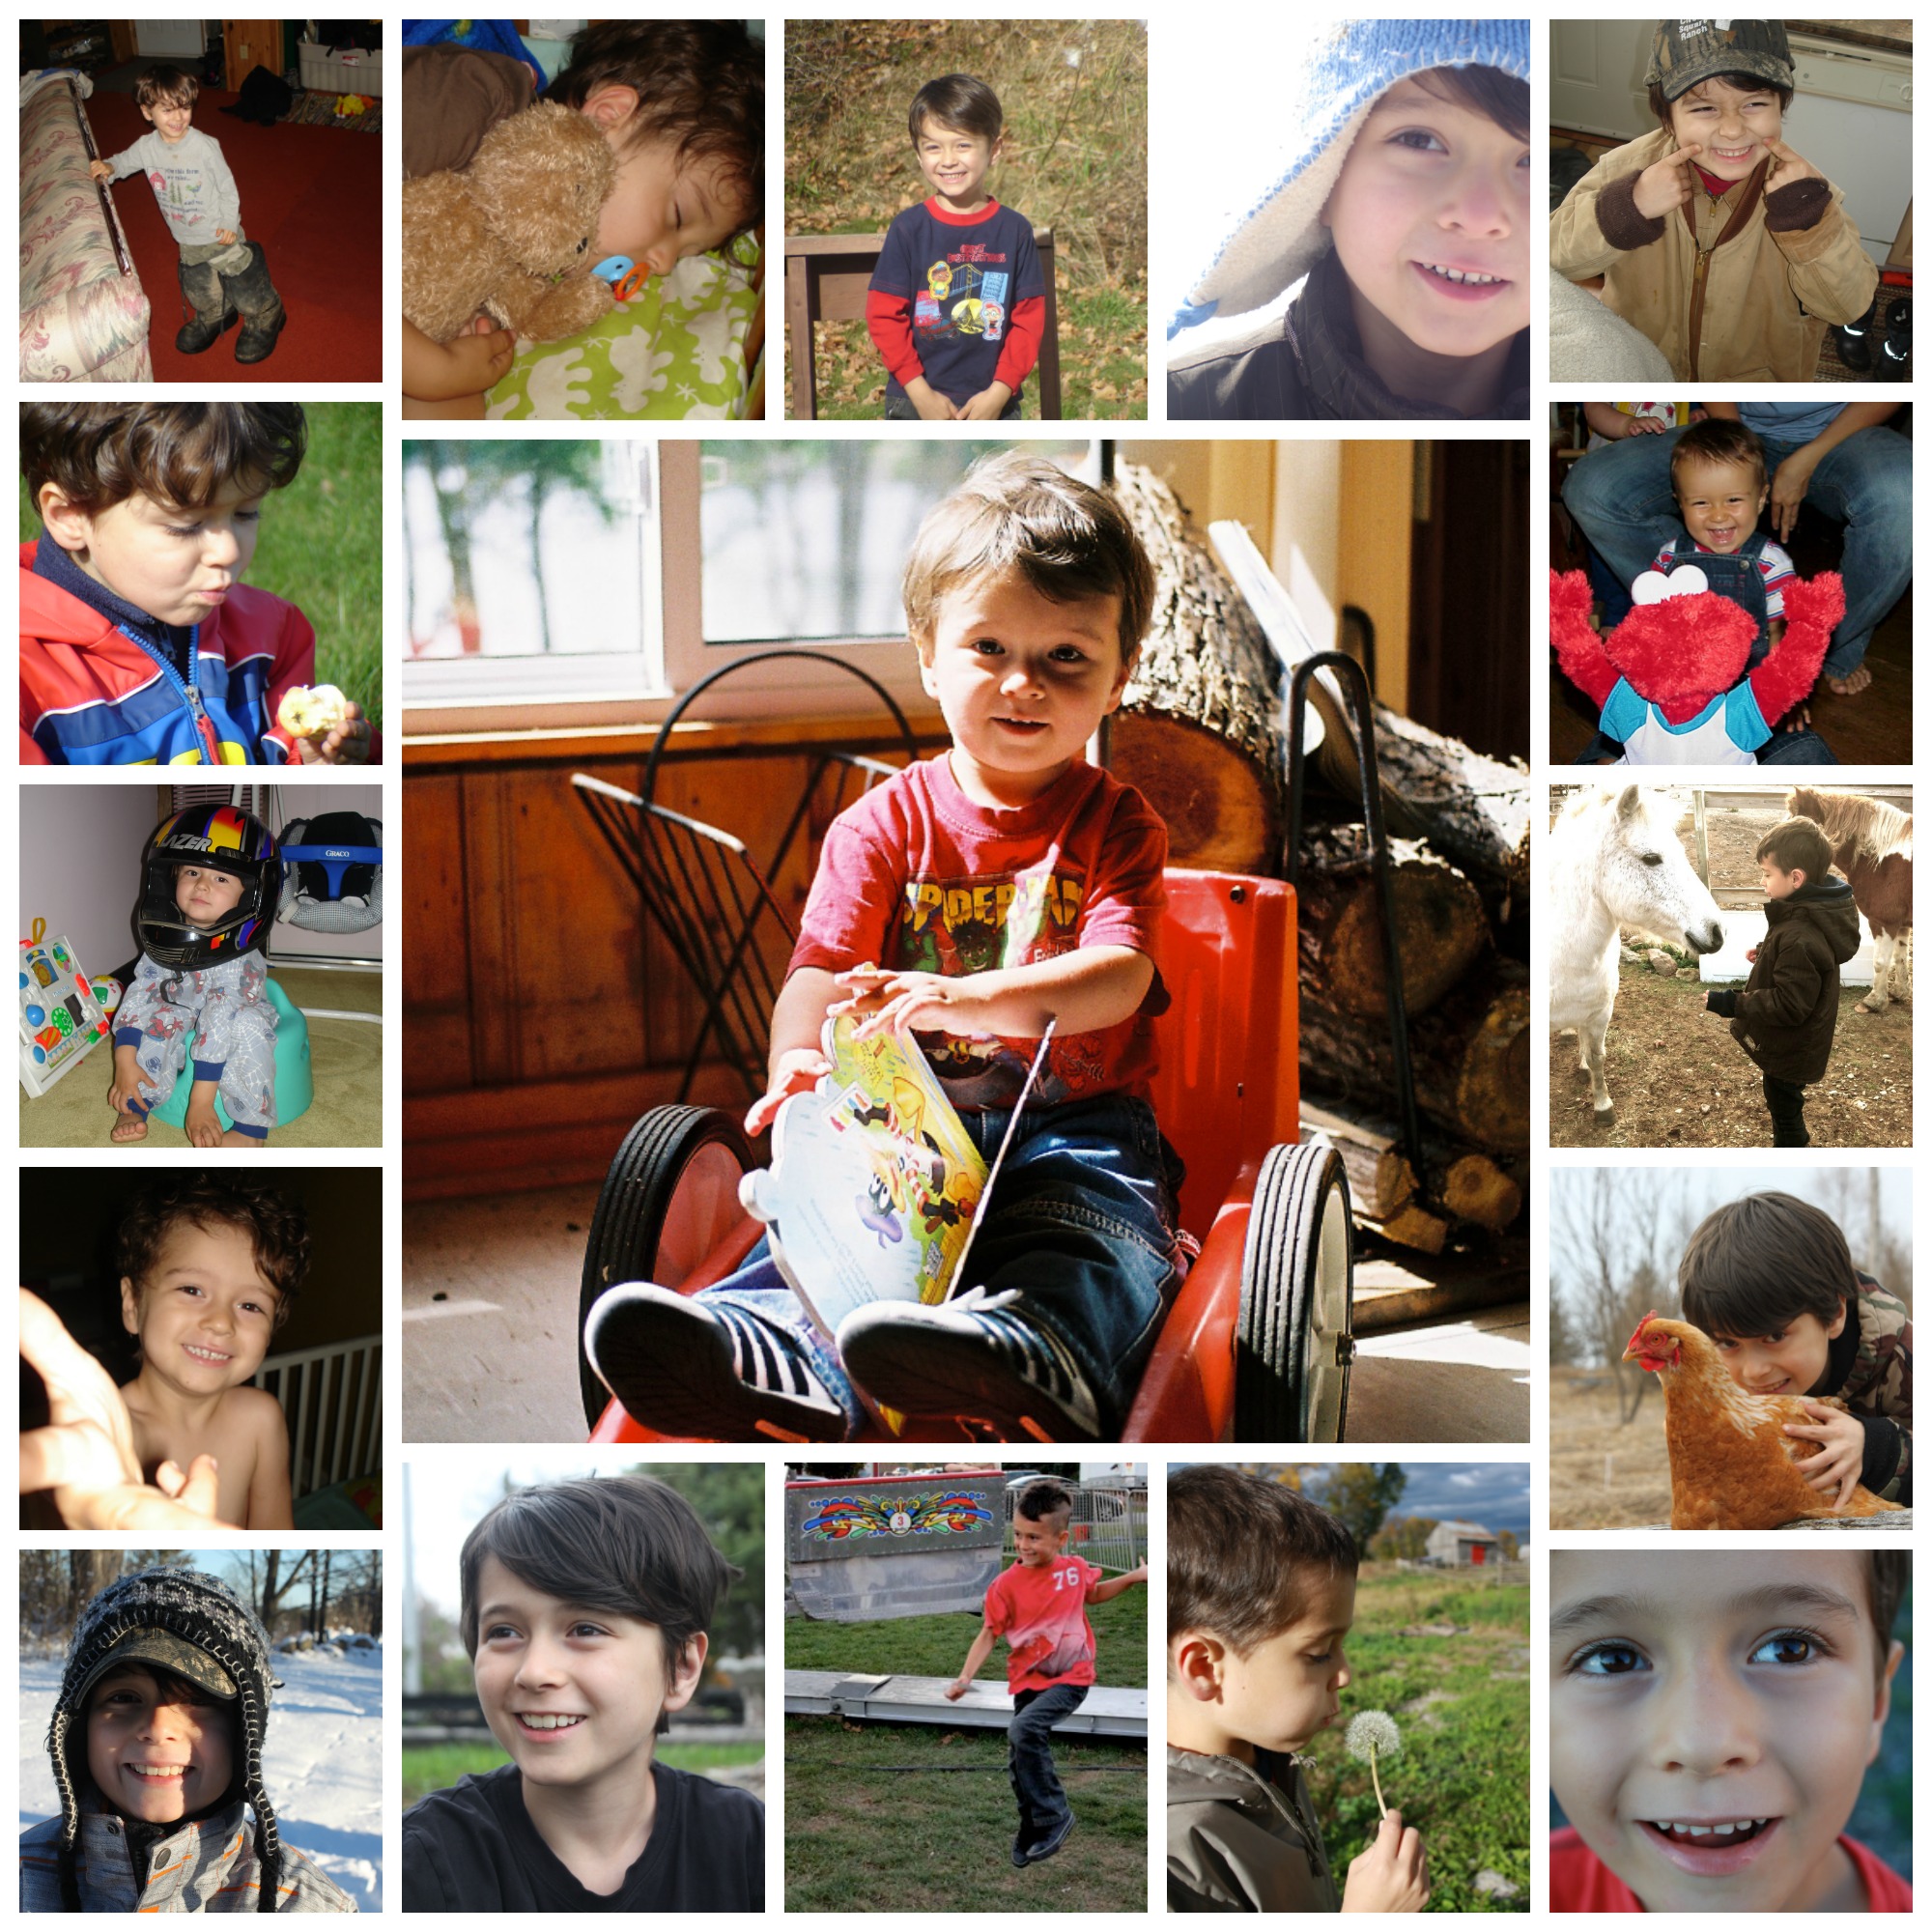 Last Wednesday I went to watch him play in his first volleyball tournament. And I needed to keep myself from crying! His classmates are so kind and helpful, and Caleb, as goofy as he is, can serve that ball like it ain't nobodies business! For now, he just subs in to serve, but that's more than enough for now! He's great at serving! He's included, and he's spending time with the boys in his class in a setting outside of the classroom, recess, and filed trips! I watched him with so much pride in my heart, knowing what the journey has been for him. When he was 18 months old and I was leaving him at a day care that told me he's mostly trouble, doesn't fit in, and struggles with every task, I never ever, in a million years would have dreamt of the day that I'd watch his team fight and win the A Championship, with him helping to achieve that! The view from here, oh friend, it's spectacular! I know from here, while looking back, that I also still have a long way ahead of me with Caleb. But stopping to look back brings clarity, brings hope, and brings so much joy to my heart that it gives me energy for the future! I have always loved my Caleb, but moments like this where I am able to see his life so clearly and all that he's done fill me up to the top with happiness! I can't believe where he is today. Cannot believe it!!! My heart today is for the parent of a child with autism who is reading this, and they are in the middle of their storm.
Please know that you aren't alone in this journey. And also know that with love, and consistency, using your gut instinct, and raising your child like they are precious, will yield temendous results - perhaps not outwardly as you may hope, but in your heart, and in the heart of your child, no matter how severe the autism. The view you have now is not the view you will have forever, take heart in that. This autism journey is tiring, it's emotional, it's so up and down! But it's also beautiful. Because one day you'll see something so amazing in your child that your heart will be filled to the top! But you need to be looking. You need to be seeing the big picture, forward and backward. Last year really sucked for Caleb. But this year? This year has been so absolutely amazing! But I only know that because I am taking stock. You can do this. You're not stuck. Autism is always changing & growing. Trust me. The view from here is amazing. xoxo
0 Comments
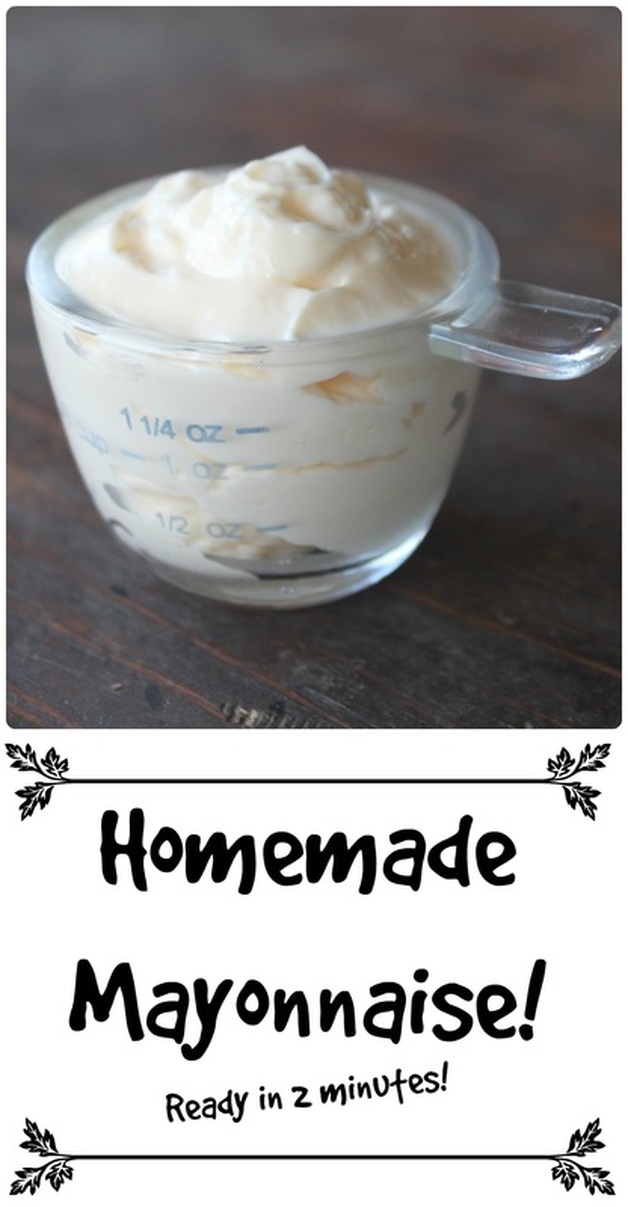 Can you tell I'm pretty excited about homemade mayo? Look at my title! Look at all those exclamation marks!!! Let me tell you though, my tale of mayo hasn't always been a happy one..... (.....insert depressing dream sequence music.....) Picture this with me, it's 2004.......(all of these ellipses are to help you stay in a dream sequence with me) :) .....I borrowed a cookbook from the library that had a homemade mayonnaise recipe in it. When I first saw you could even make your own mayonnaise, I thought, "sounds fun! I'll give it a try!". I think I was interested because I was eating sugar-free/low carb at the time, and regular mayo has sugar added, and "low carb" mayo was expensive. But, oh, I was so young and foolish. And not to mention wildly inexperienced as a food handler (for real, the newly married me from 12 1/2 years ago would have rolled around on the floor laughing if someone told her she'd be writing a blog that was food and recipe centred!)! Anyway, I digress, back to the story......). There I stood in my kitchen, doing as I was told from the cookbook I'd found the mayo recipe in. All I needed to do was to put an egg yolk, vinegar & some salt in a bowl, and slowly drip in oil while I whisked! And voila! I would have mayonnaise, made by me! And wouldn't I just be bursting proud! Well, about 15 minutes later, after I'd whisked until my arm felt like jello, and dripped each drop of oil in slowly (seriously, it said one DROP at a time!), all I had to show was a bowl of pretty gross looking, separated, curdle-y looking nastiness! And I had no internet at home, so I couldn't just quickly look up "how to fix ruined homemade mayonnaise!". Dream sequence date transition music..... It's now 2006, and I have a new recipe for mayonnaise that says if I use a hand mixer, the mayo will work out because it will be a steady beating, which is important for the emulsification process. You still need to put the oil in one drop at a time, but I thought, "well, at least the other hand won't be whisking, so it shouldn't be as hard?" I was wrong. Holding a hand mixer for 10 strait minutes IS hard, and my hand mixer was very overheated, and the mayo still didn't work out!!! Dream sequence date transition music..... Now it's 2011 (ish?), and I see a recipe for homemade mayo that says using a blender will do the trick! Apparently, hand whisking, and using a hand mixer doesn't whip fast enough. And for the egg and oil to properly emulsify. It has to happen slowly, but fully at each drop of oil, and that can only happen if it's being whipped fast enough! (hand slapped to forehead!). Well, I tried it. Long story short: it failed. I was a homemade mayo failure. I saw some time after, that using a food processor worked great, but after all the failures I'd had, I wasn't willing to try. Plus, I didn't own a food processor with the opening in the top to add food as it's whirling, and that was an important part of making mayo in said food processor. I wasn't about to go out and buy a new food processor either, just to attempt making mayo again! Dream sequence date transition music..... Here we are, it's 2015, and I'm standing in a second hand store in Tweed, looking at a immersion blender thinking, "well, I have been thinking about getting one of these because making homemade "cream-of" soups would be easier if I could just use this instead of having to dump the soup out into the blender....?". It was $5. So, I got it. And I was right, making "cream-of" soups is ridiculously easy with an immersion blender! And, not too long after getting the immersion blender, our regular blender broke, so I thought, "well, I sure am glad I bought the hand-held blender!". Then one day....one magical day....I was on a blog, The healthy Foodie, looking at a recipe, and somehow (by way of some rabbit trail I often find myself on when I'm on a blog I like!), I stumbled on "Foolproof Homemade Paleo Mayo", and there was a picture of mayo in a jar, and an immersion blender. I thought, "whaaaaaaa? Foolproof? She's never met a fool like me! I gotta try it". Dream sequence music changes to something triumphant and uplighting.... It worked!!! People, I am here as a bonafide homemade mayo failure to tell you that this is the FOR REAL foolproof method of making mayo. I've made it with cold ingredients, room temperature ingredients, fresh eggs, old eggs, using lemon juice, white vinegar, apple cider vinegar, pickle juice (which was amazing!!!-I used it to make tartar sauce for fish night!) adding dijon, adding yellow mustard, adding pepper, adding garlic powder, cayenne, rosemary, thyme-I've tried it so many ways, and this mayo hasn't failed me yet! I wanted to make a video of making it though, because while talking to my Mom on the phone one day about how crazy easy it was to make this mayo, I could sense some skepticism. That and she wasn't sure what size jar to use, and I told her "well, I'll video tape me making it, and post it to YouTube for you!" So, here it is, in all it's glory! I am so happy I'm making my own mayo that isn't a complete failure! Now, I eat paleo, and I believe in using healthy oil to make my mayonnaise. What is "healthy oil", well....quite frankly, I don't want to get into that right now.....I'm too happy about homemade mayo to argue about "healthy oil"! Now, I can tell you though that different oils produced different tastes. I use Extra Light Tasting Olive Oil because it has (duh) a light taste. I once used regular olive oil, and the mayo, although thick and lovely, was very olive oil-y tasting, and also kind of green in colour. Bleh. So, just keep that in mind when choosing an oil. Homemade Mayonnaise ****Super important note!!!*** You'll need a 16oz,(also called a Pint, or 500ml) wide mouth mason jar for this. Or, some immersion blenders come with a tall, wide mouth, cylinder shaped container that you can also use. The immersion blender needs to fit right in the container for this to work. Ingredients:
Something I add in regularly is dijon mustard, about 1 Tsp Method:
 As you can see, my immersion blender is NOT fancy. Not even a little bit! But it works! So, incase you're thinking you need to go out and buy the best, most expensive immersion blender to make this work, you're thinking wrong! Heck, if you don't already own one, and you're in not a desperate hurry to make your own mayo, just keep checking into thrift shops to see if you can snag an immersion blender at a great price! I honestly think my mayonnaise tastes even better because the blender only cost me $5! : )
Ok, full disclosure, before I got this hand blender, I did manage to make ONE BATCH of homemade mayo using the whisking method. The recipe I used it in was for Shrimp Stuffed Tomatoes (which are so delicious!), but the effort to make the mayo was too much! I can be pretty lazy, ya know! Now, making those same shrimp stuffed tomatoes with this fast mayo? Game changer. Game. Changer. I had honestly gotten used to a no-mayo life. But , there were things I really wanted it for. Tartar sauce for fish nights, for example. Or to make a ranch dressing to eat with a pile of veggies as a bedtime snack. How about creamy coleslaw? Yes please. It is a welcome addition to my life! And, my kids eat it too, although I've never told them it wasn't store bought. I feel like they'd be skeptical if they knew I made it? They are my worst critics. Anyway, maybe they wouldn't be skeptical? Either way, I find immense pleasure in knowing that they'll eat it! : ) Well, that's it, I guess! I'm happy to be here writing a post and sharing something new that I'm excited about! I hope you had a great Monday! I love history, but I wouldn't claim to know much about it at all. I just love knowing that I am grounded here in Canada. My house, for instance, was built more than 100 years ago, and young men who lived in my house may have fought in some of the wars. But knowing all of the details of history, and honouring the people who gave their lives for my freedom aren't the same things, in my opinion. I wasn't going to write today, but this morning while at a Remembrance Day Service at the Tweed Cenotaph, the ceremony MC said at the end of the service a thank-you to all the children who came out to the service because the children are "the interest on debts so dearly paid". I couldn't help but get teared up, looking my my kids standing there with students from their school, and thanking God that we live somewhere that is safe, and free. So I thought, why not write something today? Why not say "thank-you" to all those who have fought, and are currently fighting for the freedom we value so highly here in Canada. I wouldn't encourage fighting, but I think that the brave individuals who stepped (or still step) forward, or had been drafted and went forth with courage, deserve honour. As a nation, we are who we are because of brave men and women who believe in our country. Last summer, while in Europe, my husband and I had the opportunity to visit many war memorials, and it was overwhelming, to say the least. So, instead of prattling on, I just wanted to share some of the photos I have from the memorials we visited. Below are photos from some of the memorials we visited in Belgium 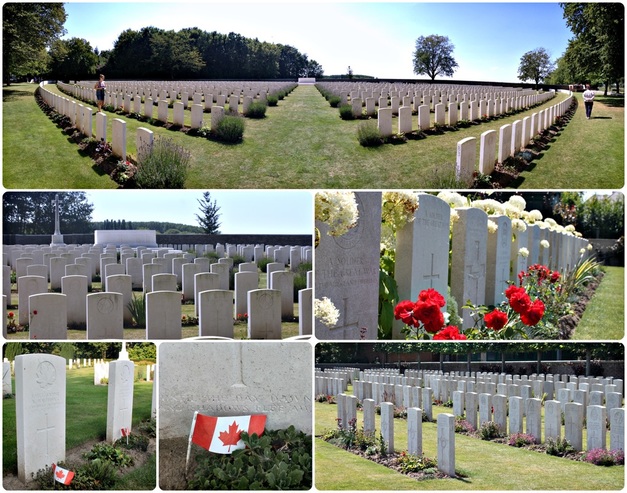 Here you see a marked grave, and a photo of the young man buried (elsewhere) in the cemetery. Also a grave with the marking "Just a thought of sweet remembrance by Mother", as well as graves marked with "Gone but not forgotten", and "known unto God" (which are marked on many graves where the soldier could not be identified). 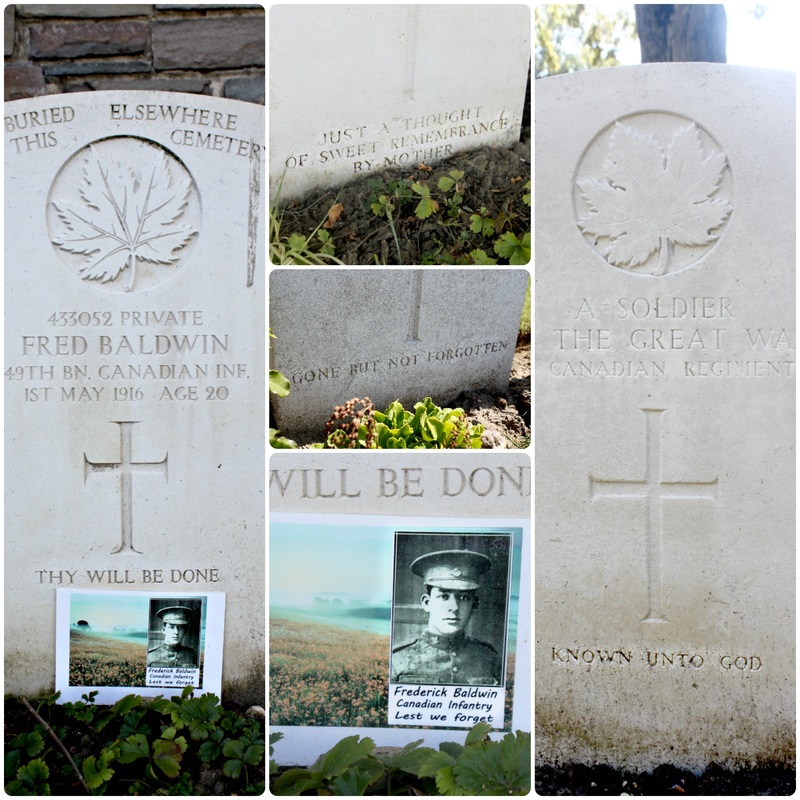 Pictured here is "Sanctuary Wood", located in Belgium. "After the First World War a farmer returned to reclaim his land in and around what was left of the wood he had left in 1914. A section of the original wood and the trenches in it were cleared of debris and casualties but generally the farmer left a section of a British trench system as he found it" (source). 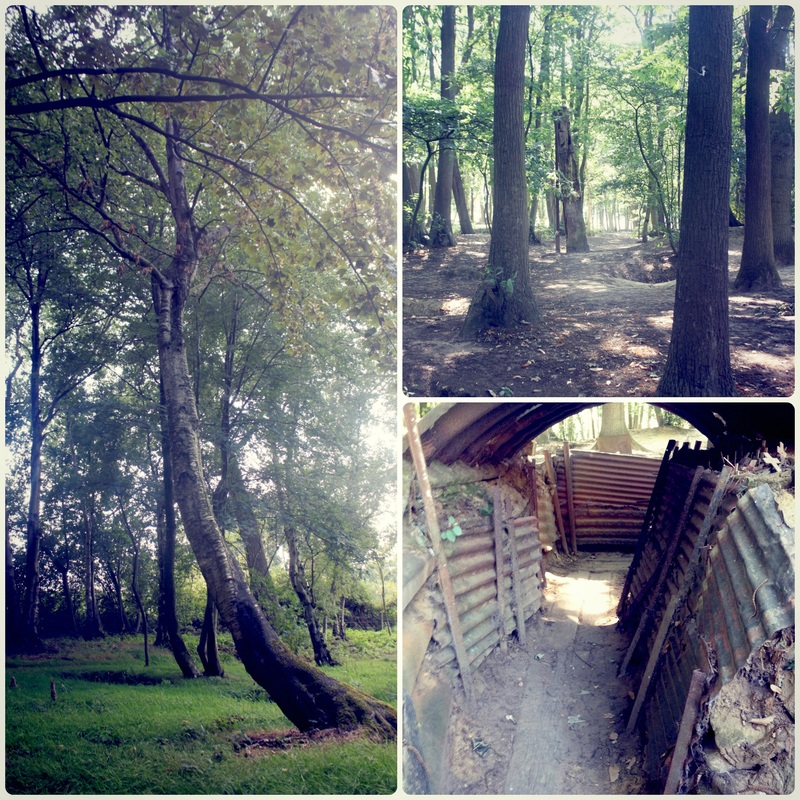 This is Hill 62 Memorial, "The memorial is located beside Sanctuary Wood on the top of Mount Sorrel, which lies next to 'Hill 62' all of which the Canadians held or recaptured from the Germans during those offensive operations in early June 1916. The British Official History of the war recorded "The first Canadian deliberately planned attack in any force, had resulted in an unqualified success." 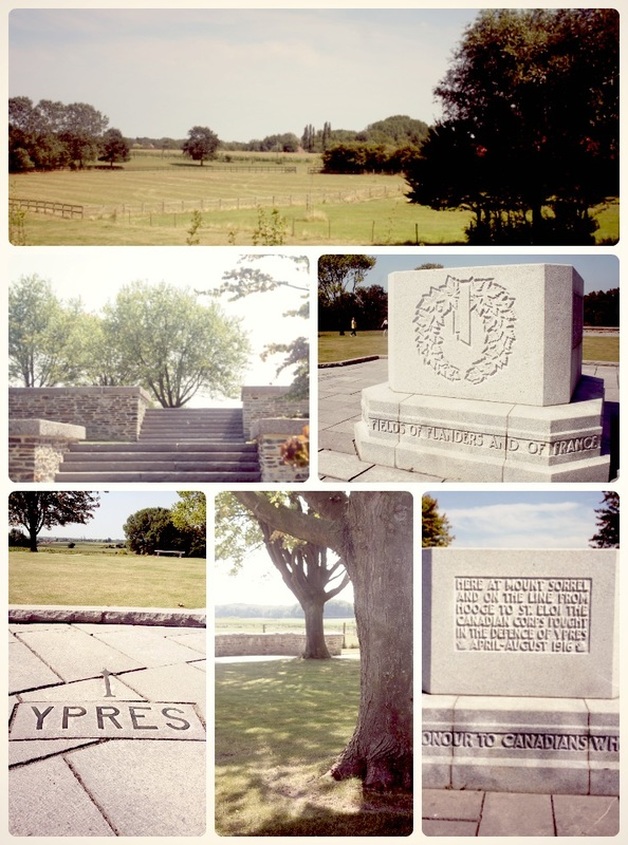 These are photos from a very emotional ceremony, the Last Post Ceremony, in Ypres, Belgium. It is similar to a Remembrance Day Ceremony you may attend with the sounding of the Last Post, a minute of silence, the “Réveille” bugle call, and laying of wreaths in memoriam. After the wreath-laying a member or guest of the Last Post Association, a visiting dignitary or a visitor will have been invited to say the words of the Exhortation, taken from Laurence Binyon's poem “For the Fallen” (fourth verse). Standing in the centre of the road under the arch of the Hall of Memory the person will say the words: “They shall grow not old, as we that are left grow old: Age shall not weary them, nor the years condemn. At the going down of the sun and in the morning, We will remember them.” (Source) 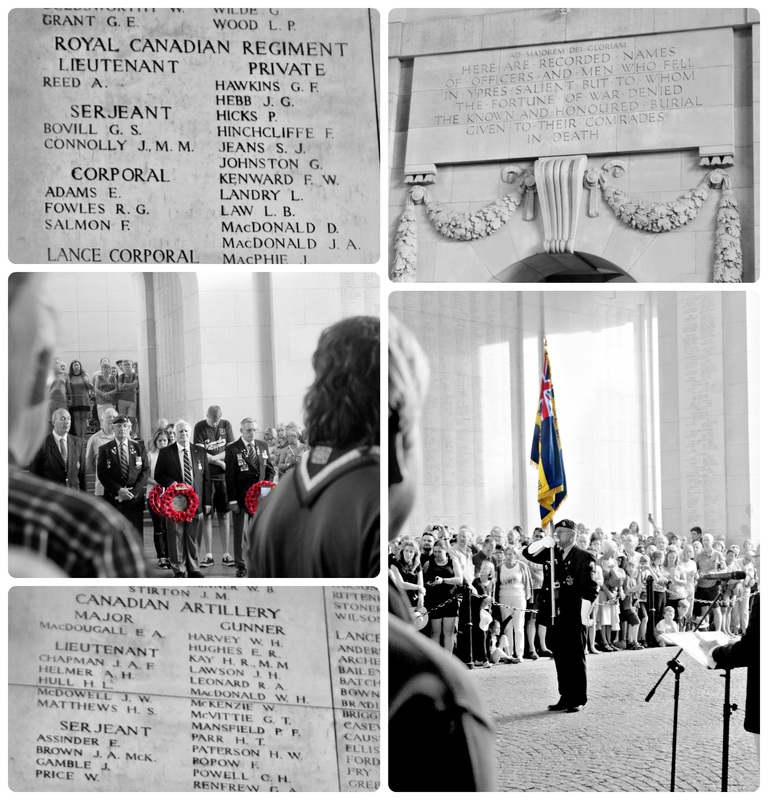 The Flanders Field cemetery is in the area known as Flanders Fields, where fierce fighting took place throughout the war on the Western Front. Canadian Lieutenant Colonel, John McCrae, was a Canadian poet, physician, author, artist and soldier during World War I, and he wrote the poem "In Flanders Fields" on May 3rd, 1915, after witnessing the death of his friend, Lieutenant Alexis Helmer, the day before. The animation below gives a quick summary of how the poppy became our symbol of Remembrance (Source) Below is the poem "Flanders Field" by Colonel John McCrae 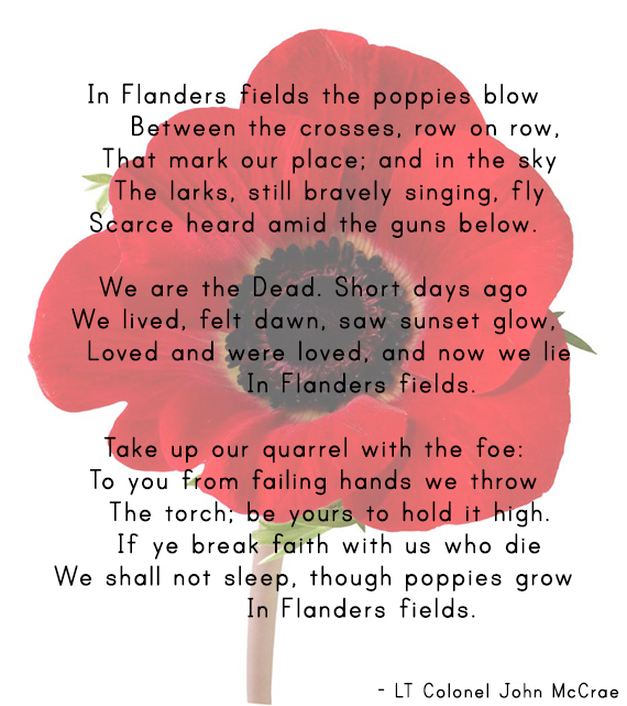 I was sitting and talking with my 8 year old daughter the other day, and she was asking about the wars and Remembrance Day. I couldn't help crying talking with her about it all, and what it meant to those families all those years ago, and today. Seeing graves in Europe marked "Known unto God" because they could not be identified, broke my heart. And the "just a thought of sweet remembrance by Mother" left me feeling so much pain for all the mothers who lost their sons in The Great War.
Whatever your views on war, and conflicts between countries, you cannot deny that we live in a place that is beautiful, strong and free. My children can play outside without fear, they can attend church services, go to school, spend lazy Saturdays in their pajamas watching Netflix. They are free! I am proud to be a Canadian, and to celebrate Remembrance Day. Lest We Forget Well, here I am! I'm back!!! : ) Ok, I've been back since the last week in August, but things have been moving at a mile a minute at the Van Londersele's! However, I had been working on this post with the intention of having it up by the first Monday in October, but when I'd finished it all up, and I hit "publish".....it VANISHED!!!!! After I sat crying at the computer for about 15 minutes, I turned the computer off, walked away and thought "well, I'm not sure when I'll have time to re-do that! And here I am, a month later, finally (hopefully) publishing this (re-done) post! So, I've been away, but I've been trying, trying really hard, to get my blog back up and running! Ok, well, now that I've got that out of my way, let's re-cap the last 4 months, shall we?! (insert dream sequence music....) Camp Cook-July & August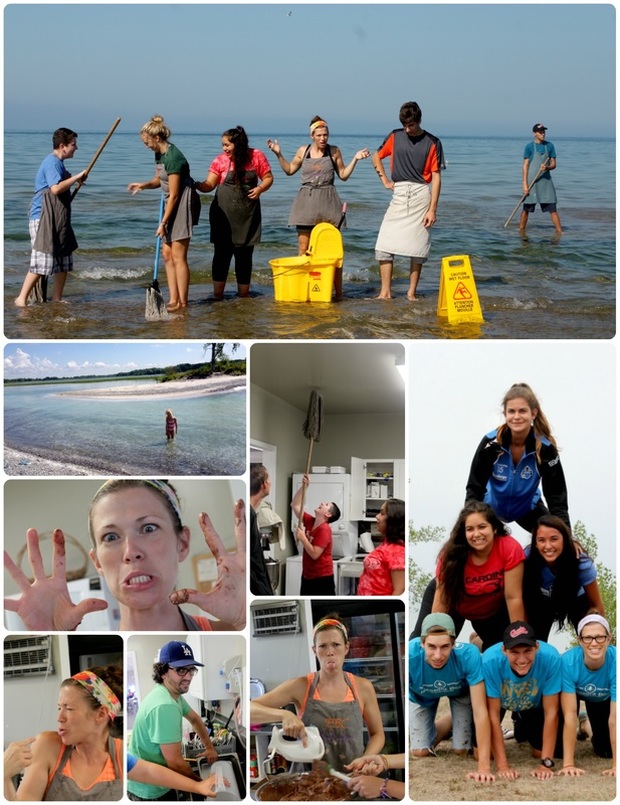 I was a camp cook at Pleasant Bay Camp in Consecon! This job left me sleepless and stressed for weeks leading up to the start date, and after the first week (where at one point I shut myself in the storage room to cry!), things seemed to click. I had some cooky and wonderful teens working with me, and they made everyday fun (and loud - we sang A LOT, and VERY loudly!). There were some failures, some successes, but mainly I grew a lot! I have serious F.O.F. (fear of failure!), and the pressure of this job felt crippling, then I got there, figured out all the quirks of how everything worked (ovens, stoves, steamers, etc.), figured out what worked and what didn't, and trusted myself, and things worked out! I needed to do a ton of planning, prepping, and figuring out exact times for (what felt like) 100 things at once so it all came out together at meal time! It was my kind of stress, it turns out! I do this at home basically everyday! When it comes to meals at home, my personality lends itself to exact planning, prepping and figuring out exact times. So, I had to tell myself to stay calm, and do what I knew how to do. In the end, I walked away feeling so proud for not completely bombing, I felt fulfilled for working so hard at something worth working at, and I felt love from my new "kitch" family (as one of my staff called it). :) And my kids had such a great time spending their days with other kids, going swimming, playing sports, making crafts (SO MANY CRAFTS!!!!), and getting a ton of sun! Family from Belgium-July Last summer Adam and I had the opportunity to go to Europe where we got the chance to visit with a lot of our family. This summer, 2 family members who we stayed with for a whole week in Belgium came to Canada! We got together for lunch one day shortly after they arrive in the True North, but later in the month we met up in Toronto (with my in-laws too) and went to Caribana. So, it was super loud, there was a lot of near-nudity (seriously!) :) , but most of all we got to see our family again which filled my heart up! Horse Staff-August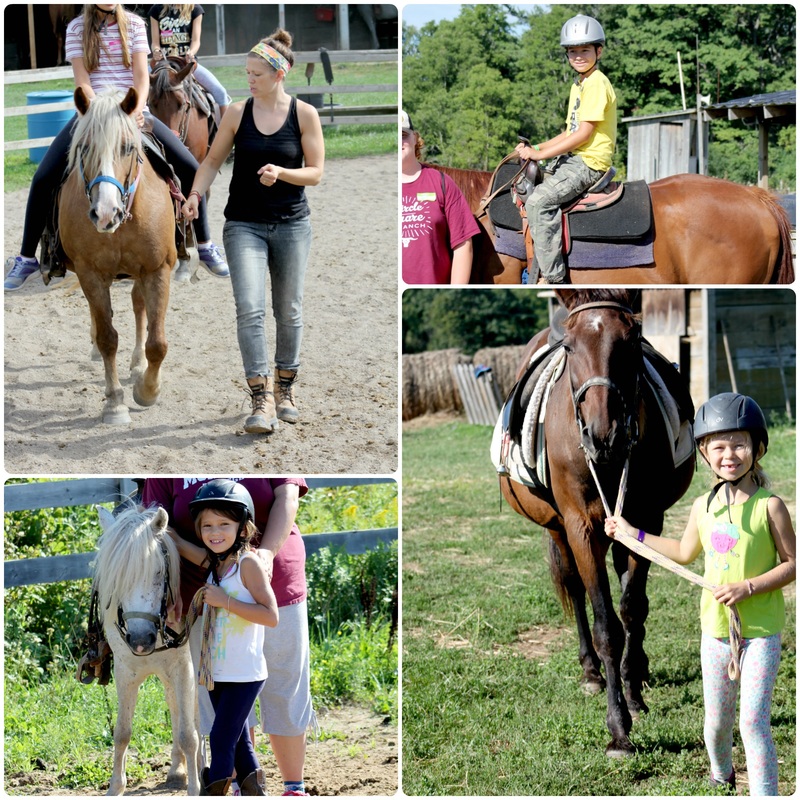 A week after we left Pleasant Bay Camp, we headed to Brantford so the kids could attend Day Camp at Circle Square Ranch, and so I could be a member of the horse staff! I spent years and years working at this camp, and I was so excited to be heading back to work for the week. I was a little nervous about teaching horseback riding again because it's been a while, but it all came back to me and it went great! And my kids had so much fun in day camp! I loved (x 10000000) being there for the week! What's Left of Summer-August & September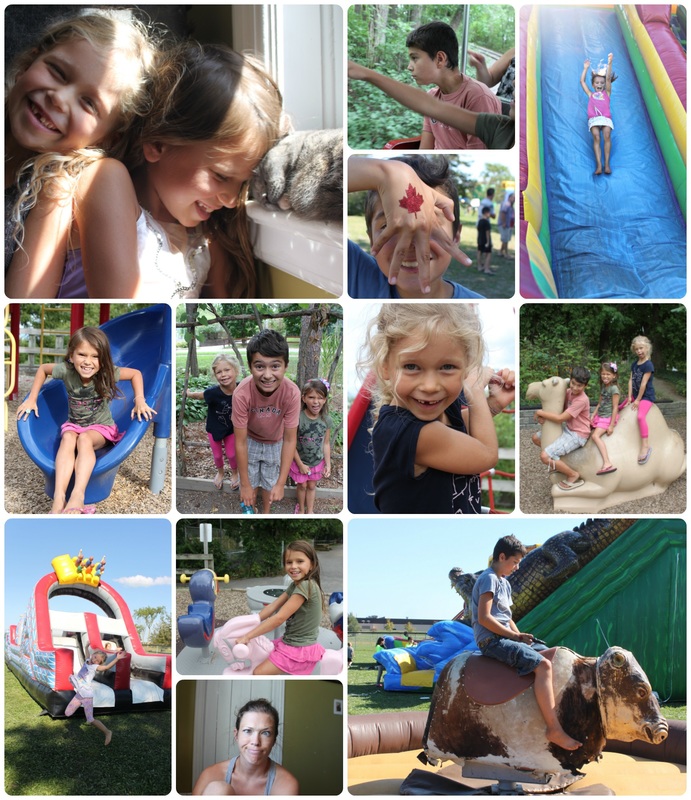 With the 2 weeks we had between leaving the Ranch and school starting, we crammed in as much "normal" summer fun as we could! We got to the Peterborough Zoo, the Tweed splash pad, the Tweed park, went for walks, visited neighbours, spent time in our jammies, cuddled our cat who we missed a lot, and went to Adam's work Labour Day Family Picnic. It was a little hectic, but wonderful! Back to School!-September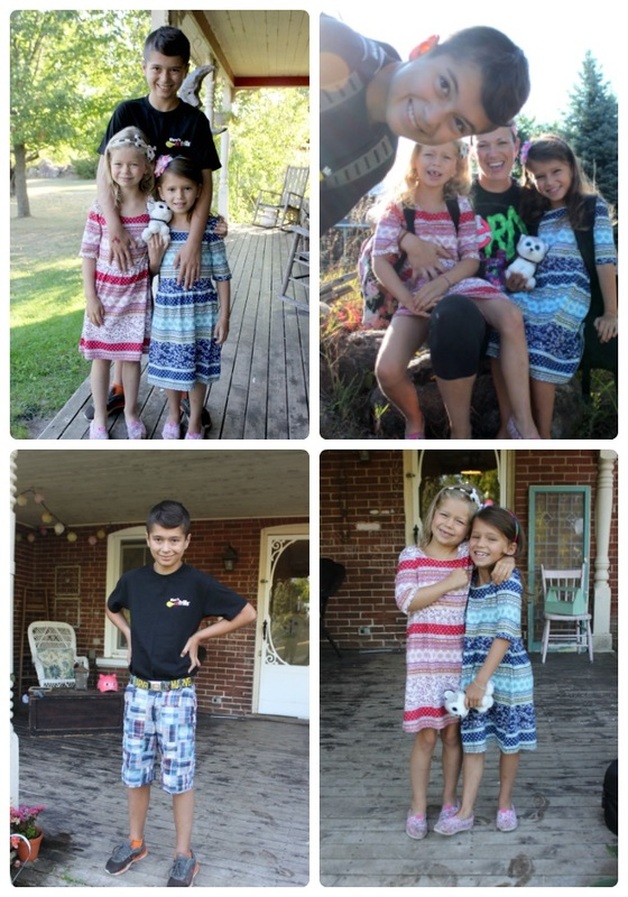 Somehow my little babies were going into grades 6, 3 and 1! (*tear*) The kids looked so good, so grown-up, so beautiful, and I felt so old! So far, this school year is going so good. Caleb's class had a teacher switch 2 weeks into the year which left us feeling upset and worried, but his new teacher is amazing, and Caleb clearly loves him and his class. Caleb also has a rock-star for an E.A. this year, so she is really helping to keep Caleb moving forward and working hard. The girls teachers are also really wonderful, and they seem to be working well together. Surprise Birthday-September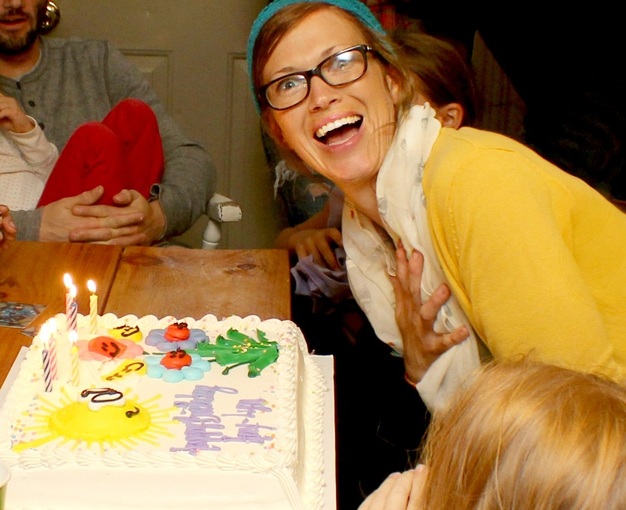 So, the day before my birthday I was in Belleville for an Art Show & Sale, and when I came home, my sister and her family, and my brother and his family, and a bunch of my friends were at my house! Surprise! I really was surprised, and it was so great to have everyone celebrating the 13th anniversary of my 20th birthday :) Hardy har har. I'm 33 and I'm ok with that! Halloween-October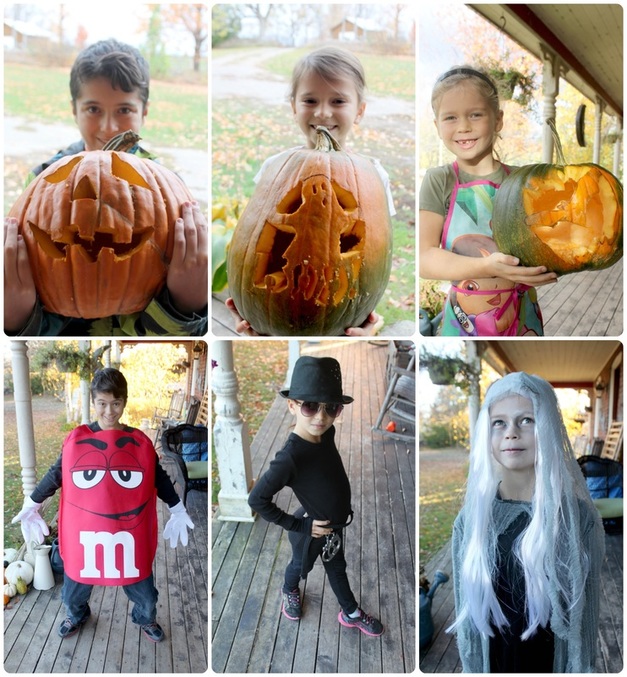 We carved pumpkins. We dressed up. We collected candy. It was awesome! This needs to further explanation! :) Simple Recipe!So, now that I've recapped the last few months of my absence, I would love to move onto a recipe that is so simple, and if you aren't into veggies as noodles, you can make this with your fav gluten-free or regular pasta. Just cook it up as usual, rinse well in cold water, and add to the pan! 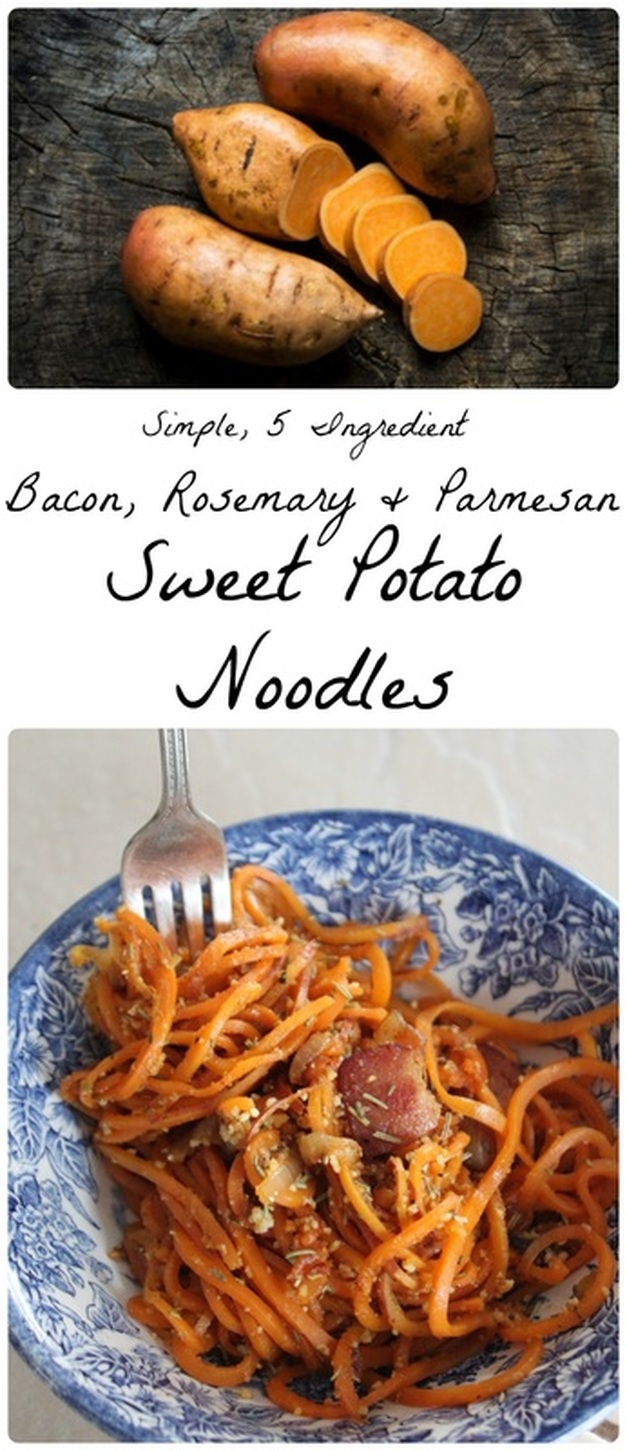 Bacon, Rosemary & Parmesan Sweet Potato Noodles Serves 2 large portions, or 3 smaller portions Ingredients:
Method:
Enjoy! 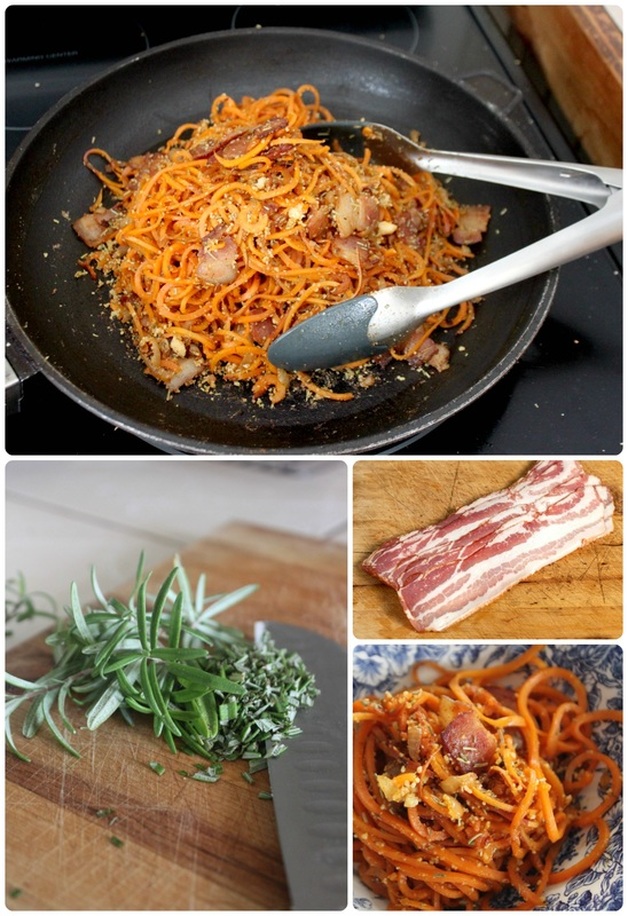 That's all there is to it! Truthfully, when I make this, because my kids aren't overly fond of sweet potato noodles, I'll cook up a pot of gluten-free pasta, then I'll rinse the pasta in cold water, and start this recipe in the pot I used to make the pasta, and add the cooled pasta to it at Step 4. In another large skillet I'll start a second "batch", and make it with sweet potato noodles. It's really not that much extra work, I'm literally doing the exact same recipe, just on 2 different burners, and with a different noodle. When all is said and done, it's still a simple meal, and has relatively few dishes! Seriously, making it 2 ways at once only yields 1 pot, 1 pan, 1 colander (for rinsing the cooked pasta), and one Spiralizer to wash! Well, and our bowls and forks, of course. Not bad for a freakin' delicious meal! :) Well, I'm happy to be "back". I'm not sure what my blogging schedule will be these days....sorry! I will work it out though! I used to like to work first things in the morning...but I've been having a heck of a time getting up early these days! So, instead I've taken to writing in the evenings, after the kids are in bed and Adam is on a night shift. It works, and hopefully I'll be able to get some lovely recipes out to ya'll, as well as some Health & Fitness posts and whatever other random things that pop into my head!
I will be taking you through my soon-to-be kitchen renovation, so stay tuned for that! Until next time, xoxoxoxox  This is my first post being back from our whirlwind summer! And I needed to talk about something very important. Today is the 4 year anniversary of the birth of my 4th child, my son, Abraham. On August 30th, 2012 I went into labour and delivered at home a little boy, tiny and perfect. In the last few years I've written about the experience. First writing about it in a post called "Abraham", and last year in a post called "Remembering & Forgetting: Abraham" At the end of the post I wrote last year, I talked about a little boy at church who was born on Abraham's due date, and who I basically avoided at all costs because it was too painful to see him. I mentioned that I "took a step" and actually talked to his Mom while she was with him, and how this was huge for me. To actually be close to this little boy, this boy who every time I looked at I imagined what my Abraham would have looked like. It was a big deal for me. But here's the thing....God was planning something. Something that would take this one giant step further. I felt as though God was just near me, providing quiet comfort all these years, and suddenly he shouted, "MOVE FORWARD!!!". He did it out of love, but it still hurt. He wasn't saying "move on & forget", he was just saying "move forward". 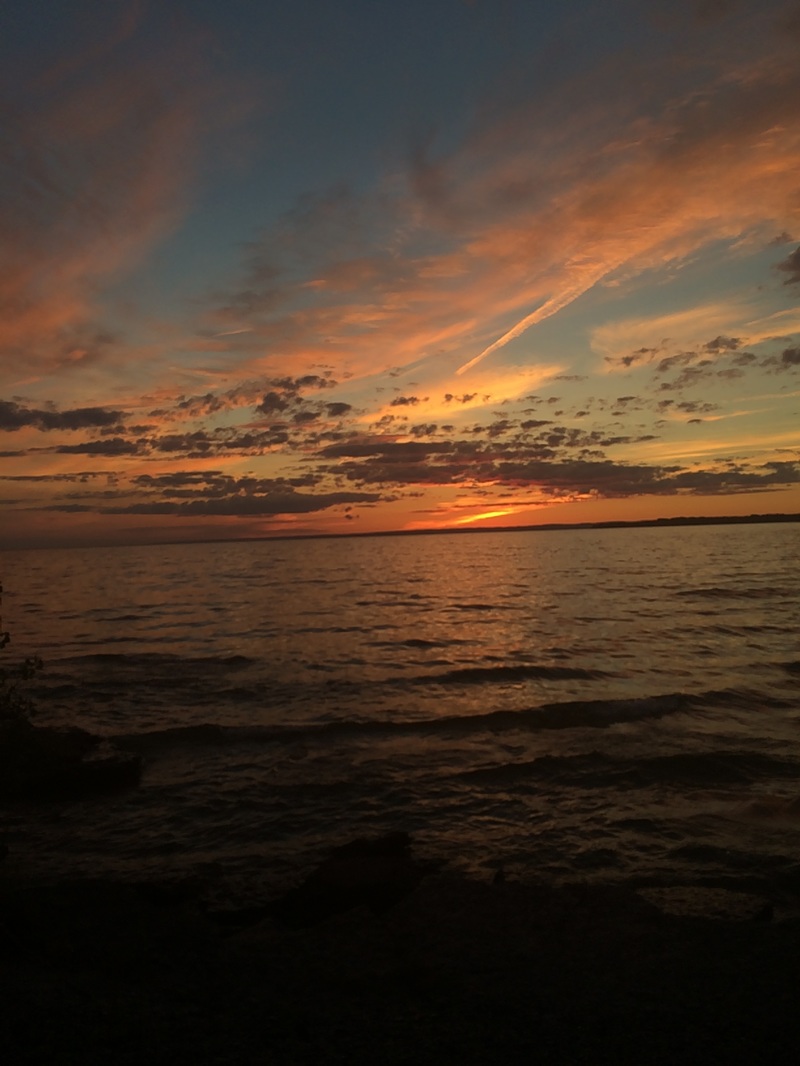 After much thought, I decided to take a job this summer as a camp cook at the beautiful Pleasant Bay Camp. I knew the job of being a camp cook would be difficult, that it would require early mornings, late nights, sweaty and stressful days, planning to a T, and managing staff. What I didn't plan on was that the woman leading the Leader In Training (LIT) programme would be living in the cottage next to me. This woman was none other than the woman from church who's son was born on Abrahams due date. The very child and family I had been avoiding was suddenly living next to me, walking around camp where I would see them, and eating in my dining hall every meal. I was suddenly and without warning, face to face with a little boy who had no clue what I've been through, or why I find him upsetting. What happened during the three week LIT programme weeks though was something I couldn't have planned. I wouldn't have planned it, honestly. I became friends with this little boys wonderful mother and father, and I stopped avoiding their son. He has special dietary needs, and he'd often have a different frozen treat as dessert, and I was able to give him his dessert, and wait for him to say "thank-you", and look into his beautiful eyes and know that just because he was here and Abraham wasn't didn't mean that I had to shut this little guy out. At one point this woman joked about how we'd been going to church with each other for 5 years and hadn't really talked much or become friends, but how now that we were at camp we were becoming friends. At the end of the 3 weeks, just before this Mum was set to leave because the LIT programme was finishing, we had a random heart to heart. She said to me that, even though we weren't friends at the time, she remembers my struggle during the time I had my second mis-carriage. She said that she felt badly that she hadn't said anything to me then, but just wanted me to know that she remembers my loss. I shared with her then that I appreciated her saying that, and also shared with her how I'd had a miscarriage before that, and how my due date was on her son's birthday, and how us not being friends at church was my fault, my design. I told her I was avoiding her and her son. I walked away from this encounter feeling God say to me, "you did it!!! You took one giant, giant, GIANT step forward!!!" I still feel sadness deep in my heart about the loss of Abraham, but the hurt is softer now, somehow. I feel like letting this little boy from church into my life let the hurt of losing Abraham fade a little. And that hurt needed to fade. There are so many feelings involved in a miscarriage, and most of those feelings are grey, not black or white. So letting go of these mysterious and un-namable feelings is extremely difficult. Tonight, the kids and I stood by the garden we buried Abraham in, and Abby, my middle child, starts singing "happy birthday" to him, and I burst into tears. She stopped singing and apologized, but I said, "No, I'm not upset at you. I think it's beautiful that you wanted to sing to your brother. I'm crying because it hurts that we'll never have a birthday party for him here with us". Then Keziah, the youngest, pipes up and says, "maybe God is having a birthday party for him?". Then I really cried. I wish I could see Abraham now, but I am happy with my family and my life. I have 3 amazing, beautiful, talented, smart, fairly whiney kids here on earth with me. I have a super handsome husband who loves me, no matter what crazy crap I'm going through. I have a dog who adores me, a cat who adore me even more, and 2 horses who adore me even more!!! I realized this summer that moving forward, and moving on are very different things. One involves embracing the loss and the hurt, seeing the beautify that remains, and choosing to live in that new beauty. The other involves bottling up any feelings, pretending the loss never happened, and living with the hurt deep inside, unexpressed. The Mom of the little boy who I became friends with talked a few times about becoming who you are, in spite of, and because of the hurt and hardships one goes through. You can't forever live in that loss, and let it be a thing in your life that stops you from living. It needs to be the thing that drives you to live. But this happens willingly, not just by chance. You need to take what you've been given, and turn it into a beautiful thing. One night in early August, one of the kitchen staff and I went out at 1 am to watch a meteor shower. As I lay outside on my quilt, hearing the waves crashing near me on the beach, and seeing stars shoot across the sky above me, I thought about how small I really am, in light of how large the world is. And still, in all of this, I mattered to God. My feelings mattered to him. But more importantly, my heart mattered to him. I came to camp at the beginning of summer expecting to be stretched and to grow, but I ended up stretching and growing in ways I never imagined. God took what was a heart "content" with hiding and hurt, and opened it up, and filled it with a healing balm. I never thought that being close to, and getting to know, the sweet little guy who reminded me of my loss and pain would be the very same child to heal parts of my heart I was "happy" to leave broken and scarred. I am happy today. Not because of my loss, obviously, but because I can say with joy and healing in my heart, that I am moving forward. I am moving forward with love and gladness in my heart. If you're reading this, and your pain from a mis-carriage is still so new, and raw and real, I understand you and feel your hurt. But I want to encourage you, and bring some light into your darkness; the pain you feel, the loss you carry with you can be a thing that becomes something beautiful in your life. This can become a step for you to become more of who you were meant to be, to become someone who can love more deeply. It might not happen today or tomorrow, but let it be a part of your heart, and it will happen eventually. You can understand the loss others suffer more clearly, and can be a light for them. Our darkness can become light for others. Doesn't that sound amazing?! I want to be that, I want to use my hurt for healing, and use my darkness for light. The pictures on today's post are from the camp that I worked at. Each beautiful sunset, each sunny, beautiful day at the beach reminded me how small I am, but how amazing and wonderful my God is. How he is the one who paints the sky, and creates each life, and he knows me, my family and my sweet little babies waiting for me in heaven. When I do meet Abraham in heaven, it will be a wonderful day. A beautiful day. I eagerly await that day! xoxoxo 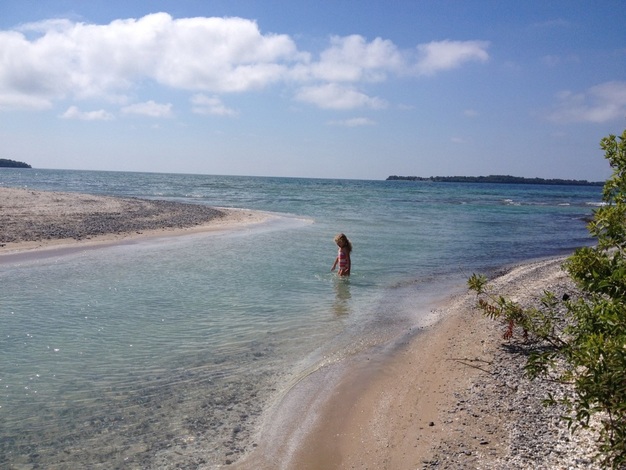 There are a few simple and easy things you need to make a campfire with s'more an event that doesn't end in everyone having melted marshmallows in their hair, and chocolate smeared on everything! All you need is a bucket, and a basket!......basically. : ) 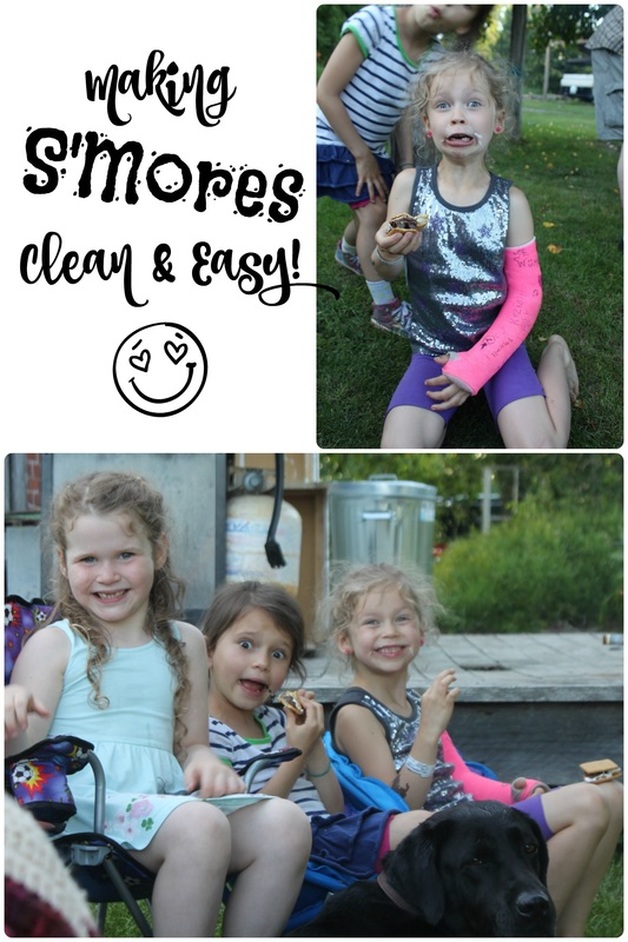 So, first, you'll need to find a basket, any basket will do (we use an old basket that was once from a deep freezer!), and load it up with all your s'more items! This may seem like a "duh", but having all the ingredients in one basket together helps to keep it from getting squished under someones foot, eaten by an unattended (and sneaky) dog, and it's just easier to have it all together instead of having your mallow all toasted and ready, then realizing the graham crackers are no where to be seen, and the chocolate was set too close to the fire and melted! So, once you've got all your things ready, you'll wanna grab a bucket, throw some wash clothes into it, a generous squirt of hand washing soap, and hot water. Now, just bring your bucket and basket out to your camp fire, and make your s'mores! Do keep the wash bucket away from the s'more ingredient basket though - you don't want soapy hands dripping into your food! 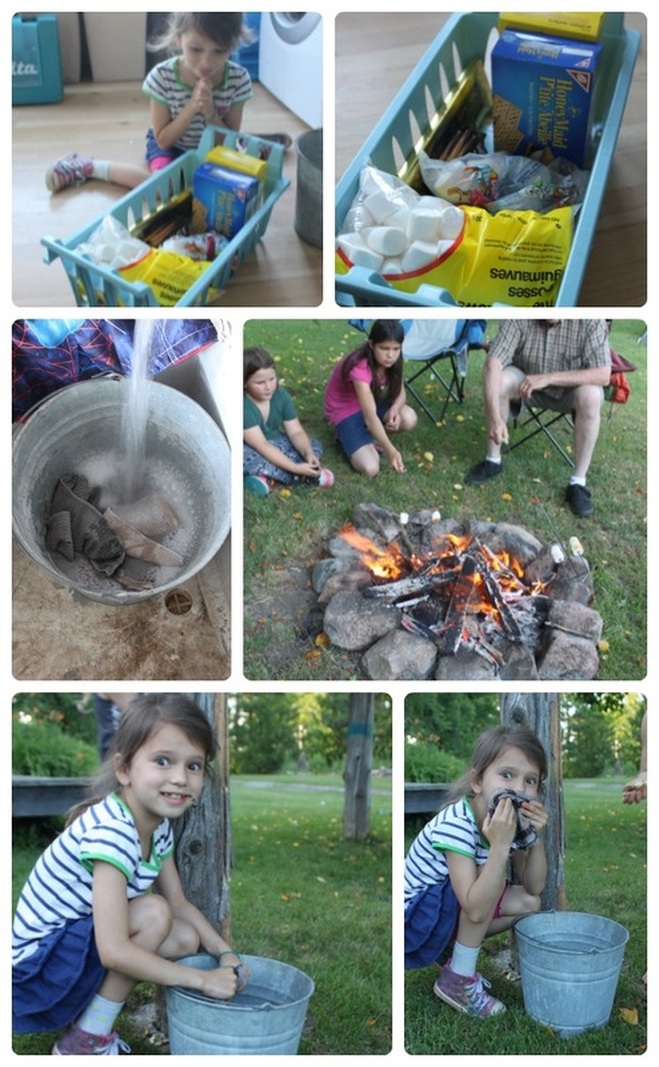 That's it! It's not rocket science, but it sure makes campfires and s'more making a lot more fun! Well, maybe it's just my kind of fun...things tidy and clean.... : ) Things are gearing up, and we're leaving for camp this week. I won't lie, I am feeling completely overwhelmed. Not necessarily by the job itself anymore, but by the getting ready to go, and the great unknown that lies ahead. I am NOT a big fan of the great unknown!!! So, I hope to put out a few posts this summer, but right now (with all this "unknown" business!), I'm not sure what I'll be able to do. Don't forget me, I'll be back. xoxoxo Oh yes, dear friends, there is definitely still more s'mores ideas out there! ....Hello. How are we today? I am EXHAUSTED!!!!!! : ) No, but seriously, I've been more stressed lately than I ever thought I could possibly be - I've had a constant headache for a week, my body is aching, I have hardly slept, and I even developed a canker sore on my lip!!! K, I'm done now. I'm just whining to all of you, to whoever will be a listening ear! I think it's time we got back to s'mores though, because s'mores always make me feel better! : ) In August of 2014 I wrote a s'more compilation post called "Please Sir....I Want S'more...", and last July I compiled another list of s'more-ific ideas in "It's Time For S'more!". I love-LOVE-LOVE s'mores! They have been a passion of mine for years and years! So, when I recently received an e-mail from Julia Arangure of Shari's Berries with a request to share their 9 unique s'more ideas on Bushel & A Peck, I thought, "well, it's worth looking at". Let me say that when I opened the link she sent, I went "whaaaaaaaaaaaaaa?!?!?!". For. Realz. When Julia said "unique" she meant it, and I have honestly never seen s'mores like the ones she shared with me, and that I am going to share with you! These amazing s'more ideas where created and photographed so beautifully, and I want to try every single one of them! So, here they are -9 unique ways to make s'mores from Sharis Berries!
........I mean, c'mon, right?!?!
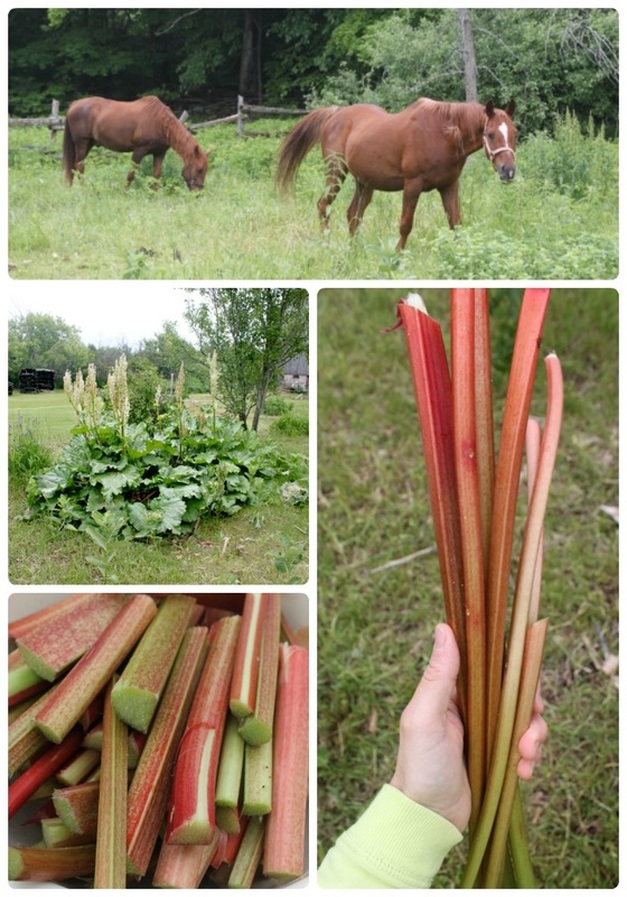
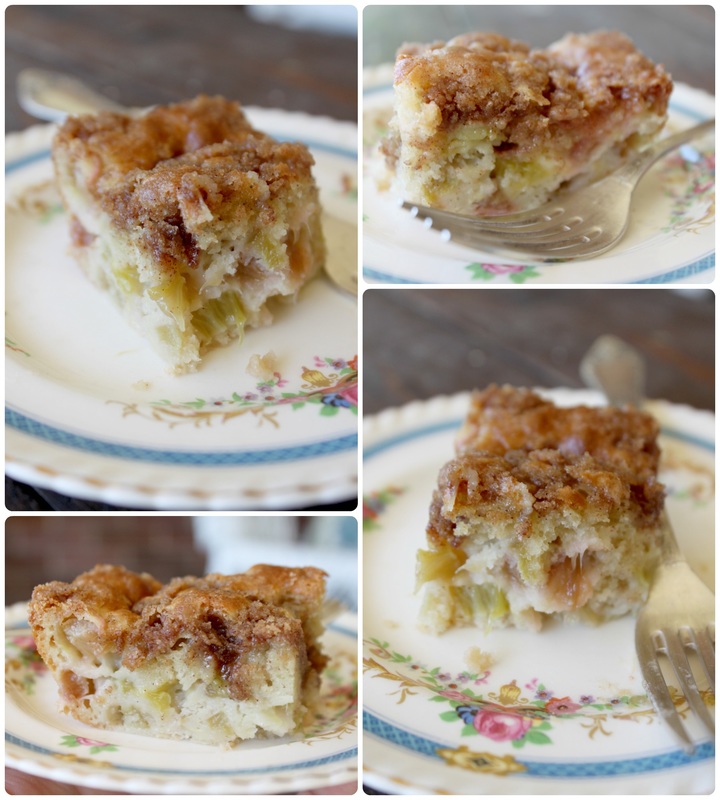
I am so excited about these s'mores, and I think I want to try the birthday one first! TO find out how to make all of theses, hop on over to Sharis Berries and the original post about these 9 amazing and unique s'more ideas! Today is Canada Day here in (obviously!) Canada! We've got the usual fun things to do in our wonderful little town of Tweed: a parade, face painting, boat tours, kids crafts, fireman water activities, live entertainers, hot dogs and cupcakes! Then, this evening we're heading to a Canada Day BBQ, where we'll be saying goodbye to some military friends who are moving to Seattle. Thumbs down to people leaving. Anyway, I hope if you live in Canada you have a wonderful Canada Day! If you live outside of Canada, have a wonderful Friday! Either way, any day is a good day to try out a new s'more (in my opinion, at least!). On Tuesday I'm going to share with you how we do s'mores around here so that it isn't a complete and utter disaster! Have a great weekend! Truthfully, the first time I heard the words "ruhbarb cake" I thought, "bleh!"I couldn't imagine how a cake made with rhubarb could taste good at all. In one of our horse paddocks we have a large rhubarb patch though, and a neighbour asked if she could take some to make this "rhubarb cake". I only really use it to eat the crazy sour stuff raw (it's alarming and refreshing!), and I've made a paleo strawberry rhubarb bare bottom pie last year for national strawberry rhubarb day, but that's it. I never even went out to cut it down and freeze it because I just never really loved much that was made from rhubarb. Anywho...back to my neighbour....she got some rhubarb from our field, made some cake, and brought some over for me to try...and, let me tell you people, this freakin' cake was so good! So, so, soooo good!!! I'm a little excited about this cake. I plan on making 2 more today! I feel some sadness over the rhubarb I've let go to waste because I didn't know about this delightful cake. This cake is a very simple white cake with rhubarb mixed in, and a crumbly, buttery, cinnamon-sugary topping. It is very moist, and not too sweet, not too sour. After I had made 3 pans of my own rhubarb cake, I brought some over to another neighbour who said that he quite hates rhubarb, and has never had any cake, pie or jam of it that he enjoyed. So I told him I wouldn't be offended if he didn't try it, but he said he would anyway. He said he was always willing to try something, just in case. Well, didn't I go back to see him the next day and he couldn't believe how good the cake was! He said (in a thick Italian accent) that his face didn't pucker, and that the sweetness wasn't too much and he loved the cinnamon in it. Enough said. 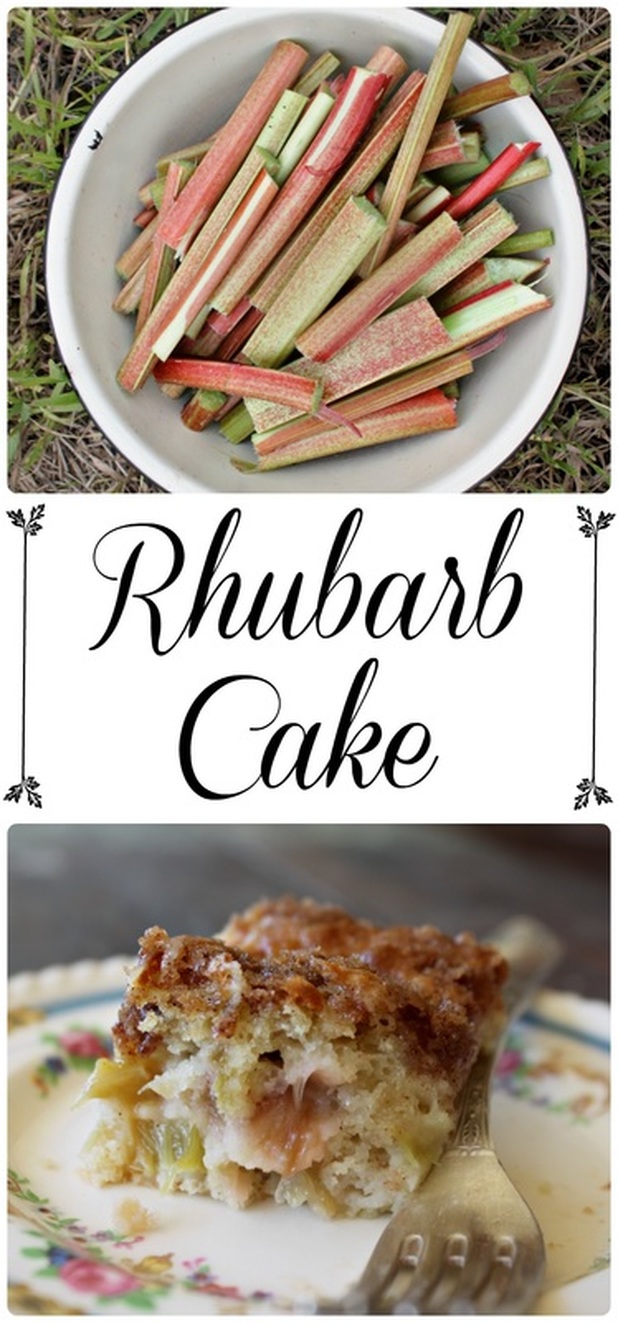 Rhubarb Cake Adapted from Oma's Rhubarb Cake Ingredients: For the Cake:
For the Topping:
Method:
 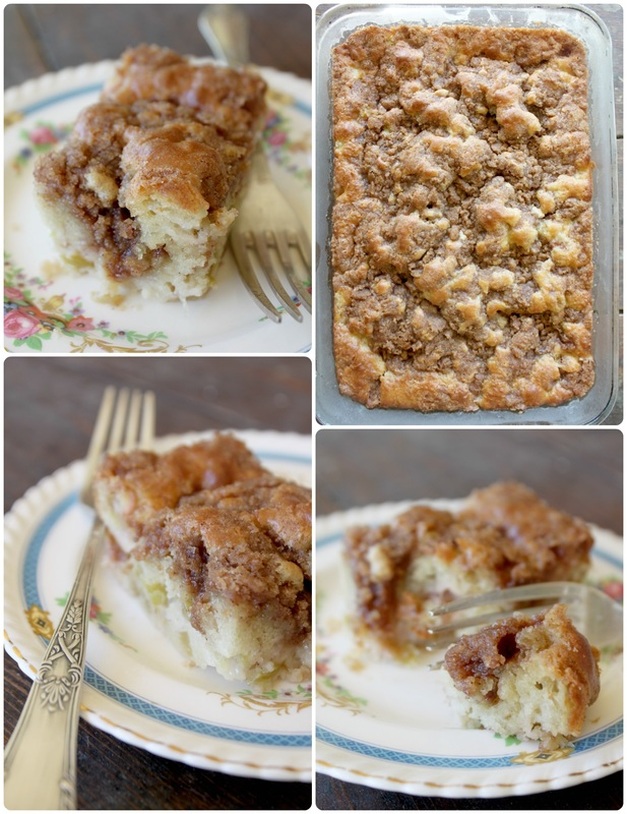  The first time I tried making this it was a gloomy Saturday. The weather was gloomy, and I felt gloomy. By the time the cake was finished and cooled, the sun had come out and the weather was no longer gloomy - and neither was I! The cake smelled so good, and looked so beautiful, and tasted so wonderful! So, that's all there is to this lovely little cake! Tonight the girls have a soccer game, then I think we'll let them have some time playing at the splash pad, and maybe we'll have a campfire tonight too. We plan to go and visit some friends tomorrow who we don't get to see too often, so I am looking forward to that also. I hope you all have a lovely weekend. xo So, yesterday I went with my middle child on a field trip to a place called "Sky Zone Trampoline Park". I wasn't sure (at all!) what to expect, but it turned out be a really fun day (except for the long bus ride there and back!). I don't know how to describe the "park" exactly, except to say that everything is trampoline based! It was fun, and (total) I probably jumped on a trampoline for at least an hour - which is a lot for an old gal like me! : ) Ok, the jumping itself wasn't too bad, but I did need to take a lot bathroom breaks to make sure I didn't pee myself! Hahaha, seriously though, having kids (and vaginal births!) really makes things like jumping on a trampoline more like playing a game of Russian roulette! Whomp whomp. Anywhooooo, this recipe today is really tasty, and not difficult to put together. There's a new Thai/Japanese restaurant in Belleville that we've been to a few times, and it has opened my eyes to the many wonderful Thai (and Japanese) dishes I've never known about. I also tried sushi (well, I tried it once before, about 10 years ago and hated it!) and really loved it. So, all that to say I've been experimenting at home with different Thai flavours, and I was pleased as punch with this dish. The sauce is adapted from Stupid Easy Paleo's Sweet Chilli Dipping Sauce, and the meatballs are just a few ingredients with nothing fancy. Well, unless you consider sesame seeds fancy? If you want to make your own Asian cuisine at home, just get yourself some sesame seeds! Just commit to it; they aren't terribly expensive and they are delightful and (in my opinion) essential in making Asian foods! All that said....you can omit the sesame seeds if you don't have any. But just get some. : ) 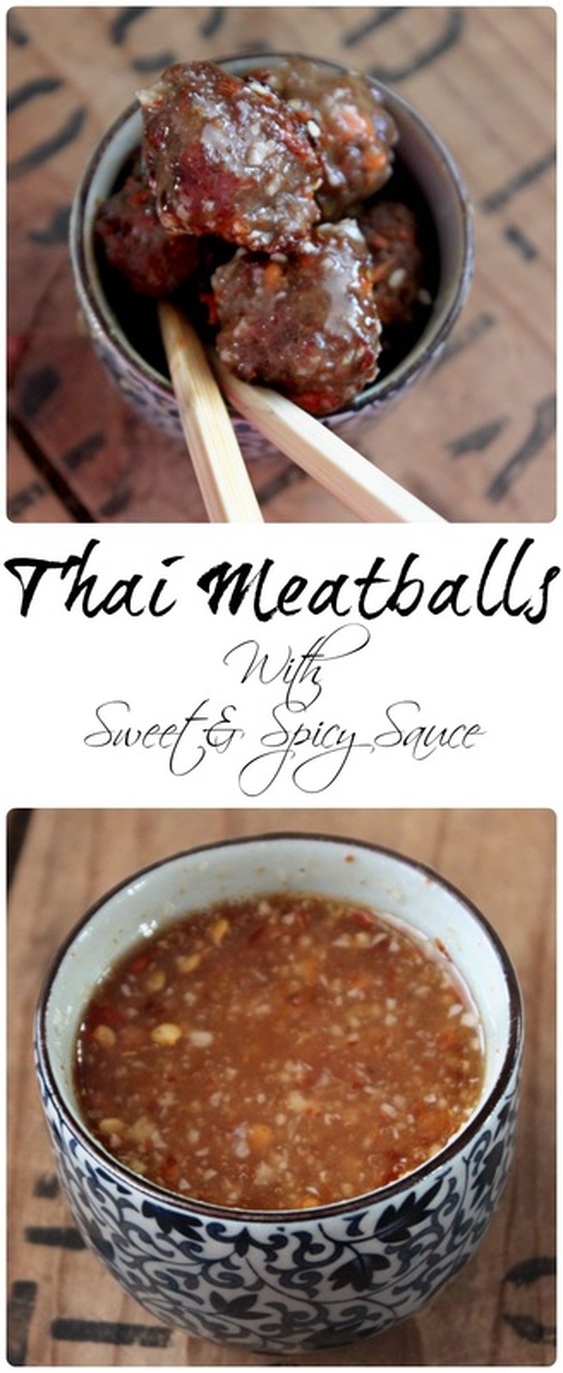 Thai Meatballs with Sweet & Spicy Sauce Ingredients: For Meatballs:
For the Sweet & Spicy Sauce:
Method: For the meatballs:
For the sauce:
***If kids are eating this, and they don't like spicy food, just leave some of the meatballs out of the sauce. They still taste great on their own!***   So, really, a pretty strait forward recipe, but with really fantastic results! I like to eat this with a quick fry of shredded cabbage, bean sprouts, thinly sliced peppers and onions, and spiralized zucchini. I'll just top it with the meatballs, and spoon a little extra sauce on it. Anyway, on Monday on my health & fitness post I talked about dealing with stress. One of the things that had been causing me anxiety was a decision to cook at a camp this summer. Once I decided I would do it, I got started on menus. I like creating menus, but I've only had to do it for my family, and special menus for if guests are coming over. So, I'm putting it out there - what kind of food would you consider quintessentially "summer camp", and what foods would you think could work on a summer camp menu? I always lean towards healthy options, but I realize (and my husband keeps reminding me!) that the whole world, and most children, don't eat or believe in eating the way I do. So I need to balance healthy foods with camp foods, oh, and all on a budget too! This might be a challenge, but I am totally up for it! Input would be welcomed though!!! So please, if you've read all this way, give me some suggestions! Have a great weekend! Hello!! I'm still here! Life has felt a little topsy turvy lately, but I'm here today to share on my Health & Fitness page some tips for dealing with stress! Check it out, would ya? And here, to help with any stress, is a few funnies! : ) 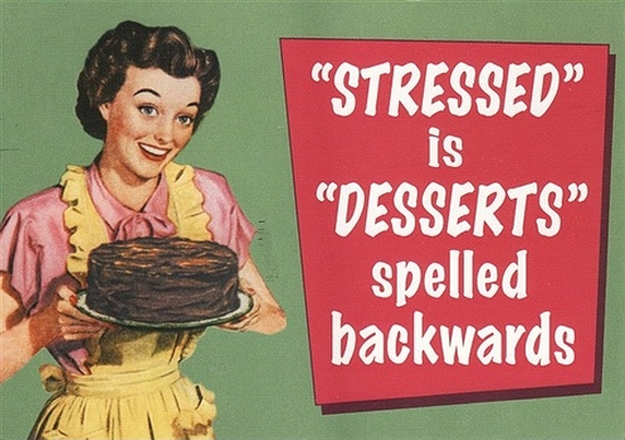 I know, right?!? I didn't realize this, but now that I know....life changed forever!  My sister sent me this one and it made me laugh out loud, and want cupcakes...(whomp whomp) Alright, well, I'm signing off here! Happy Monday one and all! |
Hi, I'm Amy-Lyn! 
I am the lady behind this here blog! I live in the sticks with my animals, my super handsome husband, and my
3 amazing kids! Here you'll find things from recipes (gluten-free, paleo, and strait up junk food!), DIY ideas, thoughts on raising a son with autism, and whatever else pops into my brain! : ) Read more about me by clicking here! Want to Stay Connected?
Find What
|

 RSS Feed


