|
Hello! Happy Monday! The kids and I spent some time "in town" last week getting a few things for school, and I couldn't believe how fast this summer went! Well, first it felt slow, but then it flew by! Does that make any sense? Anyway, I'm gonna miss the kids when they head back to school. I know the "usual" joke heading back into school is the (tongue-in-cheek, soaked in sarcasm) "sooooo sad, the kids are heading back to school!", but I actually enjoyed the kids this summer! Hahaha, well, that sounded bad! Seriously though, the kids do the usual fighting, complaining, whining and asking "what are we going to do today" instead of just doing and being kids, but overall, I've really enjoyed watching my kids grow and change this summer. We had some pretty serious road bumps like the surfacing of some pretty little liars, and Caleb developing a stutter, but it was good. It was really good. And, besides that, it's the only summer I'll ever have with them being 12 (turned 13), 7 & 8. So, that's worth cherishing! Anywhooooooooo...... I wanted to share today some school lunch ideas! A few years ago it dawned on me that sending "the typical" lunch with my kids was weird....because I never (ever!) give my kids a "normal" lunch all summer or on the weekends, so why would I send a "traditional" lunch to school?!? During the summer (besides when they're at camp) and every weekend, lunch is something like a 1 hour grazing period that includes fruits, veggies, leftovers, and, well, whatever! If I make the kids sit for a lunch during the summer and weekends, it's usually a "Dutch Lunch" as we call it, which consists of fruits, veggies, usually meats and cheese, crackers, pickles, raisins, ya know, basically a large snack. I know a lot of Moms feed their kids like this is real life, so adding stress to the school year by thinking we're suddenly required to make a proper (sandwich, etc.) lunch is silly! ***SIDE NOTE**** If you do make sandwiches for your kids because they like them and actually eat them - then make sandwiches! This is not an "anti-sandwich" post, it's a "do what you've been doing!" post! :) Does that make sense??? No Mommy guilt here is what I'm trying to say! It takes all kinds of Moms to make the world go 'round, so do what you do, and do it the best you can! If you journey with me to Fall 2014, you'll find a post a wrote about Back To School, where I share some of my tips & tricks for making the school year *relatively* stress-free (if your school year seems completely stress free...you're missing something....you may need your meds adjusted). I joke. Ok, I only joke a little. Anywho, read that post, then come back here. I'll wait. Ok, so, today I just want to share some easy, healthy, snack-meals for kids lunches! Enjoy! Oh, and don't forget to take a minute to comment and share some good kids lunch ideas with me! 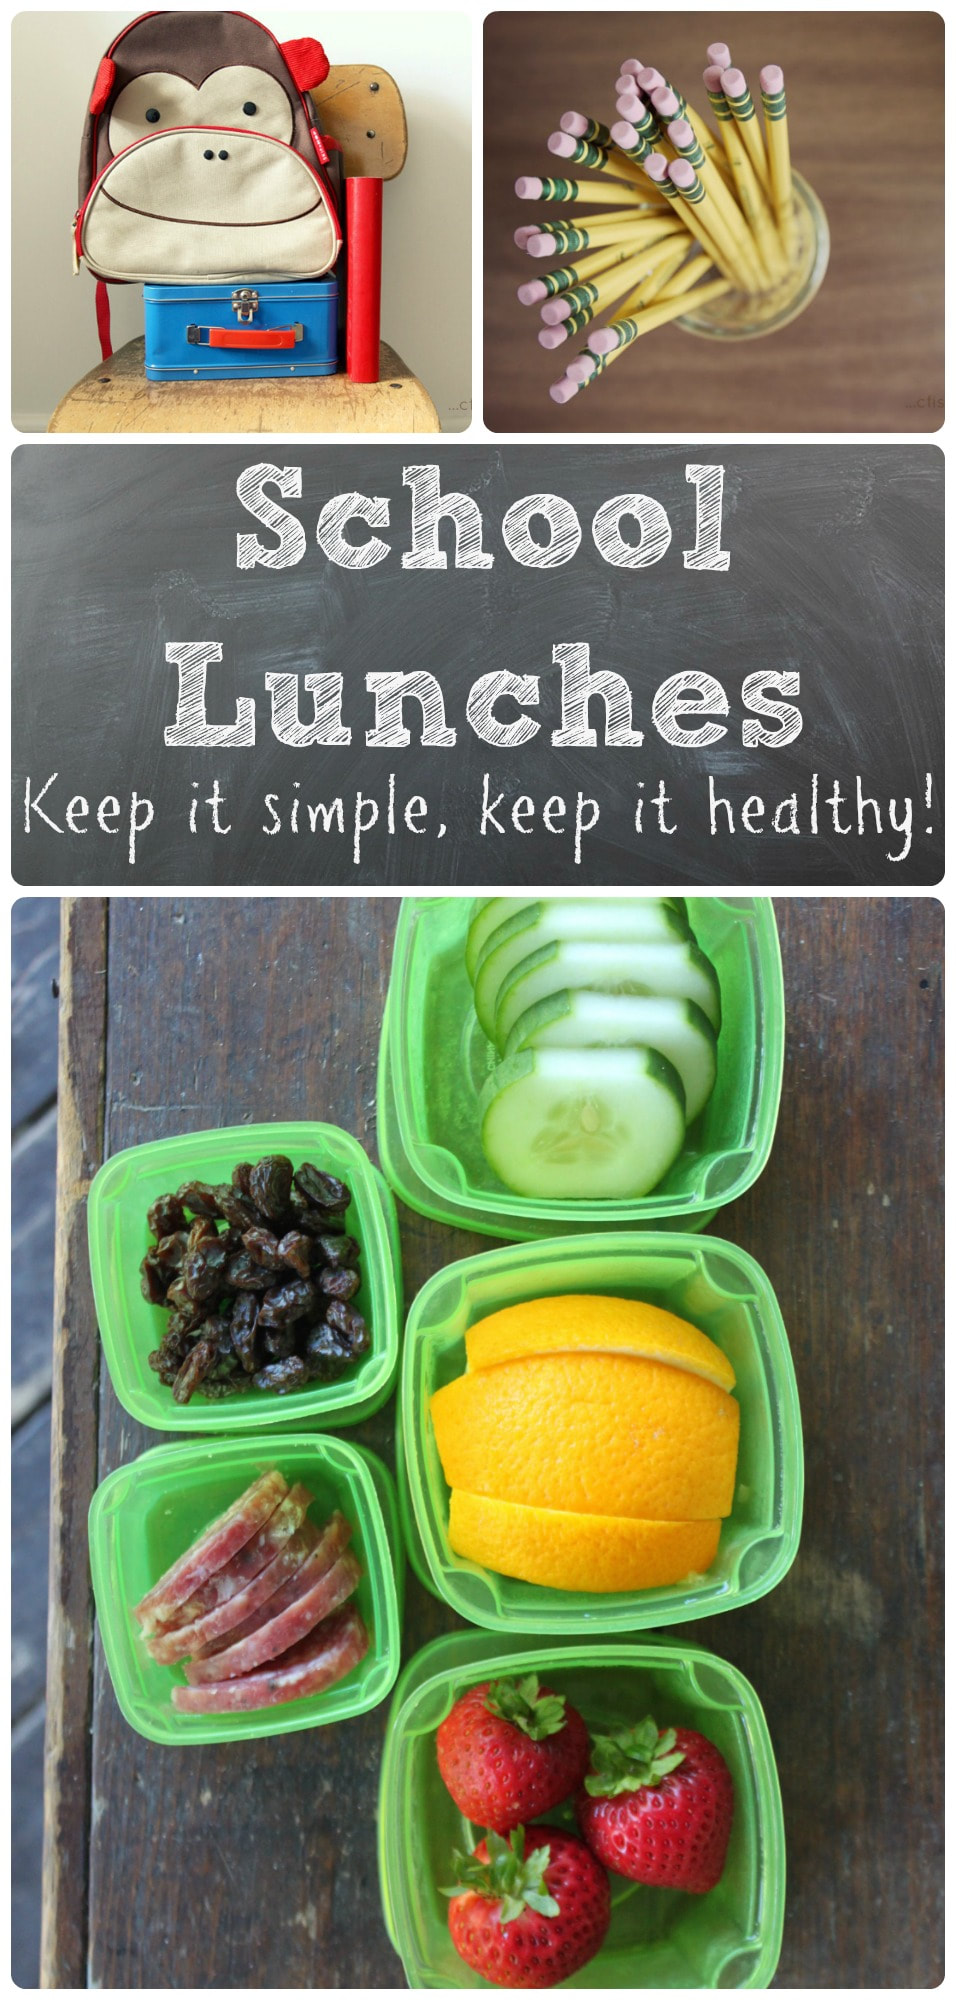 This is the lunch menu I use for my kids. It's from a site called "Hello, Cuteness", which is currently on hiatus for some reason. Anyway, it's really cute, and I've been using it for about 4 years. 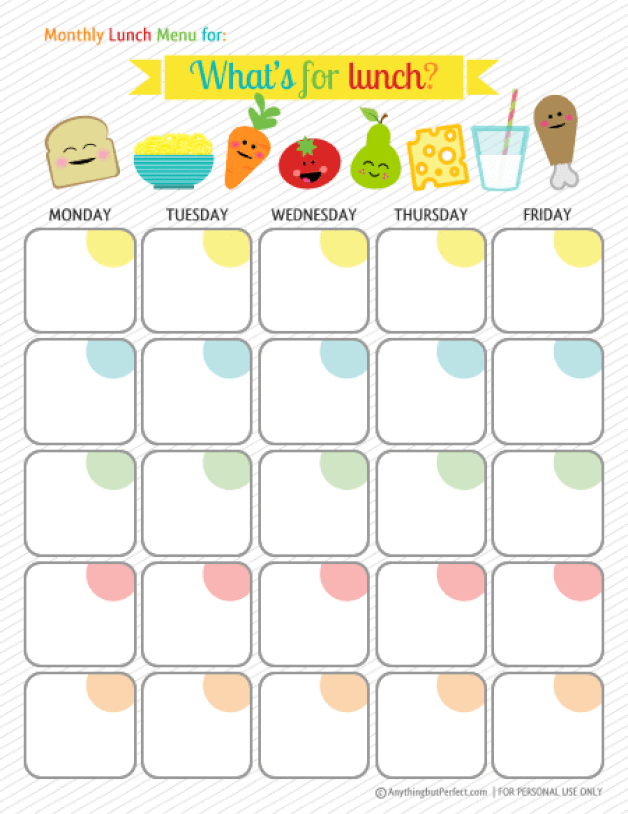 I mention this in the Back To School post from 2014, but for me, making a lunch menu saves me grief. I don't want to stand and stare into the fridge wondering what to pack my kids for lunches. And because we do our grocery shopping only once a week, and at a grocery store 40 minutes away, I can't just helter skelter pack my kids lunches because I can't just run to the store to replace what I've used if I realize I needed it for a planned dinner. Yes, we have a little grocer here where I live, but things are more expensive, and therefore not cost effective for this one-income house. If you don't want a lunch menu, then don't do one! Again, no Mommy-guilt here! I've said it before, and I'll say it again (and again!) it's about finding what works for you, and making it work! In the lunch menu shown below, the girls are separate from Caleb because there are a few differences in their preferences, and so it was easier for me to have 2 menus. Also, "special fruit" in the girls' menu refers to a different fruit they get to choose during our Sunday shopping trip that I'll pack into their lunches. It's just a chance for them to have a fruit we wouldn't ordinarily buy, but that they really enjoy! Caleb's menu says "fruits" on opposite days of "Apple" because I didn't want to have to put exactly what that "fruit" would be, but I wanted to try to not send the same fruit every day because of a faulty memory! :) So, "fruit" usually means a banana, orange, clementine, pineapple, peach, berries, basically whatever might be seasonal or on sale that Caleb enjoys! I've found that my kids eat the most when they have a variety, and not too much of anything. If your child does like sandwiches, maybe just make them a half sandwich so that they aren't overwhelmed by an entire sandwich that they may not want or have time to eat. 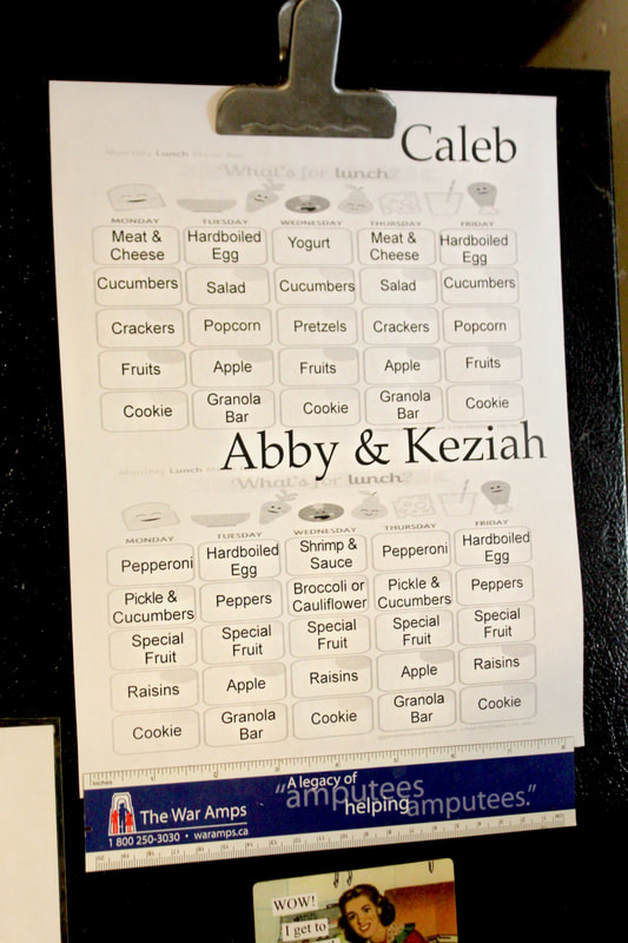 Here's a site you might not look at for kids lunches, but Beach Body on Demand has a post called "6 Simple No-Cook Snacks To make This Week" (it's a long title....and it's not no cook because hard-boiled eggs don't come out of a chicken that way!), but anyway, I still like the snack (lunches, really) ideas. 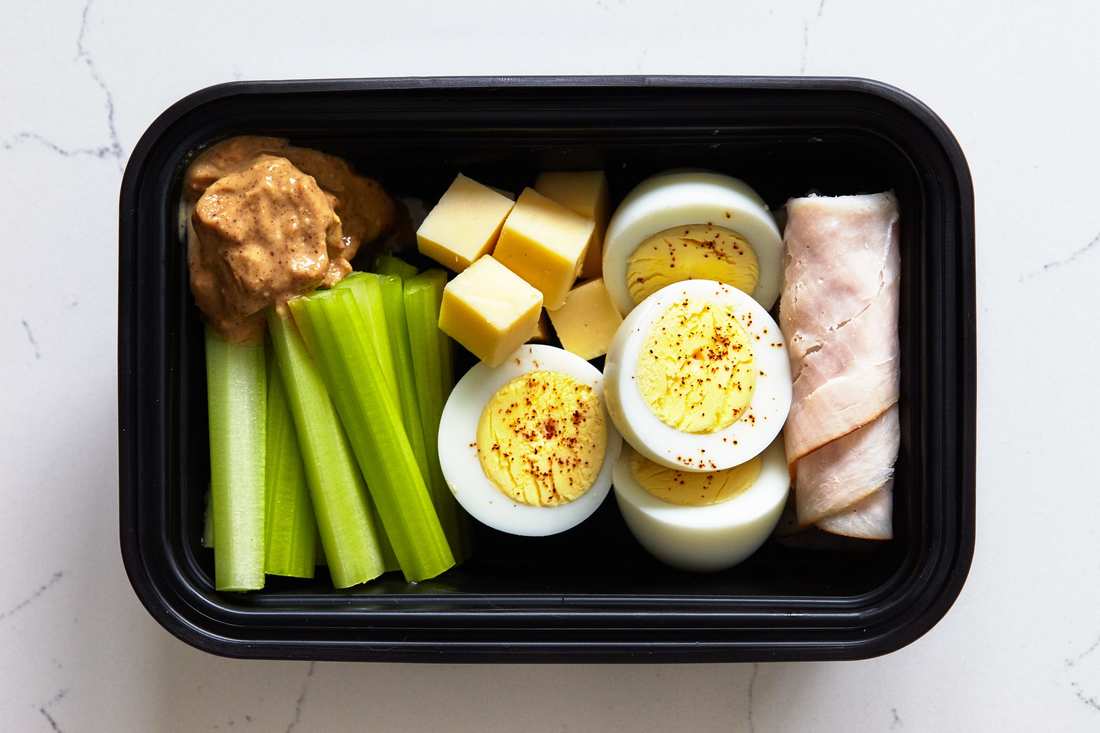 Rachel over at Following in my Shoes shares a post called "Paleo & Primal Lunch Box Ideas", and I love the cute food list she's created for it! Even if you're not feeding your kids Paleo or Primal, it's a super healthy food list, which any kid could benefit from. You'll want to check the post out because she shares the downloadable file for the list! Print it out, and stick it inside a cupboard door for easy reference! 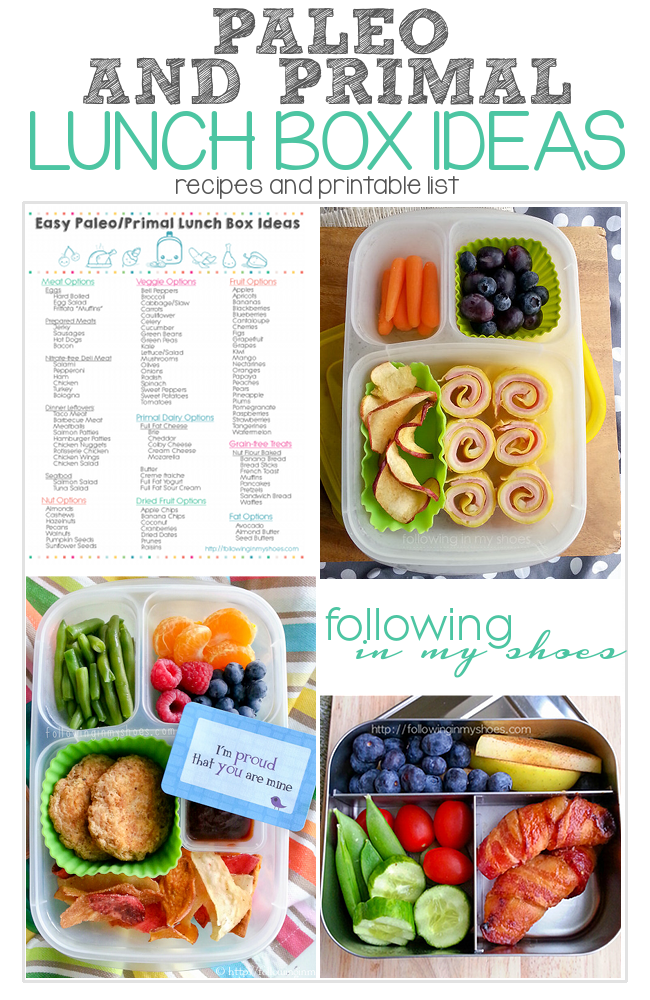 Check out my Pinterest board for "School Lunch Ideas" to see all I've been pinning, or check out my board "For Adam To Take To Work" for your older children or kids with a more adult palette!
I hope you enjoyed this post! Let me know in the comments below if you did, or share with me your favourite lunch as a kid, and be sure to share any of your lunch packing tips!
8 Comments
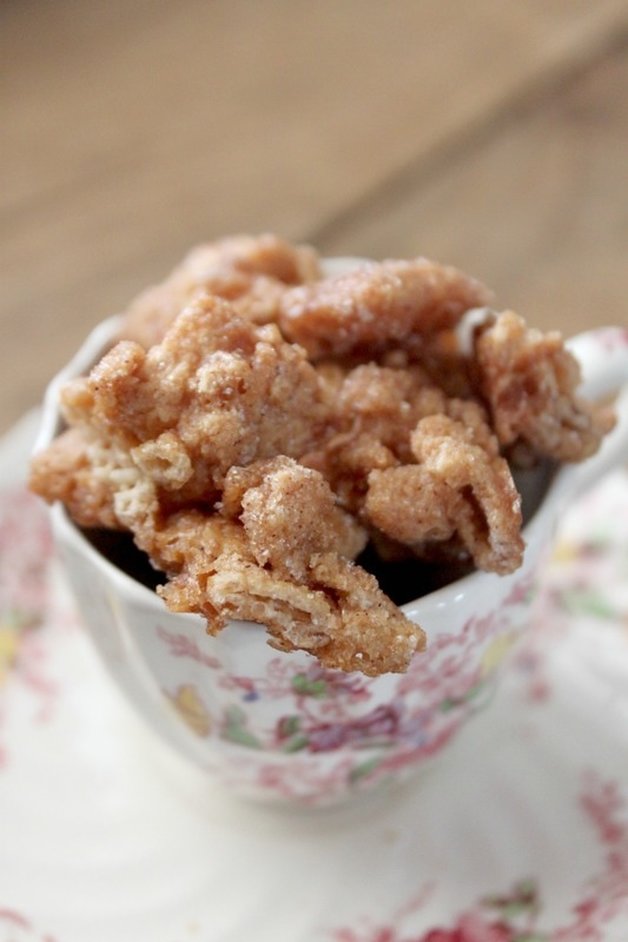
I'm sorry I've been away for soooooooo long!!! I've been home, but I've been busy and have hardly had any time at all to sit at the computer, write a blog, edit some pictures, stay still for more than 15 minutes! But I am still here! I wanted to super-quick show up today to share this oh-so-simple and fabulous treat! I first saw it on Confessions of a Cookbook Queen, and thought it looked really (reeeeaaaaally!) good! But, I hadn't gotten around to making it yet, mostly due to having a really tight grocery budget the last few months. I wasn't buying whatever I wanted to make whatever I wanted, and Chex cereal just wasn't making it on the grocery list week after week! So, when I was in a grocery store I don't normally go to, and saw they had slightly beat-up boxes of Cinnamon Chex at clear-out prices (because the boxes were a little squashed), I did a little happy dance, and grabbed two boxes! I may have also out loud said, "Oh Boy!!!". I got some side-wise glances, but, whatever! I knew the recipe I'd pinned didn't call for Cinnamon Chex, but I didn't see how it would effect this treat negatively? If anything, I imagined them being even better because of the extra cinnamon-iness. That's a word. So, here it is, a sweet treat worthy of every Canada Day, 4th of July, and summer BBQ you will attend! 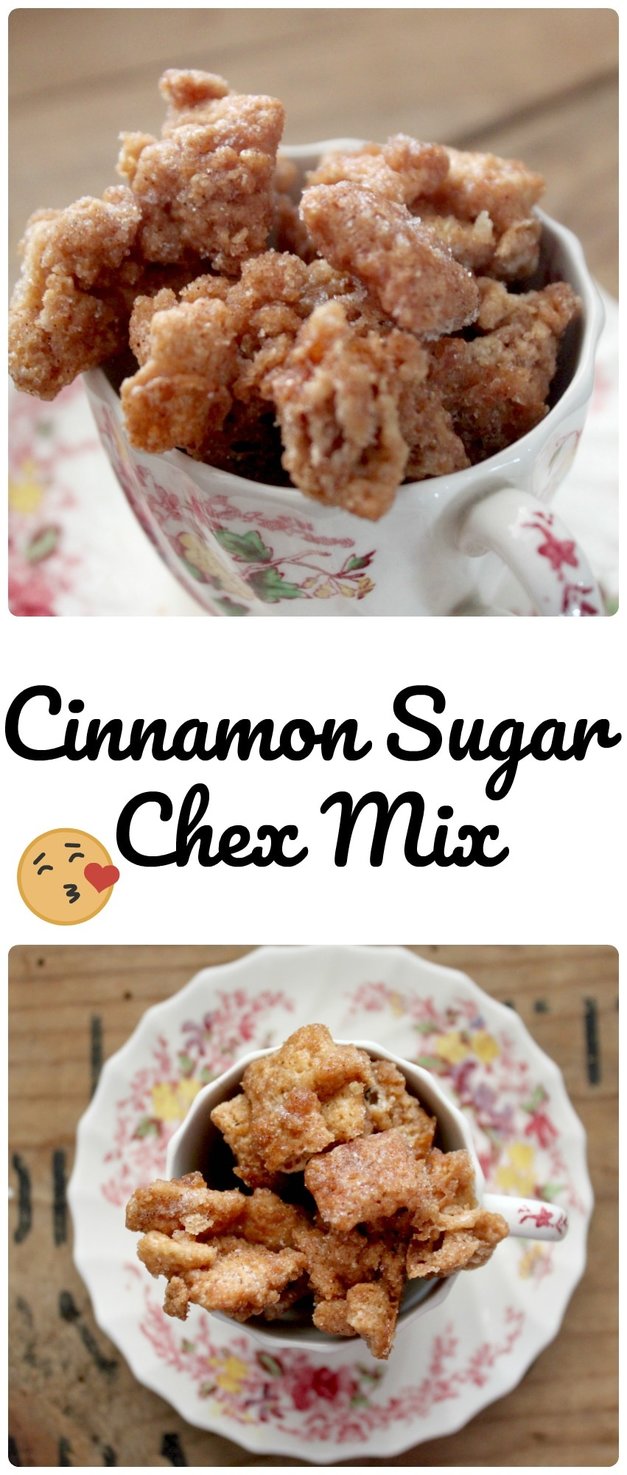 Cinnamon Sugar Chex Mix (Gluten-Free!) From Confessions of a Cookbook Queen Ingredients:
Method:
  In order for me to mentally be ok with sitting down for a while at the computer, I had to promise myself to keep this post short! No gabbing, no going on about what I've been busy with, no nonsense, just a recipe! So, I'm signing off now!
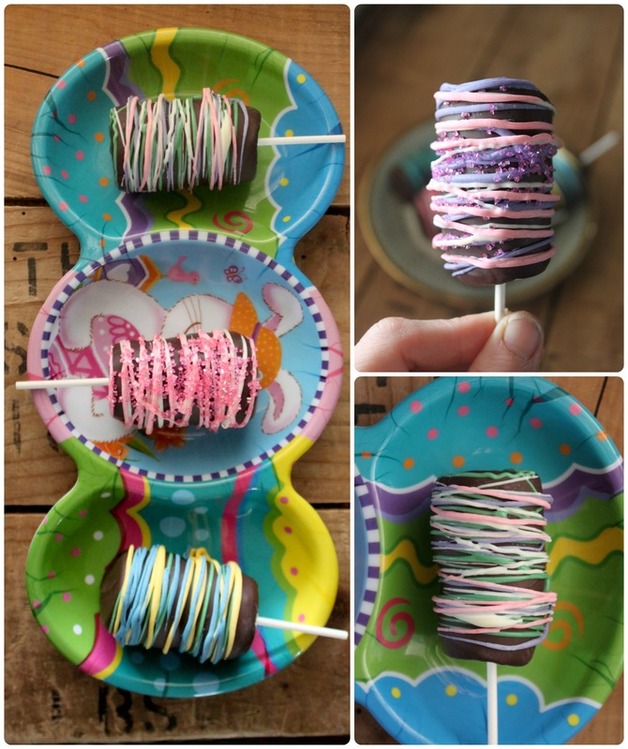
I really hope to check back in here soon with a few more posts over the summer, and be sure to let me know what your plans are for the summer! xoxoxo Hello! We head out today to spend the weekend with family, but I wanted to make a quick appearance here to share some delicious and simple treats you can make for Easter (or anytime, really!) I've got 2 treats to share, both wheat free, both could be gluten-free too (if you used gluten-free Rice Krispies). I recently saw some little rice krispie nests from Crafty Morning, and thought they looked so gosh darned cute! I knew they'd be easy to make, but I was going to make some personal preference adjustments. For starters, the beautiful nests that Michelle at Crafty Morning made had an edible grass in them...? I've never even heard of such a thing, so I decided I would make a quick and small batch of green buttercream, and pipe some grass into my nests. Also, she uses Robin Eggs candies (chocolates?), again, I don't know what they are. But I do know what Cadbury mini eggs are, and I know we all loooooove them in this house, so that swap was a no-brainer! The second sweetie I saw was Springtime Marshmallow Wands from Two Sisters. I love mallows, and chocolate, and my brain said, "Hey! You have sticks!", so then it just seemed like a natural step to go ahead and make these! So, here you go! Enjoy! 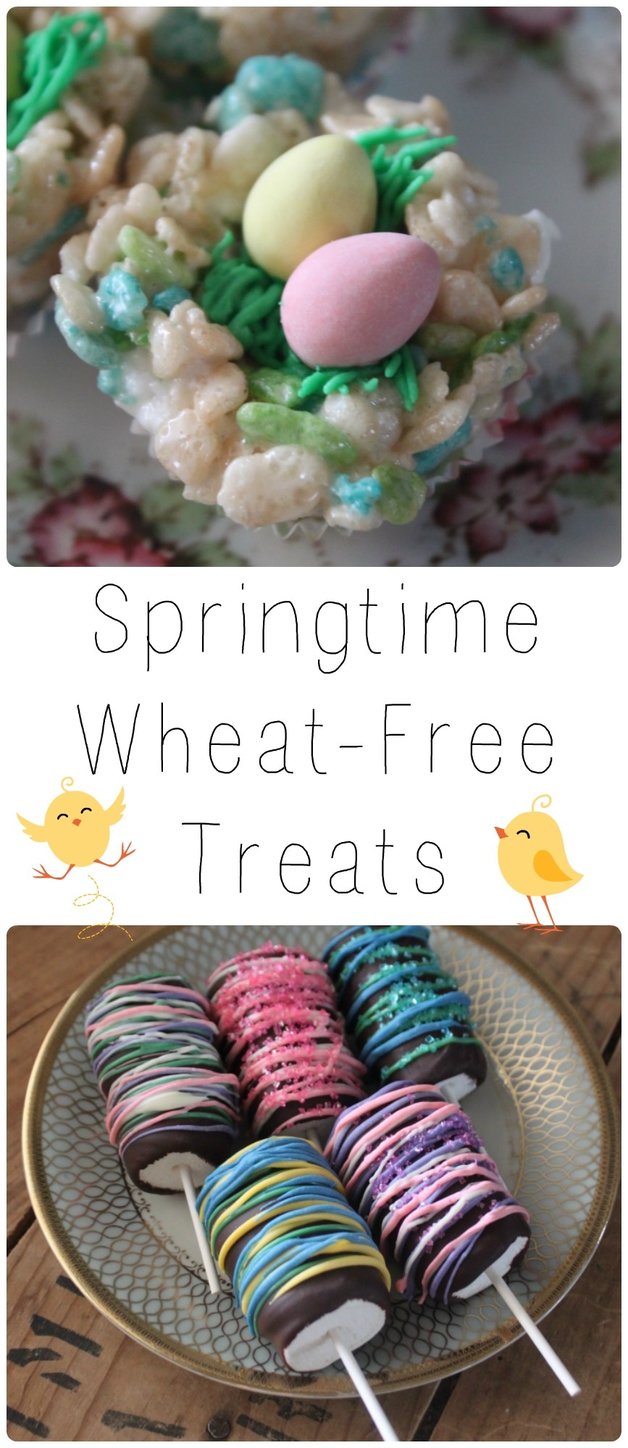 Rice Krispie Nests Makes about 36 mini nests Ingredients:
Method:
 Marshmallow Wands Ingredients/Supplies
Method:
 Ok, that's all for now!
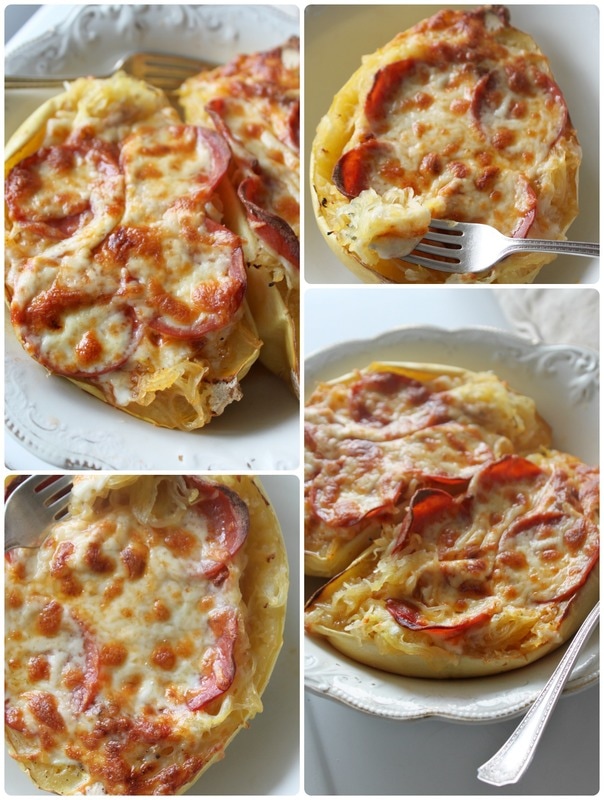
Check out a post from last year of a delicious round-up of Easter Treats, all no bake, and most gluten-free! Well, I hate to gripe about the weather....again....but it started snowing again last night! It's official! Spring is NOT coming to Ontario this year! Sorry! With some luck we'll hopefully get summer, but I'm not holding out hope at this point! While doing the barn chores this morning, and getting the hay out for the horses from our last bale I thought, "well, crap! I guess I'm going to need to get more hay?!?!" With the nice weather we had a few weeks ago I really thought we'd make it with the hay we had....but then the winter was like, "Psych! I'm cooooooming baaaaaack!". (insert weeping from this gal). Don't get me wrong, I like winter. But it's officially been spring now for 2 weeks, tomorrow is April, in 2 weeks it's Easter - so I want spring!!! I am saying that like a 3 year old having a temper tantrum! Alright....move on Amy-Lyn....no amount of whining will change the weather..... Here at the Van Londersele house we like pizza. We like store bought, homemade, take-out (well, we rarely order take-out, but sometimes people come to visit for dinner, and they stop in town and grab a pizza or two). We'll eat sauce, cheese and pepperoni on baked potatoes, zucchini, and stuffed into chicken breasts. Because, let's be honest, tomato sauce, cheese and pepperoni together are soooo yummy, I recently have been trying to get my kids (aka-trick my kids) into eating more veggies. They are actually all pretty good about eating the veggies they like, which isn't a bad variety of veggies, but I want to be able to make less and less variations of dinner to suit us all. I'm not a make-8-different-kinds-of-dinner-to-suit-everyone kind of Mom by any means, but I do tend to make the family something to eat (it's always gluten-free), but because I eat mostly paleo, I'm the one with the adjusted meal. Yes, I am the picky child in our family scenario. Ok, I'm not picky at all, just specific. So, for instance, if we're having a pasta night, the kids will have gluten free pasta, and Adam and I will have spaghetti squash noodles, or some other veggie noodle (because I own a Inspiralizer and can make noodles out of anything!). Caleb, my eldest child who has autism is getting really, really good at trying new foods, but there are still a few he is very wary about. Spaghetti squash is one of those foods. But recently I'd made a casserole using spaghetti squash, and he ate it (he picked the broccoli out though). The casserole had a "cheese sauce", bacon and chicken though, so it was easy to get him to eat it. I'm not sure he even noticed it was spaghetti squash with how much he enjoyed the meats and "cheese". So, taking advantage of his enormous pre-teen appetite, and his love of meat and cheese, and the fact that he'd successfully eaten spaghetti squash without gagging, I thought this could be a good time to try something new and delicious. Pizza stuffed spaghetti squash! Yes indeed! I will openly admit that he was reeeeeeealy skeptical, and wasn't into eating his "pizza" out of the squash shell (or the "squashes stinky coat" as he called it!), so I dumped it into a bowl, added another generous pinch of mozzarella, and a sprinkle of parmesan....and he ate it! I may have also bribed him with a treat if he finished it. I mean, sometimes, no amount of meat, cheese, or treat bribery will work to convince him to eat something new, so the fact that it did speaks to the tasty value of these pizzas! He did say when he was done, "Caleb will not like spaghetti squash" (it sounds like a question, but he was making a statement), and I said, "but you ate it all?", and he said nothing. In my Mom brain though I heard him say "drat". : ) So, I'm not going to say "everyone will love this recipe!", but if your family already likes spaghetti squash then it's a no-brainer that you'll want to try this, but if your kids are on the fence, this may be the ticket to getting them on the spaghetti squash train!  Pepperoni Pizza Stuffed Spaghetti Squash Ingredients:
Method:
 For a bunch more spaghetti squash ideas, check out this post from Buzzfeed! I blabbed too much at the beginning of this post, so all I will say now is have a great weekend! Bye! Well, I thought spring was here...but it's not (apparently!) Ok, well, the sun has been out most days lately, but the temperature is still in the below zero mark! I'm talking -10 with a nasty wind! You step out thinking, "oh, what a sun-shiny terrific day!", and then the snappy wind sweeps up and bites you in the face! Waaaaa! Yes, that was crying. Like a baby. I've started just rubbing coconut oil (organic, virgin) on my face because it was getting so dry and scratchy from the wind! Waaaa! More crying. Well, this morning we woke up to snow! Whomp whomp (waaaa waaaa). Ok, crying over, back to the coconut oil, I actually like it on my face! It smells loverly, and has made my skin reeeeeal soft! Alright. Food time. In April of last year I wrote something called "The Great Potato Debate" and talked about potatoes, and how they are the evil enemy to weight loss and a long and happy life!!! (a slightly overdramatic voice needs to be used when reading that. Possibly even putting a hand to the forehead like a damsel in distress?). Well, there are many pros and cons regarding potatoes, but sometimes, they are choice # 1 in my house. Why? Because they are really freakin' affordable, that's why! They are filling, they really do have many nutritious benefits, and they are a humble, blank slate to so many meal ideas! And THEN they are inexpensive on top of all that? Well, hot-dog, sign me up! All you need to do is load ‘em up with toppings (see the above link for a delicious recipe that I included at the end of the post!) after they come out of the oven, add a side of veggies, and your meal is complete! When we do baked potatoes as a meal, I’ll switch up what we top them with. If the budget is particularly tight, we’ll just add butter, salt, and a sprinkle of cheese. Other times we’ve made curry, chilli, pulled pork, to top them with (separately, of course!) and then there's the ever “classic” baked potato toppings of sour cream, bacon bits, green onion and cheese. Now, to take a humble baked potato to a new level, someone (who loved mashed potatoes!) at some point thought, “I wish the inside of my baked potato was filled with mashed potatoes! (this account is almost certainly 100% historically accurate!). Enter the twice baked potato! Granted, these take a little more work, but you can do the first baking, as well as mash and fill the potatoes ahead of time and then put the lovely stuffed gems into the oven when you need them! You can even fully prepare these up until the final baking, and store them in the freezer! After we had our third child, a woman from church brought us the most amazing meal, all made ahead and frozen! One of the super tasty items was twice baked potatoes, and they were so delicious! This past weekend I devoured some mini twice baked potatoes that a friend had made for a St. Paddy's day party. She made them all earlier in the week, then froze them until party time! The twice baked potatoes today are a bacon & spinach version, and they are deeeee-lightful! The process of baking, scooping, mixing, re-filling and baking again isn't that bad when you consider how yummy these are! 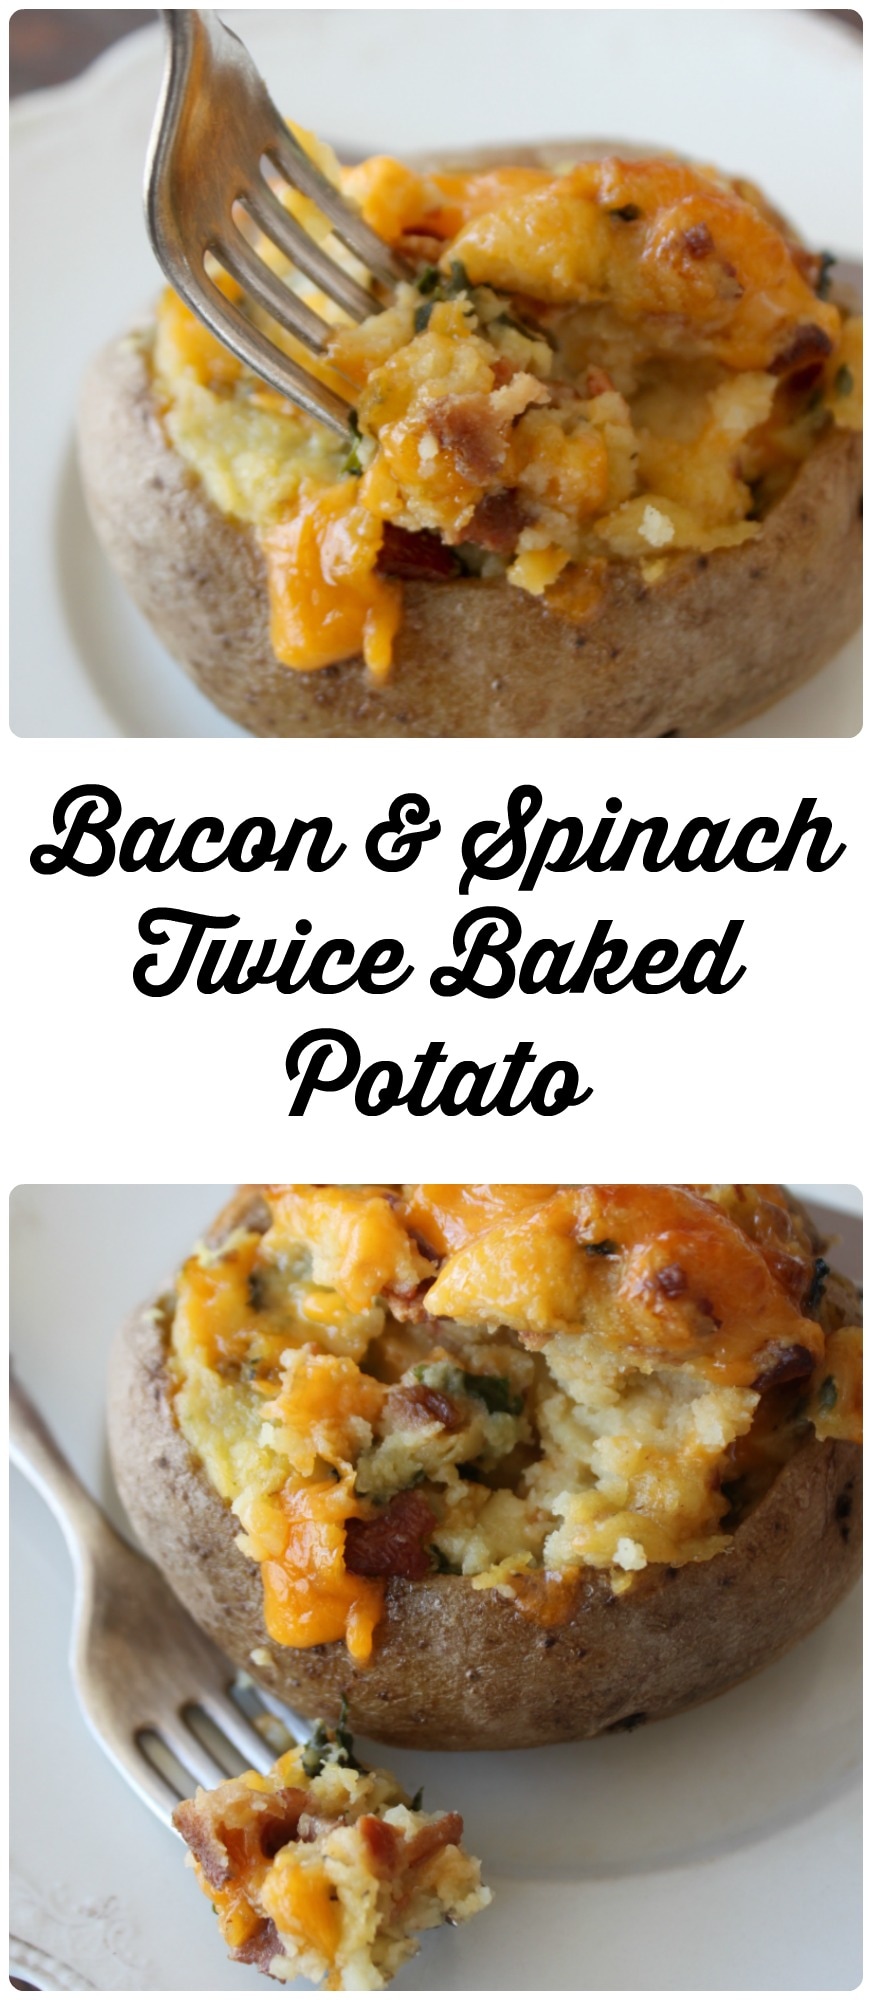 Bacon & Spinach Twice Baked Potatoes *With paleo and non-paleo options. This recipe can easily be doubled Ingredients:
Method:
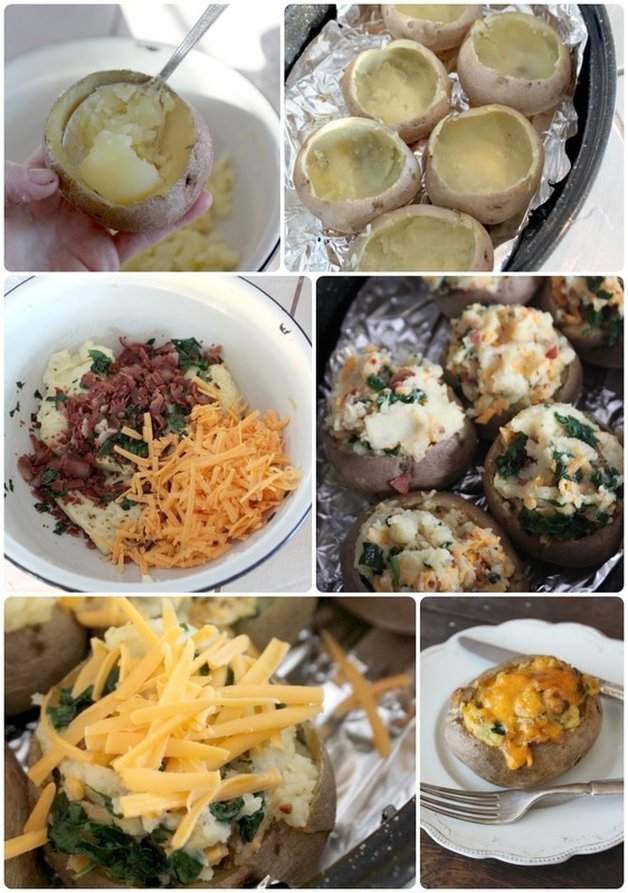 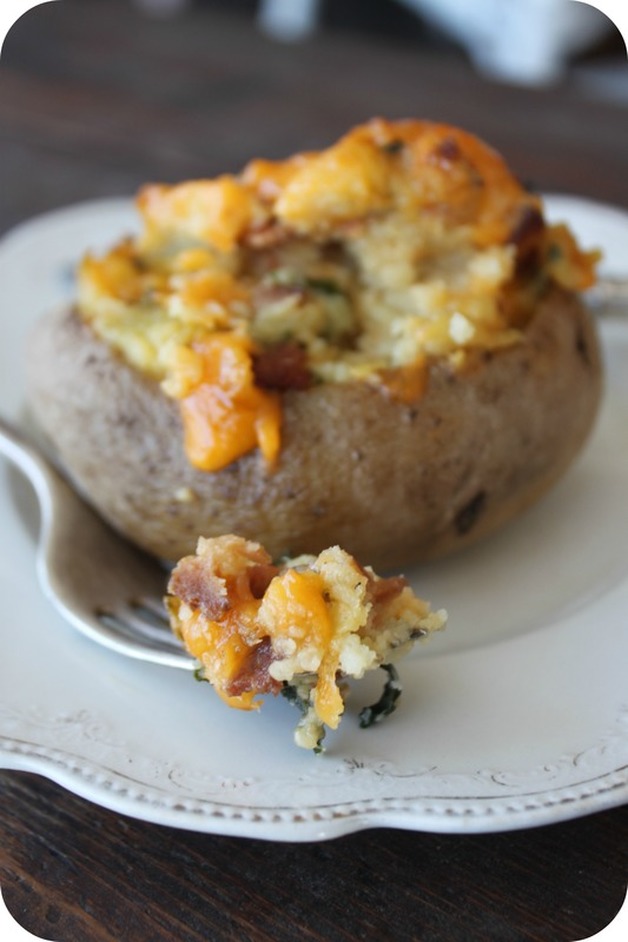 Though the paleo, cheese-free version of these may not seem as yummy, trust me, they are. The tops won't have that crispy cheese appeal, but the tops so get a nice golden brown, and the potato crisps up, and they are good.
The End. Have a lovely weekend world wide webbers! : ) 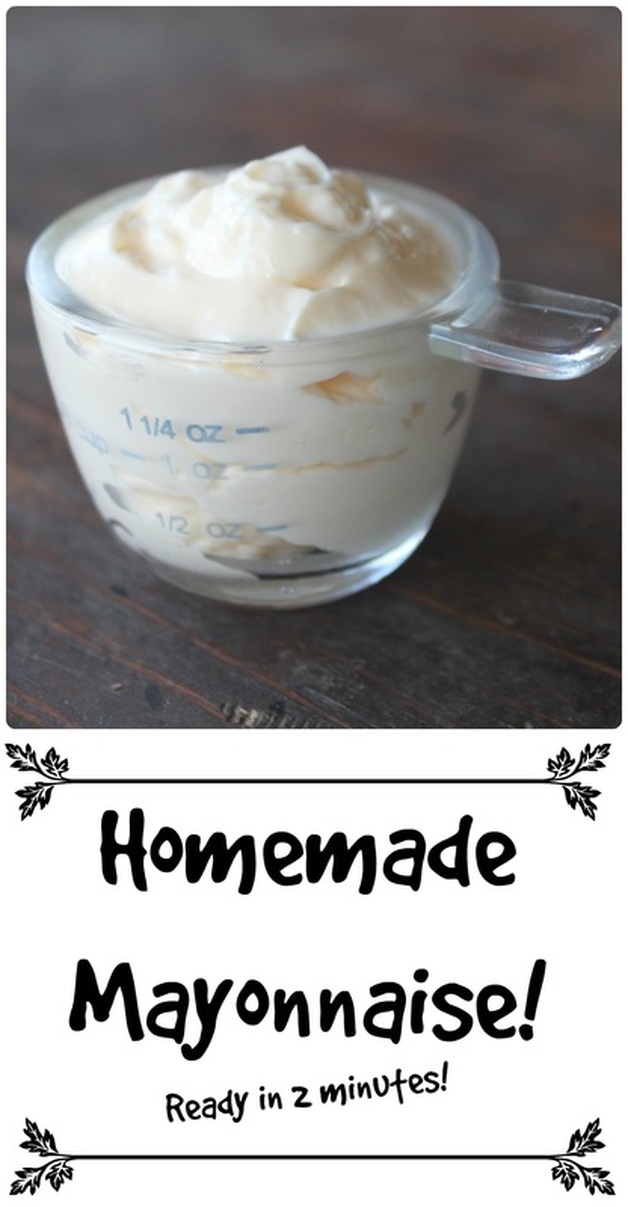 Can you tell I'm pretty excited about homemade mayo? Look at my title! Look at all those exclamation marks!!! Let me tell you though, my tale of mayo hasn't always been a happy one..... (.....insert depressing dream sequence music.....) Picture this with me, it's 2004.......(all of these ellipses are to help you stay in a dream sequence with me) :) .....I borrowed a cookbook from the library that had a homemade mayonnaise recipe in it. When I first saw you could even make your own mayonnaise, I thought, "sounds fun! I'll give it a try!". I think I was interested because I was eating sugar-free/low carb at the time, and regular mayo has sugar added, and "low carb" mayo was expensive. But, oh, I was so young and foolish. And not to mention wildly inexperienced as a food handler (for real, the newly married me from 12 1/2 years ago would have rolled around on the floor laughing if someone told her she'd be writing a blog that was food and recipe centred!)! Anyway, I digress, back to the story......). There I stood in my kitchen, doing as I was told from the cookbook I'd found the mayo recipe in. All I needed to do was to put an egg yolk, vinegar & some salt in a bowl, and slowly drip in oil while I whisked! And voila! I would have mayonnaise, made by me! And wouldn't I just be bursting proud! Well, about 15 minutes later, after I'd whisked until my arm felt like jello, and dripped each drop of oil in slowly (seriously, it said one DROP at a time!), all I had to show was a bowl of pretty gross looking, separated, curdle-y looking nastiness! And I had no internet at home, so I couldn't just quickly look up "how to fix ruined homemade mayonnaise!". Dream sequence date transition music..... It's now 2006, and I have a new recipe for mayonnaise that says if I use a hand mixer, the mayo will work out because it will be a steady beating, which is important for the emulsification process. You still need to put the oil in one drop at a time, but I thought, "well, at least the other hand won't be whisking, so it shouldn't be as hard?" I was wrong. Holding a hand mixer for 10 strait minutes IS hard, and my hand mixer was very overheated, and the mayo still didn't work out!!! Dream sequence date transition music..... Now it's 2011 (ish?), and I see a recipe for homemade mayo that says using a blender will do the trick! Apparently, hand whisking, and using a hand mixer doesn't whip fast enough. And for the egg and oil to properly emulsify. It has to happen slowly, but fully at each drop of oil, and that can only happen if it's being whipped fast enough! (hand slapped to forehead!). Well, I tried it. Long story short: it failed. I was a homemade mayo failure. I saw some time after, that using a food processor worked great, but after all the failures I'd had, I wasn't willing to try. Plus, I didn't own a food processor with the opening in the top to add food as it's whirling, and that was an important part of making mayo in said food processor. I wasn't about to go out and buy a new food processor either, just to attempt making mayo again! Dream sequence date transition music..... Here we are, it's 2015, and I'm standing in a second hand store in Tweed, looking at a immersion blender thinking, "well, I have been thinking about getting one of these because making homemade "cream-of" soups would be easier if I could just use this instead of having to dump the soup out into the blender....?". It was $5. So, I got it. And I was right, making "cream-of" soups is ridiculously easy with an immersion blender! And, not too long after getting the immersion blender, our regular blender broke, so I thought, "well, I sure am glad I bought the hand-held blender!". Then one day....one magical day....I was on a blog, The healthy Foodie, looking at a recipe, and somehow (by way of some rabbit trail I often find myself on when I'm on a blog I like!), I stumbled on "Foolproof Homemade Paleo Mayo", and there was a picture of mayo in a jar, and an immersion blender. I thought, "whaaaaaaa? Foolproof? She's never met a fool like me! I gotta try it". Dream sequence music changes to something triumphant and uplighting.... It worked!!! People, I am here as a bonafide homemade mayo failure to tell you that this is the FOR REAL foolproof method of making mayo. I've made it with cold ingredients, room temperature ingredients, fresh eggs, old eggs, using lemon juice, white vinegar, apple cider vinegar, pickle juice (which was amazing!!!-I used it to make tartar sauce for fish night!) adding dijon, adding yellow mustard, adding pepper, adding garlic powder, cayenne, rosemary, thyme-I've tried it so many ways, and this mayo hasn't failed me yet! I wanted to make a video of making it though, because while talking to my Mom on the phone one day about how crazy easy it was to make this mayo, I could sense some skepticism. That and she wasn't sure what size jar to use, and I told her "well, I'll video tape me making it, and post it to YouTube for you!" So, here it is, in all it's glory! I am so happy I'm making my own mayo that isn't a complete failure! Now, I eat paleo, and I believe in using healthy oil to make my mayonnaise. What is "healthy oil", well....quite frankly, I don't want to get into that right now.....I'm too happy about homemade mayo to argue about "healthy oil"! Now, I can tell you though that different oils produced different tastes. I use Extra Light Tasting Olive Oil because it has (duh) a light taste. I once used regular olive oil, and the mayo, although thick and lovely, was very olive oil-y tasting, and also kind of green in colour. Bleh. So, just keep that in mind when choosing an oil. Homemade Mayonnaise ****Super important note!!!*** You'll need a 16oz,(also called a Pint, or 500ml) wide mouth mason jar for this. Or, some immersion blenders come with a tall, wide mouth, cylinder shaped container that you can also use. The immersion blender needs to fit right in the container for this to work. Ingredients:
Something I add in regularly is dijon mustard, about 1 Tsp Method:
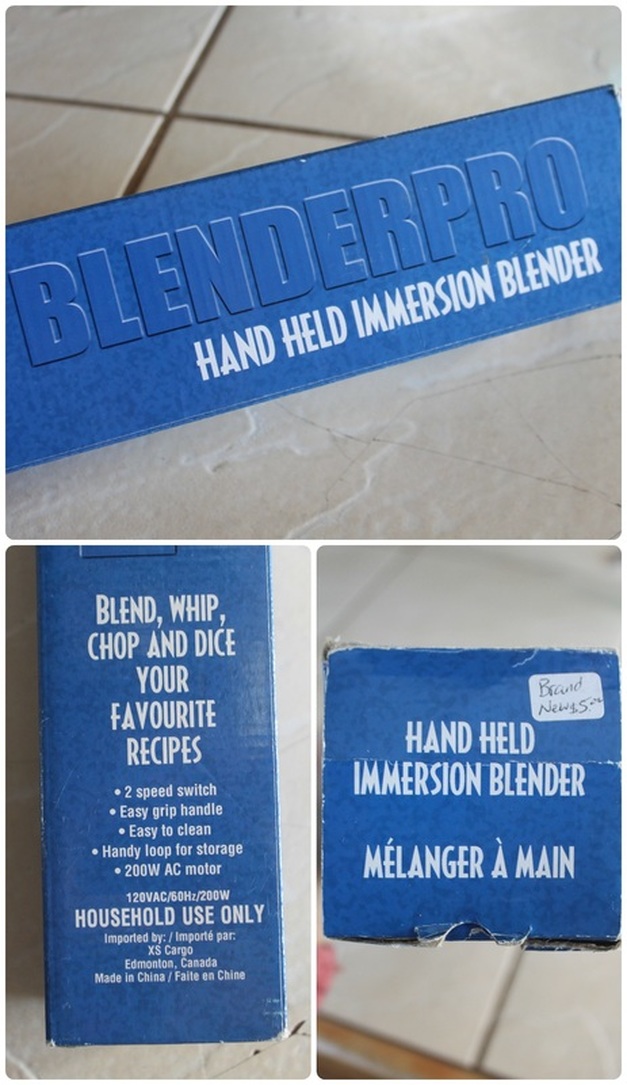 As you can see, my immersion blender is NOT fancy. Not even a little bit! But it works! So, incase you're thinking you need to go out and buy the best, most expensive immersion blender to make this work, you're thinking wrong! Heck, if you don't already own one, and you're in not a desperate hurry to make your own mayo, just keep checking into thrift shops to see if you can snag an immersion blender at a great price! I honestly think my mayonnaise tastes even better because the blender only cost me $5! : )
Ok, full disclosure, before I got this hand blender, I did manage to make ONE BATCH of homemade mayo using the whisking method. The recipe I used it in was for Shrimp Stuffed Tomatoes (which are so delicious!), but the effort to make the mayo was too much! I can be pretty lazy, ya know! Now, making those same shrimp stuffed tomatoes with this fast mayo? Game changer. Game. Changer. I had honestly gotten used to a no-mayo life. But , there were things I really wanted it for. Tartar sauce for fish nights, for example. Or to make a ranch dressing to eat with a pile of veggies as a bedtime snack. How about creamy coleslaw? Yes please. It is a welcome addition to my life! And, my kids eat it too, although I've never told them it wasn't store bought. I feel like they'd be skeptical if they knew I made it? They are my worst critics. Anyway, maybe they wouldn't be skeptical? Either way, I find immense pleasure in knowing that they'll eat it! : ) Well, that's it, I guess! I'm happy to be here writing a post and sharing something new that I'm excited about! I hope you had a great Monday! Well, here I am! I'm back!!! : ) Ok, I've been back since the last week in August, but things have been moving at a mile a minute at the Van Londersele's! However, I had been working on this post with the intention of having it up by the first Monday in October, but when I'd finished it all up, and I hit "publish".....it VANISHED!!!!! After I sat crying at the computer for about 15 minutes, I turned the computer off, walked away and thought "well, I'm not sure when I'll have time to re-do that! And here I am, a month later, finally (hopefully) publishing this (re-done) post! So, I've been away, but I've been trying, trying really hard, to get my blog back up and running! Ok, well, now that I've got that out of my way, let's re-cap the last 4 months, shall we?! (insert dream sequence music....) Camp Cook-July & August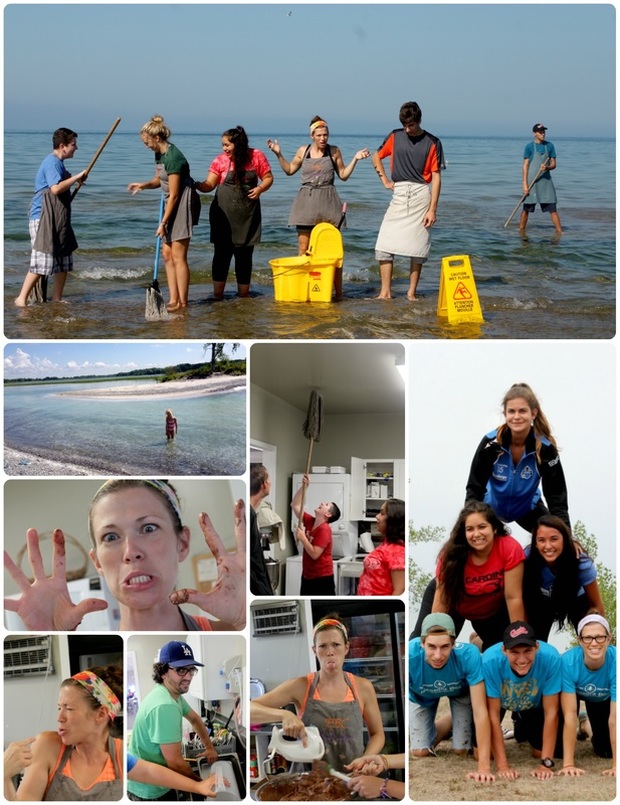 I was a camp cook at Pleasant Bay Camp in Consecon! This job left me sleepless and stressed for weeks leading up to the start date, and after the first week (where at one point I shut myself in the storage room to cry!), things seemed to click. I had some cooky and wonderful teens working with me, and they made everyday fun (and loud - we sang A LOT, and VERY loudly!). There were some failures, some successes, but mainly I grew a lot! I have serious F.O.F. (fear of failure!), and the pressure of this job felt crippling, then I got there, figured out all the quirks of how everything worked (ovens, stoves, steamers, etc.), figured out what worked and what didn't, and trusted myself, and things worked out! I needed to do a ton of planning, prepping, and figuring out exact times for (what felt like) 100 things at once so it all came out together at meal time! It was my kind of stress, it turns out! I do this at home basically everyday! When it comes to meals at home, my personality lends itself to exact planning, prepping and figuring out exact times. So, I had to tell myself to stay calm, and do what I knew how to do. In the end, I walked away feeling so proud for not completely bombing, I felt fulfilled for working so hard at something worth working at, and I felt love from my new "kitch" family (as one of my staff called it). :) And my kids had such a great time spending their days with other kids, going swimming, playing sports, making crafts (SO MANY CRAFTS!!!!), and getting a ton of sun! Family from Belgium-July Last summer Adam and I had the opportunity to go to Europe where we got the chance to visit with a lot of our family. This summer, 2 family members who we stayed with for a whole week in Belgium came to Canada! We got together for lunch one day shortly after they arrive in the True North, but later in the month we met up in Toronto (with my in-laws too) and went to Caribana. So, it was super loud, there was a lot of near-nudity (seriously!) :) , but most of all we got to see our family again which filled my heart up! Horse Staff-August A week after we left Pleasant Bay Camp, we headed to Brantford so the kids could attend Day Camp at Circle Square Ranch, and so I could be a member of the horse staff! I spent years and years working at this camp, and I was so excited to be heading back to work for the week. I was a little nervous about teaching horseback riding again because it's been a while, but it all came back to me and it went great! And my kids had so much fun in day camp! I loved (x 10000000) being there for the week! What's Left of Summer-August & September With the 2 weeks we had between leaving the Ranch and school starting, we crammed in as much "normal" summer fun as we could! We got to the Peterborough Zoo, the Tweed splash pad, the Tweed park, went for walks, visited neighbours, spent time in our jammies, cuddled our cat who we missed a lot, and went to Adam's work Labour Day Family Picnic. It was a little hectic, but wonderful! Back to School!-September Somehow my little babies were going into grades 6, 3 and 1! (*tear*) The kids looked so good, so grown-up, so beautiful, and I felt so old! So far, this school year is going so good. Caleb's class had a teacher switch 2 weeks into the year which left us feeling upset and worried, but his new teacher is amazing, and Caleb clearly loves him and his class. Caleb also has a rock-star for an E.A. this year, so she is really helping to keep Caleb moving forward and working hard. The girls teachers are also really wonderful, and they seem to be working well together. Surprise Birthday-September So, the day before my birthday I was in Belleville for an Art Show & Sale, and when I came home, my sister and her family, and my brother and his family, and a bunch of my friends were at my house! Surprise! I really was surprised, and it was so great to have everyone celebrating the 13th anniversary of my 20th birthday :) Hardy har har. I'm 33 and I'm ok with that! Halloween-October We carved pumpkins. We dressed up. We collected candy. It was awesome! This needs to further explanation! :) Simple Recipe!So, now that I've recapped the last few months of my absence, I would love to move onto a recipe that is so simple, and if you aren't into veggies as noodles, you can make this with your fav gluten-free or regular pasta. Just cook it up as usual, rinse well in cold water, and add to the pan! 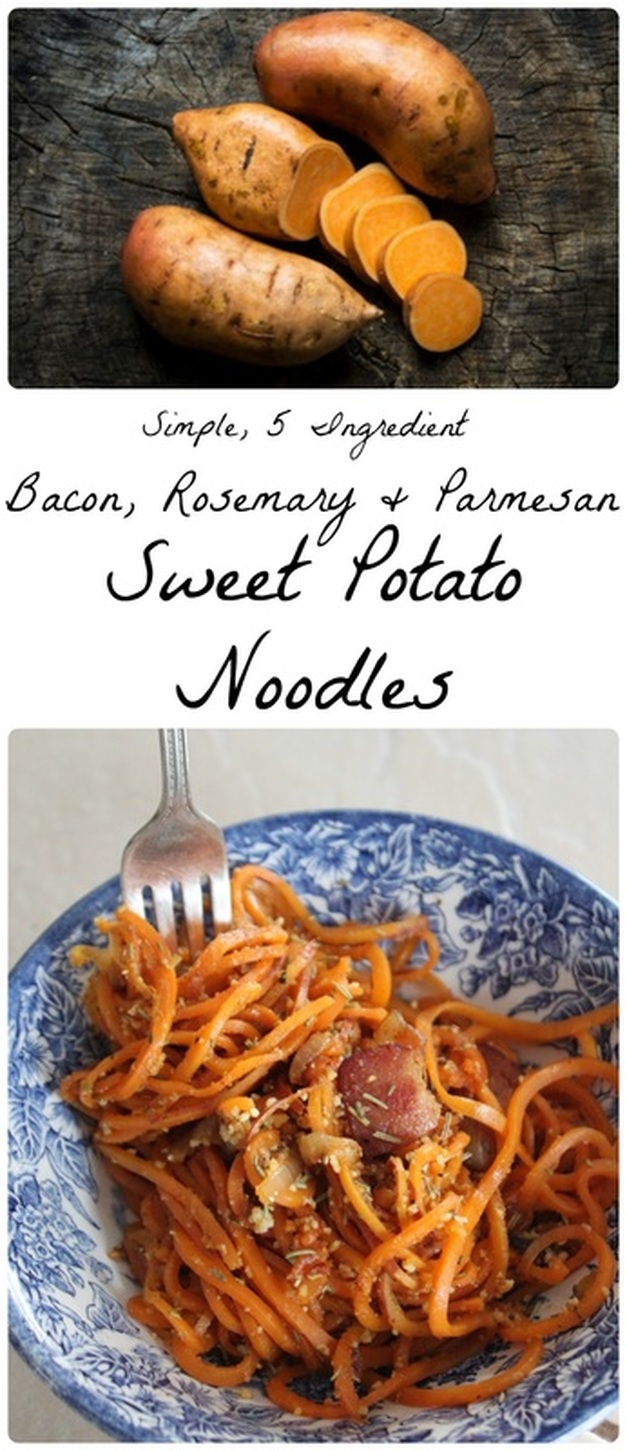 Bacon, Rosemary & Parmesan Sweet Potato Noodles Serves 2 large portions, or 3 smaller portions Ingredients:
Method:
Enjoy! 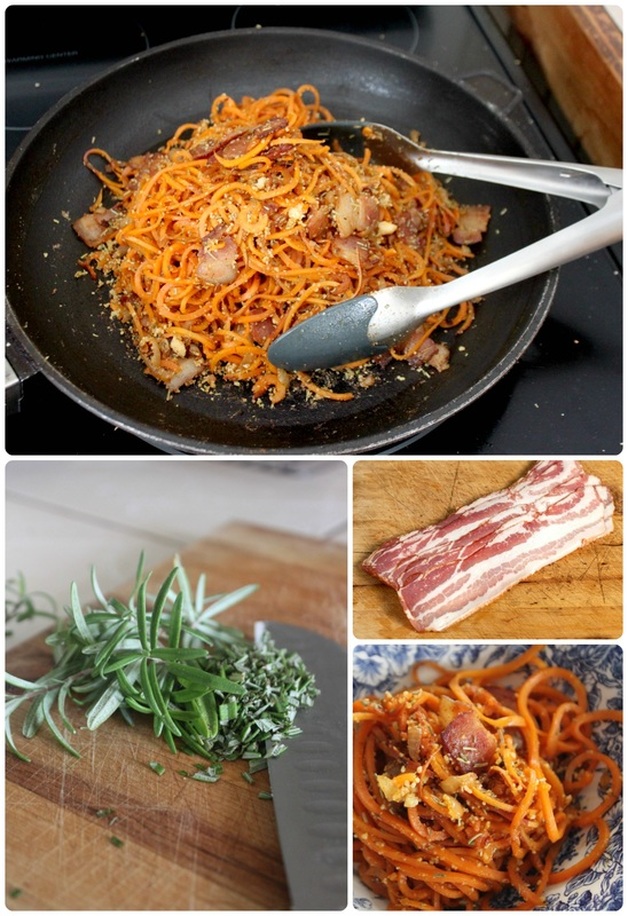 That's all there is to it! Truthfully, when I make this, because my kids aren't overly fond of sweet potato noodles, I'll cook up a pot of gluten-free pasta, then I'll rinse the pasta in cold water, and start this recipe in the pot I used to make the pasta, and add the cooled pasta to it at Step 4. In another large skillet I'll start a second "batch", and make it with sweet potato noodles. It's really not that much extra work, I'm literally doing the exact same recipe, just on 2 different burners, and with a different noodle. When all is said and done, it's still a simple meal, and has relatively few dishes! Seriously, making it 2 ways at once only yields 1 pot, 1 pan, 1 colander (for rinsing the cooked pasta), and one Spiralizer to wash! Well, and our bowls and forks, of course. Not bad for a freakin' delicious meal! :) Well, I'm happy to be "back". I'm not sure what my blogging schedule will be these days....sorry! I will work it out though! I used to like to work first things in the morning...but I've been having a heck of a time getting up early these days! So, instead I've taken to writing in the evenings, after the kids are in bed and Adam is on a night shift. It works, and hopefully I'll be able to get some lovely recipes out to ya'll, as well as some Health & Fitness posts and whatever other random things that pop into my head!
I will be taking you through my soon-to-be kitchen renovation, so stay tuned for that! Until next time, xoxoxoxox So, yesterday I went with my middle child on a field trip to a place called "Sky Zone Trampoline Park". I wasn't sure (at all!) what to expect, but it turned out be a really fun day (except for the long bus ride there and back!). I don't know how to describe the "park" exactly, except to say that everything is trampoline based! It was fun, and (total) I probably jumped on a trampoline for at least an hour - which is a lot for an old gal like me! : ) Ok, the jumping itself wasn't too bad, but I did need to take a lot bathroom breaks to make sure I didn't pee myself! Hahaha, seriously though, having kids (and vaginal births!) really makes things like jumping on a trampoline more like playing a game of Russian roulette! Whomp whomp. Anywhooooo, this recipe today is really tasty, and not difficult to put together. There's a new Thai/Japanese restaurant in Belleville that we've been to a few times, and it has opened my eyes to the many wonderful Thai (and Japanese) dishes I've never known about. I also tried sushi (well, I tried it once before, about 10 years ago and hated it!) and really loved it. So, all that to say I've been experimenting at home with different Thai flavours, and I was pleased as punch with this dish. The sauce is adapted from Stupid Easy Paleo's Sweet Chilli Dipping Sauce, and the meatballs are just a few ingredients with nothing fancy. Well, unless you consider sesame seeds fancy? If you want to make your own Asian cuisine at home, just get yourself some sesame seeds! Just commit to it; they aren't terribly expensive and they are delightful and (in my opinion) essential in making Asian foods! All that said....you can omit the sesame seeds if you don't have any. But just get some. : ) 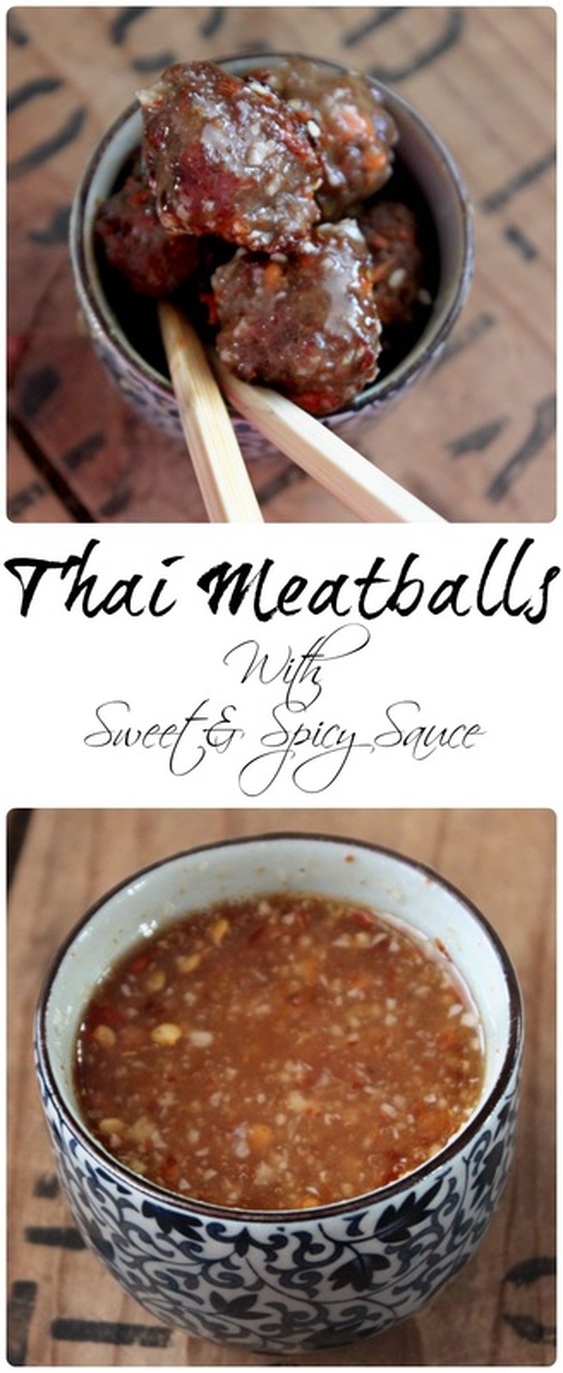 Thai Meatballs with Sweet & Spicy Sauce Ingredients: For Meatballs:
For the Sweet & Spicy Sauce:
Method: For the meatballs:
For the sauce:
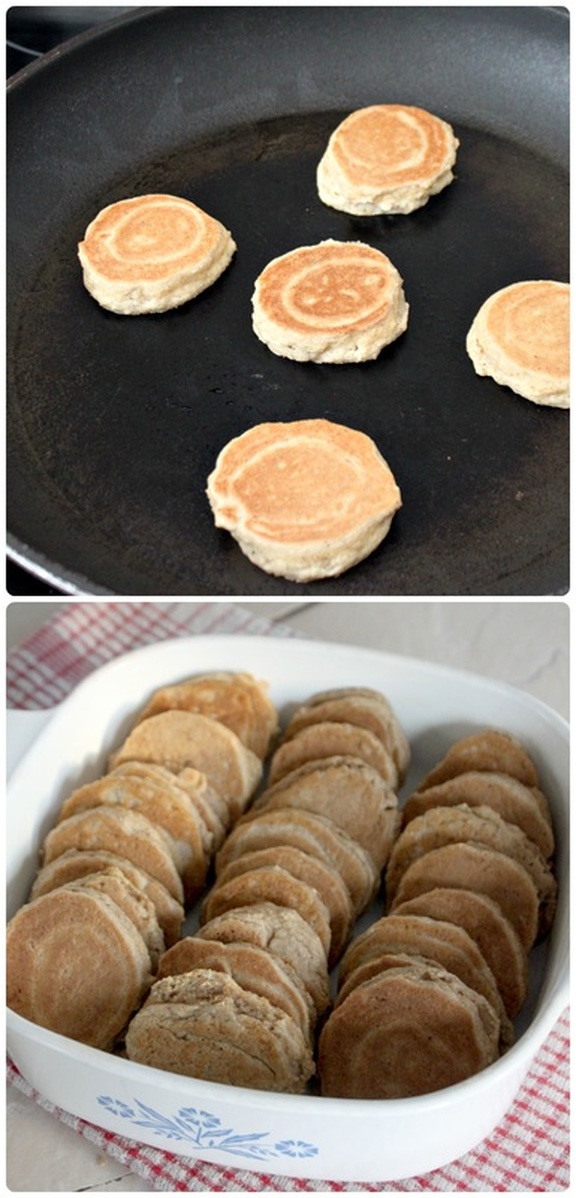
***If kids are eating this, and they don't like spicy food, just leave some of the meatballs out of the sauce. They still taste great on their own!*** 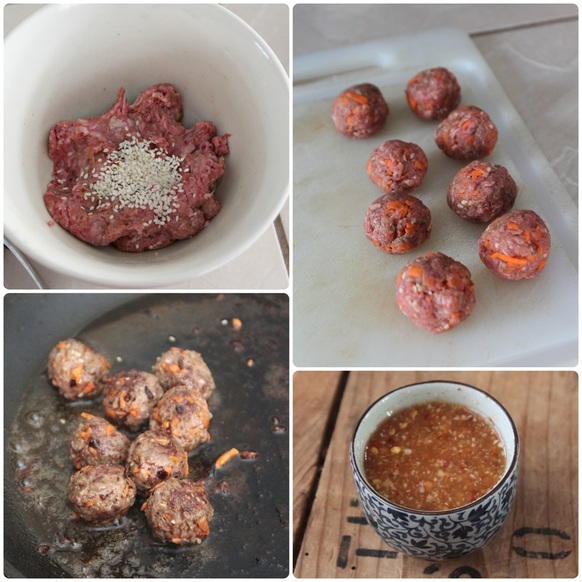  So, really, a pretty strait forward recipe, but with really fantastic results! I like to eat this with a quick fry of shredded cabbage, bean sprouts, thinly sliced peppers and onions, and spiralized zucchini. I'll just top it with the meatballs, and spoon a little extra sauce on it. Anyway, on Monday on my health & fitness post I talked about dealing with stress. One of the things that had been causing me anxiety was a decision to cook at a camp this summer. Once I decided I would do it, I got started on menus. I like creating menus, but I've only had to do it for my family, and special menus for if guests are coming over. So, I'm putting it out there - what kind of food would you consider quintessentially "summer camp", and what foods would you think could work on a summer camp menu? I always lean towards healthy options, but I realize (and my husband keeps reminding me!) that the whole world, and most children, don't eat or believe in eating the way I do. So I need to balance healthy foods with camp foods, oh, and all on a budget too! This might be a challenge, but I am totally up for it! Input would be welcomed though!!! So please, if you've read all this way, give me some suggestions! Have a great weekend! Hello there! I'm sharing a recipe today that was from Paleo Parents, who shared if from Julie Bauer's cookbook "Paleo Cookbook" So much sharing! I like to do a syrup based breakfast for the kids on Saturday mornings - wait, what? You don't know what a "syrup based breakfast", is? Well, it's a food item that gives you an excuse to eat maple syrup!!! :) I am truly Canadian. Anyway, making great paleo pancakes can be difficult, but I've made a few that I liked a lot (like these Chocolate Monkey Pancakes), but I was wanting to try something new, and also something I could make ahead. Well, I found this little dream of a recipe, and we loved it! I made the mini pancakes on Friday night (and wanted to eat them right then!), then I simply stuck 'em into an airtight container overnight, and got the rest whipped up in no time in the morning! This is so good! If you make the mini pancakes and think "why can't I just eat these like this?". Well, you can if you want to! But, making them into a delightful little pancake bake just makes it seem more like a cozy bread pudding. It seems more filling and satisfying somehow. I also changed the recipe slightly, and swapped out the coconut milk for applesauce in the mixture you make that gets poured over the mini pancakes before being baked. It made these a wonderful, apple cinnamon pancake bake! Anywho, it's the bees knees, and I think you should give it a whirl! 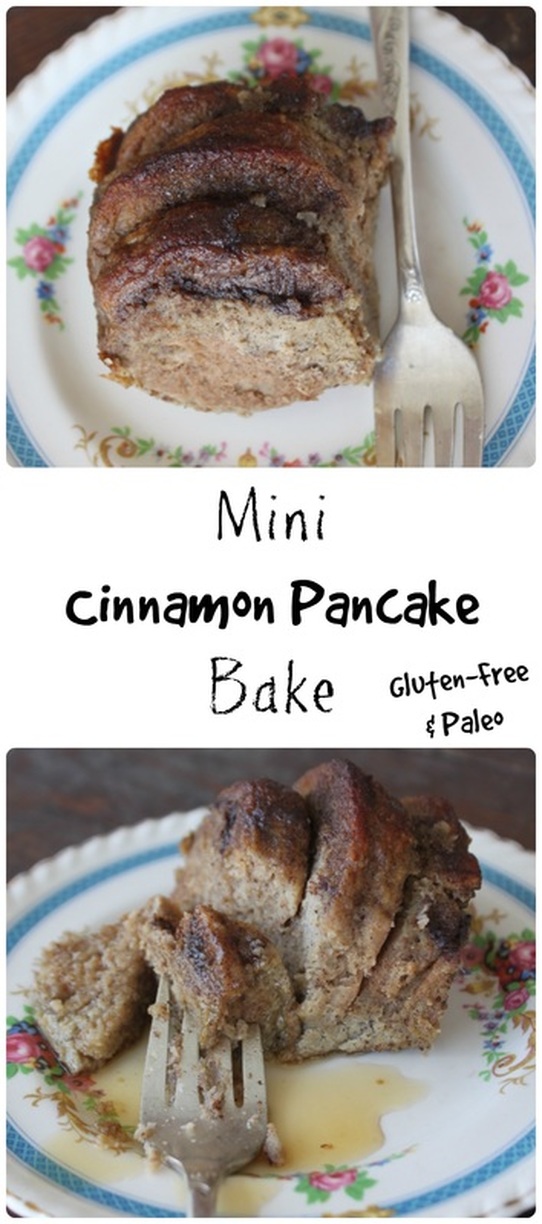 Mini Cinnamon Pancake Bake From Paleo Parents, with some adjustments of my own The Mini Pancakes Ingredients:
Method:
The Mini Cinnamon Pancake Bake Ingredients
For the topping:
Instructions
 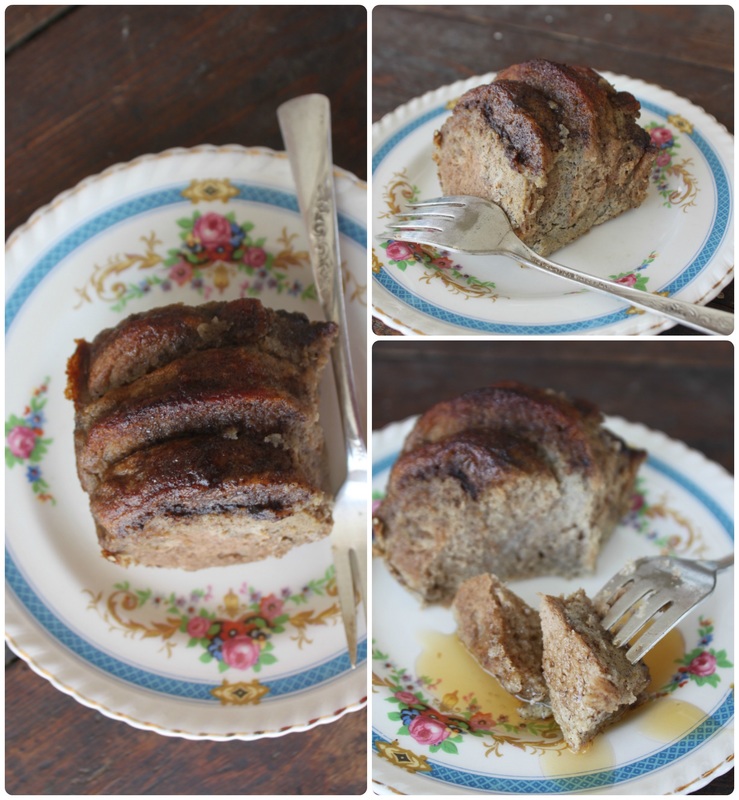 I have a very (VERY!) wiggly 6 year old on my lap while I'm writing this and when she saw the pictures she said, "Oooooohhhh! I looooove these french toasts!!!" : ) So, I think that sums this up nicely! Have a wonderful weekend! Hello there! Until a few years ago I would not - nay - COULD not eat shrimp. Originally, this started from a place of growing up not eating a lot of shrimp, but also knowing that shrimp were bottom dwellers (garbage eaters!), made my stomach turn. This does not seem like a great intro to this post....hold on, it get's worse! Hahaha! So, after I got over that and tried shrimp again randomly as an adult (I just tried the cold shrimp with the classic seafood sauce), I came to realize that shrimp was pretty tasty and I actually liked it. And then, a set back. We showed up for an Easter meal at my in-laws, and my brother-in-law had something smelling so good on the BBQ. I asked what it was and he said he had been marinating jumbo shrimp for a few hours and was now grilling them. Well, yum-diddly! I had only really eaten "party shrimp", as mentioned, but this smelled so good, and I was willing to try! Well, didn't he just bring me one when they were ready.....and it was a large, frightening, unpeeled shrimp! I literally went, "OH NO! No, no, no, no, I can't eat that....". Like a baby. Like a giant baby. My father-in-law came to the rescue and offered to peel it for me (where I couldn't see him doing it!), and then I ate that shrimp. It was tasty. But I knew my shrimp limits then and there. If the shrimp is naked, I'm good. If it's got eyes, and creepy little legs. Good golly, keep it away from me!!! For this post I wanted to find some useful links to help with the peeling and deveining process, and literally, out loud at my computer sat going, "Bleeeeh! Eeeewwwwwww!!" while making faces of disgust. I still can't handle shrimp that look like little sea creatures. Here's a link for those of you who can handle it though! If all of this made you question eating shrimp at all....I'm sorry. Seriously, so sorry. This coconut shrimp is so good though....you may want to reconsider your feelings. I shan't ever change my feelings about shrimp I'd need to peel and devein, but shrimp that's ready for fried coconutty goodness? That's a no brainer! These tasty morsels come together easily and relatively quickly. They are great on a salad, served with sauce, eaten alone, and even eaten cold the next day! I usually eat mine next to a mountain of Moo-shu (I just make a meat free version). 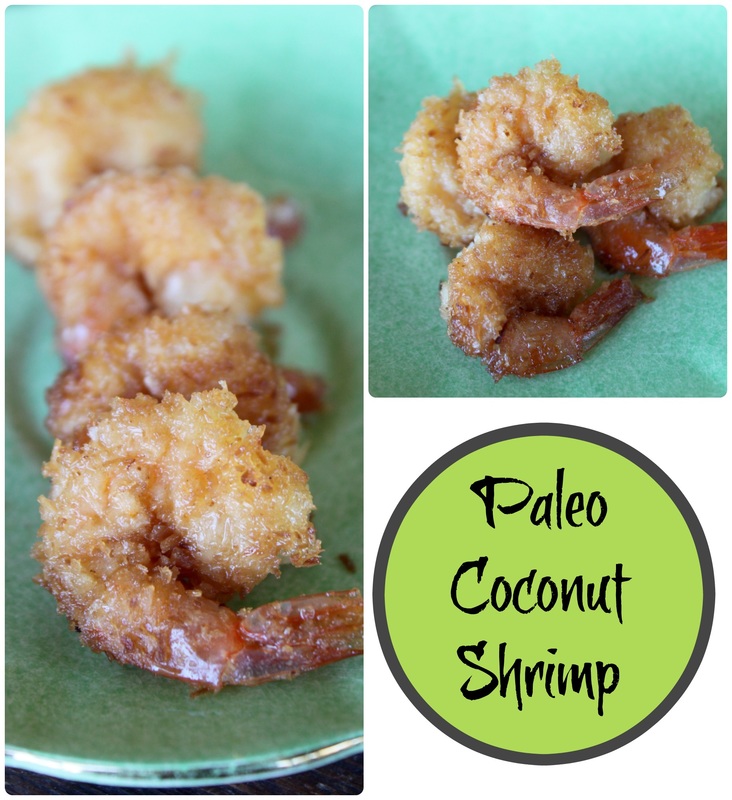 Paleo Coconut Shrimp From Wiked Spatula Ingredients:
Method:
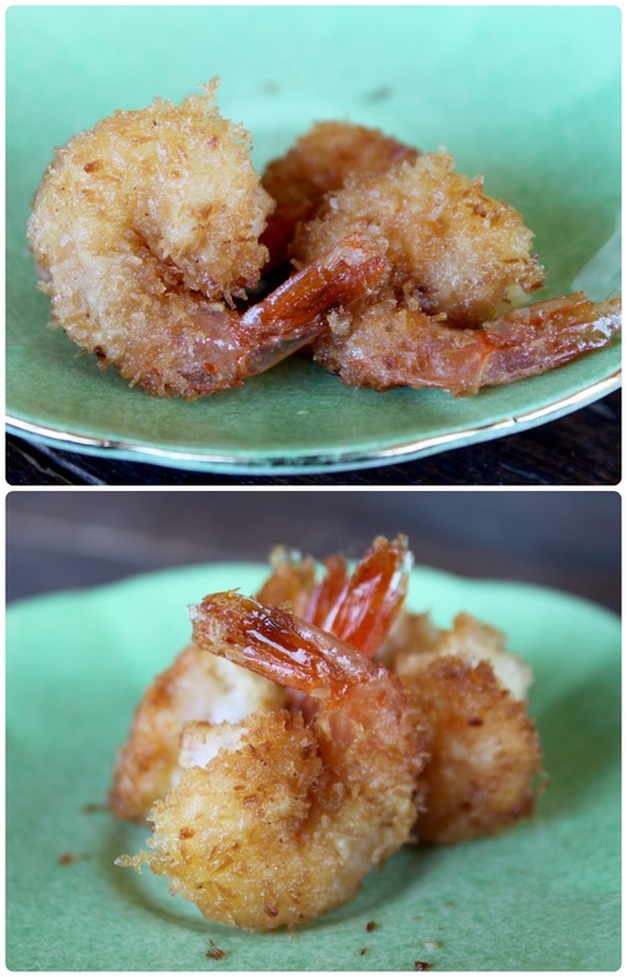 Looks good, eh? It is. It so is. Well, that's all for today! I didn't get a chance to post anything last Friday because it just turned into a day of busyness (not business), and then last minute my husband and I decided to go out for a late anniversary dinner, and well, the day just vanished. Poof! Anywho, how do you feel about shrimp? I want to know! So, feel free to share with me your truest feelings about the little sea creature. : ) |
Hi, I'm Amy-Lyn! 
I am the lady behind this here blog! I live in the sticks with my animals, my super handsome husband, and my
3 amazing kids! Here you'll find things from recipes (gluten-free, paleo, and strait up junk food!), DIY ideas, thoughts on raising a son with autism, and whatever else pops into my brain! : ) Read more about me by clicking here! Want to Stay Connected?
Find What
|
 RSS Feed


