|
Mmmmm, I want to eat this again right now! But, it's pre-sunrise and "whipping up a batch" of sesame chicken seems like a little too much....? Yes? No? Anyway, when I made this for the first time, my husband said he would gladly eat it every week. That's saying a lot for him because he quite dislikes eating the same thing week after week. That's legit. Who wants to be bored with dinner? What a waste of a meal if you're bored with it!?! I love to love my meals! I love to enjoy my meals! And this dish is one I really love to enjoy! It is really simple to pull together, and tastes so great. I can't say "it's better than take-out" because, truthfully.....I don't think I've ever had take-out sesame chicken....? But I can say it has such fantastic flavour; it's sticky, sweet, garlicky & gingery! Wonderful, wonderful! 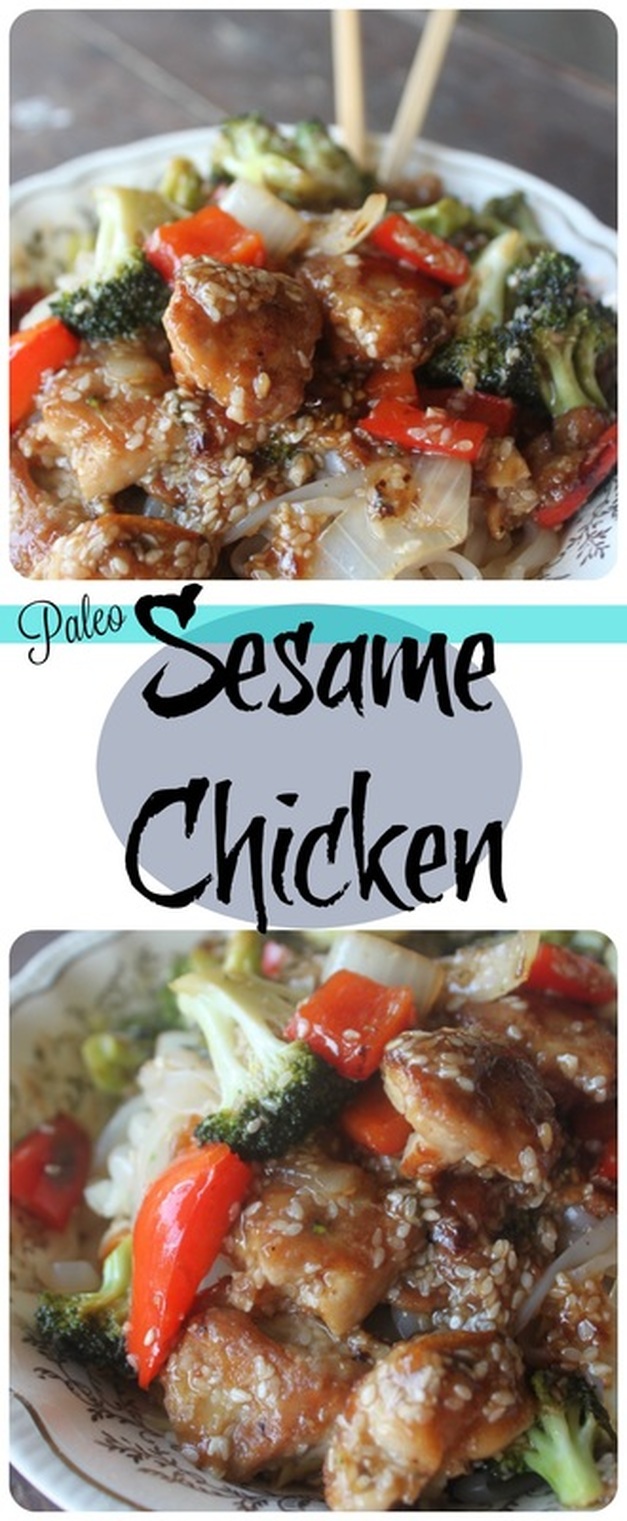 Paleo Sesame Chicken From Wicked Spatula Ingredients
***If you use frozen veggies, run them under some warm water to thaw out slightly*** For the Sauce
Method:
I like to serve Chinese dishes with stir fried cabbage (I just dump the pre-cut coleslaw mix into a pan with some oil, salt & pepper and fry it quickly). I also love using "miracle noodles" (I buy mine from Vitacost) 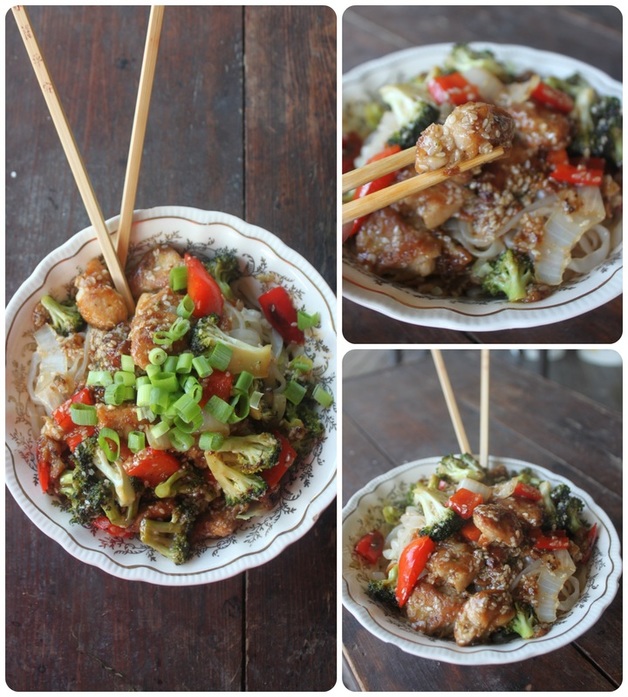 This week was like, "whaaaaaa?" for me.
Family Day was on Monday, so it was a holiday. Then Tuesday the buses were cancelled because of the wintery weather. Wednesday my kids school was closed due to burst water pipes. The kids finally went back to school on Thursday, but, I mean, that's confusing! My eldest child (who has autism) couldn't figure out what his day would look like ("free time for french?", "popcorn day?") because he was so thrown on what day of the week it was, and my youngest came out of her room and asked if we were going to church thinking that maybe it was Sunday! I felt the same! Wednesday I had a dance rehearsal for The Music Man and I got home late, so that was exhausting. Then last night my husband and I were at week 7 of a 10 week course we're taking, and we get home late from that, so I was even more exhausted! I want my coffee to be administered intravenously this morning....... When I finally sat my sorry self up in bed this morning, I mumbled to my husband, "guess what we're doing first thing tomorrow?", and he answered, "not getting up early?". He guessed right!!! Ok, whining over! : ) Have a great weekend!
0 Comments
It's Shrove Tuesday, otherwise known as pancake Tuesday! Shrove Tuesday is the day that precedes Ash Wednesday, which marks the beginning of the 40 days of Lent leading to Easter. The name Shrove Tuesday comes from shrive (to absolve), meaning absolution for sins by doing penance (desiring to repent and to do so by works). The day gets its name from the tradition of Christians trying to be 'shriven' (or having a clean heart) in preparation for Easter. So, some people make a special point of self-examination, of considering what wrongs they need to repent from, and what amendments of life or areas of spiritual growth they especially need to ask God's help in dealing with, and they do so by restricting certain foods (some people now participate in Lent by giving up certain habits that are bad, distracting, or not useful to a full life). On the day before the 40 days of Lent (shrove Tuesday), families would want to use up all the rich foods in their homes (fats, eggs, milk and sugar) because those foods weren't eaten during Lent, and they likely wanted all that yummy and tempting stuff out of the house for the 40 days of fasting for the Lent season! And eventually, it became (for some) to be called Pancake Tuesday because of the fact that pancakes are a pretty obvious dish to make from the ingredients being fasted from! There are all sorts of stories about the real start of "pancake Tuesday", and about different traditions through history and around the world regarding pancake Tuesday. Very interesting stuff! Listen to this one: On Pancake Day, "pancake races" are held in villages and towns across the United Kingdom. The tradition is said to have originated in 1445 when a housewife from Olney, Buckinghamshire, was so busy making pancakes that she forgot the time until she heard the church bells ringing for the service. She raced out of the house to church while still carrying her frying pan and pancake, tossing it to prevent it from burning. The pancake race remains a relatively common festive tradition in the UK, especially England, even today. Participants with frying pans race through the streets tossing pancakes into the air and catching them in the pan while running. The most famous pancake race, at Olney in Buckinghamshire, has been held since 1445. The contestants, traditionally women, carry a frying pan and race over a 415-yard course to the finishing line. The rules are strict: contestants have to toss their pancake at both the start and the finish, as well as wear an apron and a scarf. Traditionally, when men want to participate, they must dress up as a housewife (usually an apron and a bandanna). The race is followed by a church service (found this story here). Anywho, every year I post some pancake recipe, but this year I wanted to point a few of my own recipes out, and also some super delicious recipes that I love from a few other bloggers! In this round up I've got the perfect (regular) pancake, specialty pancakes, gluten-free and paleo pancakes. There is something for everyone! Just click on the name of the pancake to see the recipe! Enjoy! Perfect Pancake Recipe Easy peasy, simple-as-can-be pancakes From Grace & Good Eats 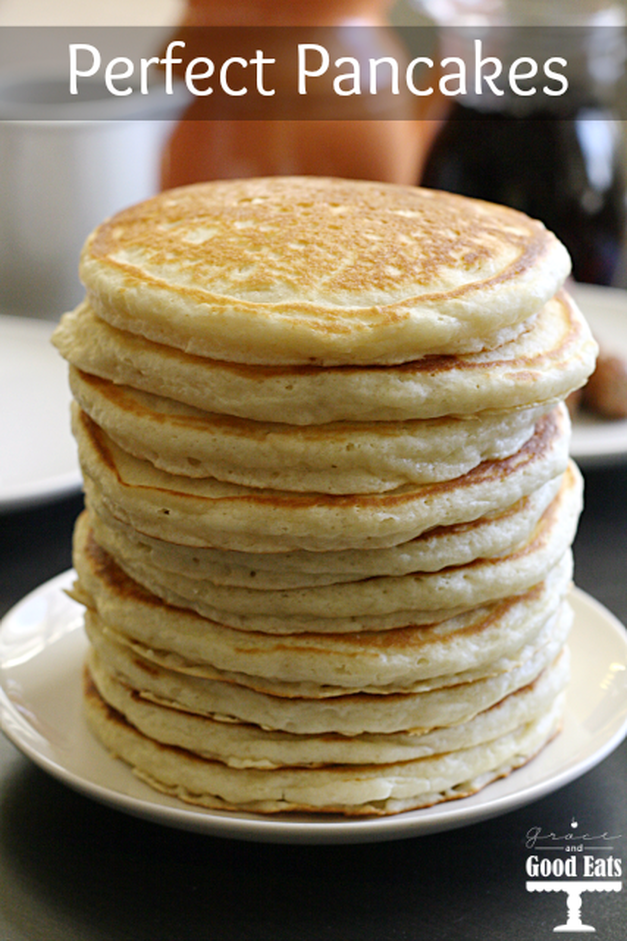  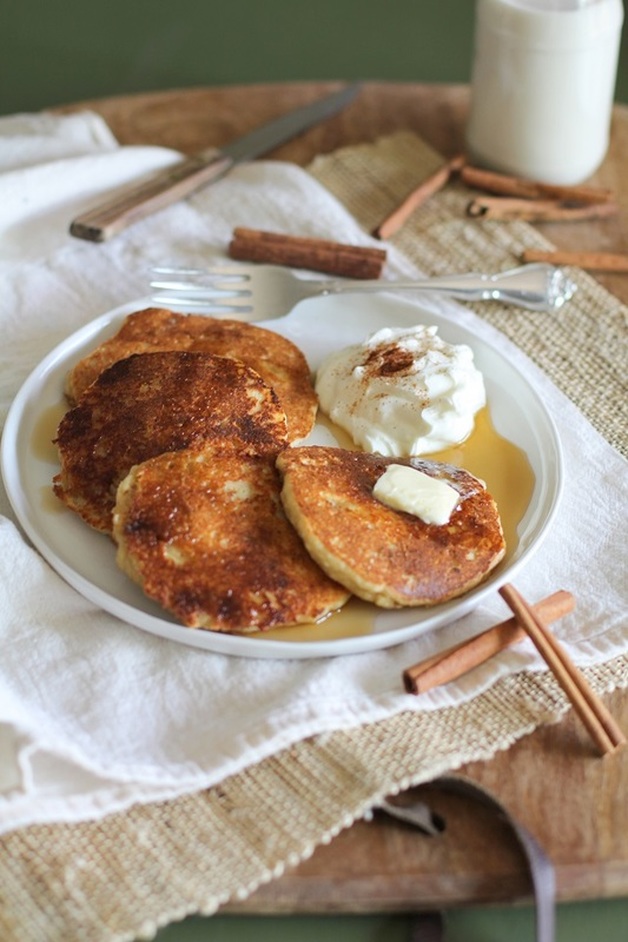 Gluten-Free Pancakes Just a strait forward g.f. pancake recipe (with a few chocolate chips hiding in there)! From Bushel & A Peck 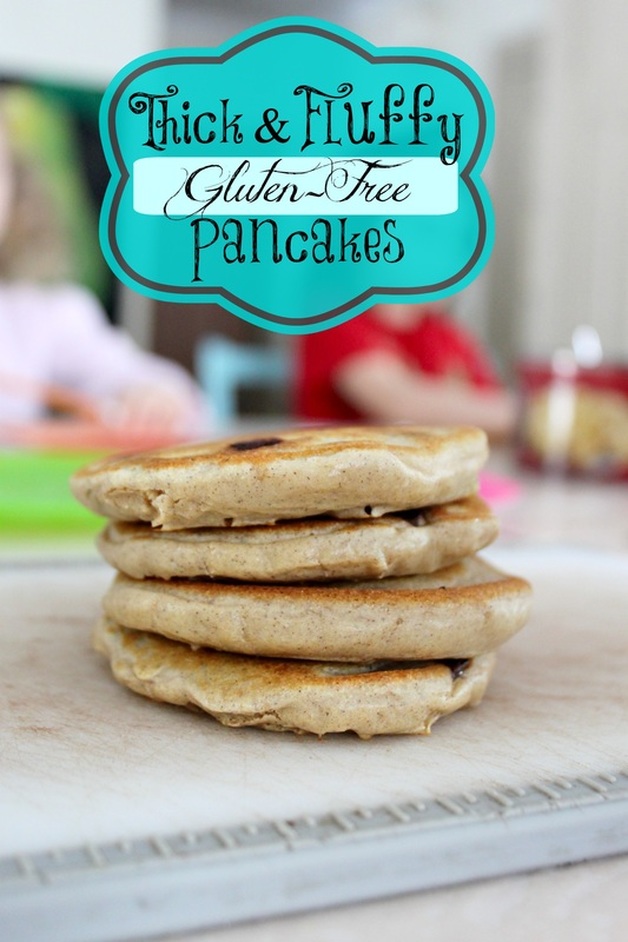 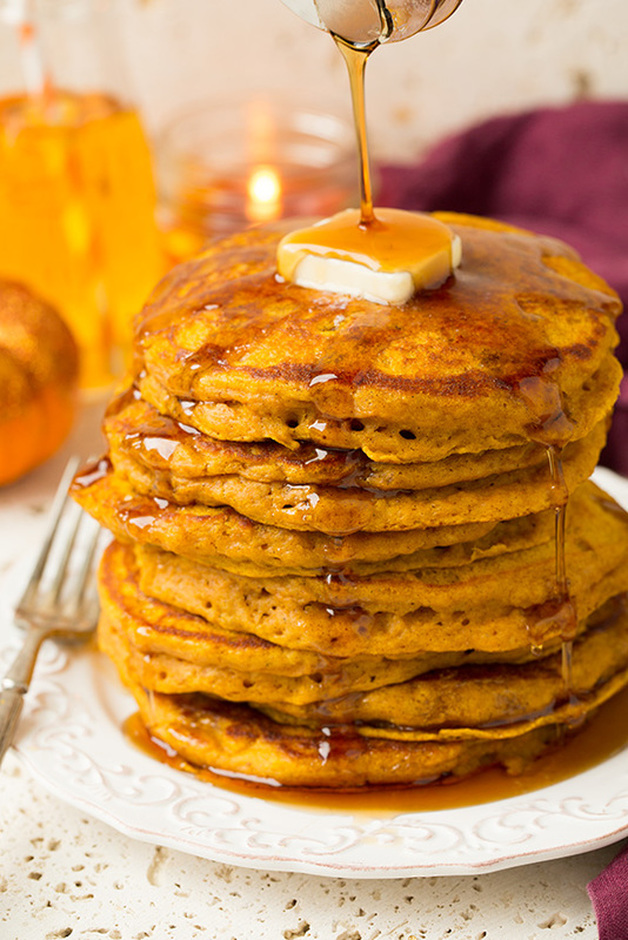 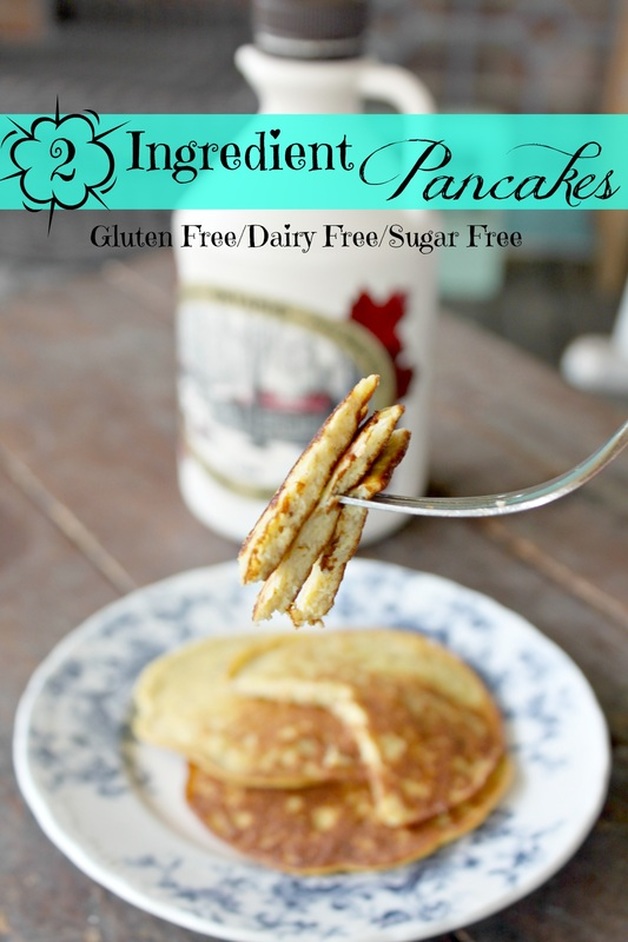 Chocolate Chip Oatmeal Cookie Pancakes Gluten free, and like a large, soft, pancake-y oatmeal cookie! From Chelsea's Messy Apron 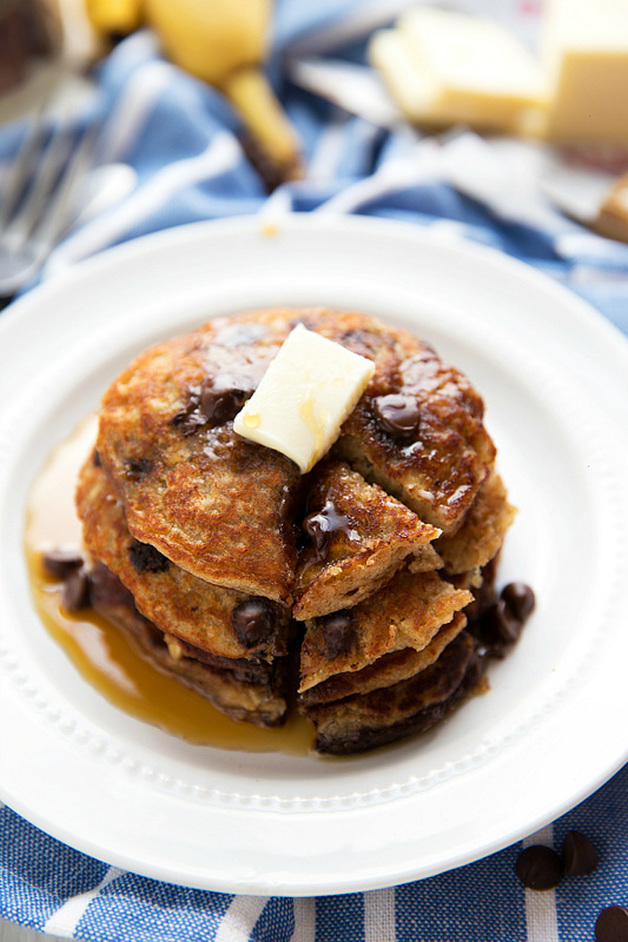 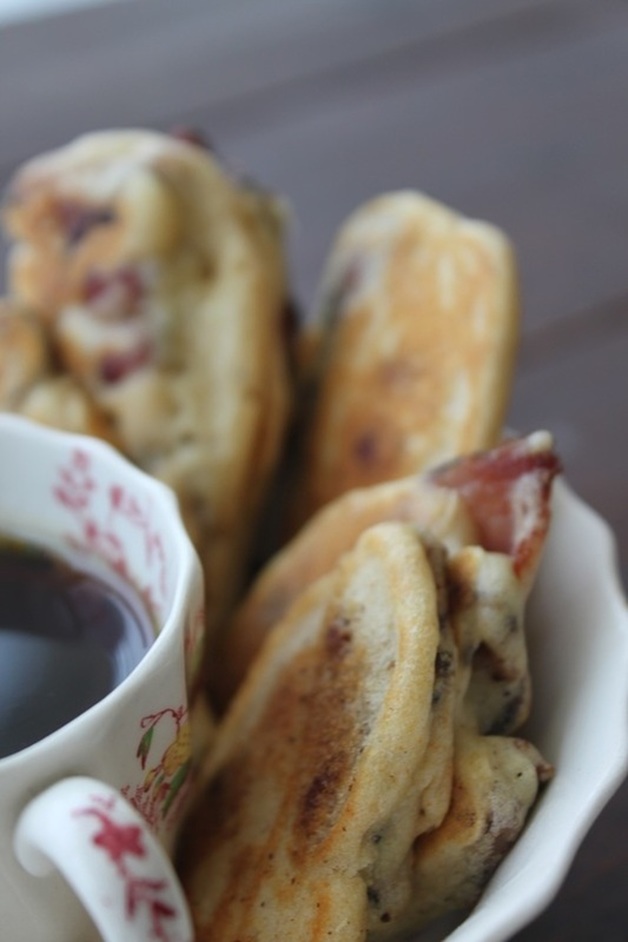 Baked Pancakes Perfect if you don't have time to stand in the kitchen flipping pancakes! From Eating on A Dime 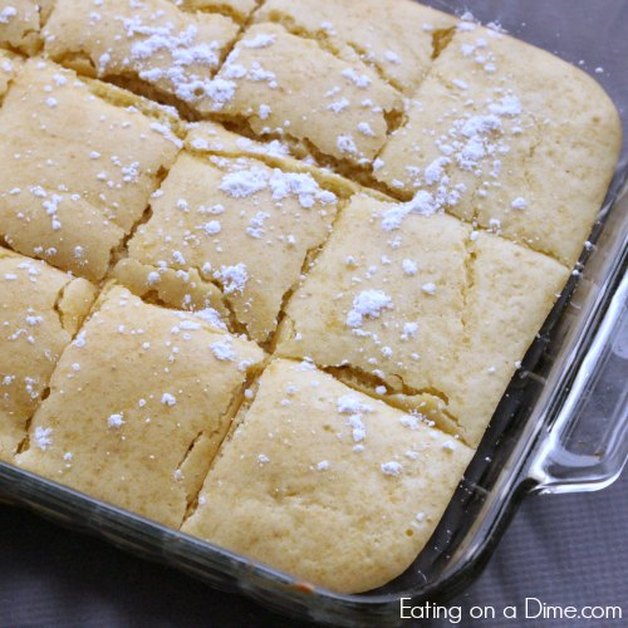 Just a little ditty to close here.....last night while cleaning up from dinner, I took the lid off my slow cooker to get the leftovers out of it, and a ladybug came careening out of no-where and landed right in the food in the crock-pot! And I dropped an f-bomb (that's the f-word, FYI). Confession time. I have a serious potty mouth. I mean, it's pretty bad. I don't say things my kids think are bad, like dumb or stupid, but I sure do say the ones I really don't want them to use! So, last night when I swore about a lady bug ruining the leftovers (I know it's just a small bug, but you agree with me that it ruined all the food?!?), I looked at my husband who's face was saying, "really? An f-bomb because of a bug in the food?" , so I said, "maybe I should give up swearing for Lent?" And, even though I don't always give something up for lent, I am going to do this. I swear more than is useful, and I should tame this beast! So, that's what I'm giving up for Lent! Are you giving anything up for Lent? Are you having pancakes for dinner? Are you sick of all my questions!?! : ) It's finally gotten to be really wintery in Ontario!!! It was so warm and spring-ish through our Christmas holidays in Brantford, but as we drive home the skies were getting grey and blustery and the temperature began to drop. We got home, got the van un-packed, and it started to snow! The snow makes me want to (and need to in our old house!) wear 2 sweaters, cozy socks and slippers and eat warm, comforting food! In the past I was never a huge pasta eater. I enjoyed it once in a while, but it was never a food crutch for me (I had many others!). But as the fall settled in, I was feeling the need to change up our "usual" dinners, and comfort foods came to mind. COMFORT FOODS!!! I'm not 100% sure why I did that, but I said it out loud while typing it....I also said it like Cookie Monster....oh boy, I'm the captain of the crazy team today! Back to warm and cosy foods.....soups and stews, casseroles and pasta, all warm, made mostly in one pan or dish, and with leftovers for packing into lunches. However, my kids (except the youngest) hate soup, they'll eat stew, but usually with some complaining and suspicious looks at what might be hiding in the dish. They enjoy casseroles, but they're not my husbands favourite.....so, that leaves me with pasta as a good family-approved comfort meal! Side note, I know it sounds like my kids are fussy (and they sure can be!), but they mostly don't like those foods because we hardly ever have them and new foods can be scary (apparently!)! Hahaha, bunch of brats...my husband included! : ) Anyway, this recipe was approved by all (with a tiny modification for the kids--I'll give that to you in the method), and was so, so soooo good! It's creamy, a little spicy, and totally satisfying! I've made this using butternut squash noodles, sweet potato noodles, and spaghetti squash, but zucchini noodles could also be used. Oh, and if you're not paleo, feel free to use gluten-free pasta, or regular pasta! 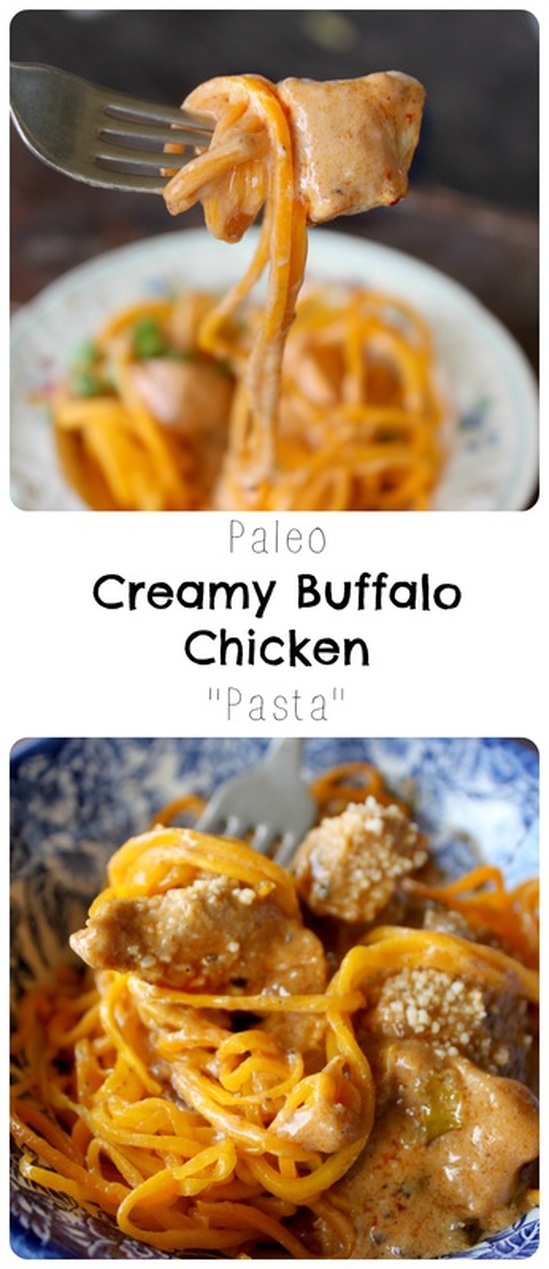 Paleo Creamy Buffalo Chicken "Pasta" Adapted from Brittany Angell Ingredients:
***I prefer to use roasted butternut squash noodles (using THIS spiralizer--it' will spiralize butternut squash without it needing too be soften at all first!), but you can also use sweet potato, or zucchini noodles. If you don't own a spiralizer you can just use roasted spaghetti squash. The amount you need depends on who's eating! I can eat an entire large spiralized butternut squash to myself! Opt for too much than too little though. Leftovers are better than not having enough. For the different cooking methods, see the instructions below!*** Method: ***Start by prepping your noodle***See below the sauce recipe for the how-to!
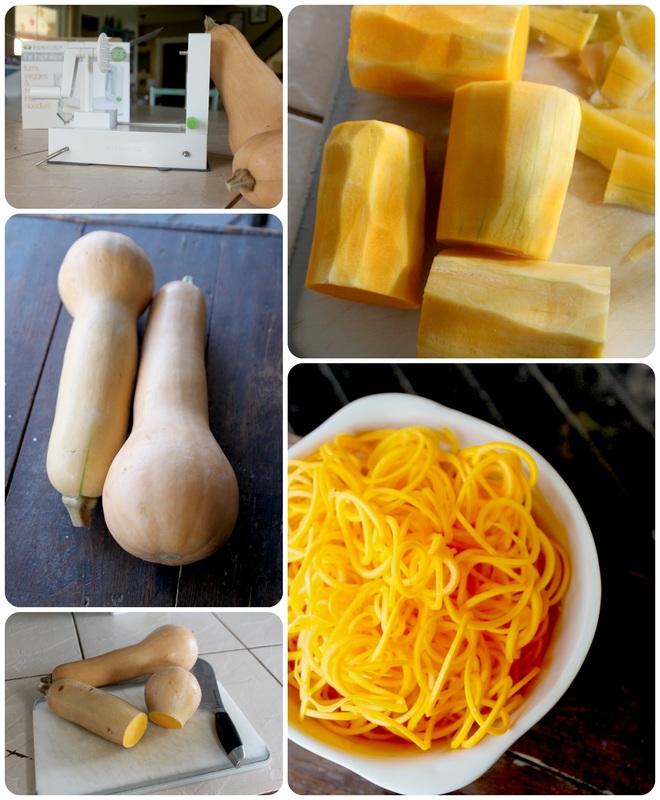 My butternut squash noodles! The Noodles! Butternut Squash- Preheat oven to 400- Cut the bulbous end of the squash off and set aside (you can scoop the seeds out to roast and snack on, and you can also roast that little portion to use in other recipes), then cut the top off the squash, and peel (see how to do this here) I use Blade D with my Inspiralizer for spaghetti noodles. Then I place them as evenly as possible onto 2 baking sheets and drizzle with olive oil. When you're almost done making the sauce, place baking sheets into hot oven to roast for 5 minutes, then take out, toss very slightly and gently, and place pans back into oven for 5 more minutes, switching which level the pan was on for the first 5 minutes. Sweet Potato- Spiralize into spaghetti noodles, and warm a large skillet over medium heat. Drizzle olive oil into the pan and place noodles into pan, and cook/saute until cooked through, about 10 minutes. Don't over cook them! Zucchini- Same instructions as for the sweet potato noodles, only cook on a lower temperature, and for up to 15 minutes. They are already soft, but just need to be warmed up and have some of the water evaporate. Don't overcook them! Spaghetti Squash- Preheat oven to 400- The typical way to roast a spaghetti squash is to cut it in half lengthwise and roast. But that's a difficult way to cut a thick and strong spaghetti squash! The easiest way to roast a spaghetti squash is THIS way. Cut the squash into rings, place onto a parchment paper lined baking sheet and roast for 40 minutes, flipping them over halfway through cooking. You'll end up with nice, long strands of squash noodles, it's a lot easier to get the noodles out, and they aren't as wet as spaghetti squash noodles that are roasted when simple cut in half. 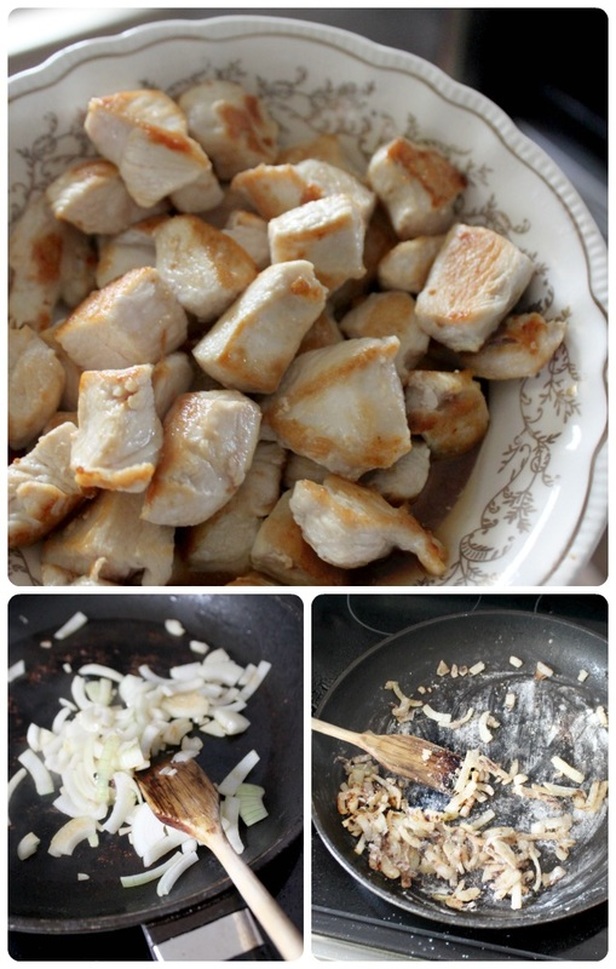 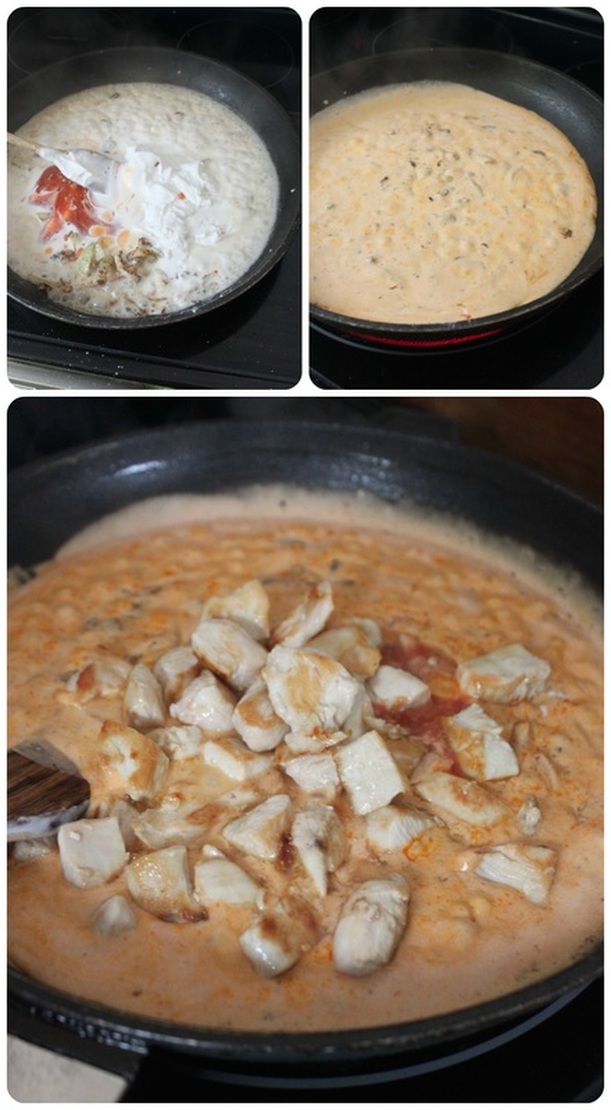 Making the fabulous sauce! Making the sauce is so simple! Two thumbs up! : ) 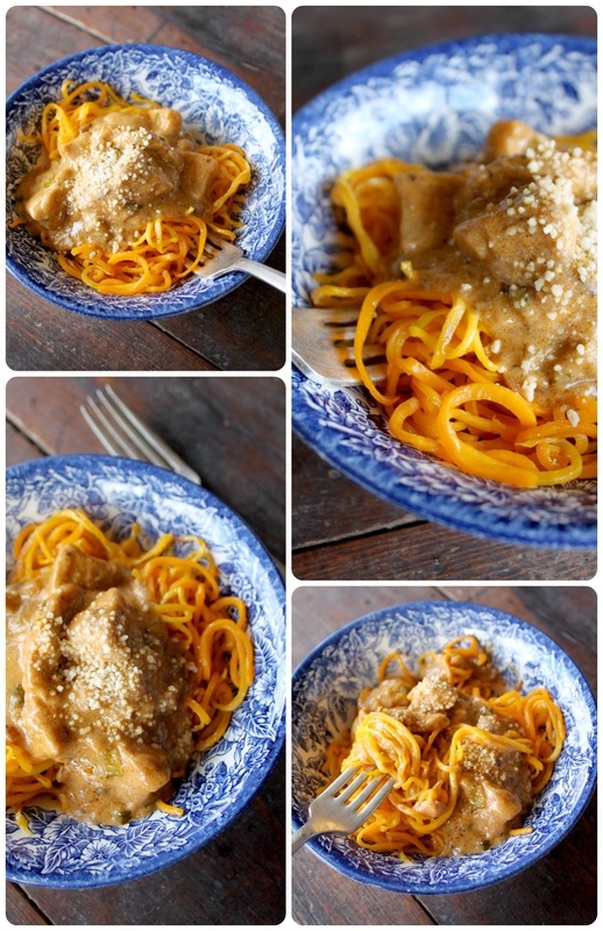 So many photos today!!!! : ) This meal is so tasty though, I needed to (apparently) include every photo I took! Haha, sorry! Well, ok, I really took about 40 more photos than this, so it could have been worse! I hope everyone had a good week! We did at the Van Londersele house! It was my youngest daughters birthday yesterday, and Adam brought a bouquet of flowers home for her and you would have thought she won an Emmy, a Grammy, and a Tony award all at once!! She was so thrilled she could hardly contain it! What a dear. This week also saw temperatures so low that made my nostril hairs freeze (yum), as well as the horses nostril hairs, and the dog had an icicle beard when she got inside! It also required me to fill our outdoor wood boiler 4 times a day! Sheesh! I wore a lot of layers this week, a lot of layers indeed! But, it's all part of the Canadian home that I love, so I take it in stride, knowing that we have 4 seasons that are beautiful and terrible each in their own way! So, this weekend we have the first round of auditions for the new musical "The Music Man" with The Belleville Theatre Guild. I'm pretty excited to get started on this new project! Have a lovely weekend all you good people! Oh, and share with me some of your favourite comfort foods, please and thank-you! : ) Background info: I saw a beautiful recipe on Pinterest from Iowa Girl Eats. It's a pretty simple recipe for Spicy Shrimp & Sausage Skewers. I loved how it sounded, so I was going to make it! I had the shrimp ready, the sausage thawed, skewers soaked and ready....then I was like, "huh....I don't feel like bbq-ing because it's cold and rainy.....", so then I was like, "I guess I could make the skewers and just fry them up in a pan...", then I was like, "If I'm just going to fry these in a pan, why the heck would I take the time to put them onto skewers....?" Oh, the other problem was how small my shrimp were (they were shrimpy, haha, get it?). I couldn't find (or afford!) the really big shrimp that would have made these pretty (which is an important element to me in my meals!), so I was just going to alternate between shrimp & sausage instead of making them look amazing by having the sausage piece tucked into the shrimp (go check out the recipe at Iowa Girl Eats to understand what I'm saying!). Anywhooooooo..... I really added a dash of lazy to this recipe, but I loved how the salad turned out anyway! It still tasted great, and was a real filler! Because I was originally going to eat a salad and have the skewers to the side but on the same plate, (not on top), I wasn't concerned about the dressing for my salad. But once I decided I was going to cook everything and throw it onto my salad, I suddenly needed a perfect dressing for it! I sometimes get a little obsessed about the dressings of my salads being exactly right! When I eat sausage I enjoy it with plain old mustard, so I wanted to create a very mustard-y dressing to go with it. My husband was extreeeeeeemely leery of a "mustard dressing", but he really enjoyed it because it was wonderful! It was sweet and tangy, you could taste the mustard which went really well with the sausage and the spicy shrimp! I also added some sour kraut to the salad....oh man, that was a perfect addition! Winner! 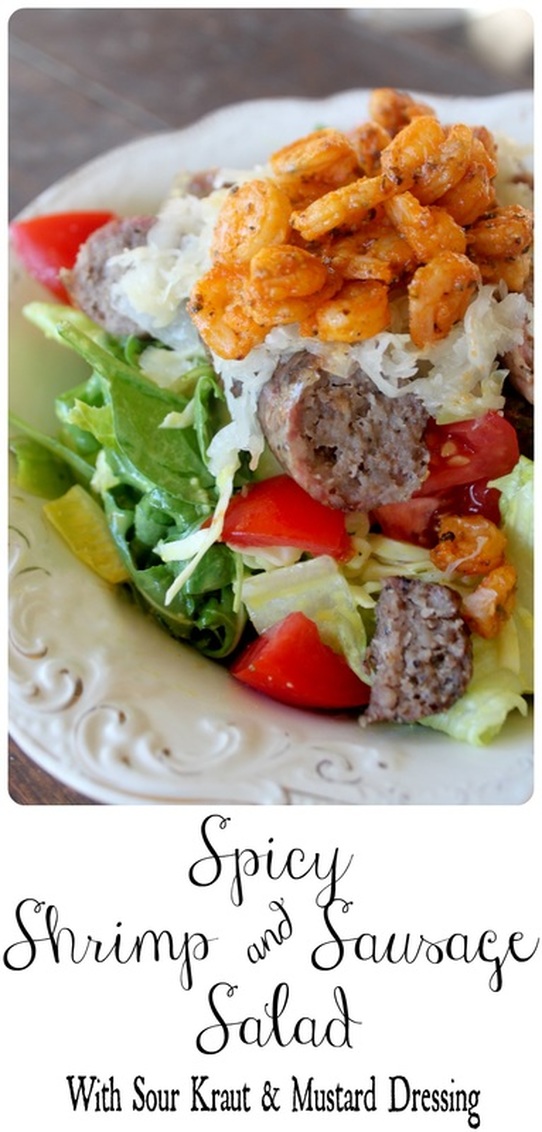 Spicy Shrimp & Sausage Salad and Mustard Dressing Makes 2 Huge Servings Ingredients:
For the Salad Dressing:
For the Salad:
Method:
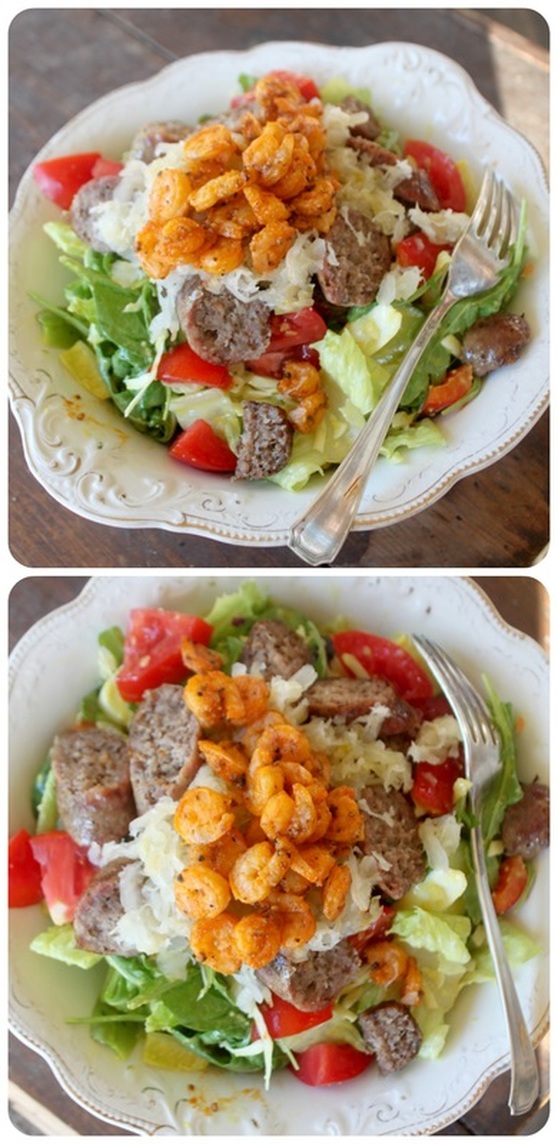 Honestly, this salad is soo good. I want to eat it every day, but alas, we don't have sausage and shrimp on hand in an endless supply! Booo hoo! I know the sour kraut might seem a little weird too, but it added this whole different taste and texture element that created such a fantastic salad! So, if you like sour kraut normally, and perhaps usually eat it with your sausage, then you'll want to add it on this. Just trust me. So, this weekend marks the beginning of our families Christmas holiday! We head South-West today to stay with & visit family. We shan't return home until the 28th, so it's a long haul! Some years the 10 days have gone by terribly, some years it's been amazing, but most years are a mix of the two! Between the kids and not knowing how they'll behave/react/cope, Adam and I trying to (and failing to) properly communicate, and pleasing family & friends it can be a roller coaster ride! But we are always happy to visit for Christmas, and the kids love seeing cousins and it somehow seems to work out. We know the outcome of the time away depends largely on our attitudes, so we've been working on keeping them in check and enjoying the season, regardless of the external factors! Well, so, leave a comment just to say "hey", or to tell me what you think about this salad, and especially to tell me if you tried it! Have a wonderful weekend! Potato salad is a classic make-to-bring-somewhere-dish. Am I right? It uses inexpensive ingredients, it's relatively quick & simple to put together, can be made ahead of time, and almost everyone likes it. My problem usually with potato salad is the disgusting amount of mayonnaise added to most recipes. Bleh. So, this is a thing that has been around for a while, but I only recently stumbled upon German Potato Salad ("Kartoffelsalat") a potato salad recipe that uses vinegar & the fat from the bacon to create the dressing. Most traditionally this potato salad is served warm, but if you let it cool, the salad does get a little "creamier" as the bacon fat cools. A potato salad that boasts a sweet & tangy dressing, and it's mayo free? Yes please! It's crazy delicious, it is a crowd pleaser, it is awesomesauce, as some people might say! And I like that saying for this because, well, it really is the "sauce" that makes this the best! 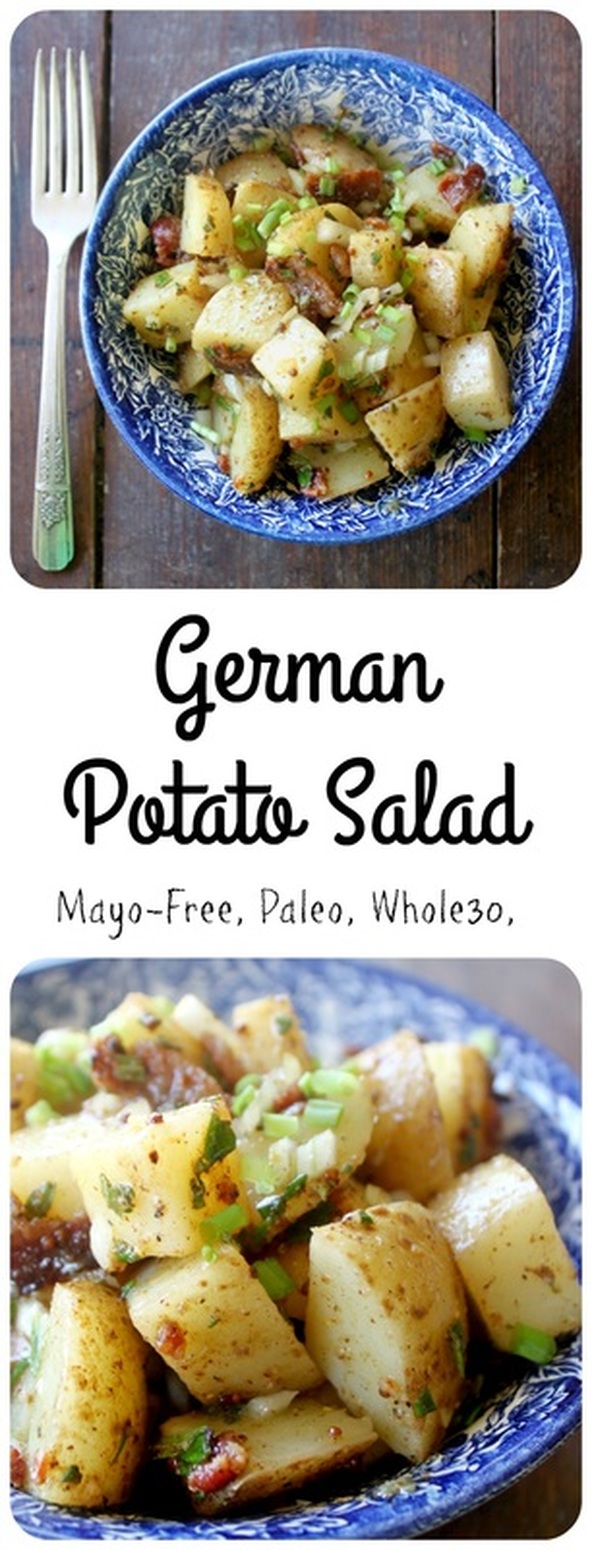 German Potato Salad Adapted from Bravo For Paleo Ingredients:
Method:
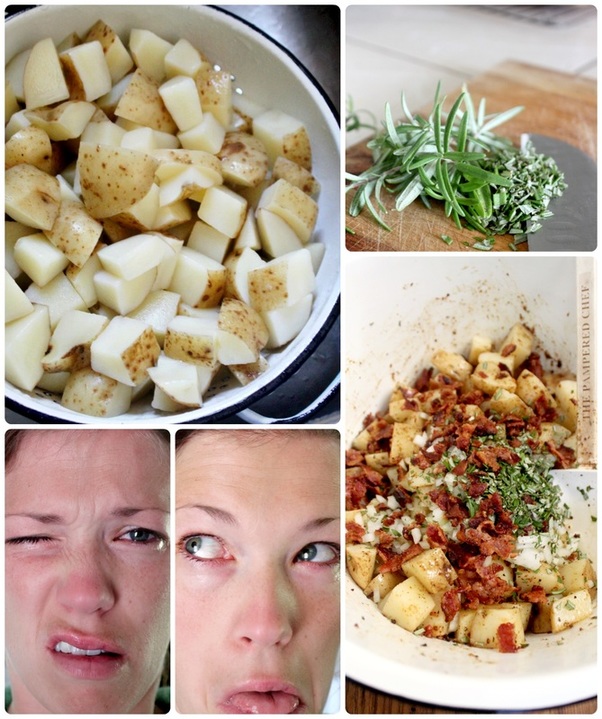 I cannot cut any type of onion without my eyes burning!!! I'm not sure how many eye-burning selfies I've shared, but I'm gonna keep sharing them because I'm weird, and because I want to! ; ) 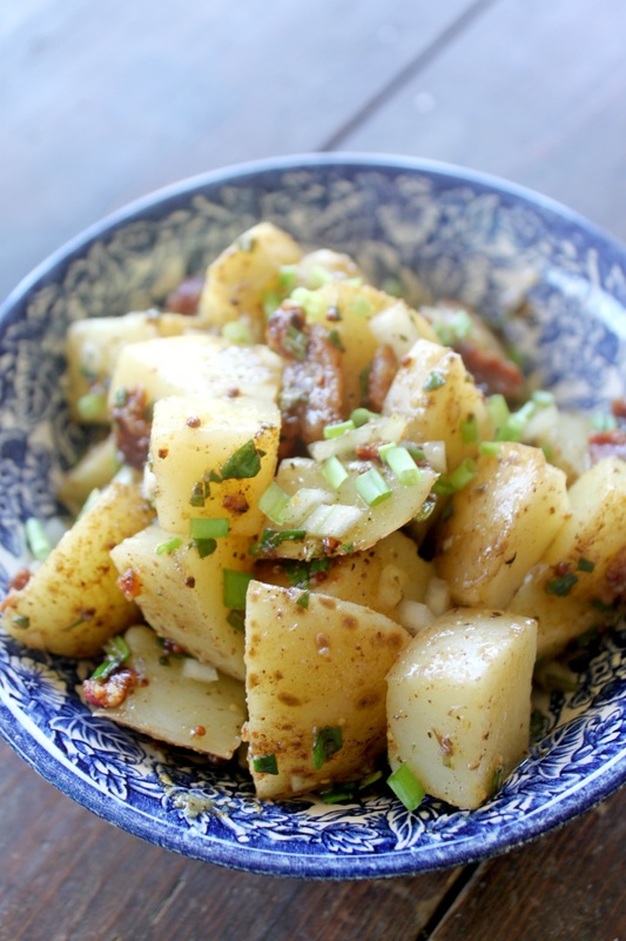 If you've got some (American) Thanksgiving festivities you're going to this weekend, bring this along! On that note, to my American friends, Happy Thanksgiving (yesterday), and I hope you have a great weekend visiting family & friends! To the rest of us, happy regular weekend in November! Take time, wherever you live, to stop and be thankful for something. To see whatever you have as a blessing, whether big or small, xoxo A peach recipe?!? Yes, I know, I know. Peach recipes are only for the summer months! Ok, there is no real rule about when one can post peachy recipes, but generally bloggers like to post seasonally.....and, well, I would have posted this back in the summer, but I got behind because of travelling, enjoying the great outdoors, and wanting to post about other things. So, this very summery recipe got put on hold! I made it several times throughout the summer, with wonderful, fresh Ontario peaches, but it wasn't until canned peaches went on sale a few weeks ago, and I tried making it with those that I knew this recipe could not be contained by any season! Finding canned fruit that is basically Paleo is tricky, but not impossible. I really and truly prefer fresh fruits and vegetables, but sometimes something is on such a great sale, and you know you might end up needing it, so you grab a can or two. In the end, I not only ended up trying this recipe with canned peaches, I also ended up using canned peaches to send with the kids to school one day (the day before grocery shopping, so fresh anything was scarce at our house!), and I even enjoyed (thoroughly) a bowl full of peaces as a bed-time snack on the same pre-grocery trip day! Canned peaches saved the day! : ) The canned peaches I bought were Del Monte 100% Juice halved peaches. The 100% juice kind are packed with water, peach & pear juice & ascorbic acid. So, while not a wonderful, fresh peach, they are a pretty fantastic second! N-E-who, the pictures for this post are from a fresh peach cobbler, but I wanted you to know it could be done with canned peaches too! 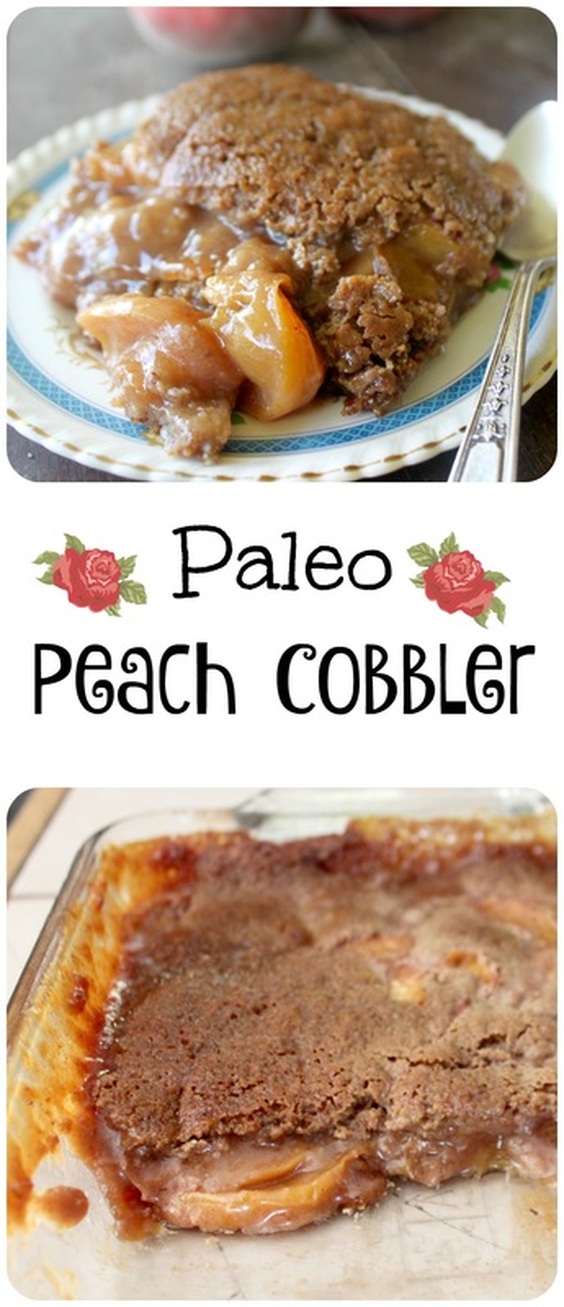 Paleo Peach Cobbler Adapted from Center Cut Cook Ingredients:
Method: ***The method may seem strange, but just do it!***
Strange order, yes? Oil, batter, peaches, no stirring together? Crazy town! The batter bakes up and over the peaches, and the oil gets all saucy with the sugars & the peach juices, and creates a caramel sauce of sorts. It is divine! Trust this lady! 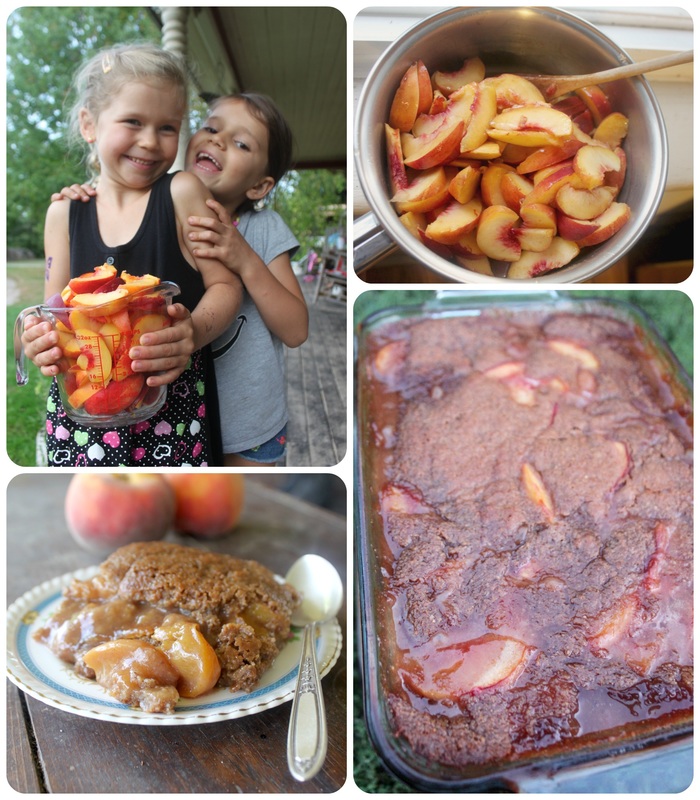 You can see the crazy delicious caramel that has bubbled around the edges of the cobbler in that bottom, right hand photo. Ya know what? Today in Tweed it is gloriously sunny! Still cool, obviously, because it is is the fall, but this day feels just as worthy of peaches as any other day! I'm liberating peaches from being stuck in the summer! Why am I so excited about this....? Hahaha...oh boy, perhaps I'm more tired than I realize? I have mentioned many times before that I actually don't even really like baked fruit desserts at all, so if I'm tooting my horn about this here cobbler, well, you's better try it! "You's" is something people 'round here say. It's not a real word at all. It's "you" made strangely plural. More strange is that some people say "you's guys". Double plural?! I love this place! Seriously, I'm not judging, I love it! That was an interesting tangent I just wondered off to..... This weekend I'll be Belleville at an artisan sale, which I am excited about, though uncharacteristically unprepared for! So, I need to get my act together today and get ready! I hope everyone had a good weekend! If you stopped by here on purpose or by accident, leave comment! Any random thought will do! : ) This Friday my husband is travelling to China for 10 days with his work!!! Yikes! We're a mix of nervous & excited about this. China hasn't ever been a destination spot on our list of places we wanted to see, but getting this chance to go is really amazing! It's funny though......ever since we found out he was going, I've wanted everything we ate to be Asian inspired! Apparently I am very easily influenced by ideas! For some reason though, Chinese style food isn't always on my radar as far as food flavours go, not because I don't like it (I really love it!), but usually because I've not been confident enough. In the 2 years of Bushel & A Peck, I've only once posted an Asian-type dish, and it was a simple and forgiving M00-Shu! So, that'll tell you how experimental I get with flavours from that part of the world! But now, here I am, dreaming about Asian dishes.....so, I turn to Pinterest! People always be hatin' on Pinterest, but I really love it! I found this amazingly delicious looking Thai Cashew Chop Salad from The Recipe Critic, but had to change a few things up to make it Paleo, but it is just a great, fresh & tasty recipe! Simple, healthy, full of flavour, blah blah blah, just go and make it already! ; )  Asian Chop Salad Adapted from The Recipe Critic For the Ginger Almond Dressing:
For the Salad:
Method:
**If you are making this ahead of time, just prep the dressing and the salad, but don't toss together. Toss before serving** It's a really simple salad, isn't it?! And it just has such nice flavours, and the fresh crunchy veggies and cashews, mmmmm....so good. I'm sure my husband will come home from his trip and say all Asian inspired food I make is inferior....and he will be correct! Haha, but for me here, in my little corner of the world, it's perfect. It's fresh and simple, and tasty and healthy! I've got my sister and her family visiting here for a few days and for dinner tonight we made a deeee-lish zucchini "noodle" dish with garlic, tomatoes, fresh baby spinach, fresh basil, and topped it off with a mediterranean goat cheese.....gosh, that was tasty! So, I shall say farewell for now, please feel free to leave a comment, and I hope you join me here again soon! : ) Hello there! How are we today? I've been struggling the last few weeks with the blog....I feel "niche-less", or too "niched". I write here for myself, it's true, but I want to reach people and become part of something in peoples' lives. But, when you've got a blog like mine, unless you are me, you won't come back because I post about super healthy recipes, super-unhealthy recipes, simple recipes, difficult recipes, writing about family & autism, DIY projects, health & fitness, not to mention the rest of my site which is dedicated to my art!!!! Good golly!!! To top it off, one particular recipe on here has been going viral, which is very exciting, but it leaves me feeling like nothing else I've done matters here...? Seriously, this month, only 20 pages were viewed on the site, which isn't bad, except I have hundreds and hundreds of pages! Let's take a look at the seedy underbelly of Bushel & A Peck, shall we? The top 3 numbers look like this: ~24, 609 views on the Meat & Potato Casserole ~2, 414 just opening to my blog ~1, 270 on my Double Chocolate Avocado Cookies There's a difference of more than 23,000 views between one recipe and the next! Geepers! Anyway, I'm not complaining exactly.....I'm thinking out loud....thinking out type? I dunno what we should call this. A few days ago I came to a realization though....I cannot fit myself or my thoughts into one niche on this blog! It's me, this is who I am! Bushel & A Peck, to me, is like a flea market! You can never be quite sure what you'll get, but it's always worth coming to check, just in case! Dig around, see what you can find, see what you love, share about it, talk about it, make it, create it, fill your own bushel!!! I want to always share what I love, what I'm passionate about, and not get bogged down in the "but I need a niche" talk that circulates around the blogosphere! My "niche" is me! I think I've talked myself into a better mood!....I also turned on the sound track for The Music Man, so, I mean, that cheers me up too! : ) Also singing karaoke to show tunes (on YouTube) makes me feel better, so I'll be doing that once I'm done here! Thanks for listening to me rant.....shall we move on then? Great! 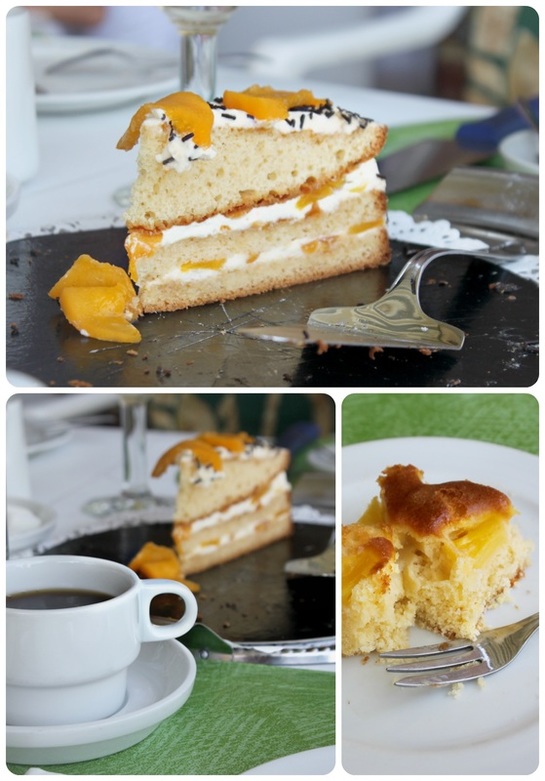 The beautiful treats we were served visiting family in Belgium In the summer when my husband, father-in-law, mother-in-law & Grandpa went to Europe, our first stop was at Grandpas cousins house in Haaltert, Belgium. I already shared part of what they served for dinner (shrimp stuffed tomatoes! Super simple, and really tasty!), but before dinner (yes before!), they served us coffee, beer, wine and cakes. I did say cakes on purpose, they served us 2 different kinds! One was a beautiful pineapple topped vanilla cake, and the other was a fabulous layered peaches & cream cake. Oh, with chocolate sprinkles added! : ) I decided I wanted to make my own peaches & cream cake when I got home, but wanted to make it paleo. I also thought it would be so tasty to incorporate a fantastic Dutch dessert, honey cake, or honingkoek, into this dessert. I like peach cobblers and crisps with nice spices, so I was sure having a spiced honey cake with the peaches and cream would be a winner! T'was, t'was indeed! 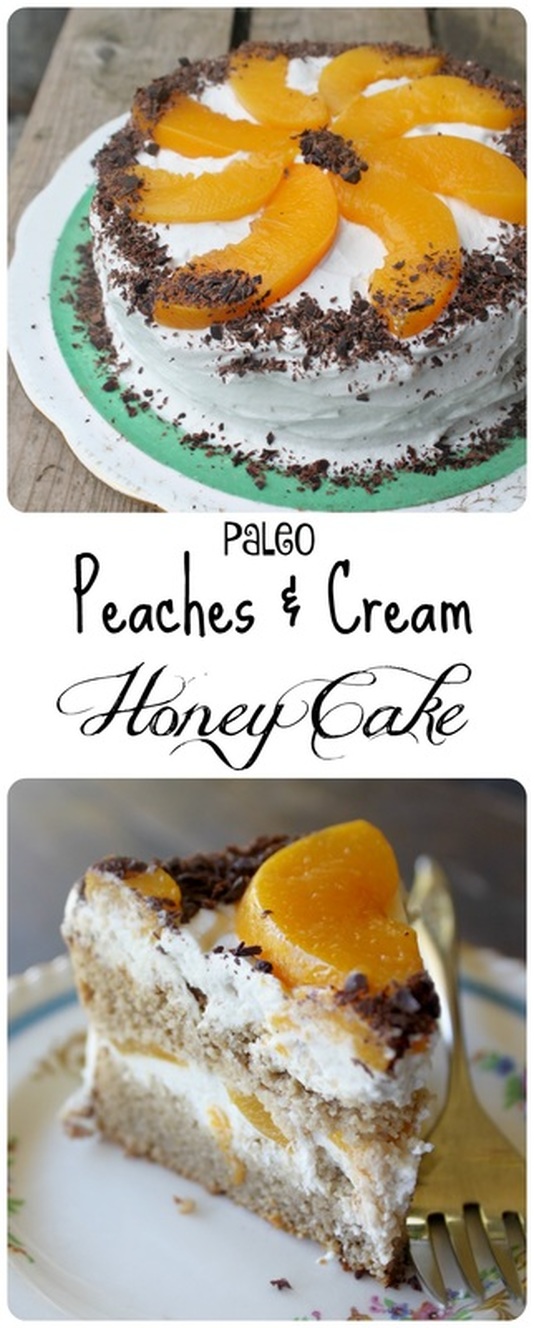 Peaches & Cream Honey Cake Adapted from The Dutch Table & Plated With Style Ingredients:
Method:
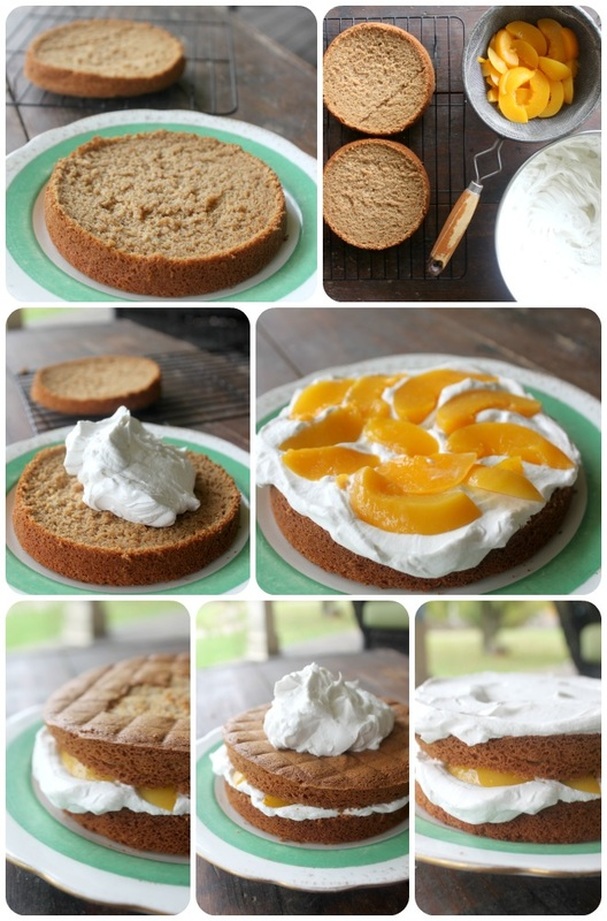 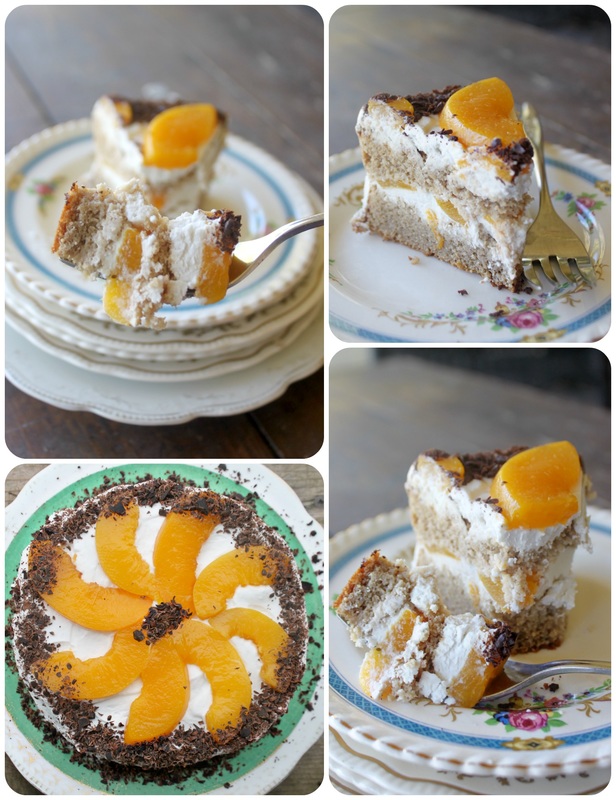 If you've ever had a regular dutch honey cake, you'll know that it is heavy & dense, but still soft all at once, and this paleo version was too! You could distinctly taste the honey and spice, and the peaches and cream really brought a cool sweetness to the whole dessert. If store at room temperature the cake stays nicer, but if your whipped cream isn't super stable you'll need to refrigerate it. It still tastes great, but the cake seems more dense once it's bee in the fridge. Best plan? Just make it to share and have it eaten sooner than later! : ) And that, my friends, is all I've got for you today! We'll be out tomorrow night dressed up and collecting tummy aches (candy!!!) for Halloween, and our sweet middle child has her 7th birthday party on Sunday which will be fun (as long as it's not raining and the kids can play outside!!!) : ) Fingers crossed! Please leave a comment if you want to say "hi" or anything! Don't be afraid, I love comments! xoxo  It's that time of year! That time when we're not really ready to commit to turning on our outdoor wood boiler to heat the house because it requires filling it with wood, and we're just a bit too lazy yet for such things. Plus the days do warm up (sort of), and if you wear warm clothing it's all good! However, today I am sitting in the freezing "office" (a nook, really) wearing many, many layers of clothes, warm wooly socks, a scarf, and pausing from typing every so often to hold my cup of coffee to warm my hands! The craziest part is that when doing the kids laundry last night, I was folding up shorts & a few tank-tops from last week because it was that warm! Oh, Canada! I really love you! Well, moving on to the recipe for today! I purchased from Bed, Bath & Beyond a spiral vegetable cutter (to make vegetable "noodles" ) and wanted some awesome recipes! I saw a recipe for Butternut Squash Noodles With Shredded Brussel Sprouts, Walnuts & Caramelized Onions on inspiralized.com and thought, "whaaat? Yumm!". So now I have been spending a lot of time looking through (and drooling!) at the beautiful recipes that Ali creates! So, believe it or not, this recipe was my wild take-off version of Ali's recipe mentioned above! I used brussels sprouts and onions, and roasted some nuts, but those are the only similarity left, really! I make a roasted Brussel sprouts with bacon recipe, so I knew I would start with that, but wanted to add more flavour and colour, so I decided to roast onions and tomato with it too. And roasted nuts are a delicious idea anytime, so I did that too! So, the end result was a really simple dish that was bursting with flavour, and full of good-for-you foods. Oh, and cheese on top is optional, but adding the feta (you could also go for some parmesan) is a nice little salty addition!  Zucchini "Noodles": Fully Loaded Makes 3 huge servings, or 5-6 smaller servings Ingredients:
Method:
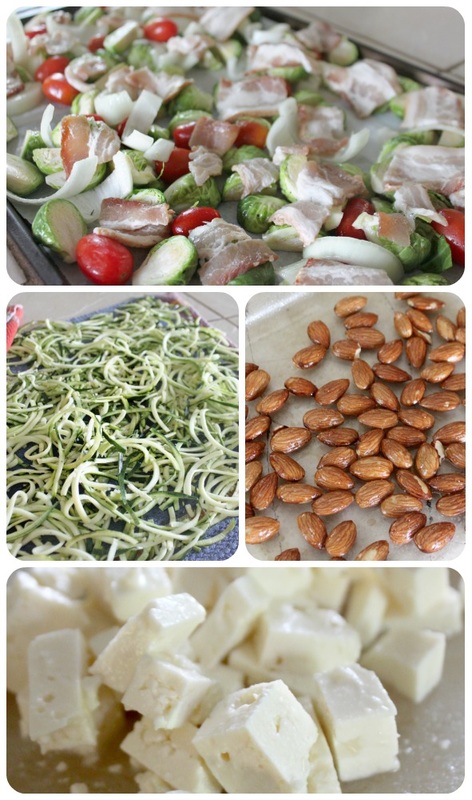 Some beautiful, fresh ingredients! 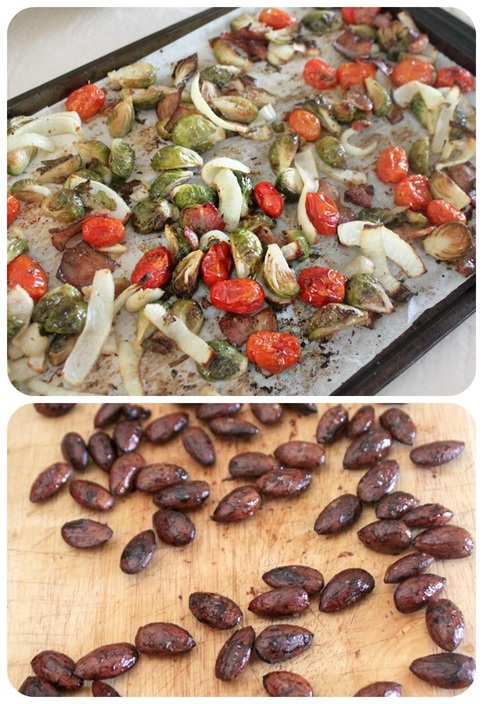 So, looks good, right? Yeah, I know. Haha, for real though, it does look good! My husband thought it was funny though that you can't even see the "noodles" in the photos because of all the toppings I added! That's how I roll.... FYI, if you plan on making this with the idea of having leftovers for a lunch, a word of warning! The roasted nuts will get soft and (in my opinion) yucky after cooling and being refrigerated. So, just store the cooled toasted almonds in an airtight container on the counter, then add them once you're ready to eat your leftovers! After owning my vegetable spiral cutter from BB&B for a while now, and knowing how much I love making noodles out of veggies, I thought I would bite the bullet and buy a more fancy version that was easier to use, but would do more. However, I hit a snag....Bed, Bath & Beyond didn't offer any other kinds besides the one I'd already bought, and I literally couldn't find any other options in my near-by Belleville. Well, unless I owned a $250-$500 stand mixer I could add an attachment to, but I sure don't own one of those!! On Amazon I found only one kind of spiralizer I had in mind, it was around $40, plus shipping, etc., but I wasn't super impressed with it. Then I thought, well, I guess I'll see how much Ali (from Inspiralized) has hers for....? Well, not only was I super pleasantly surprised by the very reasonable price, I was amazed by all the thought that was clearly put into The Inspiralizer. So....I ordered one! Gosh darn-it I'm excited for it to arrive, and I will be sure to tell you all about it when it arrives! Woot woot! Ok, I need to get moving! I always have a dread/excitement for my Monday workouts because Sunday is generally my "treat day", so I'm feeling motivated (from eating junk!) to get a good sweat going.....but then the sluggish feelings I have (from the same junk food!) makes getting going a little tricky! And I know if I get distracted at the computer starting new blog drafts or going on Pinterest I'll never get going! So, I'm going! Wish me luck! ;)
Hello!
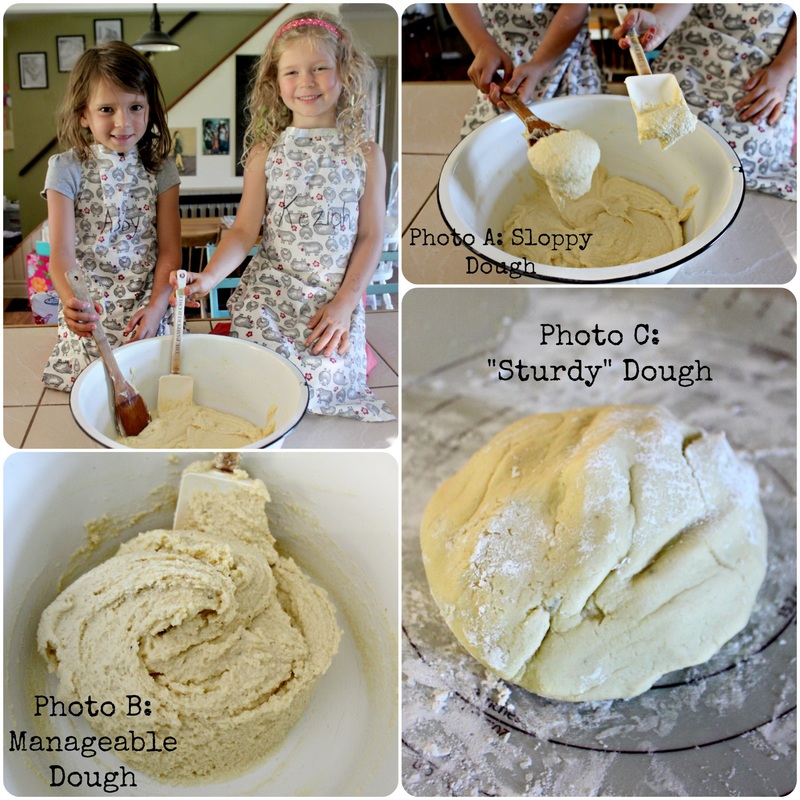
First, if you clicked here thinking, "this says Paleo, but it's covered in cheese!!!". I know, cheese isn't paleo (it's considered Primal, "technically"), but the real star of this show is the crust, and it is Paleo. Hund-o-pee (that means 100%, cool new word compliments of my cousin). He's a weirdo. Ok, now let me move on and say that "pizza" & "paleo" don't really go together. Someone asked me the other day what Paleo was. In the words of Michelle from Nom Nom Paleo: "In a nutshell, the Paleo diet (or, as I like to think of it, the Paleo template—the word “diet” tends to mislead folks into thinking this is nothing more than a temporary weight-loss program) is based on the notion that for optimal health, modern humans should go back to eating real, whole unprocessed foods that are more healthful than harmful to our bodies". So, what does that mean? It means focusing on whole, unprocessed foods like meat and eggs, seafood and vegetables, as well as fruits, nuts & seeds. Things that should be avoided on the "Paleo Template" are foods that can cause our bodies harm such as grains, legumes, sugar, and dairy. Based on those facts, pizza sounds like an out-there idea! And really, pizza isn't an everyday paleo meal for me & the fam, but it sure is nice to have on a Friday night once in a while! Seriously, somehow having pizza for dinner on a Friday night makes me feel young again! Not that I'm "old", but it does something to my brain that says "you're so hip eating pizza on a Friday night!", then my brain focuses back into the fact that I'm also married with three kids and a mortgage and a pile of responsibilities, and I'm eating a Paleo pizza. And that I said "hip"...... Moving on! Dairy and I have a love-hate relationship. It doesn't make me bloated, or make me feel ill, but it does make my saliva thicker, causing mucus (eeewwwwww). So, I just avoid it if I will be singing somewhere (in front of people, that is. I'm always singing in the house, and that can sound as good or as bad as I want it to!). Also, I don't have some sort of Paleo accountability partner who looks at me disapprovingly if I eat dairy. I eat Paleo based on how I feel, and because dairy doesn't seem to assault me with ill-feelings, I consume it periodically. Now, all that being said, this pizza crust is dairy free, and what you put on it is up to you! I found the recipe at Paleo Spirit for this crust. Lea Valle (at Paleo Spirit) deserves all the glory here people! I did make some adaptations, but it was her basic paleo pizza crust that made me believe in paleo pizza! I've made many other kinds of crusts before, and they basically all sucked. Thumbs down. So, get ready, this stuff is awesome! :) 
Basic Paleo Pizza Crust
Makes 1- 12 Inch pizza crust (approximately). I have doubled and tripled the batch with great results Ingredients:
Method:
Other Options: A: Bake the crusts a day or two before you need them, let them cool completely (on their baking sheet or pizza pan), then wrap in plastic wrap until you need them. Once you're ready to use them, just heat the oven to 400, add your toppings to the pizza, then heat for 15 minutes or until hot and the toppings are ready B: Bake the crust, let it cool completely, then wrap lightly in plastic wrap (on it's baking sheet/pizza pan) and let and freeze completely. Then you can take the crust off the pan and wrap tightly in plastic wrap and place into a freezer safe bag (or a few layers of plastic wrap for a bigger pizza). Once ready to use, preheat oven to 375, remove plastic, add toppings to the frozen crust and bake until hot through and toppings are ready, about 20 minutes C: Bake the crust for 10 minutes, then and add the toppings and bake, but only for 5 more minutes until the toppings are nearly ready. Remove from the oven and let cool completely. Then wrap lightly in plastic wrap (on it's baking sheet/pizza pan) and let and freeze completely. Once frozen, you can wrap tightly in plastic wrap, and place into a freezer safe plastic bag (if it's a small pizza) and freeze. If it's a large pizza, just wrap in a few layers of plastic wrap). Once ready to use, preheat the oven to 350, remove the plastic and heat pizza for 15-20 minutes or until the pizza is hot. You could also make the dough, and wrap tightly in plastic wrap and place into the fridge for a few days until ready to make the pizza. I've never done this, but I think if you did, you would need to pull the dough out of the fridge for at least 30 minutes to let it warm back up slightly. If you try this method let me know how it goes! 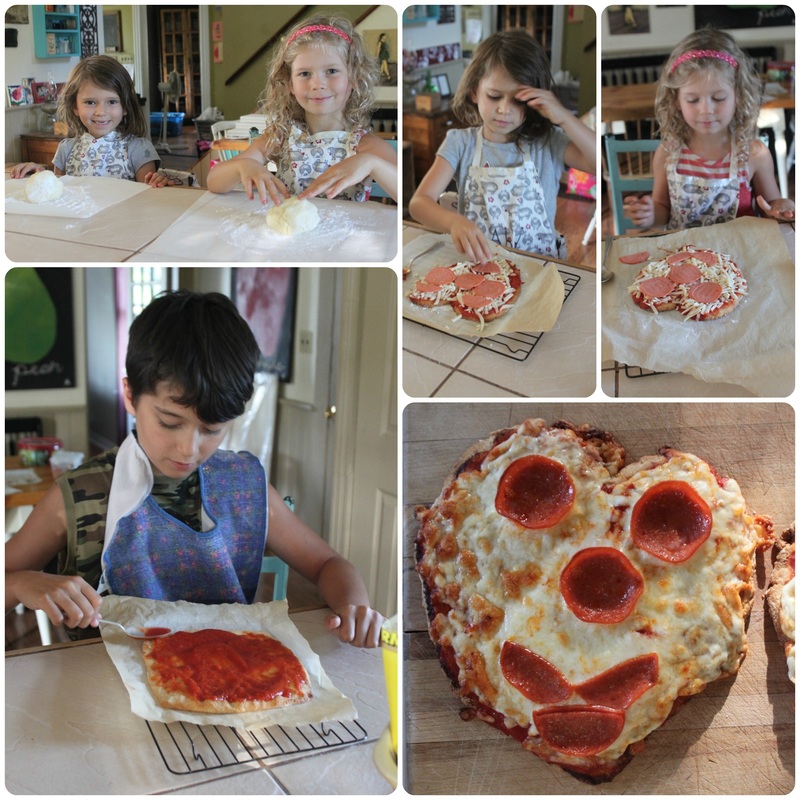
My kids who have made and eaten (and complained about) other pizza crusts really (really!!!) like this one! My lovely 6 year old took her first bite and said (very concerned), "can Caleb eat this?". Caleb is our for real, all the time gluten-free family member, and Abby has tried some pretty crappy gluten-free foods and actually thought I had maybe made a mistake and the crust wasn't gluten-free!
Pat yourself on the back, Amy-Lyn, you've fooled the toughest critic out there. :) As for Paleo pepperoni, the pickings are really slim, but Maestro makes a pepperoni that I can get at a great price at my usual grocery store and is Paleo (therefore gluten-free) and tasty! 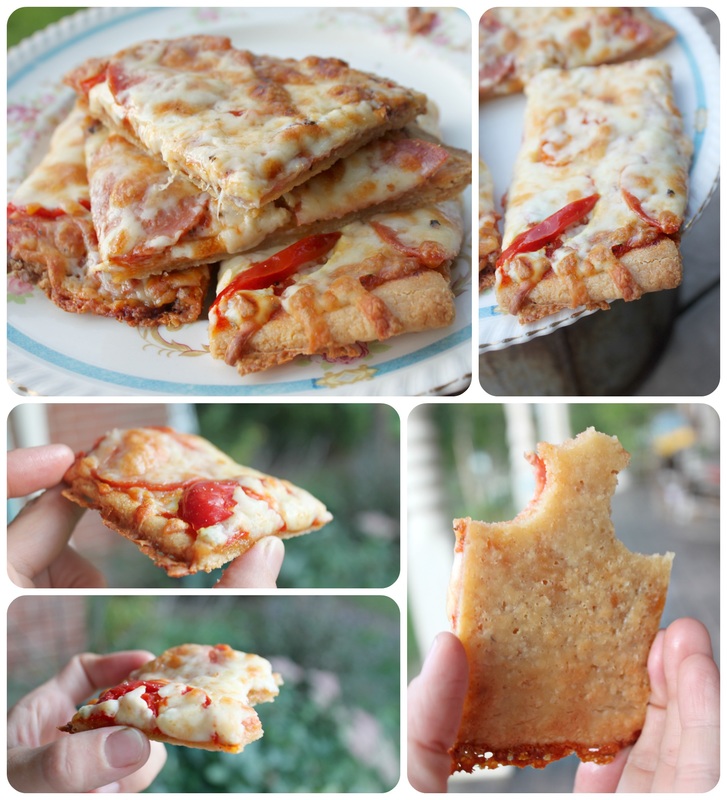
I went a little picture crazy with this pizza....it is just too good to be true...except it IS true! I didn't get any pictures of just the crust, well I actually did get some, but they were just kind of "bleh" and I don't really like "bleh" photos, I like, "Wow!!! That looks yummy!" kind of photos. But you get a nice bottom shot of the crust in that collage above, so that's something. When I made this the first time I was still mentally prepared for failure. For a weird taste, or a floppy crust you couldn't hold, but this pizza crust is the real deal! It's so easy to make, tastes great, and has a super hold! Oh, and it even tasted great and held up after being micro-waved the next day in my husbands lunch! What? I know! I know..... If you want to feel cool and young this weekend, make some pizza. Hahaha, just kidding. For real though, have a great weekend, and make some pizza! |
Hi, I'm Amy-Lyn! 
I am the lady behind this here blog! I live in the sticks with my animals, my super handsome husband, and my
3 amazing kids! Here you'll find things from recipes (gluten-free, paleo, and strait up junk food!), DIY ideas, thoughts on raising a son with autism, and whatever else pops into my brain! : ) Read more about me by clicking here! Want to Stay Connected?
Find What
|
 RSS Feed


