|
Oh boy. 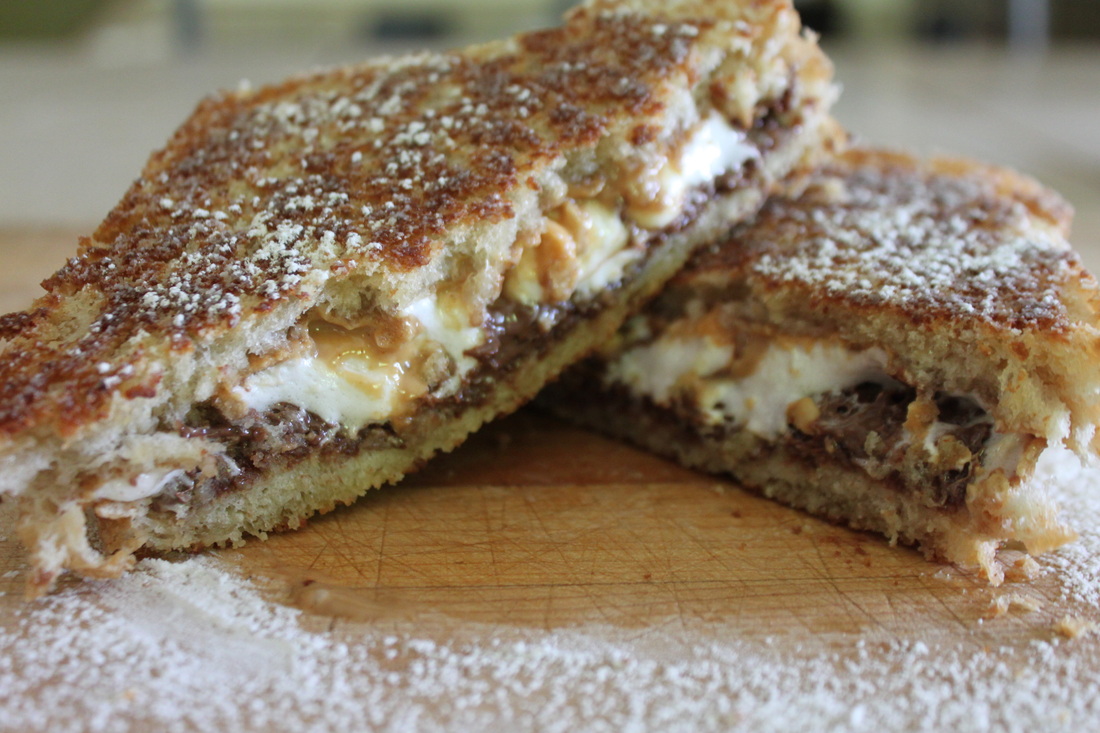 A few years ago my brilliant (read-evil!) sister created this recipe. If you love Nutella, peanut butter, and marshmallows, and have them in your pantry on a semi-regular basis....then, well, this recipe will change your life. Dessert grilled sandwich (for 2): Butter 4 slices of bread Nutella (enough for the sandwich, and for eating a spoon full of it while they cook) Peanut Butter (for amount, see note with Nutella) 2 large (or a handful of small) mallows Icing sugar (optional, but it's so good) Heat a large frying pan to med-high Butter one side each of bread Spread Nutella on one (un-buttered side) of a slice of bread Spread peanut butter on the other slice of bread (on the un-buttered side). If using big mallows, cut in half, and stick to either Nutella or the p.b. If using minis, just stick 'em in. Put sammies in the warmed pan. Allow to toast and warm, but if it takes too long, the p.b. and Nutella melts out. So, be sure your pan is hot enough to get these bad boys golden without it taking forever. Remove from pan, and dust with icing sugar (if using) 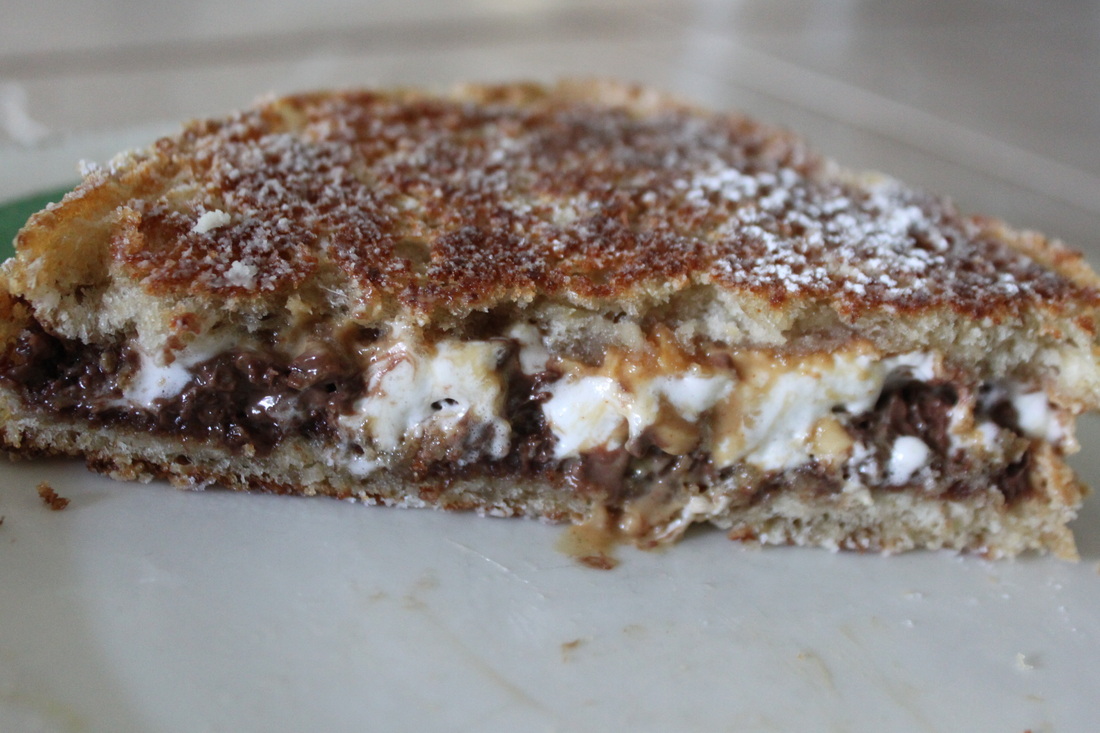 Now eat it!
It's good, you won't regret it. Amy-Lyn
1 Comment
I wanted grilled cheese for lunch. But I wasn't exactly in the mood for plain-jane grilled cheese. So, I opened my fridge, and I had an idea....based on the random things I had. I had a tomato. I had some medallion slices of bocconcini cheese (and also a random amount of cheese I had shredded the night before). I had red onion. And I had pepperoni. It was meant to be. 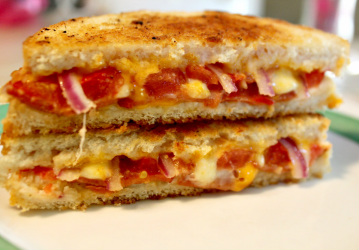 Pizza Grilled Cheese (for 2) 4 slices of bread Butter for bread 4 slices of tomato 1/4 red onion, sliced thin 2 bocconcini medallions Approx. 1/4 cup shredded cheese (I had a mozzarella and cheddar mix) 10-12 slices pepperoni Heat large skillet on medium heat Butter one side each of the 4 slices of bread Divide ingredients among the 2 sandwiches, and assemble them with buttered sides of bread facing out (tip: add cheese first, and in between each of the other ingredients, add cheese so that it all melts and sticks together. If you don't, you'll just find that the sandwich slides apart for lack of cheese "glue"). Put the sandwich on the frying pan, and let warm slowly while toasting (it took about 20 minutes to be "just right" for me). If you do it quick, the cheese won't melt sufficiently, especially the bocconcini. I ate mine as is, but my husband dipped his in caesar dressing (as he would pizza). 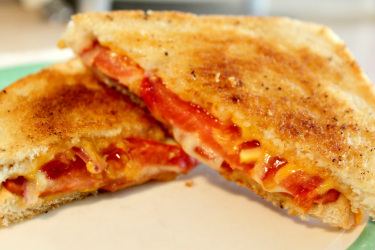 This was a good grilled cheese. Goo-ood!
Have you ever made a "special" grilled cheese? Don't be a hog, share the recipe! Amy-Lyn So, while planning my daughters 3rd birthday (a tea party), I knew I would have to rectify the problem where I didn't own a cookie stand (one of those pretty, multi-layered thingies). Well, I looked around for one, but was never terribly impressed with either the cost or how it looked. Then I saw one on Anthropologie.....for around $80. Yikes. No thanks. 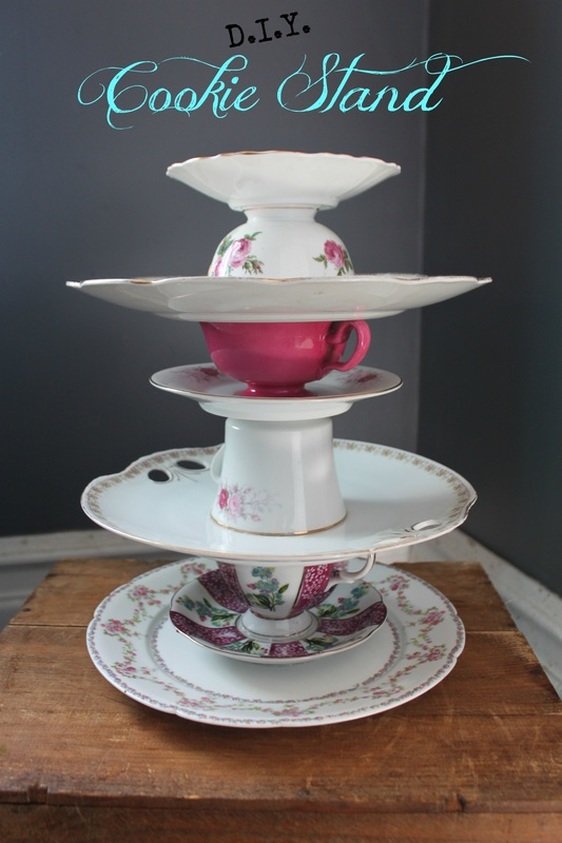 Well, when you find something you love, but it costs too much, what do you do? You go to your local thrift store, and get 'er done your own way! I looked around our "Hidden Treasures" store in my small town for dishes that would fit with the pink and white theme. In total, $3 was spent on the dishes. Then I headed over to our Home Hardware for some glue. Elmer's makes a "Fix-All Cement" (pictured below) that is good for hot and cold weather, as well as water resistant. 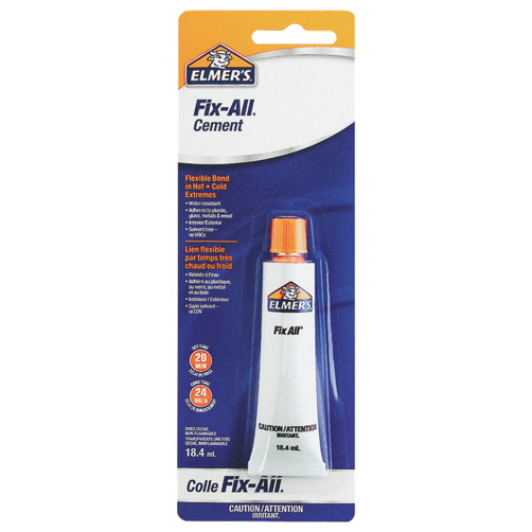 I went home with my dishes (one of which I broke while going home.....good thing I bought that glue....) and my glue, and started working on my cookie tray. I just kept stacking and re-stacking the dishes until I had something I thought was perfect. Then, I carefully glued them together, and put it somewhere safe to dry. So, for under $10 and not that much effort later, I had my own, Anthropologie inspired, cookie stand! I have used it a lot since making it, and so I am glad I have it! It's also a great conversation piece, so that's a bonus! :)
When my (then) 8 year old son said we should have a tea party for his sisters birthday last January, and she agreed, I was soooo happy! I have a "thing" for tea cups and tea. 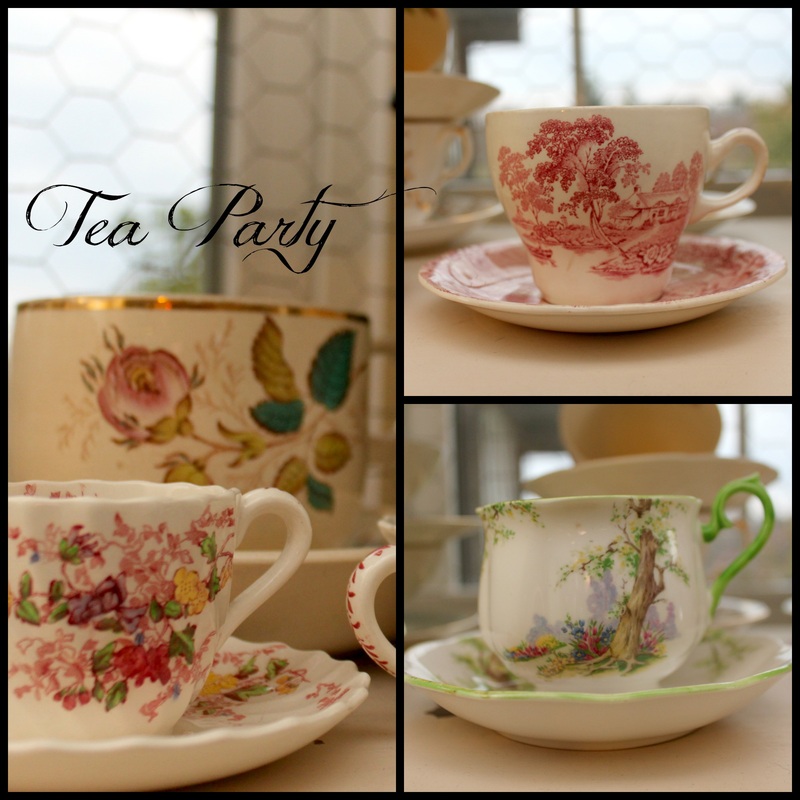 In my defence, my hoards of tea cups and antique china are our only dishes, beside a few Ikea dishes for the kids, and 4 coffee mugs. So, although I am a smidge obsessed, at least I'm not being a useless hoarder! I see my china collection as a revolving door. If I see something new I love, I get rd of something I already have. 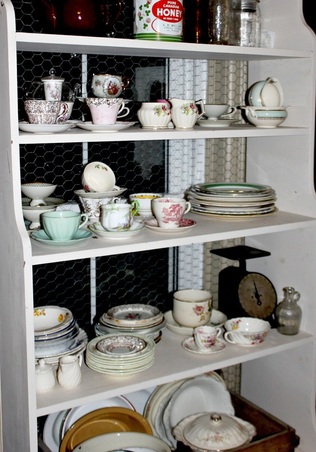 Anyway, back to the tea party for my 3 year old! I bought a set of tea cups, saucers, and plates from our local St.Vincent DePaul for $8. Yes, I know I own tea cups already, but I didn't want to have a bunch of children breaking my lovely "made in england" mostly antique tea cups. I know, I'm such a party pooper. 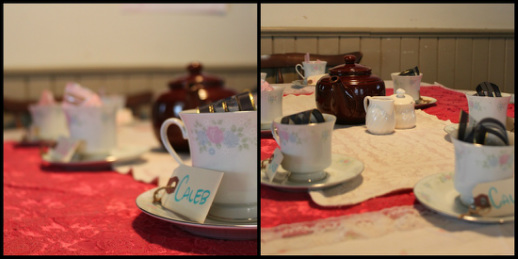 Each child had a tea cup place setting with their name on it For the food, I thought of classic british tea party foods: crustless sandwiched (including cucumber sandwiches), and other little nibblies. Tiny quiches, bite sized sausage rolls, sweet mix and bread and butter pickles. Crackers and cheese, and veggies and dip were included as well. 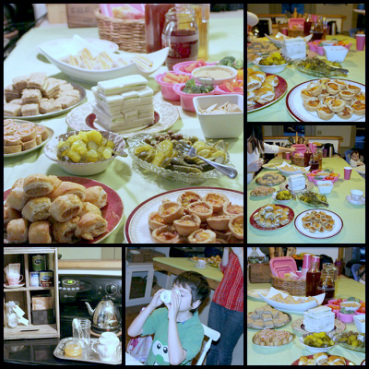 Of course the tea is an important part of a tea party! We made a pot of decaf tea, and let it cool a lot before setting on the table for the kids. For the grown-ups, a kettle and lots of tea, and hot chocolate was set out. Adult guests were able to choose their own tea cup from my collection. 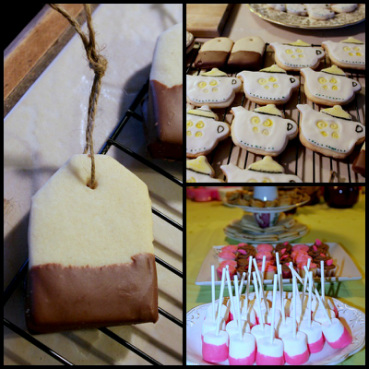 The sweets (though there were many) were not a stressful part of the party. I literally wrote on my calendar what I needed to make and when so that I was slowly adding fresh baked goods to my freezer to be able to pull out the night before the party.
So, the party went great, and all the kids really enjoyed themselves, even if (as my husband pointed out) they probably didn't notice all the details. Really, I love the details. As a stay at home mom, I love having a "project" to work on, and look forward to. And to me, celebrating birthdays is important. Life is a gift, our day of birth is a gift! Celebrate it! My son who turned 9 this summer wanted a "Pirates Who Don't do Anything" themed birthday party. Um, o.k! I love (love, love!) a themed party. There is charm and beauty in an un-themed party, but my personality thrives on a theme. Instead of making it more stressful it actually helps me decide on foods, colours, etc. a lot easier. That's just me though. 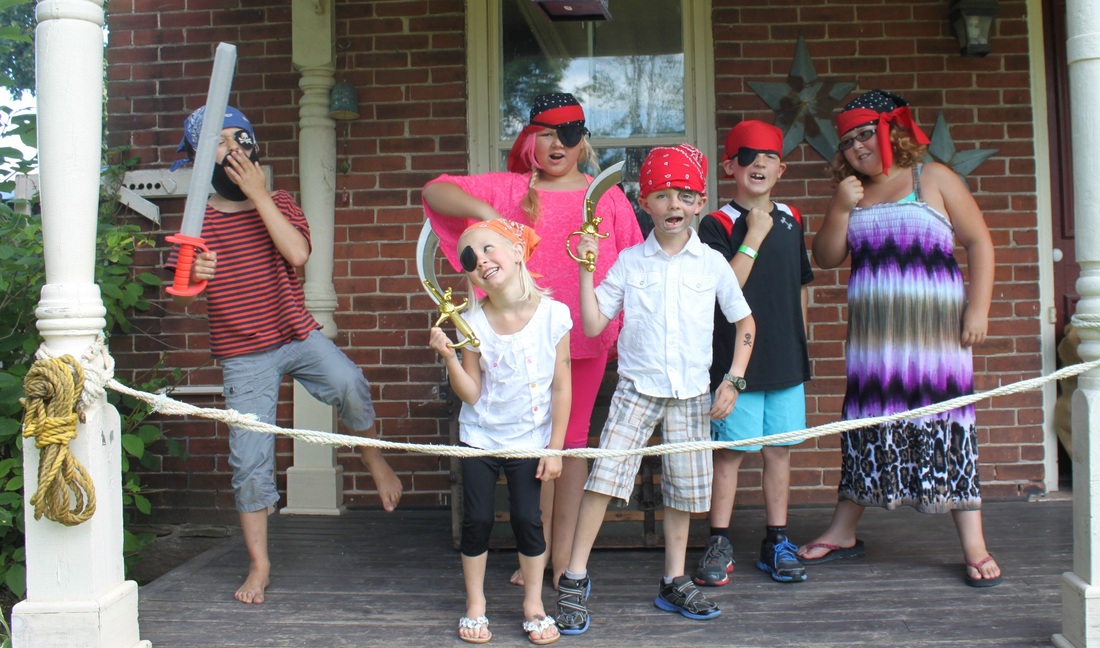 A band of dastardly pirates on their ship! The most important part of a themed party, is to make sure the guests know about it! That way they can come prepared. If they don't come prepared though, just have a few things handy to let them use. In this case, I had made eye patches and cut out read and black cloth for kids to use if needed. The felt, elastic, and black and red fabric cost me all of $6 because I just rooted through the bargain bin at our local Fabric Land!  Oma and Opa going all out on the theme! For decoration, I decided the obvious thing to do was to turn our front porch into a pirate ship! O.k, maybe that idea was a bit overboard (pun intended), but I really enjoyed doing it! And my kids thought it was so much fun for days leading up to the party (I did it about 5 days in advance just so it was ready). I just borrowed rope from my favourite antique guy in my area, filled up some old burlap sacks I had to look like sacks of food supply on the ship, and hung some lanterns I already owned. I used the extra fabric I had for pirate bandanas for tables clothes 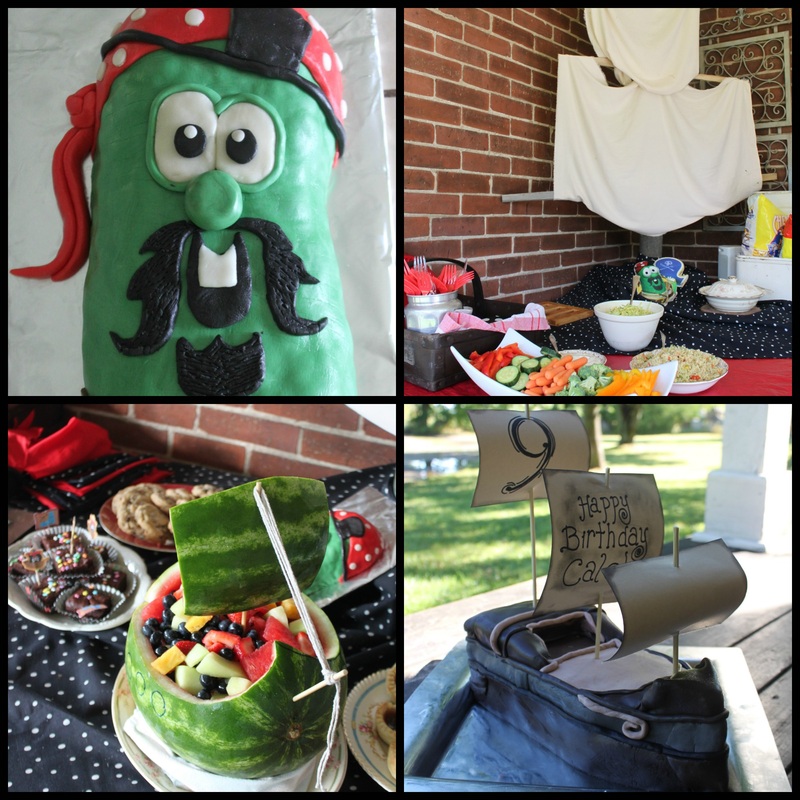 Food glorious food! And the best part-the food! We ate messy pirate food-chicken drumsticks, corn on the cob, baked beans, and some healthy veggies and dip. Oh, and chips. According to my husband, it's not a party unless there are chips. Sheesh. Desert had 2 gluten free cakes (one made from brown rice Rice Crispie Squares), and the other from the g.f. cake mix from Well & Good called "Chocolate Mud Cake mix". For real, it is the best gluten free cake mix. I made the cake into a pirate ship (see post about the "Larry the Cucumber Cake" for how to make brown and black fondant). There was also some other dee-lish foods brought by my sister and mother-in-law, and I made a pirate ship watermelon as well that served as a fruit bowl.  I got into the theme too, of course! It was a great day! It rained for a bit, but everyone just hopped onto the "pirate ship" to stay dry, and it was all good!
Have you thrown a great themed party? Tell me how it went! Amy-Lyn 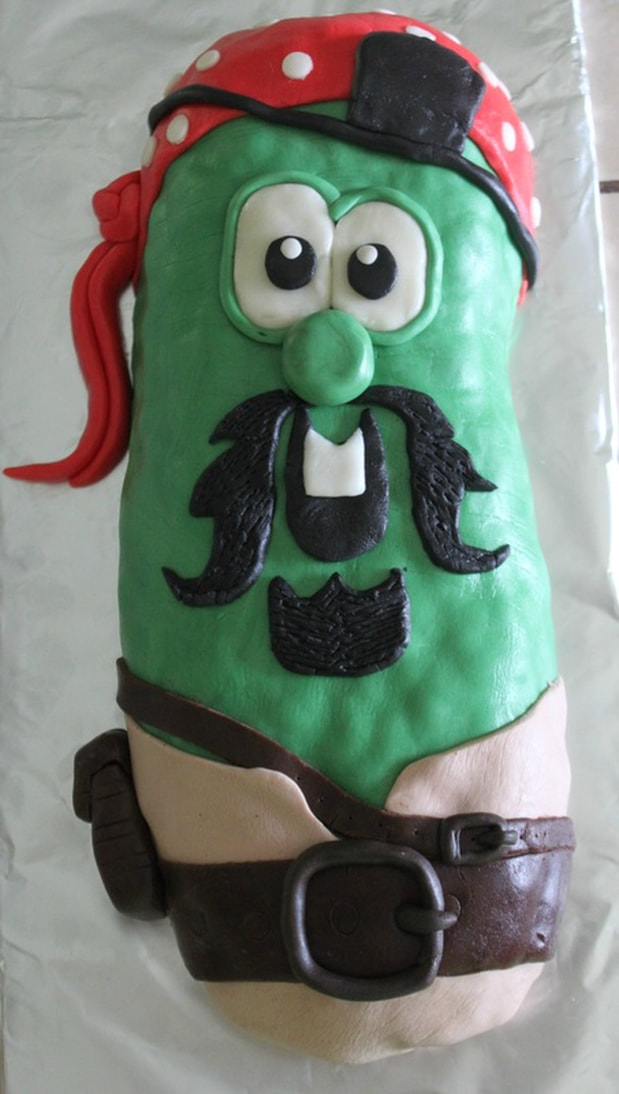 The Larry the Pirate cake I made If you are not familiar with Veggie Tales, than that armless, green pirate guy is probably very strange to you. But to my son who turned 9 this summer, it was perfect! My son has Autism, and can get pretty hooked on movies, subjects, foods, colours, anything! The "need for sameness" is a very common thing among children and adults with autism, and "sameness" can often read as "never ending......." My son has loved Veggie Tales for years.....and years..... So, to all those Veggie Tale virgins out there, it is a series of movies and short shows that deal with life issues (listening to your parents, being your self, facing hardship, etc.) in a fun way, using vegetables (and a few fruits) as the characters. Without further ado, meet Larry the cucumber as one of his many characters, Larry, "The Pirate Who Doesn't do Anything!" I don't have a step-by-step on how I made him, but I will give you my tips from the experience: Tip #1 I used this fondant to decorate him: http://cakejournal.com/tutorials/how-to-make-marshmallow-fondant/ I find this fondant to be very forgiving, and simple to make (two of my favourite things!) Tip #2 To make brown fondant....add cocoa. I know, so simple. When the recipe says to add icing sugar, do it, but also add cocoa as the dry ingredient to make different shades of brown. Ta daa! Tip#3 To make black fondant.....start with brown!!! This is the best tip anyone ever gave me! Tip#4 To make that perfect Larry green....have patience! I just kept adding and tweaking until it was just right (green, yellow, a tiny drop of black). Add each colour in small amounts-trust me! 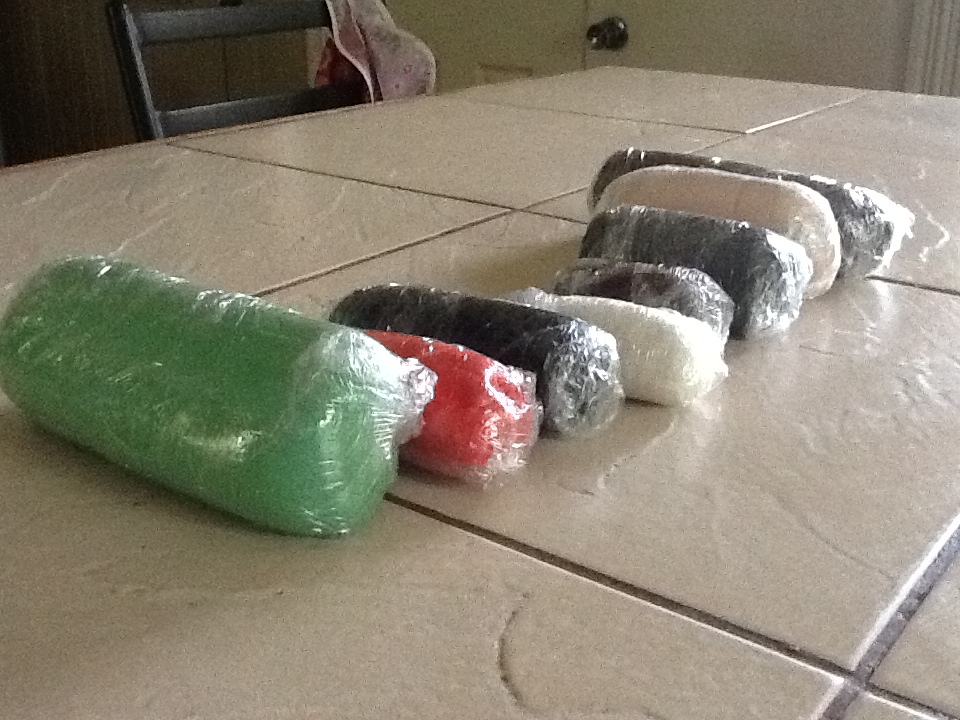 The fondant all ready to go. See the link above for an easy fondant recipe Tip#5
Give yourself lots-o-time to do this! It took me 3 hours to make all the fondant, and then to decorate him. The "cake" itself was actually a big Rice Crispie square that I made 4 days earlier and shaped as Larry, put on a cookie sheet, wrapped up really well, and froze until I started working with it to decorate. I figured it would be easier to use a giant Rice Crispie square to get the shape I wanted. Tip#6 You can freeze a Rice Crispie square! It's one less thing to do the day of the party. Have you made a cake that not only your child or loved one thought was great, and you also thought, "well, that turned out just as I wanted it to!" (truthfully, a rare thing for me!)? Share your pictures of stories with me! Amy-Lyn |
Hi, I'm Amy-Lyn! 
I am the lady behind this here blog! I live in the sticks with my animals, my super handsome husband, and my
3 amazing kids! Here you'll find things from recipes (gluten-free, paleo, and strait up junk food!), DIY ideas, thoughts on raising a son with autism, and whatever else pops into my brain! : ) Read more about me by clicking here! Want to Stay Connected?
Find What
|
 RSS Feed


